
.webp)
Ultimate Guide to Geo-Targeted Form Customization



I start with one rule: ask only for the location detail needed to route a lead or schedule a meeting. Country or state may be enough; a time zone can help you show appointment times. IP location is an estimate - not proof of identity - so <u>let visitors correct it</u> and keep a working path when it’s missing.
In this guide, I cover how to:
- Plan: Choose your goal, location sources, privacy notices, and retention limits.
- Build: Set conditional questions, local copy, accessible fields, and Reform workflows.
- Route: Map CRM fields, assign one owner or queue, and handle duplicates and delivery failures.
- Test: Check every branch, location conflict, scheduling change, and fallback. Aim for a 100% pass rate on supported test cases before launch.
- Measure: Compare lead quality, conversion, routing accuracy, and response time against a standard form.
My approach: use location to make the form more relevant - not harder to submit. Test the results rather than assume personalization will improve them.
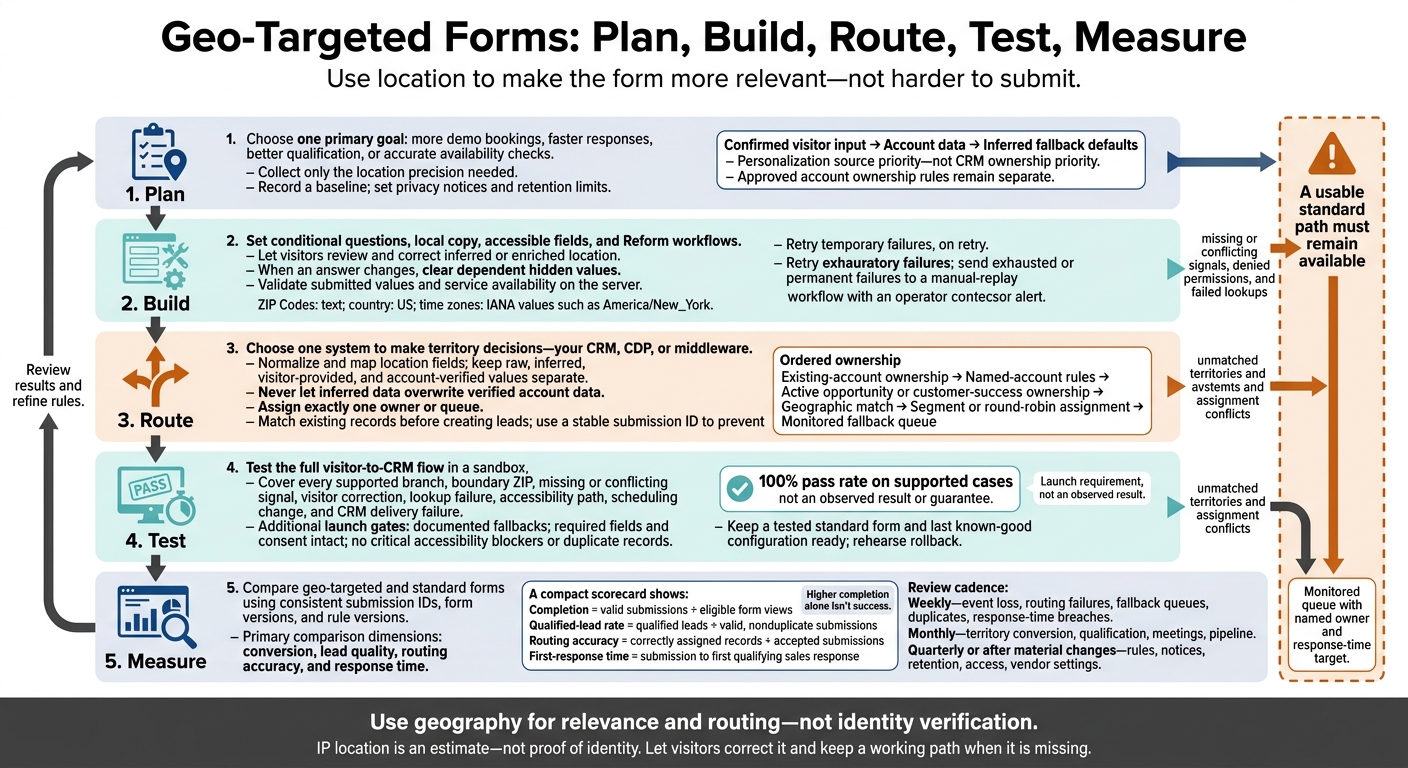
Geo-Targeted Forms: Plan, Build, Route, Test, Measure
Plan Your Geographic Personalization
Start with one primary goal: more demo bookings, faster responses, better qualification, or accurate availability checks. Then choose the smallest location level that supports it. Decide what the form needs to ask, infer, route, and report.
Before changing the form, record a baseline for view-to-start, start-to-complete, overall conversion, completion by device and region, qualified-lead rate, meeting-booked rate, duplicate or spam rate, median response time, routing errors, unassigned leads, and revenue per lead.
Set the comparison period, audience, traffic sources, and attribution window in advance. That way, you won’t mistake seasonal traffic or campaign changes for gains from personalization. These baselines let you measure whether your source, precision, and fallback rules work.
Choose Use Cases and Location Data Sources
Choose a source based on the decision it supports, not how much data it provides. Keep current location, business location, billing location, and sales territory in separate fields. This interactive multi-step approach helps enrich leads while keeping prospects engaged.
Inferred signals can’t verify a street address. If a decision requires an address, use visitor-provided details and separate validation when needed.
| Source | Transparency | Precision | Setup effort | Suitable uses |
|---|---|---|---|---|
| Visitor-selected country, state, ZIP code, or city | High; visible and correctable | As specific as the selected field | Low | Eligibility, service availability, routing, reporting, and location-specific copy |
| IP geolocation | Low unless disclosed | Approximate; generally strongest at country level | Low to medium | Country defaults, broad content defaults, fraud signals, and coarse routing |
| Browser locale | Medium | Preference signal | Low | Language and formatting defaults |
| Device time zone | Medium | Preference signal | Low | Scheduling defaults and local business-hour messaging |
| Visitor-entered ZIP code | High | ZIP code area, not a verified address | Low | Availability checks, territory matching, taxes where legally appropriate, and local scheduling |
| Account, billing, or CRM data | High for known accounts; depends on how current the data is | Can represent a business headquarters, billing address, or account territory | Medium to high | Account ownership, renewals, expansion routing, and reporting |
| Address or location returned by an enrichment provider | Medium; disclose the provider and purpose | Varies by source and record quality | Medium to high | Lead enrichment, duplicate resolution, and territory assignment |
Set Privacy and Data Retention Rules
Create a location data register for each field. Record its source, purpose, precision, required status, recipients, access, retention, correction, and deletion method. Note whether the field changes pricing, eligibility, or routing.
Set separate retention rules for raw location data, CRM territory fields, analytics, and audit logs. Keep aggregate regional reports when you don’t need individual-level detail.
Review vendor access, subprocessors, storage locations, reuse restrictions, encryption, and deletion commitments. Check how new uses affect notice and consent requirements. Keep precise location out of URLs, event names, session recordings, and free-text analytics fields.
Assign deletion responsibilities across the form platform, CRM, warehouse, and backups. Have privacy counsel review applicable U.S. state requirements for notice, consent, sensitive data, access and deletion rights, and opt-outs. The obligations depend on the data and how you use it.
Set Location Priority and Fallbacks
Use confirmed visitor input first, account data second, and inferred signals only as fallback defaults. Keep approved account ownership rules separate from personalization, and store each value’s source and timestamp.
Define a standard path that works when signals are missing or conflicting, visitors use VPNs, lookups are blocked, or lookups fail. For unsupported regions, show an availability message and a general contact path. For unassigned territories, keep the submission in a monitored queue with a named owner and a response-time target.
Use these priorities to build multi-step form fields, conditional paths, and local copy.
sbb-itb-5f36581
Build Location-Based Form Paths
Create Location Fields and Conditional Rules
Turn your approved location signals and fallback rules into form logic. Display full state names, but store USPS state codes. Use US for country and IANA values such as America/New_York for time zones. Store ZIP Codes as text, supporting five digits and optional ZIP+4. Keep internal territory, source, and confidence or review status in separate fields. Confidence measures signal quality - not eligibility.
Keep rule chains short and clear, starting with the most specific condition and ending with the broadest fallback. Document each rule’s condition, action, priority, and owner. When an answer changes, clear dependent hidden values.
Validate formats in the form. Then check submitted values, geographic consistency, and service availability on the server. Hidden routing fields are metadata, not instructions.
These rules control which questions appear, which values you store, and which path each visitor sees.
Write Local Copy and Keep Forms Accessible
Use persistent labels, full state names, clear date guidance such as MM/DD/YYYY, and time-zone labels instead of unexplained abbreviations. Label budgets “Estimated annual budget (USD)” and format amounts as $1,250.00. Use U.S. customary units where relevant.
Preserve keyboard order, announce dynamic changes, and link text errors to their fields. Test every branch with keyboard navigation and screen readers, not just the default path.
Give each branch copy, formatting, and fallback text that matches the visitor’s location.
Example condition Fields User-facing copy Routing action Fallback Privacy treatment country = USandstate_code = TXShow state-specific service selection “Which Texas location or service area best matches your needs?” Assign territory = South-CentralSend missing or invalid state values to review Store state and source; collect an address only if required intent = general_inquiryHide sales-budget and purchase-timeline questions “Tell us how we can help.” Route to general inquiry queue Route unknown territories to the standard support queue Collect only details needed to respond time_zone = America/Los_AngelesShow appointment times in Pacific Time “Times below are shown in Pacific Time.” Notify owner during local business hours Offer neutral scheduling if time zone is unknown Store time zone only for scheduling or communication location_confidence = lowShow location confirmation field “Please confirm your state so we can connect you with the right team.” Route to review queue Use unassigned queue Retain confidence and source for auditability
Treat these as configuration patterns. Verify routing and eligibility on the backend; the form only personalizes the path.
Configure Geo-Targeted Forms in Reform
Once the logic and copy are set, connect the fields to your form workflow and delivery rules.
Use Reform as the form and workflow layer. Collect intent first, then ask for location details through multi-step qualification and conditional routing. Reform’s Form Shortening hides mapped fields when enrichment returns data and keeps them visible when it doesn’t. Hidden fields remain separate, backend-only metadata.
Run email validation and spam prevention before delivery. Map normalized location fields to connected systems. Show the expected response window and, when relevant, the scheduling time zone.
Missing-data fallbacks are defaults, not corrections. Let visitors review or change the enriched location. Don’t assume native IP geolocation, ZIP-to-territory mapping, or address verification. Before publishing, verify plan access, field mappings, routing behavior, and CRM integration.
Route Geographic Leads to Your CRM
Once location fields are normalized, send them through one ownership system. Choose one system to make territory decisions - your CRM, CDP, or middleware. The form collects the lead; the chosen system assigns ownership using the same location data used for form personalization.
Use a native CRM integration if it supports your field mapping and routing rules. Choose a webhook or middleware when you need enrichment, complex territory calculations, deduplication, retries, or delivery to multiple systems. Document which system owns each step.
Territory assignment should rely on normalized inputs, not raw location guesses. The rules below keep assignments predictable and easy to audit.
Standardize and Map Location Fields
Create a routing data dictionary that defines each field’s format, allowed values, source, CRM property, and fallback. Along with normalized location fields, map campaign and UTM values, consent status, submission_id, form_version, routing_rule_version, and UTC receipt and routing timestamps.
Keep raw, visitor-provided, inferred, and account-verified values separate. Never let inferred data overwrite verified account data. Decide which location controls assignment: the visitor’s location, company headquarters, billing address, or a named account’s registered location.
Define Territory Rules and Fallback Queues
Set a clear order for assignment: existing-account ownership, named-account rules, active opportunity or customer-success ownership, geographic match, segment or round-robin assignment, and finally a monitored fallback queue.
Document exceptions. Specify whether ZIP Code rules override state rules and whether state rules override country rules. Save the matched rule and its version with every assignment.
| Routing criteria | Required fields | Primary risk | Suggested audit frequency |
|---|---|---|---|
| Existing-account ownership | Account ID or matched domain | Reassigning an active relationship | Monthly and after CRM ownership changes |
| Named account | Account name or domain | Ambiguous account matching | Monthly |
| ZIP Code or state | Normalized ZIP Code or state | Missing, mistyped, or boundary ZIP Codes | Monthly during launch; quarterly afterward |
| Country or region | Normalized country code | Too-broad assignment | Quarterly |
| Time zone or business-hours coverage | Valid time zone | Incorrect response scheduling | Quarterly and after coverage changes |
| Round-robin within territory | Territory and active-rep list | Uneven distribution or inactive users | Weekly operational review |
| Fallback queue | Submission ID and failure reason | Leads becoming unowned | Daily monitoring |
Send unmatched or conflicting submissions to a monitored fallback queue. Keep the complete payload, normalized and raw location values, rule version, arrival time, and a reason code such as conflicting_location or unmapped_territory. Name an operations owner and set a service-level target.
For example, review high-intent U.S. demo requests within 15 minutes during business hours and lower-priority requests within one business day.
Assign Lead Owners and Handle Delivery Failures
Assign exactly one owner or queue, and log the decision before sending notifications. Exclude inactive representatives and set backup coverage for leave and off-hours.
Match existing CRM records before creating new leads. When repeat submissions belong to an existing record, save them as related activities. Use the stable submission ID as an idempotency key, backed by an atomic uniqueness check, so retries cannot create duplicate leads.
Retry temporary timeouts, rate limits, and server errors using bounded exponential backoff and jitter. Honor Retry-After. When retries are exhausted or errors are permanent, send the submission to a manual-replay workflow with an operator alert and attempt history.
Measure receipt-to-assignment time and human-response time by lead tier and business hours. Review assignments after staffing, ownership, or coverage changes.
Test Geo-Targeted Forms Before Launch
Once the rules are built, check every branch and failure mode before launch. Test the full visitor-to-CRM flow in a sandbox. Use a synthetic record with a distinct test ID. Log the browser, device, network, form version, rule version, timestamp, expected outcome, actual outcome, and defect status. Keep test records out of production communications and reporting.
Test Location Signals and Rule Boundaries
Build a test matrix that covers every supported territory, boundary ZIP, leading-zero ZIP, blank or invalid input, unsupported region, VPN, mobile network, conflicting signal, permission denial, and lookup timeout.
Use repeatable fixtures to check signal precedence and visitor corrections, including edits made after conditional fields appear. A usable standard path must remain available when permissions are denied or revoked, optional processing is refused, or a lookup times out. That path must not send disallowed location data.
Check Accessibility, Scheduling, and CRM Delivery
Test mobile layout, screen rotation, zoom, autofill, slow connections, and back-button recovery. Check labels, focus order, dynamic-field announcements, validation errors, and confirmations.
When visitors change regions, keep entered values that still apply. Remove outdated hidden requirements that could block submission. For scheduling, check visitor-selected time zones and daylight saving time transitions across the form, confirmation, notification, and CRM.
Inspect the CRM record - not just the API response. Check mappings, consent, ownership, timestamps, source, and location source. Force timeouts, HTTP 429 and 503 responses, expired credentials, invalid payloads, duplicate events, and notification failures. Confirm that no duplicate records appear and that failed deliveries can be replayed with a traceable record.
Set Launch and Rollback Requirements
Define launch gates before releasing the form:
- 100% pass rate on supported cases and correct routing on approved boundaries.
- Documented fallbacks for unavailable or refused signals.
- Required fields and consent remain intact, with no critical accessibility blockers or duplicate records.
Set delivery-latency and alert thresholds before launch. Document untested cases instead of marking them as passed. Start with internal users, one region, or a small traffic segment. Monitor failed submissions, fallback volume, routing errors, and delivery delays.
Keep the standard form and tested versions of the form, rules, mappings, and integrations ready to restore. Rehearse rollback: restore the standard form, disable or bypass geo rules, preserve submissions already received, notify owners, and reconcile any leads in a fallback queue.
Use critical privacy issues, accessibility blockers, and sustained delivery failures as rollback triggers. Once launch is stable, compare regional performance in the reporting section.
Measure Conversion and Lead Quality
After launch, compare geo-targeted and standard forms using the same submission ID, form version, and rule version.
Define Events and Geographic Reports
Track views, starts, completions, errors, spam, duplicates, CRM creation, qualification, meetings, opportunities, and influenced pipeline. Define abandonment upfront: a start without a valid submission within a fixed session or time window.
Build your metric scorecard around the submission ID, form version, rule version, territory, and routing result established during routing and launch. Set exclusions and attribution windows before reporting. Keep spam and duplicates visible in operations reports, even when you exclude them from lead-quality calculations.
Join form and CRM data using a stable submission ID or CRM lead/contact ID. Report visitor-entered, inferred, territory, campaign, and account locations separately. Limit exports to timestamps, campaign parameters, form and rule versions, consent, location source, territory, and routing result.
Preserve first-touch and last-touch attribution. Before publishing, reconcile missing IDs, duplicates, overwritten attribution values, and sales activity that hasn't synced.
| Metric | Definition | Useful segments | Source | Target or review trigger |
|---|---|---|---|---|
| Completion | Valid submissions ÷ eligible form views | Region, device, campaign, form version | Form analytics | Compare with baseline and control |
| Abandonment | Starts without a valid submission ÷ starts | Region, step, browser, device | Form analytics | Review when above the historical baseline |
| Errors | Blocked submission attempts ÷ submission attempts | Region, field, browser, form version | Form analytics and error logs | Investigate unusual spikes |
| Spam | Rejected spam submissions ÷ total attempts | Region, source, IP or risk category | Form security logs | Review regional spikes or ceiling breaches |
| Duplicates | Duplicate submissions ÷ accepted submissions | Region, campaign, account, contact | CRM deduplication system | Track separately from spam |
| Qualified-lead rate | Qualified leads ÷ valid, nonduplicate submissions | Territory, industry, company size, version | CRM lifecycle data | Compare with baseline and target |
| Meeting rate | Meetings ÷ qualified leads | Region, owner, source, version | CRM and scheduling records | Review regions with weak progression |
| Routing accuracy | Correctly assigned records ÷ accepted submissions | Territory, rule version, fallback queue | CRM audit log | Investigate failed or fallback assignment |
| First-response time | Submission to first qualifying sales response | Territory, owner, business hours, region | CRM activity data | Compare median and percentile to the SLA |
| Opportunity rate | Opportunities ÷ valid submissions or qualified leads | Region, segment, campaign | CRM opportunity data | Evaluate after the defined attribution window |
| Influenced pipeline | Pipeline amount connected to form activity | Region, campaign, form version, account | CRM and attribution system | Review against spend, target, and sales-cycle length |
Compare Standard and Geo-Targeted Forms
Confirm which events and dimensions your stack exports before comparing Reform analytics with CRM outcomes. Check whether you can measure form views, starts, incomplete-submission events, assignment and version fields, geographic dimensions, submission-ID export, and CRM outcome synchronization. If you can't reliably measure assignment or abandonment, document the gap rather than present an unsupported comparison.
Before testing, define the hypothesis, random visitor assignment, stable versions, regional and device segments, and one primary metric, such as qualified-lead rate. Set guardrails for completion, spam, lead quality, routing, and response time.
Calculate sample requirements using the baseline, minimum detectable effect, power, and statistical significance. Choose a test duration that covers normal traffic cycles and gives CRM outcomes time to mature. Name the decision owner, required improvement, and rollback conditions.
Higher completion alone isn't success. Small regional samples show direction, not conclusive results. Avoid ending the test early because repeated checks show favorable results.
Review Routing, Privacy, and Performance
Turn the results into weekly, monthly, and quarterly checks.
- Weekly: Marketing operations reviews event loss, routing failures, fallback queues, duplicates, and response-time breaches.
- Monthly: Marketing and sales review territory conversion, qualification, meetings, and pipeline.
- Quarterly or after material changes: Review rules, notices, retention, access, and vendor settings.
Log each correction with its owner, date, affected regions, validation evidence, and whether reporting needs a backfill. Preserve both original and corrected territories. Before crediting personalization for gains, check spend, traffic and device mix, sales coverage, consent gaps, and sample size.
Conclusion: Geo-Targeted Form Launch Checklist
Before launch, check these four areas:
- Data and privacy: Document each location source, its confidence level, purpose, retention limit, access scope, and deletion steps. Collect only the location precision needed for routing.
- Defaults and rules: Show inferred locations and let users edit them. Include a “Choose your location” fallback. Check source priority and fallback behavior, and match the copy to each path without promising availability or eligibility.
- Accessibility and testing: Check labels, keyboard access, screen reader support, and error messages. Test every geographic branch, conflicting signal, missing value, and territory boundary. Preserve valid answers when users change locations.
- CRM and launch controls: Confirm field mappings, owner assignments, backup territory rules, retries, and a monitored fallback queue. Assign owners for the form, privacy, CRM, and analytics. Keep the last known-good configuration available, with a named rollback owner and measurable rollback triggers.
Use geography for relevance and routing - not identity verification. Confirm inferred locations and provide a safe fallback.
FAQs
When is geo-targeting worth the added complexity?
Geo-targeting is worth the extra setup when it improves lead quality, meets regulatory requirements, or delivers a large lift in conversion rates. It can route leads to territory owners who know local markets, speak the right languages, and understand legal requirements, such as GDPR.
Consent fields or shipping details tailored to each region can remove unnecessary hurdles and increase completion rates by up to 30%. Across jurisdictions or time zones, geo-targeting helps deliver relevant experiences that meet legal requirements and reach people at the right time.
How can I personalize forms without making visitors uneasy?
Keep forms clear, short, and relevant. Use Reform’s form shortening and enrichment features to cut down on manual questions. Add hidden fields for metadata such as time zones or referral sources. Use clear labels, and make location-based conditional logic helpful without feeling intrusive.
Ask only for the information you need. Explain what data you collect and why. Leave consent checkboxes unchecked by default, and make your privacy policy easy to find.
What if conversions rise but lead quality drops?
Your form may be getting more submissions - but fewer relevant leads. Refine your qualification questions and remove fields that don’t help with lead scoring. Then break down results by traffic source and device to see which paths bring in low-quality submissions and which bring in qualified leads.
Use Reform’s real-time analytics to track downstream lead quality. Adjust your logic branches so only high-intent prospects reach the final submission step.
Related Blog Posts
Get new content delivered straight to your inbox

The Response
Updates on the Reform platform, insights on optimizing conversion rates, and tips to craft forms that convert.




Drive real results with form optimizations
Tested across hundreds of experiments, our strategies deliver a 215% lift in qualified leads for B2B and SaaS companies.
