
.webp)
Checklist for Setting Up Constant Contact API Integration


The Constant Contact API v3 helps you automate lead management by integrating forms, contact lists, and email campaigns into one streamlined system. But getting it right requires precise setup to avoid errors like failed API calls or compliance issues. Here's what you need to know:
- Prep Work: Confirm your Constant Contact account is active, generate API credentials securely, and plan your data fields (e.g., email, name, custom fields).
- Consent Compliance: Ensure opt-ins meet CAN-SPAM rules, store consent records (timestamp, IP, form name), and sync unsubscribe data.
- API Configuration: Set up OAuth 2.0 authentication, manage tokens securely, and define key endpoints for creating or updating contacts.
- Form Integration: Map fields to Constant Contact’s schema, configure lists and tags for segmentation, and test webhooks or integrations.
- Testing: Validate all workflows with test data, check unsubscribe handling, and monitor API performance for errors or rate limits.
Getting these steps right ensures your leads flow efficiently into Constant Contact while staying compliant with email regulations.
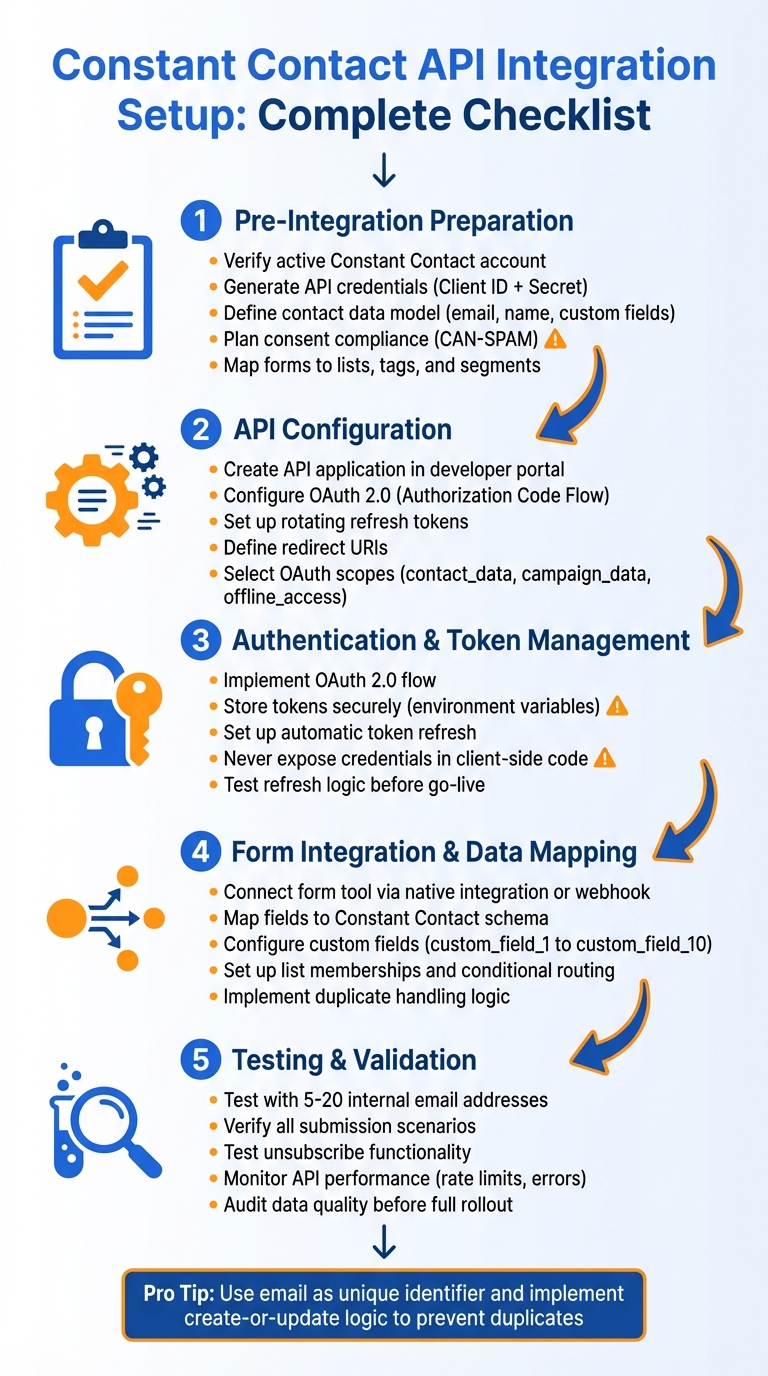
5-Phase Constant Contact API Integration Setup Checklist
Constant Contact Integration | Advanced Form Integration
Pre-Integration Preparation Checklist
Before diving into coding or connecting systems, it's essential to lay the groundwork. Skipping these steps can lead to sync errors, lost leads, and compliance issues. The checklist below will help ensure your Constant Contact API integration starts off right.
Confirm Account and API Access
Start by verifying that your Constant Contact account is active and in good standing. Trial or restricted accounts often block API calls. Make sure the user handling the integration has the necessary permissions - typically an account owner or admin role - to manage contacts, lists, and campaigns.
To generate your API credentials, log in to Constant Contact and go to My Applications. Click New Application, name it (e.g., "Website Lead Forms"), and take note of the API key (Client ID) and client secret provided. Keep in mind, the client secret is shown only once - if you lose it, you’ll need to regenerate it, which will invalidate the previous one. Store both credentials securely, such as in environment variables or a secrets manager, and never expose them in client-side code or version control.
Also, review Constant Contact's API rate limits in the v3 documentation and compare them to your expected usage. Think about your daily and peak-hour lead volume, the number of API calls per form submission (e.g., creating a contact, adding to a list, applying tags), and any scheduled sync jobs. If you anticipate heavy traffic, like during a Black Friday sale or a viral campaign, plan for batching or queueing to avoid hitting limits and losing data.
Next, outline the data structure you’ll be integrating.
Define Contact Model and Data Requirements
Identify the data fields you need to collect. At a minimum, this includes an email address, first name, and last name. You might also include optional fields like phone number, company, job title, and address details (street, city, state, ZIP). Custom fields, such as product interest or UTM parameters for attribution, can add even more value. For U.S. businesses, structuring address data with separate state and ZIP fields is useful for segmentation and compliance.
For each field, define its data type, whether it’s required or optional, and any default values. Map these fields to Constant Contact’s contact schema and custom fields. Document this model in a shared resource to ensure developers and marketers stay aligned.
You’ll also need a duplicate handling strategy. Use email as the unique identifier and adopt a create-or-update approach via the contacts endpoint. Decide how to handle conflicting data - for example, whether to prioritize the most recent submission or preserve existing values. Plan for scenarios like email changes: will they create a new contact or update the existing one after verification?
Finally, map each form or funnel step to relevant Constant Contact lists, tags, and segments. For example, a "Demo Request" form might automatically add contacts to a "Leads – Demo Requests" list, apply tags like "demo" and "website", and place them into a "High-Intent" segment based on their responses. Document these mappings in a clear matrix so everyone understands the purpose of each list and tag.
Plan Consent and Compliance Handling
Determine your legal basis for emailing, which in the U.S. is typically express opt-in. Include an unchecked checkbox on your forms, clearly stating the purpose of the emails (e.g., newsletters, promotions, event updates) near the submit button.
For every opt-in, store a consent record that includes the timestamp (formatted as MM/DD/YYYY HH:MM AM/PM), IP address, form name, and the exact consent text version. Decide whether this record will be stored in Constant Contact, your CRM, or both. Ensure compliance with CAN-SPAM requirements by including a valid physical mailing address, clear advertising identification, and an easy way to unsubscribe in every email.
Plan how you’ll sync unsubscribes and suppression lists across your systems. Treat Constant Contact as the source of truth for subscription status. If someone unsubscribes there, ensure that status is updated in your CRM or form tools to prevent further emails. Decide how to handle resubscriptions - only allow it if the user gives fresh, clear consent. Also, create rules for internal suppression lists (e.g., competitors, undeliverable domains, or legal holds) and ensure your integration checks these lists before adding or resubscribing contacts.
Form and UX Prerequisites
Make sure every form includes all required fields from your contact model, with clear labels and formatting that follow U.S. conventions (e.g., separate fields for state and ZIP code, familiar phone number formats). Implement email validation to catch formatting errors and, ideally, verify MX records or block disposable email addresses. Add spam prevention measures like honeypot fields, rate limiting, and CAPTCHA to keep your contact lists clean and maintain your sender reputation.
Ensure that error messages, dates (MM/DD/YYYY), and any currency or measurement fields align with en-US standards. Test your forms on both desktop and mobile devices, and confirm that labels, required indicators, and error messages are accessible, including for screen readers.
If you’re using Reform as your form builder, double-check that your forms include all fields required by your Constant Contact data model. Make sure field names or IDs remain stable for mapping. Configure conditional routing to send only qualified leads to Constant Contact or tag them appropriately - for example, routing enterprise leads to a specific list and tagging them as "high-value." Enable lead enrichment to capture additional data, such as firmographics or behavioral insights, and map this information into Constant Contact custom fields for better segmentation. Finally, test all webhooks or native integration connectors thoroughly before going live to ensure everything works as intended.
Constant Contact API Configuration Checklist
Now that you're ready, it's time to configure the Constant Contact API. This step is crucial for generating the credentials your integration will use to communicate with Constant Contact and for setting up authentication and data exchange between your systems.
Create and Configure API Application
Start by logging into your Constant Contact account and heading to the My Applications tab in the developer portal. Click New Application, then give your app a unique name. For OAuth2 flows, select Authorization Code Flow for server-side integrations or Implicit Flow for client-side scenarios. To ensure secure, long-term access without frequent re-authorizations, enable Rotating Refresh Tokens.
Once you click Create, Constant Contact will provide your API Key (Client ID). Next, click Generate Secret to obtain your Client Secret - this will only appear once, so make sure to copy it and store it securely, such as in environment variables.
You'll also need to configure your redirect URI, which is the callback URL where Constant Contact will send users after they authorize your app. If you're integrating with platforms like Salesforce or other tools, retrieve the specific callback URL from your authentication provider settings and add it to your Constant Contact application under Redirect URL. Make sure the redirect URI matches exactly, including protocol and trailing slashes.
Finally, select the OAuth scopes that align with your integration requirements. For example, if you're automating lead management, you’ll likely need the following:
- contact_data: To create and update contact information.
- campaign_data: To manage email campaigns.
- offline_access: To enable refresh tokens for uninterrupted access.
By limiting scopes to only what your integration needs, you can enhance security and avoid granting unnecessary access.
Secure Authentication and Token Management
Constant Contact uses OAuth 2.0 for authentication, so you’ll need to implement the Authorization Code Flow securely. Start by building an authorization URL using your API Key, Client Secret, and redirect URI. Direct users to this URL so they can approve access. Once approved, Constant Contact will redirect them to your callback URL with an authorization code.
Exchange this authorization code for an access token server-side using your Client Secret. Store both the access and refresh tokens securely, either in environment variables or an encrypted database. Never expose these tokens in client-side code or include them in version control.
Since Constant Contact uses rotating refresh tokens, each time you refresh an access token, a new refresh token is issued. To avoid authentication disruptions, implement automatic token refresh before the access token expires. Update your stored tokens with each refresh and test your refresh logic thoroughly to ensure it functions correctly before your forms go live.
Once your authentication setup is complete, you can move on to mapping your forms to Constant Contact’s data structure.
Define API Endpoints and Operations
Identify the specific API endpoints your integration will rely on. For automating lead management, the most relevant endpoints include:
- POST https://api.cc.email/v3/contacts: To create new contacts.
- PUT https://api.cc.email/v3/contacts/{contact_id}: To update existing contacts.
- GET https://api.cc.email/v3/contacts: To search for contacts by email or list them.
- GET/POST https://api.cc.email/v3/lists: To retrieve or manage contact lists.
Each API call requires two headers:
Authorization: Bearer {access_token}Content-Type: application/json
Define your CRUD (Create, Read, Update, Delete) behavior to handle duplicates effectively. For example, before creating a contact, query the API using the email address as a filter. If the contact exists, update it using a PUT request; if not, create it with a POST request. Wrapping your API calls in try-catch blocks is essential for logging and handling exceptions gracefully.
With these steps in place, you'll be ready to integrate your forms seamlessly with Constant Contact's API.
sbb-itb-5f36581
Form Integration and Data Mapping Checklist
Once your API credentials and endpoints are set up, you're ready to link your forms to Constant Contact. This connection turns raw form submissions into actionable contact records for your email marketing efforts.
Connect Your Form Tool to Constant Contact
To connect your form builder to Constant Contact, you can use native integrations or webhooks. For example, if you're working with Reform, head to your form's integration settings and select Constant Contact from the list of options. Input your API Key (Client ID) and Client Secret, which you generated earlier, and complete the connection using OAuth 2.0.
For webhook-based setups, configure your form tool to POST submission data to https://api.cc.email/v3/contacts. Make sure to include your access token in the Authorization header as Bearer {access_token} and set the Content-Type to application/json. Test the integration by submitting a sample form entry and verifying that the contact appears in your Constant Contact dashboard.
Map Fields and Custom Properties
Accurate field mapping is key to ensuring your form data is organized correctly in Constant Contact. Start by mapping basic fields: the email field in your form should connect to email_address.address, while name fields map to first_name and last_name. For additional tracking, set up custom fields in Constant Contact by navigating to Contacts > Custom Fields. Examples include fields like "Lead Source" or "Consent Timestamp."
Use Reform's custom mapping feature to align form fields with Constant Contact's custom properties (e.g., custom_field_1 to custom_field_10). For instance, if you’re tracking lead origins, map a hidden field with a value like "Reform Webinar – 2025-12-15" to custom_field_1. To capture consent, include the submission timestamp in ISO format (YYYY-MM-DD) and map it to a custom field. Here's an example of how your API payload might look:
{
  "email_address": {
    "address": "jane@example.com",
    "permission_to_send": "normal"
  },
  "first_name": "Jane",
  "last_name": "Doe",
  "custom_field_1": "Reform Form - US Campaign"
}
Ensure your form fields comply with Constant Contact's schema. For instance, email addresses must be formatted as objects with both an "address" and a "permission_to_send" property set to "normal" to meet CAN-SPAM requirements. Reform’s email validation feature helps catch formatting errors before the data reaches Constant Contact.
Configure List, Tag, and Segment Behavior
Decide which Constant Contact lists will receive submissions from your form. Start by retrieving your available lists with a GET request to https://api.cc.email/v3/accounts/{accountId}/lists. When setting up the integration, include list_memberships in your API payload with the relevant list ID and set the status to "ACTIVE."
Reform’s conditional routing feature makes it easy to send leads to specific lists based on their responses. For example, you can direct high-value leads to a "VIP Leads" list and others to a "Nurture" segment. Set up this logic in Reform’s form builder by creating conditional paths that trigger different actions within the integration. This ensures that each lead is assigned to only one primary list, avoiding conflicts.
Finally, implement logic to check for existing contacts to prevent duplicates. While Constant Contact’s API automatically handles upserts (updates or inserts) based on email addresses, configuring your form to block multiple simultaneous submissions can help maintain clean, accurate data in your account.
Testing and Validation Checklist
Before rolling out your Constant Contact integration, it's vital to ensure all functions work as expected. Thorough testing helps catch errors and avoid compliance issues.
Run Sandbox and Sample Data Tests
Start by using a controlled group of 5 to 20 internal email addresses specifically set aside for testing. You can use "+test" aliases, like "yourname+test@company.com", to make it clear these addresses are for testing purposes. Create a separate "Test" list in Constant Contact to keep these contacts distinct from actual subscribers.
Test every possible submission scenario: adding new contacts, updating existing ones, handling incomplete data, and catching invalid formats. For each scenario, confirm that the contact appears in Constant Contact with the correct details - email address, first and last name, custom fields, tags, and list assignments. If you're using multi-step forms, check conditional routing to ensure contacts are assigned to the right lists and tags. Verify this behavior in your Constant Contact dashboard. Also, confirm that consent fields, opt-in timestamps (in MM/DD/YYYY format), and source tracking are recorded accurately.
A test cycle is only complete when every mapped field displays correctly, contacts are placed in the intended lists and segments, and all consent data is accurate and ready for audits.
Don’t forget to test unsubscribe functionality and compliance processes to ensure proper handling of opt-outs.
Verify Unsubscribe and Compliance Processes
Testing unsubscribe behavior from multiple angles is essential. First, send a test campaign to your test group and click the unsubscribe link in the email footer. Check that the contact's status in Constant Contact updates to "unsubscribed" and that they’re added to the appropriate suppression list. Then, try re-submitting the same email address through your integrated form. The system should either block re-subscription or require explicit new consent - contacts should never be re-subscribed automatically.
If your form includes its own preference center or unsubscribe option, test those features too. Ensure they correctly update the contact's status in Constant Contact without allowing automatic re-subscription. Additionally, test what happens when a previously unsubscribed contact updates non-marketing information, like their company name, through a form. Confirm that the updates are applied without altering the subscription status.
Once unsubscribe processes are verified, shift focus to maintaining data quality and monitoring API performance.
Monitor Data Quality and API Performance
After enabling the integration for a small production segment, conduct regular audits of your data. Export a sample of new contacts from Constant Contact and compare it with your source data. Look for missing fields, incorrect mappings, formatting errors (like phone numbers not following U.S. standards or improper state abbreviations), and duplicate records. Adjust your logic to use the email address as a unique identifier to avoid duplicates.
Keep an eye on key API metrics during testing. Pay attention to HTTP status codes, especially 429 errors, and monitor response times during high-traffic periods. Log request payloads, responses, and timestamps to help with debugging. Implement retry logic with backoff for temporary issues, and set up a dashboard to track contact creation, error rates, and response times. Since Constant Contact's API v3 has rate limits, make sure your integration handles throttling smoothly before scaling up to full production traffic.
Conclusion
Setting up a lead automation system that works seamlessly with Constant Contact requires careful planning, precise configuration, and thorough testing. When done right, this process turns a one-time setup into a reliable system you can depend on.
Good preparation minimizes errors and saves time. Start by confirming your Constant Contact account level and API access. Define a clear contact data structure, plan consent processes to comply with U.S. email regulations, and ensure your form fields align with Constant Contact's requirements. These steps help prevent mapping issues and failed API calls.
Every lead attribute needs a clear destination in Constant Contact. Misplaced or uncategorized contacts can make it harder to target the right audience later. If you're using tools like Reform, features such as multi-step forms, conditional routing, and lead enrichment add marketing value - provided they’re properly mapped to Constant Contact lists, tags, or custom fields.
The final step in the process is rigorous testing. Use sandbox data to test unsubscribe flows, simulate real-world scenarios like high traffic or invalid emails, and ensure the system can handle edge cases before going live. Once operational, keep an eye on metrics like contact counts and API error logs to ensure everything runs smoothly. Regular audits and staying updated on Constant Contact API changes will help you adapt your setup as your business grows, ensuring your system remains effective and compliant over time.
FAQs
How can I ensure my Constant Contact API integration complies with CAN-SPAM regulations?
To meet CAN-SPAM regulations when working with the Constant Contact API, stick to these essential practices:
- Get explicit consent from recipients before sending any marketing emails. This ensures you're only reaching out to those who want to hear from you.
- Include clear opt-out options in every email, and make sure to process unsubscribe requests promptly.
- Be honest with your subject lines and headers - avoid anything that could be considered misleading or deceptive.
- List your physical mailing address in all email communications to comply with transparency requirements.
Make it a habit to regularly assess your email practices. Staying compliant with CAN-SPAM not only avoids penalties but also helps build trust and credibility with your audience.
What’s the best way to handle API rate limits during peak traffic?
To navigate API rate limits during busy periods, the first step is to track your API usage closely. This helps you spot usage trends and ensures you remain within the set limits. When requests fail, use exponential backoff and retries to handle them smoothly. You can also boost efficiency by batching requests instead of sending them individually.
Another useful approach is to spread your API calls evenly over time. This avoids sudden surges in traffic that could trigger rate limit issues. These methods can keep your integration running smoothly while minimizing the risk of interruptions from hitting those limits.
How can I manage duplicate contacts in Constant Contact?
To manage duplicate contacts in Constant Contact, take advantage of deduplication rules to merge entries that share the same email address or other common identifiers. You can also use the platform's contact management tools to spot and remove duplicates, keeping your contact list clean and well-organized. This ensures better targeting for your campaigns and improves the quality of your data.
Related Blog Posts
Get new content delivered straight to your inbox

The Response
Updates on the Reform platform, insights on optimizing conversion rates, and tips to craft forms that convert.


Drive real results with form optimizations
Tested across hundreds of experiments, our strategies deliver a 215% lift in qualified leads for B2B and SaaS companies.
