
.webp)
Google Ads Lead Form API Setup Guide


The Google Ads Lead Form API helps you automatically send lead data from your campaigns directly to your CRM or database in real time. This eliminates manual downloads, reduces errors, and allows you to respond to leads faster. Here's a quick overview of what you need to know:
- What It Does: Sends lead data (e.g., name, email, phone) from ads to your systems via HTTP POST in JSON format.
- Supported Campaigns: Search, Video, Performance Max, and Display.
- Key Features:
- Real-time lead delivery via webhooks.
- Detailed data like
lead_id, GCLID, campaign details, and more. - OAuth 2.0 authentication and secure API setup.
- Setup Requirements:
- Google Ads manager and advertiser accounts.
- Developer token and API credentials from the Google Cloud Console.
- A public HTTPS endpoint for webhook integration.
- Testing: Use Google Ads' "Send test data" feature to ensure your setup works.
This API simplifies lead management, improves response times, and provides better insight into campaign performance. Keep reading for a step-by-step guide on setting up and securing your integration.
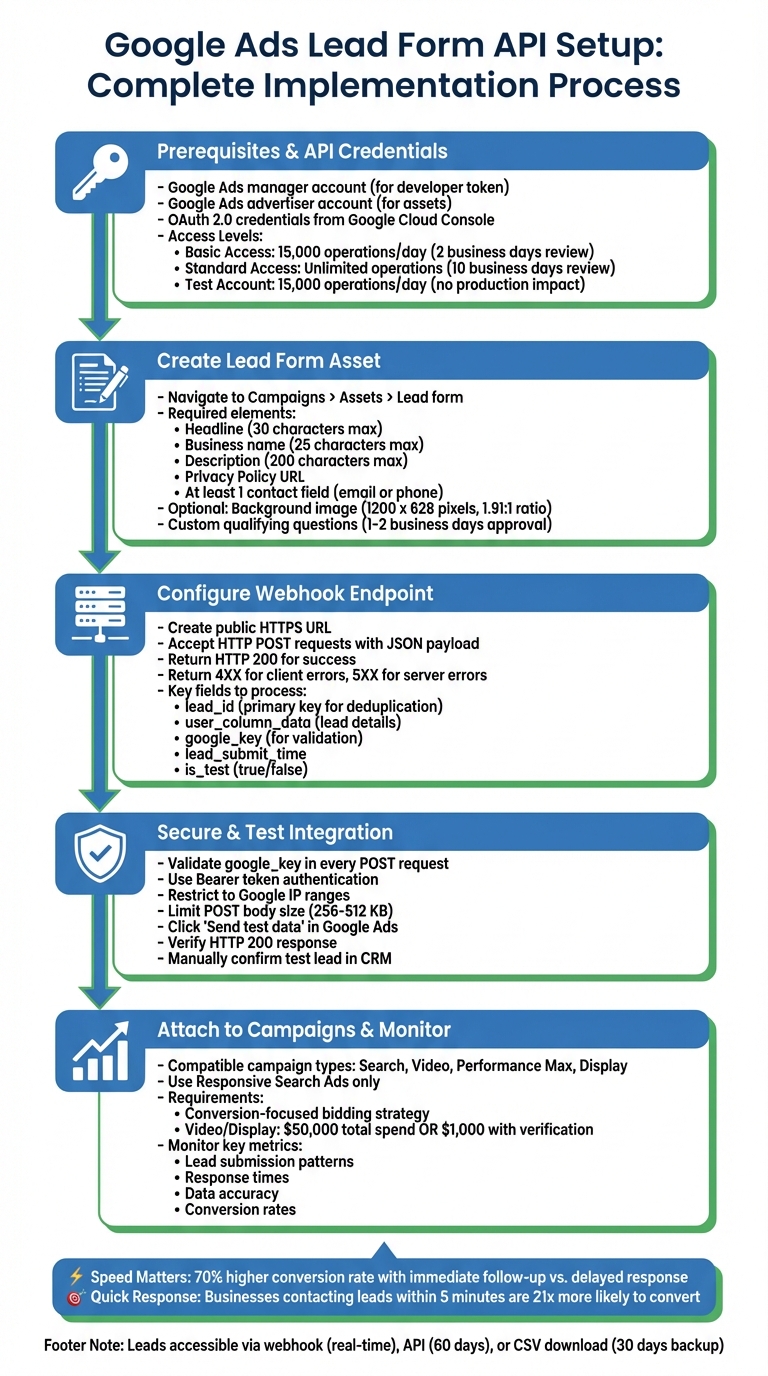
Google Ads Lead Form API Setup Process: 5-Step Implementation Guide
How to Integrate Google Lead Forms with Go High Level Webhooks for Ad Campaigns | Full Tutorial
sbb-itb-5f36581
Prerequisites and Setup Requirements
To integrate the Lead Form API, you’ll need a Google Ads manager account (for a developer token) and an advertiser account (to host your assets). API requests must be authorized using the OAuth 2.0 scope https://www.googleapis.com/auth/adwords along with a valid developer token from your API Center. Make sure to review system account requirements and properly set up API credentials before proceeding.
Google Ads Account and Permissions
To manage API settings and create lead form assets, admin-level access to your Google Ads account is required. User roles align with those in the Google Ads interface. If you’re working through a manager account to access a client account, include the login-customer-id HTTP header in your API requests, specifying the manager account’s customer ID.
For production use, your developer token must be approved for "Ad creation / management" permissible use. The level of access granted to your account also determines your daily operation limits:
- Basic Access: Allows up to 15,000 operations daily and is typically reviewed within 2 business days.
- Standard Access: Offers unlimited operations but requires up to 10 business days for review.
During development, you can use Test Account Access, which supports up to 15,000 daily operations without affecting production systems.
Obtaining API Credentials
Generate OAuth 2.0 credentials through the Google Cloud Console and enable the Google Ads API. To do this, navigate to the API Library, search for "Google Ads API", and enable it. You’ll need to decide between two authentication methods:
- User authentication
- Service account authorization: If you opt for this, create a service account in the Cloud Console and download the private key in JSON format.
For webhook delivery, you’ll need to generate a Webhook URL (your delivery endpoint) and a Webhook Key (used for lead validation) within the lead form asset editor. Keep your google_key secure - if it’s compromised, update it immediately in your lead form settings. Use the "Send test data" feature in the Google Ads interface to confirm that your CRM receives a successful HTTP 200 response.
Developer Tools and Libraries
For development and testing, install the official client libraries for Java, C# (.NET), PHP, Python, Ruby, or Perl. These libraries can be installed via standard package managers:
These libraries simplify tasks like authentication, retries, and data marshaling, making them more efficient than using raw HTTP requests.
When configuring your JSON parser, ensure it ignores unknown properties. While command-line tools like curl or gcloud are helpful for quick testing, they’re not recommended for production environments. Use these only during initial setup or troubleshooting.
Setting Up Lead Form Assets
Once you have your API credentials ready, it's time to create the lead form asset for your ads. This process ensures your forms can capture quality user data in real time. Go to the "Campaigns" menu in your Google Ads account, click on "Assets," and select "Lead form" to start creating an asset at either the account or campaign level.
Creating a Lead Form Asset
To set up a lead form, you'll need a few essentials: a headline (up to 30 characters), your business name (up to 25 characters), a description (up to 200 characters), and a Privacy Policy URL [7,8]. You must also include at least one question to collect user information. This could be basic details like Name, Email, Phone, or City, or professional details such as Job Title, Company Name, or Work Email.
For more tailored data, you can add custom multiple-choice questions to qualify leads. These responses will appear in your API and webhook data under the "Lead stage" field, which helps you prioritize leads with higher intent. Keep in mind that custom qualifying questions require approval, which typically takes 1 to 2 business days if you're submitting a new suggestion to Google's catalog. You can also enhance your form's appearance by adding a background image with a 1.91:1 aspect ratio (recommended size: 1200 x 628 pixels).
Once your form is designed, it's crucial to set up field validations to maintain data accuracy.
Configuring Field Validation
At least one contact method - either email or phone - must be mandatory. Additionally, qualifying questions cannot be optional, as they are essential for filtering leads based on your specific criteria.
When setting up your form, you can choose between two modes: "More volume" for simplicity or "More qualified" for filtering higher-intent leads. If you're getting too many low-quality submissions, switching to the "More qualified" mode can help by adding some friction to the process, discouraging less serious prospects.
If you're processing leads through your API or webhook, always use the lead_id field to deduplicate entries. Keep in mind that Google does not guarantee exactly-once delivery.
The next step is to decide how you want to receive your lead data.
Selecting Lead Delivery Methods
Google provides multiple ways to access your lead data. One option is webhook integration, where leads are delivered in real time via HTTP POST requests in JSON format directly to your CRM [1,6,2]. To set this up, go to the "Export leads from Google Ads" section in the form builder and input your Webhook URL and key.
Alternatively, you can use third-party platforms like HubSpot, Salesforce, LeadsBridge, Adverity, or Driftrock. Another option is to retrieve leads programmatically through the Google Ads API, which allows access to up to 60 days of lead data.
After entering your webhook details, click the "Send test data" button to confirm that your endpoint responds with an HTTP 200 status [6,3]. This sends a sample payload containing a dummy lead_id and gcl_id, ensuring that your CRM can correctly parse the JSON. It's a good idea to design your JSON parser to ignore any unrecognized fields, as Google may add optional fields to the payload in the future.
Webhook Setup and Configuration
To set up your webhook, you’ll need a public HTTPS URL capable of receiving and processing JSON payloads from Google Ads in real time. This URL will act as the endpoint that parses incoming lead data and stores it in your CRM or database. The JSON payload includes key fields like lead_id, user_column_data, form_id, campaign_id, and a google_key for verification.
Creating a Webhook Endpoint
Start by building an HTTPS endpoint that can handle HTTP POST requests and return the appropriate HTTP status codes. If a lead is successfully saved or queued, the endpoint should return HTTP 200. For client-side errors like authentication issues or invalid schema, return a 4XX code, and for server-side problems, use 5XX codes so Google knows to retry the request.
The user_column_data array contains the actual lead details. Each entry in this array includes a column_id (e.g., "FULL_NAME" or "EMAIL") and a string_value. Phone numbers will be in E.164 format (e.g., "+11234567890"). Before connecting your endpoint to Google Ads, test it using a curl command like this:
curl -v -X POST --header "Content-Type:application/json" -d @request.txt https://your_webhook_url
This test ensures your parsing logic and database insertion processes are functioning correctly. Once your endpoint is confirmed to be working, you can move on to securing it.
Securing Webhook Requests
With your endpoint operational, the next step is to secure it. Always validate the google_key included in the POST payload against the key you set in Google Ads. As Google’s documentation highlights:
"Before processing a lead received over webhook, validating google_key is the same as configuring in Google Ads in order to have more confidence that the lead is valid".
Keep this key private, and if you suspect it has been compromised, update it immediately in Google Ads.
"Keep this key confidential and update in Google Ads if there is a reason to believe that this has leaked widely." - Google Developers
For added protection:
- Use header-based authentication with a Bearer token (e.g.,
Authorization: Bearer <token>). - Restrict incoming traffic to Google’s known IP ranges.
- Limit the maximum POST body size to 256–512 KB to guard against denial-of-service attacks.
Speed is also critical - brands that follow up with leads immediately after submission see a 70% higher conversion rate compared to those that delay. So, secure your endpoint without sacrificing performance.
Testing and Troubleshooting Webhooks
Google Ads offers a "Test" button in the lead form builder, which sends a sample JSON payload to your endpoint. A green status message appears if your system returns an HTTP 200 response. However, just seeing a 200 OK status in Google Ads doesn’t guarantee the data was processed correctly. You’ll need to manually verify that the sample payload was parsed and stored in your CRM as expected.
"Without performing this step [verifying CRM receipt] there is no guarantee that the webhook is working properly." - Google Developers
Test payloads include an "is_test": true field, allowing you to differentiate between test data and actual leads. If you skip sending test data, your webhook will enter an error state, and real leads won’t be delivered.
Adding Lead Forms to Campaigns
Attaching Lead Forms to Campaigns
Once your webhook is set up, the next step is to attach your lead form to a campaign to enable real-time lead delivery. For existing campaigns, navigate to the Assets > Associations tab and select your lead form. For new campaigns, choose the Leads goal and select a compatible campaign type - such as Search, Video, Performance Max, or Display - during the setup process.
To use lead forms, your campaign must be optimized for a Google lead form conversion goal and utilize a conversion-focused bidding strategy. Keep in mind that Responsive Search Ads are the only ad format that works with lead forms; Expanded Text Ads are not supported. For Video or Display campaigns, your account must meet a total spend threshold of over $50,000 USD. However, advertisers who complete the Advertiser Verification Program may qualify with a reduced threshold of $1,000 USD per account or $15,000 USD across all accounts.
Lead forms can also be attached at the account level. To do this, select Account in the "Add to" dropdown menu when creating a lead form asset. Note that only one lead form asset can be active at the account level at any given time. If you're using the Google Ads API, the process involves two steps: first, create a LeadFormAsset resource, and then link it to a campaign by creating a CampaignAsset with the fieldType set to LEAD_FORM.
After attaching your lead form, it’s crucial to confirm that lead data flows correctly by testing and validating submissions in your CRM.
Confirming Lead Data Flow
Attaching the lead form is just the beginning - you also need to verify that lead submissions are being delivered to your endpoint. Use the "Send test data" feature in the lead form editor to ensure you receive an HTTP 200 response. Then, manually check your CRM to confirm that the test payload has been parsed correctly.
The test payload will include a field labeled "is_test": true, which makes it easy to differentiate test data from actual leads. If the test fails, you may encounter Error state C (no response from your endpoint) or Error state D (your endpoint returned a 4XX or 5XX error code instead of 200). These errors indicate issues with endpoint accessibility and should be addressed. Once the test lead appears in your CRM with all fields correctly mapped, your lead form is ready to handle real customer submissions.
Testing and Monitoring Performance
Using Google Ads Testing Tools
Google Ads provides a handy test tool within the lead form builder to verify your webhook endpoint. By clicking "Send test data", a sample JSON payload is sent to your configured endpoint, allowing you to confirm that everything is functioning as expected. Once this test data is sent, check your CRM to ensure the payload is correctly parsed and mapped to the appropriate fields. Notably, the test lead will include "is_test": true in the JSON payload, making it easy to identify. If the test doesn't go as planned, error messages may point to issues such as endpoint inaccessibility. For more direct testing, developers can also use command-line tools to interact with the endpoint.
For additional validation, the Google Ads API offers a validate_only field. This feature checks if your request is properly structured and compliant with policies without actually executing the command. It’s a great way to ensure your integration logic is solid before going live.
Once basic connectivity is confirmed, the next step is monitoring lead quality and submission metrics to gauge performance.
Tracking Lead Quality and Metrics
After successful testing, it's crucial to keep an eye on key metrics to maintain performance. The lead_id field acts as your primary key for deduplication, helping you avoid duplicate entries in your CRM and enabling you to reference specific leads when troubleshooting with Google. Additionally, the lead_submit_time field helps you track submission patterns and response times.
To ensure the authenticity of incoming data, always verify the google_key included in each POST request against your configured key. It's also wise to configure your JSON parser to ignore unrecognized fields, as Google may introduce new optional fields over time. Strict parsers could break if they encounter unexpected data. Keep an eye on HTTP response codes from your webhook endpoint - while a 200 response signals success, 5XX errors should be treated as retryable issues.
Before scaling up, start with a small pilot campaign to confirm that your CRM can handle live leads seamlessly. And if your webhook integration encounters problems, don't worry - leads won't be lost. You can manually download them as a CSV file from the Google Ads UI. To troubleshoot further, use tools like the Enhanced Conversions for Leads Diagnostics Report, which highlights issues like tags not firing or missing personally identifiable information (PII). The Conversions Diagnostics Tab offers a broader, account-level view of conversion actions and their statuses.
| Field Name | Purpose | Recommended Action |
|---|---|---|
lead_id |
Deduplication & troubleshooting | Use as the primary key to prevent duplicate entries in your CRM |
lead_submit_time |
Performance tracking | Monitor submission trends and measure response times |
google_key |
Security validation | Verify against your configured key to ensure authenticity |
is_test |
Data filtering | Exclude from production metrics for cleaner reports |
Conclusion
To implement the Google Ads Lead Form API, start by creating high-converting lead forms, setting up field validations, integrating a secure webhook, and thoroughly testing the connection. These forms simplify lead generation by using pre-filled user data from Google accounts, allowing for quick, one-tap submissions - a vital feature considering that 96.3% of mobile users interact with optimized experiences.
This setup doesn’t just make lead capture easier - it also improves performance significantly. The standout feature is real-time data synchronization, which ensures immediate access to leads. This is crucial since businesses that contact leads within five minutes are 21 times more likely to qualify and convert them. For industries with competitive lead costs, this rapid response can dramatically improve ROI.
Another key advantage is improved data accuracy and lead quality. The lead_id field helps eliminate duplicate entries in your CRM, while the google_key verifies the data’s authenticity. Additionally, advanced qualification options allow you to screen prospects before they enter your sales pipeline, ensuring better-quality leads.
"By setting up a webhook integration, you can automatically send leads from lead form extensions to your customer relationship management (CRM) system." - Google Ads Help
To get started, run a small pilot campaign to confirm your CRM processes live leads correctly. If you need help scaling, consider expert form strategies to optimize your conversion and routing. Once verified, scale your campaigns confidently. And if any issues arise, you can still download leads as a CSV file for up to 30 days, providing a reliable backup option.
FAQs
What fields are included in the webhook payload?
The webhook payload for Google Ads lead form extensions contains several important fields, including lead_id, campaign_id, gcl_id, and user_column_data. The user_column_data array is particularly useful as it captures user details like name, phone number, email address, and postal code. Additionally, fields such as submission ID and the date/time of submission are included, providing a complete set of lead information.
How can I prevent duplicate leads in my CRM?
To keep duplicate leads out of your CRM while using Google Ads Lead Form Extensions, try these approaches:
- Add Unique Identifiers: Use a field like an email address or a custom ID to match new leads with existing records.
- Validate via Webhook: Set up your webhook to compare incoming lead data against your CRM's records before adding it.
- CRM Deduplication Rules: Adjust your CRM settings to flag or update duplicate entries based on shared details like phone numbers or email addresses.
Why am I not receiving real leads after a test?
If you’re not getting actual leads, start by double-checking that your webhook is set up properly and that your CRM is handling lead data correctly. Use the test button in Google Ads to send a sample payload and ensure everything is functioning as it should. Make sure your lead form is connected to your campaign and is actively collecting submissions. Also, look out for potential issues like webhook errors, mismatched schemas, or CRM limitations that could be blocking the data.
Related Blog Posts
Get new content delivered straight to your inbox

The Response
Updates on the Reform platform, insights on optimizing conversion rates, and tips to craft forms that convert.


Drive real results with form optimizations
Tested across hundreds of experiments, our strategies deliver a 215% lift in qualified leads for B2B and SaaS companies.
