
.webp)
7 HubSpot Progressive Profiling Examples



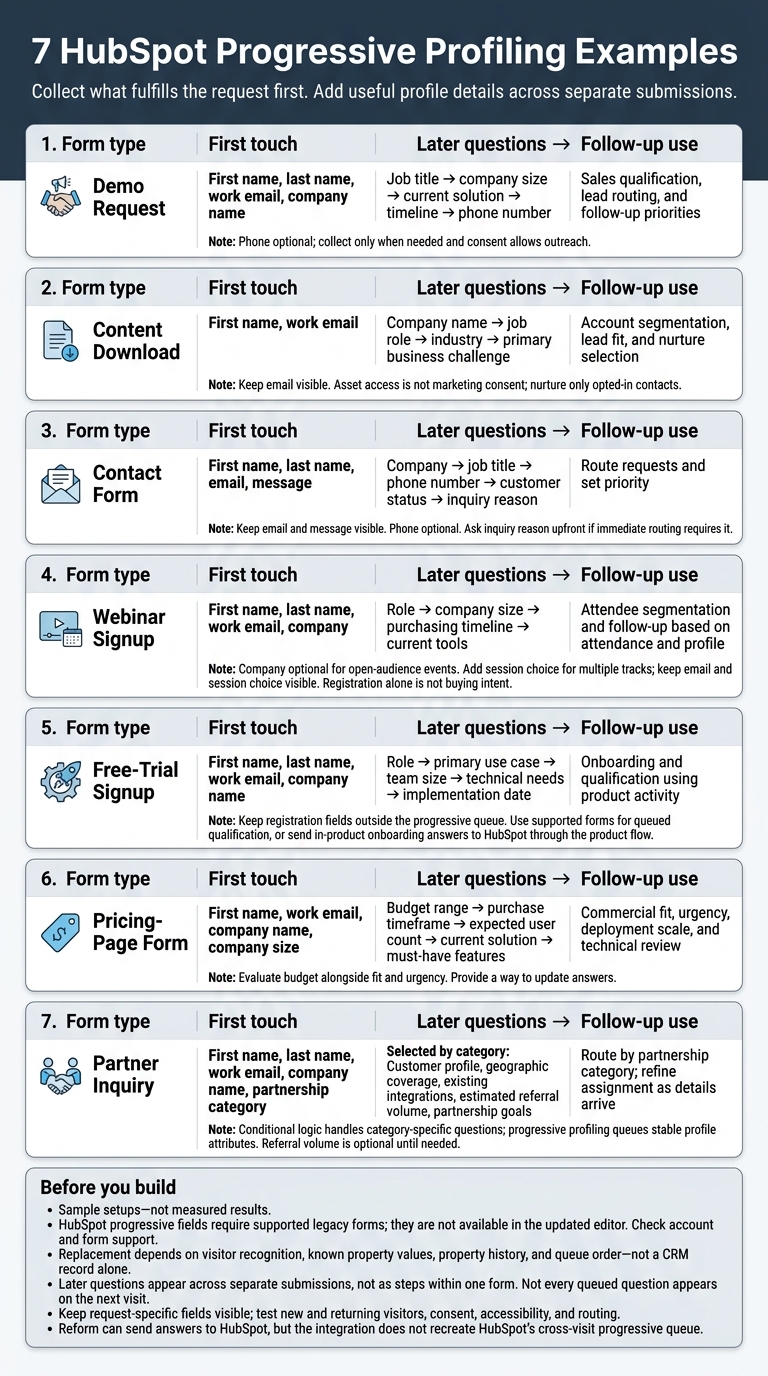
I start with the fields needed to fulfill a request, then ask returning contacts for more details. HubSpot’s progressive profiling supports this across separate submissions - not steps within one form.
These 7 sample setups show how I’d put that approach to work:
- Demo requests: Collect contact details first; ask sales qualification questions later.
- Content downloads: Start with name and email; add role, industry, and business challenges.
- Contact forms: Keep email and message visible; collect profile details over time.
- Webinar signups: Collect registration details first; add questions for attendee follow-up.
- Free trials: Start with account details; collect use case and technical needs during onboarding.
- Pricing-page forms: Check basic company fit first; ask about budget, timing, and features later.
- Partner inquiries: Route by partnership category; collect matching partner details afterward.
Before building, I check <u>legacy-form support, high-converting lead form principles, and visitor recognition</u>, then test field order, consent, and routing. Reform can send answers to HubSpot, but that connection doesn’t recreate HubSpot’s cross-visit question queue. These are sample builds, not measured results.
7 HubSpot Progressive Profiling Examples
How Progressive Profiling Works in HubSpot
Known Fields and Queued Questions
In a legacy form, arrange queued progressive fields in the order you want HubSpot to ask them. Open Queued progressive fields and drag the questions into place. HubSpot can replace an initial field set to Replace with queued progressive field when it recognizes the contact and already knows that field’s value.
The queue moves forward across submissions, so a returning contact may see a different question next. Which question appears depends on the queue order and whether the property has - or has ever had - a value. Property history matters: clearing a value won’t reliably reset your test.
These rules determine which fields change in the examples below.
Progressive Profiling, Multi-Step Forms, and Conditional Logic
These tools serve different purposes. Choose based on when you need to collect the data.
| Approach | Trigger | Collection timing | Appropriate use |
|---|---|---|---|
| Progressive profiling | Recognized contact has a known field value | Across submissions | Add data to records without asking for the same answers |
| Multi-step form | Visitor advances to the next step | During one submission | Break one form into steps |
| Conditional logic | Answer or field value meets a rule | During the current interaction | Show fields based on answers |
Keep these differences in mind when reviewing the sample setups that follow. HubSpot treats them as separate form behaviors, so check that your form supports the features you need before publishing.
Account Support and Visitor Recognition
Check both your subscription and form editor. HubSpot’s documentation lists progressive fields as a legacy-form feature; they aren’t available in the updated editor. The Always create contacts for new email address setting also prevents their use. Review Pre-populate fields with known values to check how stored data affects which fields appear.
HubSpot recognizes visitors through a prior form submission and a tracked browser cookie - not a website visit alone. That recognition determines whether it shows the next queued question or repeats the initial fields. Using another browser or device, browsing in a private session, or clearing cookies can reset recognition. A CRM record alone doesn’t trigger recognition.
Test with a new visitor, a recognized contact with partial data, and a recognized contact with all initial fields completed. Then repeat those tests in a separate browser.
sbb-itb-5f36581
1. Demo Request Form
First-Touch Fields
Start with first name, last name, work email, and company name, followed by a Request a demo button. These fields identify the contact and let your team follow up right away. Save deeper qualification for later.
Returning-Contact Fields
After the first conversion, ask questions that help sales qualify the lead. Queue them in this order: job title → company size → current solution → timeline → phone number. Make phone number optional, or leave it out unless your follow-up process includes phone outreach.
Progressive-Field Setup
Order queued questions by sales priority, not form length. Map each question to a HubSpot contact property, and keep email first so the submission links to the CRM record. Mark the name and company fields for progressive replacement.
Add the questions under Queued progressive fields in the order above so qualification comes after the first request.
Lead Routing and Follow-Up
On submission, trigger a confirmation, lead routing, and a sales task - even if qualification isn't complete. Use company size, timeline, and current solution to route leads, set follow-up priorities, and shape the next touch, including the sales conversation.
For example, company size can route larger organizations to an enterprise queue and smaller companies to a commercial queue.
Collect phone numbers only when consent allows outreach.
Use this pattern for high-intent forms: ask just enough upfront to record intent, then collect qualification details on return visits. The next example reduces the upfront burden for content offers.
2. Content Download Form
First-Touch Fields
Ask for First name and Work email. Require email and map it to HubSpot’s Email property. Use a clear download CTA and provide the resource immediately. Include the required consent language: accessing an asset does not mean consenting to marketing.
Returning-Contact Fields
Queue company name → job role → industry → primary business challenge for later downloads. Use existing contact data to determine which unanswered question appears next.
Progressive-Field Setup
In HubSpot’s form editor, set first name to Replace with queued progressive field. Add the later questions under Queued progressive fields, and keep email visible as the contact identifier.
Use the same properties and standardized dropdown values across all download forms to keep the data consistent. Test with a partially completed contact record to check that the form skips known answers.
Lead Routing and Follow-Up
Use company name for account segmentation. Use role, industry, and business challenge to assess lead fit and choose a nurture track. Track each asset as a separate engagement signal.
Notify sales only when a contact meets your qualification criteria. Enroll only opted-in contacts in nurture.
The next example shows how to keep a general contact form short while still collecting the details you need.
3. Contact Form
First-Touch Fields
Start with First name, Last name, Email, and Message. Add short helper text and give visitors enough room to explain their request. Keep Message required in most cases so returning contacts can share a new question.
Returning-Contact Fields
Queue company, job title, phone number, customer status, and inquiry reason, in that order. Make phone optional. For customer status, use options such as Prospect, Customer, Former customer, and Partner.
Progressive-Field Setup
Map each question to its HubSpot property, then add secondary fields to the progressive queue. Keep Email and Message outside the queue so Message appears on every submission. Use the added answers to route requests and set their priority.
Lead Routing and Follow-Up
If a request needs immediate assignment, ask for inquiry reason on the first submission. Offer options such as Sales, Support, Billing, Partnerships, and Other. Use conditional logic to show an account number field for support requests and a product interest field for sales requests.
Send support requests to support, billing requests to billing, and partner inquiries to partnerships. Confirm which team will receive the request and when the contact can expect a response. This keeps the form short while sending each request to the right team.
4. Webinar Signup Form
First-Touch Fields
Ask for First name, Last name, Work email, and Company. HubSpot’s webinar-registration guidance lists First name, Last name, and email as required fields for supported webinar integrations. Keep Company optional for open-audience events. For events with multiple sessions or tracks, add a session choice.
Returning-Contact Fields
After the registration fields, ask only for profile details that help you segment attendees. Queue role, company size, purchasing timeline, and current tools, in that order. Use controlled choices to keep the data clean.
Timeline options can include Researching, Within 3 months, Within 6 months, and No active project.
Progressive-Field Setup
Keep work email and session choice visible. Queue only the profile fields you plan to reuse across future forms.
Lead Routing and Follow-Up
Send every registrant a confirmation. After the webinar, use attendance, role, timeline, and tools to decide who gets which follow-up.
Use Within 3 months to trigger a sales review. Notify account owners when someone from a target account registers, and send No active project contacts educational follow-up. Tailor messages by role and tools.
Send non-attendees the recording. Registration alone doesn’t show buying intent.
Use the same pattern when a form also signals product interest, such as a free trial.
How to Set Up Progressive Fields in HubSpot Forms | HubSpot How To's with Neighbourhood
5. Free-Trial Signup Form
Free trials work best with a short signup form. Save qualification questions for onboarding.
First-Touch Fields
Start with First name, Last name, Work email, and Company name to create the account. Collect passwords only during secure product registration.
Returning-Contact Fields
After signup, ask for role and primary use case. Then collect team size, technical needs, and implementation date.
Technical needs can include API access, integrations, or single sign-on. Implementation date choices can include Immediately, Within 30 days, Within 90 days, and Later.
Progressive-Field Setup
Map each answer to its own HubSpot property. Leave initial registration fields outside the progressive queue. On supported forms, queue qualification fields in the order shown above. For in-product onboarding, send those same answers to HubSpot through your product flow.
Once the form is live, use users’ first product actions to continue qualification.
Lead Routing and Follow-Up
Trigger onboarding with the trial-start event, then use product activity to qualify contacts.
Engagement signals include completing setup, connecting an integration, inviting teammates, or using a core feature.
Work with sales and customer success to define qualified-lead criteria. Track activation, trial-to-paid conversion, and completion of later prompts to check whether profiling helps qualify contacts.
Route highly engaged contacts with urgent implementation needs to sales or a solutions consultant. Send activated users relevant onboarding content, and give users with incomplete accounts guidance to finish setup.
6. Pricing-Page Form
Pricing-page forms should qualify high-intent visitors without getting in the way of their purchase research.
First-Touch Fields
Start with First name, Work email, Company name, and Company size. A Company size dropdown helps check account fit without asking visitors for purchase details on their first visit.
Returning-Contact Fields
Queue budget range, purchase timeframe, expected user count, current solution, and must-have features for returning contacts.
Progressive-Field Setup
Put these later questions in Queued progressive fields. Use dropdowns for budget and timeframe, a number field for user count, and multiple checkboxes for must-have features.
Include an update link or follow-up form so contacts can revise their budget, timing, user count, current solution, and feature needs.
Lead Routing and Follow-Up
Collect identity details first, then check commercial fit on return visits. Evaluate budget alongside fit and urgency - not on its own. Any budget brackets used for qualification are sample ranges, not product prices. If a contact needs features the product doesn't support, route them to a product-fit or technical review rather than pushing for a sale.
| Field timing | Intent signal | Sales action |
|---|---|---|
| First touch: name, work email, company, and company size | Identifiable business contact and basic fit | Create or update the contact, link it to the company record, and assign the appropriate segment |
| Returning: budget range | Commercial potential | Compare budget with actual deal sizes |
| Returning: purchase timeframe | Urgency | Prioritize Within 30 days; nurture 6–12 months |
| Returning: expected user count and current solution | Deployment scale and migration needs | Assign the appropriate representative and prepare discovery questions |
| Returning: must-have features | Product fit | Send relevant guidance or arrange a technical review |
The next example applies the same progressive approach to partner referrals.
7. Partner Inquiry Form
First-Touch Fields
Use this form when the inquiry type determines which questions come next. Collect First name, Last name, Work email, Company name, and Partnership category. For the category dropdown, offer Referral, Technology integration, Agency, and Co-marketing.
Returning-Contact Fields
Queue questions about customer profile, geographic coverage, existing integrations, estimated referral volume, and partnership goals based on the inquiry category. Ask for referral volume per month or quarter, and leave it optional until you need it.
Progressive-Field Setup
Start with the inquiry category, then branch the remaining questions. Map each answer to a HubSpot property. Add stable attributes, such as customer profile and geographic coverage, to Queued questions so returning contacts see the next question they haven’t answered.
Use conditional logic to ask questions that fit each category:
- Referral: Referral process and volume.
- Technology integration: Integration method and implementation timeline.
- Agency: Services and client profile.
- Co-marketing: Campaign goals and distribution channels.
Check whether your editor supports conditional logic and form customization.
Lead Routing and Follow-Up
Route the first submission by category: referral inquiries go to a channel-partnership manager, technology inquiries to integrations or business development, agency inquiries to the agency-partner team, and co-marketing inquiries to a marketing-partnership manager.
Update the assignment as geographic and qualification details come in. Send a confirmation, create a task that includes the submitted answers, and follow up with documentation or program requirements.
HubSpot Progressive Profiling Setup Checklist
Use this checklist to get the seven sample forms above ready to publish in HubSpot. Run the same launch checks for each form.
Map Fields to Properties and Follow-Up Actions
Start with the minimum fields for each conversion:
- Email for downloads, webinars, and pricing-page forms.
- Email and company for demos, free trials, and partner inquiries.
- Email and message for contact forms.
Add only what you need to fulfill the request, and map each field to a HubSpot contact property. Keep request details visible. Queue only profile fields that help with segmentation, qualification, or routing, and connect answers to routing, nurturing, or task creation.
Test New and Returning Visitors
Test the form as both a new visitor and a returning contact. Check field replacement, queue order, required fields, saved answers, and follow-up routing.
Review Consent, Accessibility, and Mobile Use
Check consent for each submission and display the correct consent controls. Use clear labels and validation messages. Confirm that visitors can navigate with a keyboard and use the form on mobile.
Track Completion Rates and Lead Quality
After launch, track completion rate and lead quality. Remove any question that hurts either measure, and use the live form’s results to refine the build in Reform.
Using Reform With HubSpot
Reform can give your team a branded form front end for HubSpot. Before building, connect your HubSpot account, map your fields, and check current Pro-plan availability. Reform supports multi-step forms, conditional routing, and HubSpot meeting calendar embeds. But those features don’t recreate HubSpot’s cross-visit progressive profiling.
Treat the integration as a data connection, not a progressive queue. Map fields to Contact, Company, or Deal properties, include an email field for matching, and confirm whether submissions create records or update existing ones. The goal is lead capture and conversion - not copying HubSpot’s native progressive queue.
Also, check whether the form recognizes someone before they submit, through email, cookies, login state, or another method. Updating a HubSpot contact after submission doesn’t prove the form recognized that person beforehand. HubSpot’s native queue uses stored property history; a Reform connection doesn’t reproduce that behavior.
Check attribution separately. Enable tracking and add reform.app to HubSpot’s analytics tracking site domains. With that setup, keep forms short and let HubSpot handle the rest of the lead record.
Conclusion: Start With the Fields You Need
Across these seven forms, give every field a job. Ask for email first, then collect only what you need to identify the contact and qualify the lead. Save extra questions for answers that guide a specific follow-up, such as lead routing, budget qualification, or product interest.
Keep request-specific questions visible when they affect the next step.
Test one form with both new and returning visitors. Then remove any question that hurts completion, routing accuracy, or lead quality.
FAQs
Can I share a progressive field queue across forms?
Yes. Use your CRM as the central source of truth and map your forms to the same CRM properties.
Before a form loads, the system checks the contact’s CRM record. If a field already has a value, the form hides that question and shows a new one instead. That way, information collected through one form carries over to your other forms.
How do I profile leads who never return?
Gather as much useful information as possible during the first interaction. You can’t count on repeat visits to build a profile over time, so use multi-step forms to collect the data you need in one session without overwhelming users.
Abandoned submission capture saves partial data when users leave before finishing a form. Lead enrichment tools can also add firmographic details automatically, using a user’s email domain or website to fill gaps in their CRM profile.
How many progressive questions should I ask per visit?
There’s no fixed number of form fields. Ask only for what you need to meet your immediate goal so people have less work to do. Start with email and first name. Add company details or qualifying questions as the relationship grows or someone shows more interest, such as requesting a demo or pricing.
Fewer fields can improve completion rates. Use conditional logic to show only questions that apply based on previous interactions.
Related Blog Posts
Get new content delivered straight to your inbox

The Response
Updates on the Reform platform, insights on optimizing conversion rates, and tips to craft forms that convert.




Drive real results with form optimizations
Tested across hundreds of experiments, our strategies deliver a 215% lift in qualified leads for B2B and SaaS companies.
