
.webp)
Journey Builder Entry for Form Leads



A form submission doesn’t automatically put a lead into Journey Builder. I choose the entry path based on how soon you need follow-up and where your eligibility data lives:
- API events: For demo requests and trial signups that need near-real-time entry after validation.
- Data extension entry: For scheduled batches that need consent checks, qualification, or enrichment first.
- Synchronized CRM audiences: For CRM-led campaigns. Sync and filter records, then load a sendable entry data extension.
- Post-entry routing: For deciding what happens after admission - not for bringing leads in.
Quick Comparison
| Approach | Timing | Data needed | Entry and repeat submissions | Main checks |
|---|---|---|---|---|
| API events | Near real time; no fixed guarantee | Valid payload and stable contact key | Validate eligibility; deduplicate retries | Credentials, responses, admission |
| Data extension entry | Load and evaluation schedule | Sendable entry table | Check filters, evaluation mode, and re-entry | Loads, rejected rows, schedule |
| CRM-synced audience | Sync, query, and evaluation timing | CRM identity and eligibility fields | Filter synced records; prevent duplicate admissions | Sync delays, relationships, query results |
| Post-entry routing | After admission and any waits | Routing fields and activity data | Uses the journey’s re-entry rules | Branches, consent, exits, failed activities |
Before launch, I check identity, consent, duplicate handling, and actual submission-to-send timing. <u>An accepted request or successful load is not proof of journey entry.</u>
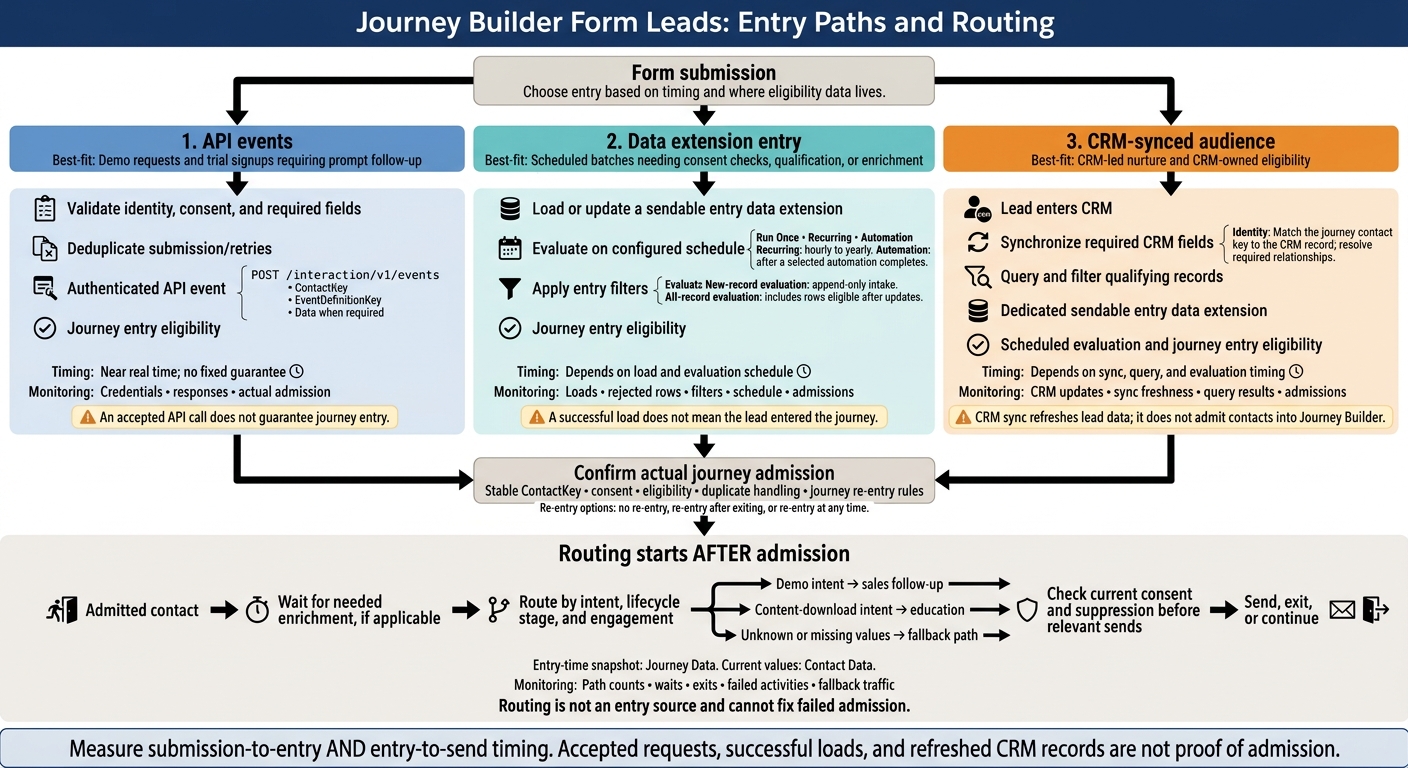
Journey Builder Form Leads: Entry Paths and Routing
1. API Events
Entry Speed and Data Timing
For immediate entry, send the event only after validation and once identity, consent, and routing fields are present. An accepted API call does not guarantee journey entry: processing and send settings can still cause delays. Don’t promise a fixed response time.
Integration and Data Requirements
Use a Salesforce Marketing Cloud installed package with an API Integration component to get an OAuth access token. Keep credentials server-side and send an authenticated JSON request to POST /interaction/v1/events.
Include ContactKey, EventDefinitionKey, and Data when the event requires attributes. For UTF-8 content, use Content-Type: application/json; charset=UTF-8. Match payload field names and types to the target data extension’s schema.
Map ContactKey to a durable CRM or business identifier - not a new form-session ID. Store the exact EventDefinitionKey in environment-specific config, and don’t use periods in the key.
Entry Rules, Routing, and Re-entry
Validate submission-time requirements before calling the API. Then use entry filters to enforce eligibility and journey splits to route contacts.
Choose no re-entry, re-entry after exiting, or re-entry at any time based on the workflow. Before submission, store an ID that identifies that submission alone so retries and duplicate clicks don’t create duplicate entries.
Monitoring and Error Handling
Log the contact key, event key, submission ID, timestamp, HTTP status, and sanitized error details. Reject malformed payloads and retry transient failures with bounded exponential backoff.
A timeout can happen after acceptance, so enforce deduplication before resending. Before launch, test consent exclusions, duplicate submissions, expired credentials, data extension writes, admission, and routing - not just the REST response.
sbb-itb-5f36581
2. Data Extension Entry
Entry Speed and Data Timing
Use data extension entry when the form should wait for processing. If leads don’t need to enter in real time, load them into a sendable data extension and evaluate them on a schedule.
Run Once runs at activation or at a specified date and time. Recurring runs on a schedule ranging from hourly to yearly. Automation runs after a selected Automation Studio automation completes. Salesforce provides no fixed latency guarantee.
Integration and Data Requirements
Use a sendable data extension with a send relationship that maps a stable lead identifier to Contact Key. Include the required channel address, consent fields, personalization attributes, and values needed by downstream activities.
To combine data from multiple data extensions, use a SQL Query Activity. The automation must directly load or update the entry data extension. This approach works best when the form data lands in a table first and enters Journey Builder later.
Entry Rules, Routing, and Re-entry
Prepare a focused audience, then use entry filters to check consent and qualification. New-record evaluation fits append-only intake. All-record evaluation also includes rows that become eligible after updates. New-record detection compares the current data extension with the previous evaluation. Keep entry eligibility separate from the journey’s re-entry settings.
With Overwrite, every row in the data extension looks new at the next evaluation. With Add and Update, added rows count as new, but updated rows may not. Test the update method, evaluation mode, and re-entry settings before allowing repeat submissions in production.
Monitoring and Error Handling
A successful load doesn’t mean the lead entered the journey. Track loads, filter matches, rejects, duplicates, and admissions. Investigate evaluations with zero eligible rows or spikes in admissions.
Store invalid rows in an exception data extension, fix them, and check eligibility again before reprocessing. Before activation, verify the schedule’s time zone and first-run time. Don’t change the entry data extension structure after launch; the live journey may not pick up added fields.
If the lead source already lives in CRM, route it through that system before admitting it to Journey Builder.
3. Synchronized CRM Audiences
Entry Speed and Data Timing
If a B2B or SaaS form lead enters CRM first, sync it before Journey Builder checks entry eligibility. CRM sync refreshes lead data; it does not admit contacts into Journey Builder. Use this path for CRM-driven nurture after sync - not immediate form follow-up. Field selection and sync timing are the main setup decisions.
Integration and Data Requirements
Sync only the fields needed for eligibility, personalization, routing, and measurement.
Before launch, confirm that the journey contact key matches the CRM record created from the form. Contact Builder derives synced-object relationships from CRM relationships. You cannot change those relationships after setup.
Query the synced data into a dedicated sendable entry data extension.
Entry Rules, Routing, and Re-entry
Apply entry rules after sync and segmentation. In the query, check lifecycle stage, ownership, campaign membership, and suppression. Use an immutable submission or campaign ID to prevent duplicate admissions.
Copy routing fields into the entry table to preserve an entry-time snapshot. When routing needs to reflect later sync changes, use related Contact Data instead. Match audience selection to the re-entry rule.
Monitoring and Error Handling
Track CRM updates, sync freshness, query results, and journey admissions separately. UI row counts update on a display interval, not in real time.
Before launch, test representative Lead and Contact records, including records with missing or changed associations. Measure the delay from form submission to journey entry, too.
4. Journey Routing After Entry
Entry Speed and Data Timing
Once a lead enters through API, a data extension, or a CRM-synced audience, routing determines where it goes next. Routing starts after entry. Add a short wait after API intake so enrichment data can arrive before Decision Splits evaluate the lead.
Then route by intent, lifecycle stage, and engagement.
Integration and Data Requirements
Standardize routing fields such as FormIntent, CustomerStatus, LeadScore, TrialStage, and ExpansionInterest. Include an explicit unknown value so incomplete data has a defined path.
Entry Rules, Routing, and Re-entry
Route demo intent toward sales follow-up and content-download intent toward education. Use lifecycle stage to distinguish acquisition, trial onboarding, adoption, and expansion follow-up.
Use Engagement Splits for message interactions. After a wait, use activity data to separate contacts who opened, clicked, logged in, or completed a target action from those who didn’t. Give missing or unrecognized values a fallback path.
Check current consent before relevant sends. Apply suppression and publication lists rather than relying only on entry-time consent. Set goals or exit criteria to stop outdated nurture when lifecycle status changes. Align exit criteria with re-entry rules to prevent duplicate enrollment, and add source-side deduplication for repeat submissions.
Monitoring and Error Handling
Track entry counts, path counts, wait states, exits, failed activities, and fallback traffic. Before publication, test every branch, along with changed consent, delayed scoring, overlapping enrollment, repeated submissions, and invalid or unmapped intent values.
If a contact takes the wrong path, fix the source record, deduplicate the event, and resubmit through the approved path instead of manually re-entering the contact.
Journey Builder API Entry Event in Salesforce Marketing Cloud
Compare Timing, Data Needs, Entry Rules, and Reliability
Choose from three entry sources first to create high-converting lead forms. Routing comes after admission. It’s a separate layer, not another way for contacts to enter.
Entry Speed and Data Timing
| Approach | Timing dependency |
|---|---|
| API events | Fastest path, though validation and platform processing still apply. |
| Data extension entry | Depends on the load and evaluation schedule. |
| Synchronized CRM audiences | Depends on how current the sync data is, not when the form was submitted. |
| Routing after entry | Depends on admission, waits, and downstream processing. It doesn’t speed up entry. |
API events: Demo requests, contact-sales requests, and trial activation requiring submission-specific context.
Data extension entry: Webinar attendee imports, MQL imports, and scheduled nurture.
Synchronized CRM audiences: Trial conversion and account-based lifecycle campaigns where CRM status is authoritative.
Routing after entry: Onboarding follow-up after activation or webinar reminders after registration.
Integration and Data Requirements
| Approach | Data readiness | Identity and context |
|---|---|---|
| API events | A server-side authenticated event call that matches the target schema. | A stable contact key, submission context, and source event ID. |
| Data extension entry | A sendable data extension with stable field types. | Consistent identity mapping across loads. |
| Synchronized CRM audiences | An authorized CRM connection and the objects needed for segmentation. | A CRM person ID. Account-based campaigns also need account context. |
| Routing after entry | Fields that journey activities can access. | Entry-time Journey Data versus current Contact Data. |
Entry Rules, Routing, and Re-entry
| Approach | Eligibility | Duplicate and re-entry policy |
|---|---|---|
| API events | Validate identity, required attributes, and consent before admission. | Deduplicate by source event ID. Handle new submissions differently from retries. |
| Data extension entry | Entry filters determine which loaded records qualify. | Choose whether updates can qualify again. |
| Synchronized CRM audiences | Resolve CRM relationships before admitting contacts from the audience. | Match by CRM ID, not email, and deduplicate repeated event rows. |
| Routing after entry | Routing can’t admit contacts or fix failed entry criteria. | Follows the journey’s re-entry policy, not a separate admission rule. |
Monitoring and Error Handling
Each source fails differently - and needs a different fix.
| Approach | Failure signal | Source-specific fix |
|---|---|---|
| API events | Response codes or uncertain acceptance. | Correct rejected requests and deduplicate before replay. |
| Data extension entry | Load/query failures or rejected rows. | Keep rejected rows for correction and re-evaluation. Verify evaluation eligibility. |
| Synchronized CRM audiences | Stale sync data or missing relationships. | Repair and rebuild. Don’t treat stale sync data as a complete audience. |
| Routing after entry | Activity failures or unexpected message outcomes. | Fix the downstream activity, not the entry event. |
Track source_event_id, contact_key, received_at, processed_at, status, error_code, and retry_count. Use different fixes for API rejection, import rejection, and pending CRM sync.
Pros, Cons, and Prelaunch Checks
Compare the tradeoffs below, then use the checklist to test your chosen path.
| Approach | Pro | Con |
|---|---|---|
| API events | Fast follow-up triggered by submissions. | Requires OAuth upkeep, payload validation, retry handling, and event-definition maintenance. |
| Data extension entry | Batch control allows review and enrichment before admission. | Adds scheduled delays and evaluation-mode complexity. |
| Synchronized CRM audiences | Account, owner, and lifecycle context helps align campaigns with sales. | Relies on up-to-date synchronization, identity matching, and correct contact relationships. |
| Post-entry routing | Adjusts follow-up based on form answers and lead attributes. | Can conflict with overlapping journeys or sales processes. |
Post-entry routing is separate from entry methods. Once you understand the tradeoffs, test your chosen path against these release checks.
Treat these checks as release gates, not setup notes.
- [ ] Forms and routing: Test every branch, blank answer, unexpected value, and fallback. Check messages, waits, notifications, exits, and cross-journey conflicts.
- [ ] OAuth and responses: Check credentials, permissions, token renewal, retries, and rejection handling. Form success means accepted or queued - not confirmed journey entry.
- [ ] Payloads and sendability: Check field names, types, required values, consent fields, and timestamps against the event schema. Confirm entry data extension sendability and contact key mapping.
- [ ] Identity, synchronization, and filters: Trace one stable contact key across the form, CRM, and Marketing Cloud. Confirm that required CRM fields arrive before evaluation and that filters exclude ineligible records.
- [ ] Duplicates and re-entry: Test first submissions, repeat submissions, resubmissions while active, resubmissions after completion, double-clicks, and API retries.
- [ ] Consent and suppression: Check promotional permission separately from transactional permission. Also verify global unsubscribe, publication-list, business-unit, and campaign suppression.
- [ ] Diagnostics and recovery: Submit one valid and one invalid payload. Check entry diagnostics, contact history, path, and send status.
- [ ] Timing and versioning: Measure submission-to-entry and entry-to-send delays, including sync and batch waits. Assign rollback owners for schema, event-definition, filter, and journey changes.
Before changing a shared event definition, check every journey that uses it. For breaking schema changes, test a new event version before moving traffic.
Conclusion: Choose Entry Based on Timing and Data
Choose your entry method based on how soon leads need to enter and which system owns the eligibility fields. Weigh speed, data ownership, and the work needed to maintain each approach.
| Business requirement | Recommended approach |
|---|---|
| Prompt admission | API events |
| Scheduled batches | Data extension entry |
| CRM-owned eligibility | Synced CRM audience, then query qualifying records into a sendable entry data extension |
| Post-entry routing for admitted contacts | Post-entry routing, added to the entry method - not a replacement for it |
Before activation, approve field mappings, consent, suppression, and one reliable ContactKey across systems. If leads don’t need immediate admission and API upkeep takes too much work, choose controlled batch entry. Measure actual timing rather than promising instant delivery.
FAQs
Can I combine API entry with CRM-based routing?
Yes. If native integrations can’t handle your routing rules, a custom API or middleware can process, enrich, and score leads before they reach your CRM.
Reform can collect form data and trigger these workflows. Leads can then be routed by territory, company size, or intent before CRM records are created or updated. You control the processing across multiple systems while keeping data clean for your sales team.
How do I handle leads who submit multiple forms?
Use an upsert strategy with a unique identifier, such as an email address, as your primary matching key. Check whether a record exists before creating one. If you find a match, fill only empty fields or update fields that need changes - don’t overwrite other existing data.
Assign an idempotency key to each submission so repeated requests count as the same action. This prevents duplicate entries caused by retries or accidental double-submissions.
Why was my form lead accepted but not admitted?
A form lead can be saved in your CRM without entering a journey. CRM acceptance doesn’t mean the lead meets Journey Builder’s entry requirements.
Check the field mapping, including hidden fields such as the event key or SubscriberKey. Validate email addresses and phone numbers, confirm that the API payload matches the expected schema, and review the journey entry filters.
Then check the logs to see whether the record was saved but failed to meet the entry requirements.
Related Blog Posts
Get new content delivered straight to your inbox

The Response
Updates on the Reform platform, insights on optimizing conversion rates, and tips to craft forms that convert.



Drive real results with form optimizations
Tested across hundreds of experiments, our strategies deliver a 215% lift in qualified leads for B2B and SaaS companies.
