
.webp)
Ultimate Guide to CRM Integration Planning



If your CRM handoff is not mapped before launch, leads slip, reports drift, and sales loses time.
I’d sum up CRM integration planning like this: set clear goals, define who owns what, map your data, lock in routing rules, and test the full lead path before go-live. The article shows how to move from form submission to CRM record, owner assignment, alerts, and reporting without leaving gaps.
Here’s the full article in plain terms:
-
Start with business goals
- Track things like sync rate, required-field completion, assignment time, and MQL-to-SQL conversion
- Use those numbers to judge whether the setup works after launch
-
Set scope early
- Include forms, landing pages, marketing automation, and the CRM
- Agree on lifecycle stages like New, MQL, SAL, SQL, Opportunity, Closed-Won, Closed-Lost, and Recycled
-
Assign ownership
- Marketing handles form setup and source tracking
- Sales or RevOps handles routing, lifecycle rules, and CRM control
- IT or Engineering handles APIs, webhooks, security, and monitoring
-
Map the data model before building
- Define lead, contact, account, and deal objects
- Document every field’s source, destination, type, default value, and transformation rule
- Set dedupe and governance rules before launch
-
Keep form inputs tight
- Ask only for data needed for qualification and routing
- Use dropdowns for fields like region, industry, and company size to avoid messy entries
-
Validate and enrich at the form level
- Stop bad emails and spam before records enter the CRM
- Add company or profile data after submit so forms stay short
-
Write routing as a step-by-step flow
- validate → enrich → dedupe → create/update record → assign owner → trigger alerts
- Include fallback rules for unmatched leads and failed payloads
-
Pick the integration method on purpose
- APIs, webhooks, or middleware each change control, timing, and risk
- If personal data moves between systems, keep that path documented and limited
-
Test before go-live
- Use sandbox submissions that mimic live leads
- Check duplicates, failed payloads, timestamps, owner assignment, and notifications
- Bring sales and marketing into UAT
-
Launch with a checklist and rollback plan
- Freeze major changes during launch
- Confirm owners, queues, alerts, and production form flow
- Document how to pause automation and switch to manual entry if needed
-
Review performance after launch
- Watch sync rate, duplicate rate, routing accuracy, assignment time, and form conversion rate
- Review results daily in week one, then again after 30 days
Bottom line: I’d treat CRM integration planning as a lead-management project first and a system setup second. When goals, field mapping, routing, and testing are written down up front, the CRM stays clean and handoffs stay on track.
10 Steps for Successful CRM Implementation
sbb-itb-5f36581
Define Goals, Scope, and System Ownership
Once the business outcome is clear, the next step is to set the rules for the integration: goals, scope, and owners. After that, define the data model and the handoff rules each team will manage.
Set Measurable Lead Management Goals
Goals like "improve lead quality" sound nice, but they don't give the team much to work with. You need targets you can track.
A solid starting point includes:
- Submission-to-CRM sync rate - the percentage of submissions that reach the CRM without errors, plus a set error threshold that triggers review
- Percentage of leads with complete required fields - a simple way to check data quality at the moment of capture
- Average lead assignment time - the time from submission to assignment, which becomes your SLA benchmark
- MQL-to-SQL conversion rate - the downstream sign that routing and qualification rules are doing their job
These metrics give your team something concrete to measure after launch. Without them, it's tough to tell whether the integration is working well or just quietly running in the background.
Define Systems, Lead Sources, and Lifecycle Stages
Phase 1 should cover website forms, landing pages, marketing automation, and the CRM.
Just as important, teams need to agree on lifecycle stage definitions before any technical work starts. If marketing and sales use different meanings for MQL, the data may look clean on the surface, but the handoff will still fall apart. Align on shared lifecycle stages - New, MQL, SAL, SQL, Opportunity, Closed-Won, Closed-Lost, Recycled - so every handoff follows the same rules.
Assign Ownership Across Marketing, Sales, and Technical Teams
When ownership is fuzzy, every new tool creates another place where things can go wrong. The best fix is simple: assign responsibility by domain before the build begins.
| Team | Owns |
|---|---|
| Marketing | Form strategy, source tracking |
| Sales / RevOps | Routing, lifecycle stages, CRM governance |
| IT / Engineering | APIs, webhooks, security, monitoring |
Write these responsibilities down. Don't leave them as a verbal agreement in a meeting that everyone half-remembers later. Clear documentation makes handoffs smoother and troubleshooting much faster when something breaks. With ownership in place, the next step is to map the CRM objects and fields each team will manage.
Design the CRM Data Model and Field Mapping
Once ownership is set, the next move is to define the data structure itself. Do this before you map form inputs or build automation rules. That structure keeps routing, reporting, and compliance rules lined up.
Define Objects, Stages, and Required Fields
Start by setting up the CRM objects that will store lead, contact, account, and deal records. From there, map the lifecycle stages and the fields your routing, reporting, and compliance rules rely on.
For regulated workflows, spell out how PII is handled and where verification outcomes are stored. If required fields are missing, the problem doesn’t stay small. It gets pushed downstream and increases the chance of errors.
Those required fields then become the starting point for form design and validation.
Create a Field Mapping and Transformation Document
Your field mapping document should tie every source field to its CRM destination field. For each one, record:
- source name
- destination field
- data type
- default value
- any transformation logic applied in transit
Keep this document up to date. Every mapping should be documented. Otherwise, direct links between systems can pile up technical debt as your stack expands.
"Technical debt in integrations grows faster than application-code debt because it spans multiple systems, each with their own release cycles, API versioning policies, and rate limits."
Plan Data Quality, Deduplication, and Governance Rules
Set deduplication rules before launch. Use identifiers like email addresses or platform-specific tracking tokens, and decide what should happen when a duplicate appears: merge it automatically or send it to manual review.
It also helps to treat the CRM as the single source of truth. That gives every team the same validated data and cuts down on sync conflicts. If your workflow moves PII between systems, make sure that path is intentional, documented, and limited to approved fields.
Use this model to decide which fields must be collected on the form and which ones can be filled through enrichment.
Plan Form Inputs, Enrichment, Routing, and Integration Logic
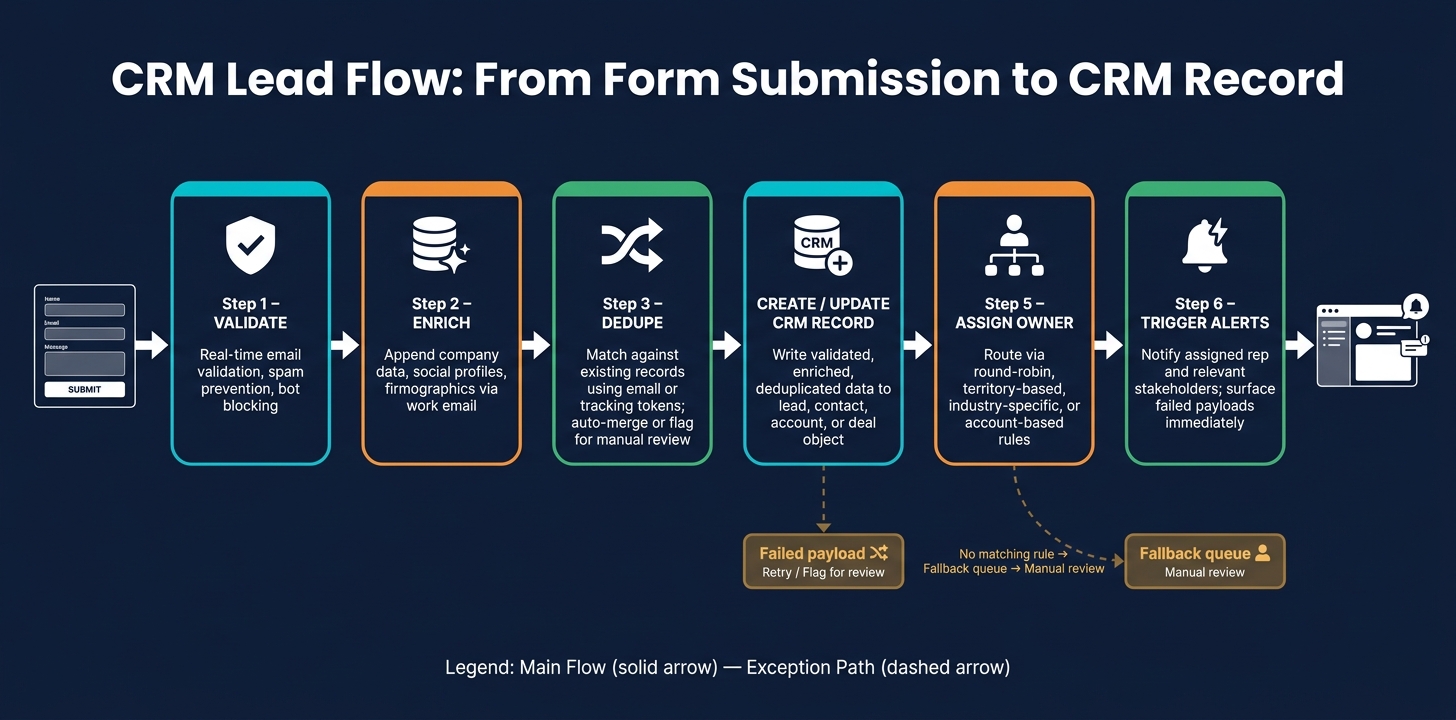
CRM Integration Planning: End-to-End Lead Flow Process
Your data model is set. Next comes the part that either keeps your CRM clean or turns it into a mess: what the form asks, how submissions get cleaned up, and where each lead goes after submit.
Choose Form Fields That Support Qualification and Routing
Ask only for the fields you need to qualify the lead and send it to the right person: name, work email, company, role, company size, industry, region, timeline, budget, and product interest.
For routing fields like industry, region, and company size, use dropdowns or radio buttons. That keeps entries consistent and cuts down on manual cleanup later. If one person types “Healthcare,” another types “health care,” and a third writes “medical,” routing gets sloppy fast.
Start with the required fields from your data model as the minimum form set. Then add only the fields that help with routing or follow-up.
Validate, Enrich, and Score Leads at the Point of Capture
Bad data is much easier to stop at the form than to fix later in the CRM.
Real-time email validation catches typos before a record is created. Spam prevention blocks bot submissions that can pollute your lead data.
Enrichment adds company data or social profiles based on a submitted work email. That means you can ask for fewer fields without giving up qualification detail. Reform combines multi-step forms, conditional routing, lead enrichment, spam prevention, email validation, and CRM integrations in one no-code workflow.
After the submission is clean, map the exact delivery path to the right owner.
Define Routing Rules and Delivery Flow
Once a submission passes validation and enrichment, it needs a clear assignment path. Write that path as a direct decision tree:
validate → enrich → dedupe → create or update CRM record → assign owner → trigger internal alerts
Define each step before you build anything. For owner assignment, the most common models are:
- Round-robin: equal distribution across reps
- Territory-based: by state or region
- Industry-specific: by vertical
- Account-based: match leads to existing accounts in the CRM
You also need a fallback path for submissions that don't match any rule. Otherwise, leads can just sit there, and that's the kind of problem teams notice too late.
On the technical side, choose your integration method on purpose. Direct API connections give you tight control over data flow. Webhooks are a good fit for real-time triggers. Middleware can help too, but be careful with personally identifiable information (PII). In regulated industries, avoid sending PII through tools that log payloads in transit.
Document the integration method, authentication approach, request formatting, and error handling. Make delivery errors visible so failed submissions are retried or flagged right away.
Once the flow is defined, test the full path before launch.
Build, Test, Launch, and Review Performance
Once the flow is designed, the next step is simple in theory and messy in practice: test it, launch it carefully, and watch it closely after it goes live.
This is the part where small setup mistakes turn into missed leads, bad routing, and a lot of finger-pointing. So it pays to slow down here.
Test the End-to-End Lead Flow Before Launch
Before anything goes live, run the full lead flow in a sandbox environment using sample submissions that look like actual leads. Check field mapping, timestamps, assignment, and notification delivery. Also confirm that the flow matches what you mapped in the CRM data model and routing logic.
Pay extra attention to edge cases:
- A duplicate submission
- A lead that doesn't match any routing rule
- A failed payload
These issues are easy to miss before launch and painful to spot after the fact. Make sure the entire handoff path works from start to finish.
A broken integration can chip away at trust in the CRM, even when records seem to sync on the surface.
Bring sales and marketing into UAT before launch too. They often spot routing mismatches and confusing field labels that pure technical testing won't catch.
Use a Go-Live Checklist and Rollback Plan
Freeze major CRM and system updates during the launch window so nothing shifts under your feet. Then run through the checks below before you turn on the integration in production:
| Go-Live Check | Why It Matters |
|---|---|
| Change freeze | Prevents configuration drift during the launch window |
| Active owner and queue check | Confirms leads route to active users, not dead queues |
| Production form test | Validates the full flow in production, not just sandbox |
| Alert check | Makes sure sync failures trigger alerts right away |
| Rollback documentation | Gives the team a clear path to pause the integration and revert to manual entry without losing data |
Document exactly how to pause automation and switch back to manual entry if needed.
After launch, track the same lead-management metrics defined earlier. That way, the review phase measures the outcome you planned for, not just whatever happened.
Review KPIs After Launch and Refine the Workflow
Monitor submission-to-CRM sync rate, duplicate rate, routing accuracy, and assignment time every day during the first week. Then review actual submissions after 30 days.
| KPI | What It Tells You |
|---|---|
| Submission-to-CRM Sync Rate | Whether payloads are reaching the CRM reliably |
| Duplicate Rate | Whether deduplication logic is working |
| Routing Accuracy | Whether leads land with the right owner on the first attempt |
| Assignment Time | How fast sales acts after a submission |
| Form Conversion Rate | Whether the form itself is working well or creating friction |
After 30 days, review actual submissions and refine fields, routing, enrichment, and governance.
FAQs
How do I choose the right CRM integration method?
Choose based on your workflow complexity and engineering resources. Native integrations are usually the better pick. They’re fast to set up, easier on the budget, and managed by the vendor, so they work well for standard fields and simple lead capture.
Go with a custom API integration only when native options fall short. That usually means cases like advanced lead scoring, real-time enrichment, complex routing across multiple systems, or support for custom objects. A custom build also comes with extra work: ongoing maintenance, monitoring, and engineering support.
What fields should I collect on lead forms?
Start with the core identity fields: name, email address, and phone number. Then add qualification and routing fields like job title, industry, and account size.
The key is to gather secondary details bit by bit instead of asking for everything at once. That helps cut form abandonment.
You can also use hidden fields for attribution, such as UTM parameters, and add consent flags for compliance.
And because Reform can fill in missing data like company size or industry, you don’t need to ask for every detail up front.
What should I test before CRM integration go-live?
Before go-live, make sure the data moves the way it should - and that it stays secure while doing it.
In a sandbox, send sample submissions through the flow and check the basics first. Verify that field mappings are correct, formatting stays intact, and partial form data lands in the right place. Do the same for UTM parameters so they populate the correct CRM records.
Then pressure-test the edge cases. Test deduplication, retry policies, dead-letter queue handling, and volume limits. You want to confirm that existing records update correctly, failed records are routed to the proper place, and total record counts stay within rate limits.
Related Blog Posts
Get new content delivered straight to your inbox

The Response
Updates on the Reform platform, insights on optimizing conversion rates, and tips to craft forms that convert.




Drive real results with form optimizations
Tested across hundreds of experiments, our strategies deliver a 215% lift in qualified leads for B2B and SaaS companies.
