
.webp)
Integrating Webflow Multi-Step Forms with CRMs


Want to turn your Webflow forms into lead management powerhouses? Connecting Webflow multi-step forms to a CRM helps you organize leads, automate follow-ups, and improve conversions. Here's how:
- Multi-Step Forms Work Better: Breaking long forms into smaller steps increases form completions by 56% and boosts site conversion rates by 20%.
- CRMs Make Lead Management Easier: CRMs centralize data, track interactions, and automate tasks like sending welcome emails or notifying sales teams of new leads.
- Integration Benefits: Directly linking forms to CRMs eliminates manual data entry, reduces errors, and speeds up response times.
You can connect Webflow forms to CRMs through tools like Zapier for a no-code solution or use direct API integrations for more customization. Both approaches save time and help you capture and manage leads effectively. Ready to learn how? Let’s dive in.
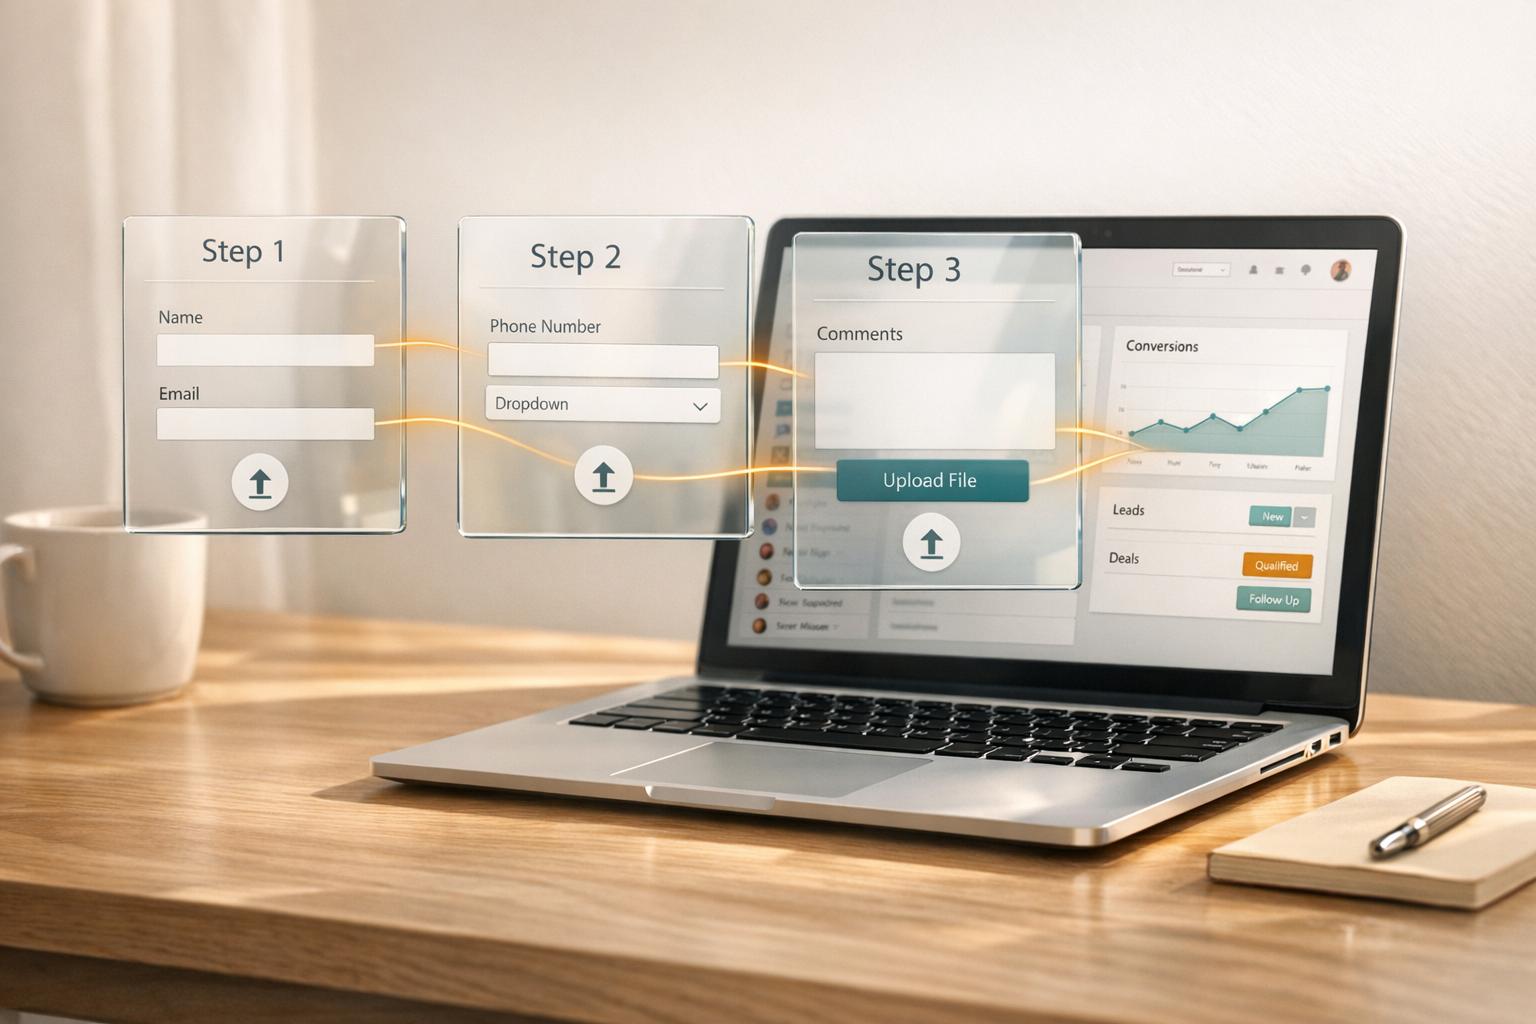
Setting Up Multi-Step Forms in Webflow
Building Multi-Step Forms in Webflow
Webflow doesn’t come with built-in support for multi-step forms, so you’ll need to use custom code. This typically involves combining multiple Form Blocks with JavaScript transitions and CSS toggling to create a seamless experience.
To avoid any hiccups with APIs or integrations, make sure each Form Block and input field has a distinct name. Once your form is built, publish your site and submit a test entry to ensure integration tools can properly detect and map the form’s structure.
If your form requires file uploads - like resumes or signed contracts - you’ll need Webflow’s Business Plan, which costs $39 per month. Go to Site settings > Apps & Integrations and disable the "Restrict uploaded file access" option. This ensures your CRM can access the uploaded files without issues.
"When we switched to a more advanced multi-step form solution, we saw an immediate uplift in our conversion rates - double or even triple in some cases. Our cost per lead improved significantly, and the system has been rock-solid from day one." - Eugen Bachir, Head of Performance at BeMarketable
Design Tips for Multi-Step Forms
Once the structure of your form is ready, it’s time to refine the design to improve usability and engagement.
Keep each step simple, focusing on just one or two fields. This minimizes mental effort for users and creates a more conversational flow. Adding a progress bar or step counter can reassure users about how far along they are, which can help reduce drop-offs.
Don’t forget to test your form on different screen sizes, especially on mobile. Ensure buttons have enough padding and touch targets are large enough for easy tapping. You might also want to include hidden honeypot fields to catch spam submissions and use UTM parameter tracking to identify which marketing channels are driving your best leads.
Lastly, make sure your form’s colors, fonts, and buttons match your site’s overall branding. If your page already has a title, skip redundant headers to keep the layout clean and purposeful. Monitor drop-off rates at each step to identify and fix any points where users might abandon the form.
How to integrate Webflow forms with Hubspot for free
Connecting Webflow Forms to CRMs

Zapier vs Direct API Integration for Webflow CRM Connection
Once your multi-step form is set up, the next step is connecting Webflow to your CRM. You have two main options: using a no-code tool like Zapier or going the more advanced route with a direct API connection. The choice depends on your technical know-how and what your project demands. Let’s start with the simpler, no-code method before diving into the API approach.
Using Zapier for Integration
Zapier makes it easy to link Webflow forms to CRMs like HubSpot and Salesforce. With connections to over 8,000 apps, it’s a popular choice for automation - 87% of Forbes Cloud 100 companies rely on it. The best part? Setting up a basic workflow usually takes less than 6 minutes.
Zapier operates on a trigger-and-action system. When someone submits your Webflow form (the trigger), Zapier automatically updates or creates a record in your CRM (the action). All the data from multi-step forms is submitted together.
Before starting, make sure to submit a test entry through your published form. Zapier uses this to detect your form’s structure and map Webflow fields to your CRM fields. Next, install the official Zapier app from the Webflow marketplace. This gives you access to pre-built templates and lets you manage workflows directly from your Webflow dashboard.
When setting up your Zap, you’ll manually map fields - for example, linking Webflow’s "First Name" field to HubSpot’s firstname field.
"Mapping fields between Salesforce and Webflow typically involves selecting which data fields in Webflow should correspond to those in Salesforce when setting up your integration." - Zapier
Zapier also offers advanced features like "Paths", which let you route leads based on their responses. For instance, you can send enterprise leads to one sales team and small business leads to another, depending on their answers to specific form questions. You can even add "Code" steps to validate email addresses or format phone numbers before the data hits your CRM.
Keep in mind that integrations with CRMs like Salesforce and HubSpot often require a paid Zapier plan, as these are considered "Premium" features. Alternatively, you can use "Webhooks by Zapier" to send form data via a unique URL.
Pro Tip: Avoid renaming your form after setting up a Zap - it will break the connection and force you to reconfigure everything.
Direct API Integration with CRMs
For those who need more customization, direct API integration is the way to go. This method provides full control over how data flows between Webflow and your CRM, but it does require some technical expertise.
Start by setting up a Webflow webhook triggered on form submission. Use the form_submission trigger type to send a real-time JSON payload to your server. Due to CORS restrictions, you’ll need a server-side intermediary (like a serverless function) to securely make API calls to your CRM.
Here’s how it works: the intermediary receives the Webflow JSON payload, transforms it into the format your CRM expects, and makes the API call. For example, when working with HubSpot, you’ll need to convert Webflow’s data object into HubSpot’s fields array and map fields accordingly (e.g., Webflow’s "First Name" to HubSpot’s firstname).
To ensure security, validate incoming requests using the x-webflow-signature header with an HMAC SHA-256 hash. Reject any requests older than 5 minutes.
For authentication, use private app tokens if you’re working with a single CRM account. Be mindful of rate limits, especially with HubSpot (100 requests per 10 seconds for Free/Starter plans, 190 requests per 10 seconds for Professional/Enterprise plans). Track the X-HubSpot-RateLimit-Remaining header and implement exponential backoff to avoid hitting limits.
If a webhook delivery fails, Webflow retries up to 3 times at 10-minute intervals before deactivating the webhook. To handle failures more effectively, consider building retry logic with dead-letter queues. Note that Webflow allows up to 75 webhook registrations per trigger type for each site.
One big advantage of direct API integration is the ability to capture the hubspotutk tracking cookie from a user’s browser. Including this in your API payload ensures proper lead source attribution in HubSpot.
sbb-itb-5f36581
Testing and Troubleshooting Your Integration
Testing Form Submissions
To ensure your integration works seamlessly, start by publishing your site and submitting a full response through your form. This step helps verify that every part of your multi-step form is functioning as intended. Double-check that each form field has a unique name in Webflow's settings; duplicate names can lead to issues like incorrect data retrieval or broken field mapping.
For a closer look at how your data is being processed, use tools like webhook.site to inspect the JSON payload. Additionally, review Zapier's Task History to confirm that the trigger, data transformation, and delivery to your CRM are happening correctly. Don't forget to check your CRM's submission log (e.g., HubSpot's Submission Log) to ensure all fields are being populated accurately.
Your browser's Network tab can also provide valuable insights. Look for response status codes like 404 (wrong endpoint), 422 (validation errors), or 500 (server errors). If you're testing attribution tracking, make sure to include hidden fields for UTM parameters and confirm they're being captured alongside your lead data.
Running these tests ensures your data flows without hiccups before diving into troubleshooting specific issues.
Fixing Common Integration Problems
When tests uncover errors, follow these steps to identify and resolve common problems. For example, if a webhook fails, Webflow will attempt delivery three times at 10-minute intervals before deactivating the webhook entirely. Keep an eye on your inbox for notifications about deactivated webhooks.
| Error Code | Common Cause | Resolution |
|---|---|---|
| 404 | Incorrect Form Action URL or broken redirect link | Verify the endpoint URL in Webflow's Form Settings. |
| 422 | reCAPTCHA interference or validation issues | Check your reCAPTCHA keys and adjust field configurations. |
| 500 | Server-side errors or incorrect API keys | Confirm your API credentials and check the status of your CRM service. |
Field mapping issues are another frequent culprit. If data isn't transferring properly, ensure that your CRM has matching custom fields for every field in your Webflow form. Note that renaming a form after setting up the integration can disrupt triggers in tools like Zapier or webhooks, so you'll need to reconfigure settings if changes are made.
For email notification problems, avoid using role-based email addresses like admin@, info@, or support@, as they are more likely to be flagged by spam filters. Instead, opt for personalized addresses like jane@domain.com. Lastly, if you're using direct API integrations with signature validation, remember that webhook signatures are only valid for 5 minutes, providing an added layer of security against replay attacks.
Conclusion and Next Steps
Key Takeaways
Connecting Webflow multi-step forms with a CRM streamlines your workflow by eliminating manual data entry, automatically routing high-value leads, and allowing your sales team to focus on the most qualified prospects.
This integration reshapes how you manage leads. By passing UTM parameters directly into your CRM, you gain a clear understanding of which marketing channels are driving conversions. To ensure everything runs smoothly, map all revenue-related fields to the appropriate CRM properties. Adding CRM tracking scripts across your Webflow site can help you avoid tracking gaps. Also, give each form block a unique name to prevent API conflicts.
Additional Resources
If you're looking for a faster way to set up multi-step forms with built-in CRM integrations, check out Reform (https://reform.app). This no-code platform is tailored for lead capture and management, offering features like conditional routing, lead enrichment, spam prevention, and real-time analytics - all without the need for custom coding or complicated middleware.
For teams ready to dive into these integrations, costs typically range from $500–$1,800 for basic app setups, with custom API integrations exceeding $5,000. Using tools like Zapier can also cut setup time by up to 70%. Use these strategies to enhance your Webflow integration and boost your lead conversion efforts.
FAQs
How can I set up multi-step forms in Webflow without native support?
If you're looking to add multi-step forms to your Webflow project, there are two main approaches you can take: using a no-code tool or diving into custom coding.
One option is to use a no-code form builder like Reform, which makes it simple to design branded, multi-step forms that look great and perform well. Once you've created your form, you can easily embed it into your Webflow site with an HTML snippet - no coding required.
If you're comfortable with coding, you can build multi-step forms directly in Webflow using custom JavaScript and interactions. This approach offers more control over the design and functionality but does require technical know-how and extra time to set up.
What are the advantages of using Zapier to connect Webflow multi-step forms with CRMs?
Using Zapier to connect Webflow's multi-step forms with CRMs can make life a whole lot easier. For starters, it takes care of lead capture automatically, so you can say goodbye to manual data entry. This not only saves time but also cuts down on mistakes. Plus, your leads get added to your CRM right away, letting your team jump on follow-ups without delay.
Zapier also simplifies your workflow by linking Webflow with well-known CRMs like Salesforce. For instance, you can set up automations to create new leads in your CRM the moment a form is submitted. This way, you never miss an opportunity, and your lead management becomes more efficient, giving your team's productivity a solid boost.
What should I keep in mind when connecting a CRM via API?
When you're setting up an API integration with a CRM, there are a few important steps to keep in mind to ensure everything runs smoothly and securely. Start by diving into the CRM's API documentation. This will give you a clear picture of the features it offers - like creating, updating, or retrieving data - and help you confirm it supports the specific tasks you need, such as managing leads or syncing contact details.
Next, make security a priority. Use API keys or tokens to safeguard sensitive data during authentication. Plan your data synchronization strategy carefully, whether it's real-time updates or scheduled intervals, and take steps to avoid duplicates or data conflicts. If the CRM supports webhooks, they can be a game-changer for triggering immediate updates whenever changes happen.
Before going live, make sure to test the integration thoroughly in a development environment. This will help you catch any issues and ensure data transfers are accurate and reliable from the start.
Related Blog Posts
Get new content delivered straight to your inbox

The Response
Updates on the Reform platform, insights on optimizing conversion rates, and tips to craft forms that convert.


Drive real results with form optimizations
Tested across hundreds of experiments, our strategies deliver a 215% lift in qualified leads for B2B and SaaS companies.
