
.webp)
How to Map HubSpot Form Fields


Mapping HubSpot form fields ensures data from forms is accurately directed to the right CRM properties, like email addresses or job titles. This process is essential to maintain data quality, streamline workflows, and avoid errors that can disrupt your sales and marketing operations. Here's a quick overview:
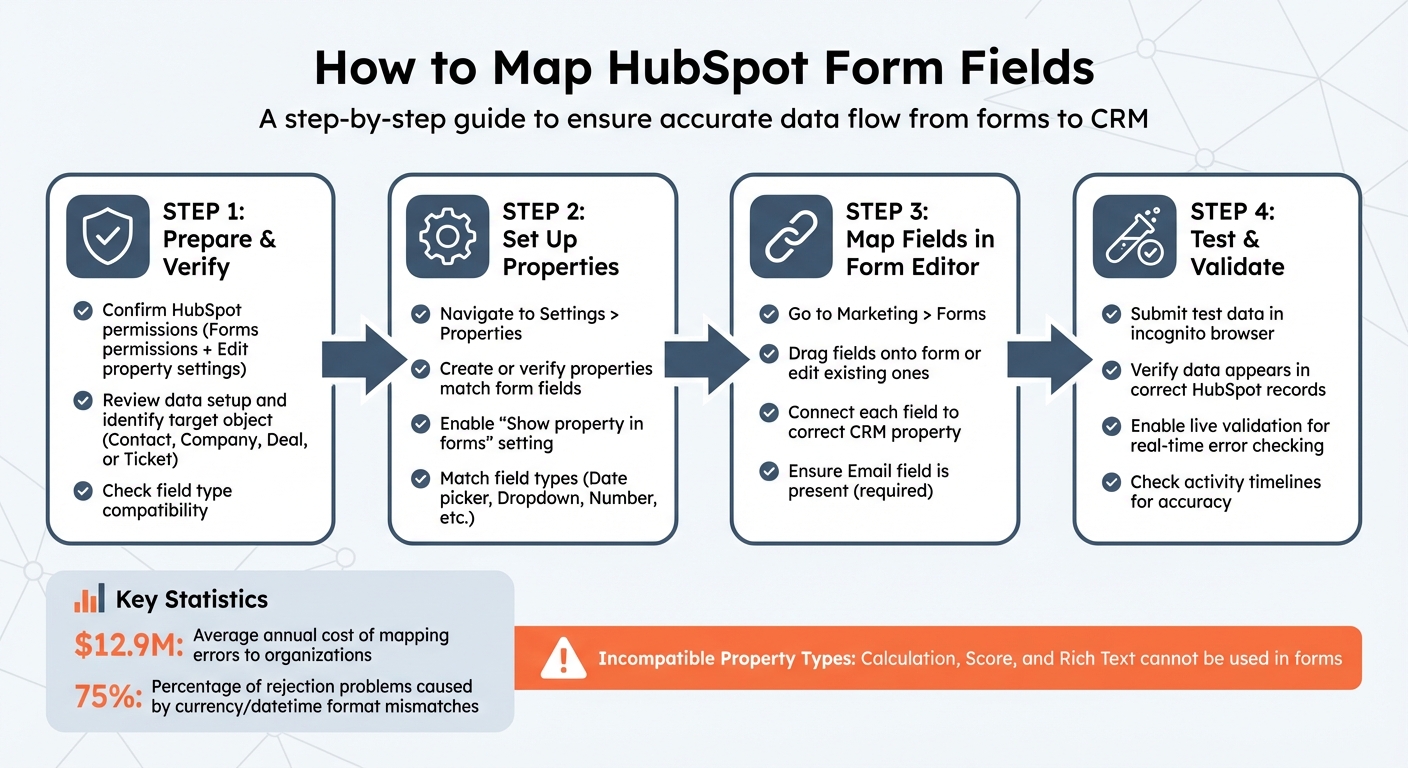
- Why It Matters: Incorrect mapping leads to sync failures, incomplete lead profiles, and inaccurate reporting. On average, mapping errors cost organizations $12.9 million annually.
- Benefits: Accurate mapping provides a clear view of leads, supports marketing attribution, and enables automated workflows.
- Common Issues: Mismatched field types, unsupported formats (e.g., date or currency), and missing required fields are frequent problems.
- Steps to Map Fields:
- Confirm permissions and review your data setup.
- Set up HubSpot properties matching your form fields.
- Use the HubSpot form editor to connect fields to CRM properties.
- Test submissions to ensure data syncs correctly.
Accurate field mapping is crucial for maintaining CRM integrity and supporting smooth operations. Follow the steps above to avoid common pitfalls and ensure your data flows seamlessly.
4-Step Process for Mapping HubSpot Form Fields to CRM Properties
Setting Up Custom Fields | HubSpot Tutorial

Why Field Mapping Accuracy Matters
Getting field mapping right is essential to protecting your revenue pipeline. When a form field is linked to the wrong HubSpot property - or worse, not linked at all - the effects can ripple across your entire operation. On average, mapping errors cost organizations $12.9 million annually, and many of these issues begin with something as simple as a misaligned form field. This highlights just how critical precise mapping is to your business.
Benefits of Correct Field Mapping
When fields are mapped correctly, they create a reliable single source of truth. This gives sales teams a complete view of each lead, including the content they’ve engaged with, the pages they’ve visited, and where they are in their buying journey. With this level of detail, outreach becomes more than a cold call - it’s a warm, informed conversation.
Field mapping also plays a key role in marketing attribution. For example, fields like “Campaign ID” or “Original Lead Source” must connect to the correct properties in order to track which campaigns are actually driving revenue. Tom Ryan, Founder & CEO of MarCloud, explains:
"When done properly, field mapping becomes much more than an integration task. It directly supports alignment between marketing and sales. Marketing gets the data that they need to attribute revenue accurately, and sales receives the complete context to engage leads effectively."
Automation workflows are another area where accurate mapping shines. When fields like lifecycle stage, industry, or company size are correctly mapped, automated systems can route leads to the right sales representative, send tailored follow-ups, and update deal stages - all without manual input. This not only enhances lead profiles but also ensures seamless CRM integration. By preventing data fragmentation, proper mapping ensures that information from forms, integrations, and manual entries is stored consistently.
While the advantages of accurate mapping are clear, even small errors can have big consequences.
Problems Caused by Incorrect Mapping
When fields are mismatched - like linking a dropdown to a free-text field - it can lead to sync failures that reject entire records, reducing your ability to follow up with leads.
One of the most common issues involves mismatched currency and datetime formats. These errors account for over 75% of rejection problems during migration audits. For instance, if a date field is formatted as MM/DD/YYYY in your form but HubSpot expects YYYY-MM-DD, the data will fail to sync. Similarly, number fields that include currency symbols or thousands separators can cause rejections, leaving gaps in your records.
Incorrect mapping also results in incomplete lead profiles, which can erode trust between teams. Sales teams may receive leads missing key qualification data, while marketing struggles to demonstrate campaign effectiveness when attribution fields don’t sync properly. Leadership can lose faith in CRM reports when the numbers don’t add up. As the MoldStud Research Team points out:
"Missing or misconfigured links directly impact downstream reporting, pipeline automation, and email personalization workflows."
The operational fallout can be costly. Automated workflows fail when required fields are empty or data ends up in the wrong property. Email segmentation breaks down when contact attributes are scattered, and privacy compliance becomes a concern if sensitive information isn’t stored securely. These breakdowns can drain time, money, and critical opportunities from your organization.
Preparing for Field Mapping
To ensure your mapping process runs smoothly, it's essential to secure the right permissions and set up your data correctly. Skipping this step can lead to errors and disrupt data transfer.
What You Need Before Starting
Start by confirming your HubSpot permissions. You'll need "Forms permissions" to view and edit forms and "Edit property settings" permissions to create or manage the CRM properties your fields will map to. If you're unsure about your access level, reach out to your HubSpot administrator. Keep in mind, users with View-Only seats won't be able to access the forms tool.
Next, review your current data setup. Determine which HubSpot object - Contact, Company, Deal, or Ticket - your form will populate. Then, check that your form fields align with existing HubSpot properties or plan to create custom ones. Be mindful of field types; for instance, a date picker on your form must connect to a Date property in HubSpot, not a text field. Note that certain property types, like Score, Calculation, and Rich Text, cannot be used in forms.
| HubSpot Property Type | Form Compatibility | Key Limitation |
|---|---|---|
| Single-line / Multi-line Text | Compatible | 65,536 character limit in CRM |
| Dropdown / Radio / Checkbox | Compatible | Options must match HubSpot values exactly |
| Date Picker | Compatible | Recommended over Date and Time picker |
| Number | Compatible | Can be formatted as currency or percentage |
| Calculation / Score | Incompatible | Cannot be used in forms |
If you plan to use advanced features like conditional logic, ensure you have a Marketing Hub or Content Hub Professional or Enterprise subscription, as these features are only available at those levels.
Proper preparation minimizes data mismatches and ensures seamless integration.
Setting Up HubSpot Properties
After confirming your permissions and reviewing your data, it's time to set up your HubSpot properties to match your form fields. To do this, click the settings icon in the top navigation bar and select Properties from the left sidebar. Then, choose the object (Contact, Company, Deal, or Ticket) the property belongs to before proceeding.
When creating a property, define the Label (visible to users) and the permanent Internal name (used for integrations). To make the property available in your form editor, enable the "Show property in forms" setting.
Make sure the field type of your property matches the data your form collects. For example, use "Date picker" properties for dates instead of "Date and time picker", as the latter isn't supported in the updated form builder. For dropdowns and checkboxes, remember that each option can have up to 3,000 characters, and you can include up to 5,000 options per property. If you need to change the field type of an existing property, export your data first, as changing types can delete stored values.
Before creating custom properties, check if a default HubSpot property meets your needs. This helps avoid data fragmentation and keeps your CRM organized. If you're using third-party form tools, you might need to manually clear the custom field cache if new properties don't appear in your mapping menus.
sbb-itb-5f36581
How to Map HubSpot Form Fields
Once your properties are set up, the next step is linking your form fields to the right spots in your CRM. While the process is simple, paying close attention to details ensures your data flows seamlessly.
Opening the HubSpot Form Editor
To get started, go to Marketing > Forms in your HubSpot account. If you’re working with an existing form, select it and click Edit. If you’re creating a new form, click Create form in the top right, choose Form Editor, and hit Next to pick a starting template. The editor provides a live preview alongside field controls.
To map fields, either drag new ones onto your form using the + add icon or click an existing field in the preview to adjust its connection. This opens the mapping interface, where you can link fields to CRM properties.
Connecting Fields to HubSpot Properties
When you drag a new field onto the form, the "Connect field to a property" dialog box pops up. You can choose from suggested properties or use Search properties to find a specific one. The All properties dropdown in the Properties tab lets you filter by object type - such as contact, company, ticket, or custom object properties. This is important because, for example, company properties must update company records, not contact records.
To update an existing field’s connection, click the field in the preview, expand the Connected property section in the left sidebar, and select Change property. If the property you need isn’t available, you can create a new one. Keep in mind that the Email field is always required for form submissions to create or update contact records.
For ticket properties, you’ll need to select a specific help desk or inbox to ensure submissions create tickets in the correct location. Use the search bar in the connection dialog to quickly find the right CRM property.
Once your fields are connected, it’s time to ensure the data formats align with HubSpot’s requirements.
Checking Data Types and Formatting
After mapping your fields, double-check that each field’s data type matches its corresponding HubSpot property. Any mismatch here could cause sync errors.
Enable Live validation of form fields in your form’s Submission Settings to alert visitors if their input doesn’t meet the required format. For instance, entering text in a number-only field will trigger an error. For date fields, use the Format dropdown to specify the expected format - typically MM/DD/YYYY for U.S. users. For phone number fields, set a default country code in the field settings to ensure proper formatting and validation.
Be aware that certain property types like Calculation, Score, or Rich Text aren’t supported in HubSpot forms. If you need to update dropdown or checkbox options, make those changes in Settings > Properties so they apply to all forms using that property.
Testing and Fixing Field Mappings
Testing Form Submissions
Once your properties are properly set up, it's time to test and ensure the field mappings work as expected. To do this, submit sample data using the form's standalone URL in an incognito browser tab. This method ensures that no website scripts or cookies interfere with the data transfer process. After submitting, check that each mapped field correctly populates the corresponding HubSpot record - whether it's a Contact, Company, or Deal.
If you're mapping properties for Companies or Deals, take a closer look at those specific records. Confirm that the submission details appear accurately on their activity timelines. For multi-step forms, consider enabling Partial form submissions. Introduced in January 2025, this feature helps capture incomplete entries, reducing the risk of losing leads from form abandonment.
To ensure every test submission creates a distinct record, enable the "Always create contact for new email address" option in the form's settings. HubSpot uses cookies and email addresses to deduplicate contacts, so testing in incognito mode is essential to prevent merging test data with existing records.
If your test results show any issues, refer to the troubleshooting tips below to resolve common mapping problems.
Fixing Common Mapping Problems
If you notice data isn't syncing correctly during testing, the problem often falls into a few specific categories. One common issue is field type mismatches, where the form sends text to a number property or uses an unsupported date format. Another frequent problem is enumeration errors, which occur when dropdown or checkbox values don't match the predefined options in HubSpot. To fix this, either update the form's values or add the missing options in HubSpot.
| Common Mapping Error | Likely Cause | Resolution |
|---|---|---|
| Field not appearing on live form | Progressive field logic | Disable the "Progressive field" setting if you want the field to show every time. |
| No contact record created | Missing Email field | Ensure the default HubSpot Email field is present and marked as required. |
| Data not appearing in timeline | Missing object field | Verify the form includes and populates a property tied to the specific object type (e.g., Company property). |
| Invalid enumeration option | Submitted value doesn't exist as an option | Add the value as a new option in HubSpot or adjust the form to use existing options. |
If a field isn't visible in your form editor, head to Settings > Properties, locate the property, and make sure the "Show property in forms" checkbox is selected. You can also enable Live validation in the form's Submission Settings to catch input errors before users submit their data.
Conclusion
Now that your field mappings are set up and verified, it's time to put these practices into action for long-term success. While field mapping might seem like a small detail, it plays a critical role in maintaining data consistency. By correctly aligning field types, standardizing naming conventions, and thoroughly testing your submissions, you create a system that minimizes duplicates, sync errors, and data gaps.
Getting your mappings right does more than just tidy up your data. It saves your team time by reducing manual entry mistakes, ensures reports reflect accurate business trends, and makes your CRM more user-friendly for both sales and service teams. As Seth Nagle, a Growth Marketing Specialist, points out:
"By staying on top of your mappings, you're building a solid foundation for consistent, trustworthy data".
Field mapping isn’t a one-and-done task. As your business grows and you integrate new tools, it’s essential to schedule regular audits - quarterly, if possible - to review and update your mappings. This proactive approach helps you catch outdated fields before they disrupt your data quality.
FAQs
What happens if HubSpot form fields are mapped incorrectly?
Incorrectly setting up HubSpot form fields can create a ripple effect of data problems in your CRM. You might face issues like duplicate records, mismatched properties (such as splitting a "Full Name" field into separate names incorrectly), or formatting mistakes with dates or phone numbers. These errors can lower the quality of your leads, throw off workflows, and lead to inaccurate reporting - making it tough to measure campaign performance effectively.
But the consequences don’t stop there. Poor data quality can frustrate sales teams who have to deal with incomplete or unqualified leads, create hurdles for marketers trying to prove ROI, and result in unreliable reports for leadership. Over time, these mistakes can undermine trust in your data, wasting both time and revenue. To steer clear of these challenges, ensuring precise field mapping and conducting regular data checks is critical.
How do I map form fields in Reform to HubSpot properties?
To connect form fields in Reform to HubSpot properties, start by ensuring your fields align with HubSpot's property types and formats. For example, check HubSpot's property settings to confirm the required data types - like text, dates, or numbers - and any validation rules they may have. Once you know these requirements, create matching fields in Reform, using the same internal labels or IDs to make the integration smooth.
Pay attention to data consistency. For dates, stick to the MM/DD/YYYY format. For phone numbers, include the country code (e.g., +1). If you're working with currency, format it as $1,234.56. You can use Reform’s field-level validation tools to enforce these formats and prevent errors before the data even reaches HubSpot. After your fields are ready, head to the integration settings in Reform, connect it to HubSpot, and map each form field to the corresponding HubSpot property. Don’t forget to save your changes!
Once everything is set up, test the connection. Submit a few sample entries through your form and check HubSpot to ensure the data is flowing correctly. Double-check that all fields, even hidden ones, are mapped properly. If something's off, tweak the settings until it’s right. This approach helps ensure accurate data transfer and keeps your CRM well-organized for future workflows.
How can I fix common field mapping errors in HubSpot forms?
To fix mapping errors between your HubSpot form and CRM, start by ensuring that your form fields align with the required properties in HubSpot. Pay close attention to any mismatched data types - for example, a text field mistakenly linked to a date property - and confirm that all required fields are properly completed.
Next, review your mapping setup in Reform to verify that each form field is correctly connected to the corresponding HubSpot property. Running tests with sample submissions can be incredibly helpful here. Use realistic data to identify potential issues, and take advantage of any validation feedback HubSpot provides. This feedback can highlight specific problems, like invalid email formats or missing required fields, making it easier to address them.
Lastly, leverage Reform’s built-in validation tools to catch common issues, such as formatting errors or duplicate entries, before they cause problems. After making the necessary adjustments, retest your setup until the data syncs seamlessly. Don’t forget to document your final mapping configuration - it’ll save you time and effort if you need to revisit it later.
Related Blog Posts
Get new content delivered straight to your inbox

The Response
Updates on the Reform platform, insights on optimizing conversion rates, and tips to craft forms that convert.


Drive real results with form optimizations
Tested across hundreds of experiments, our strategies deliver a 215% lift in qualified leads for B2B and SaaS companies.
