
.webp)
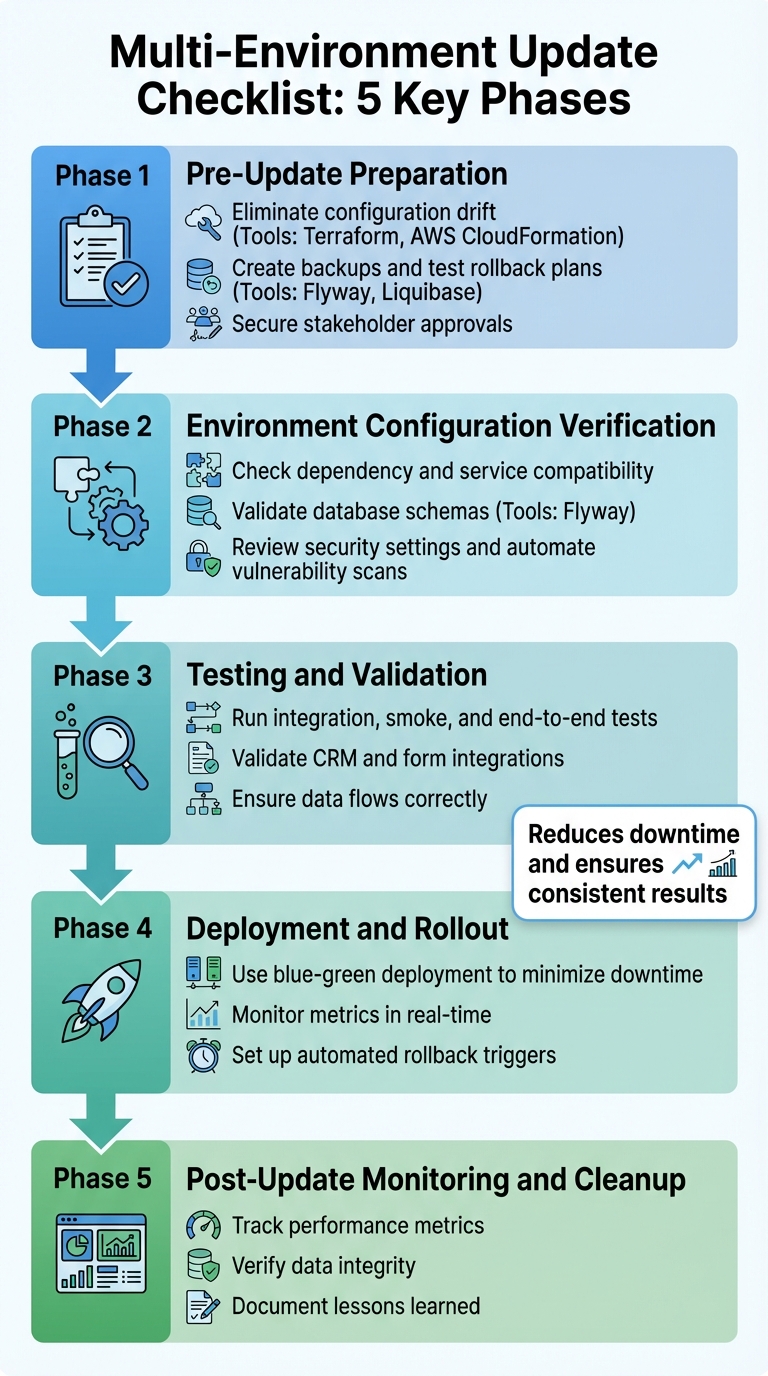
Checklist for Multi-Environment Updates


Updating software across development, staging, and production environments can be risky, but a structured checklist can help you avoid common pitfalls. Here's a quick overview of the key steps to ensure smooth and reliable updates:
-
Pre-Update Preparation:
- Eliminate configuration drift using tools like Terraform or AWS CloudFormation.
- Create backups and test rollback plans with tools like Flyway or Liquibase.
- Secure stakeholder approvals to ensure readiness across teams.
-
Environment Configuration Verification:
- Check for dependency and service compatibility.
- Validate database schemas with tools like Flyway.
- Review security settings and automate vulnerability scans.
-
Testing and Validation:
- Run integration, smoke, and end-to-end tests.
- Validate CRM and form integrations to ensure data flows correctly.
-
Deployment and Rollout:
- Use blue-green deployment to minimize downtime and risks.
- Monitor metrics in real-time and set up automated rollback triggers.
-
Post-Update Monitoring and Cleanup:
- Track performance metrics and verify data integrity.
- Document lessons learned to refine future processes.
This checklist transforms complex updates into predictable, repeatable processes, reducing downtime and ensuring consistent results.
5-Phase Multi-Environment Software Update Checklist
How to set up a deployment solution for the Azure infrastructure. Part-03 "templates, multiple env."
Pre-Update Preparation Checklist
Being well-prepared can make the difference between a smooth update and a chaotic failure. By ensuring your environment is consistent, securing data, and gathering necessary approvals, you can turn potentially risky updates into predictable, controlled operations.
Check Environment Consistency
Configuration drift - when environments like development, staging, and production differ in software versions or database schemas - can sabotage deployments. The best way to avoid this is by treating your infrastructure like code.
Tools like Terraform or AWS CloudFormation allow you to define your environments as code. This ensures that every environment is built from the same template. For instance, running terraform plan lets you preview changes and catch inconsistencies before they cause problems.
"Keeping your environments as similar as possible makes it easy to find environment-related errors in the first phases of testing, which increases development and testing speed and reliability." - Microsoft Learn
To further safeguard your setup, use separate credentials for each environment. This prevents accidental deployments to production from test environments. For example, different Service Principals can ensure developers don’t unintentionally push changes to the wrong environment. Sensitive information such as database passwords or API keys should always be stored in secret management tools like HashiCorp Vault or Azure Key Vault, never in your codebase.
Additionally, run drift detection scripts on a production backup. This lets you identify mismatches without touching live systems. If your platform involves integrations, like Reform’s form submissions or CRM connections, double-check that API endpoints, webhook URLs, and credentials align across environments to avoid routing errors.
Once your environments are consistent, the next step is creating backups and preparing for rollbacks.
Create Backups and Rollback Plans
Before any update, backups are non-negotiable. Ensure you create complete backups and verify their integrity with partial restores to confirm they’re usable.
"The only thing worse than no backup is a backup that doesn't work." - Leo A. Notenboom, Founder, Ask Leo!
Rollback procedures should also be documented and tested in a staging environment. Automate these processes where possible - manual rollbacks during high-pressure situations often lead to errors. For database changes, tools like Flyway or Liquibase can manage schema migrations and include rollback options.
Feature flags are another smart strategy. They let you toggle new features on and off without needing a full rollback. You can even set up automated rollback triggers based on performance metrics, ensuring the system reverts to a stable version if issues arise.
With backups and rollback plans in place, the final step is obtaining stakeholder approvals.
Get Required Approvals
No deployment should proceed without proper sign-offs. The Change Advisory Board (CAB) helps provide an objective review of technical dependencies that individual developers might overlook.
Your approval process should involve key stakeholders, including peer reviewers, product owners, quality managers, and operations teams. For platforms like Reform that integrate with CRMs and marketing tools, it’s also critical to include sales and customer support teams who will address user concerns post-update.
| Stakeholder Group | Responsibility |
|---|---|
| Development/Engineering | Peer code reviews, technical documentation, API verification |
| Operations/DevOps | Infrastructure readiness, environment setup, rollback plan validation |
| QA/Quality Management | Validation of unit, integration, and performance testing results |
| Product/Business | Verification of user stories, acceptance criteria, and market readiness |
| Security/Compliance | Vulnerability assessments and adherence to regulations (e.g., GDPR, HIPAA) |
Clearly define sign-off criteria for each group. For instance, specify which tests must pass, what security scans need to be clean, and any other requirements. When everyone knows their role and expectations upfront, you minimize last-minute delays. Considering that system downtime costs an average of $5,600 per minute, thorough approvals are a small price to pay for avoiding costly production issues.
Environment Configuration Verification Checklist
After completing your pre-update preparations, the next step is making sure your environments are fully equipped to handle the changes. Deployment failures often stem from configuration mismatches, and catching these early can save you from unnecessary headaches, wasted time, and financial losses. Start by mapping your architecture to highlight potential weak spots.
Check Dependency and Service Compatibility
Begin by outlining your architecture to detail server roles and how services interact. It's essential to know which servers or services will host the release and how they communicate through APIs or other interfaces.
Create a comprehensive list of third-party tools and external dependencies, such as syndicated partners, mail systems, and other services your application relies on. Use vendor-provided pre-update tools to identify configuration conflicts - these tools are particularly helpful in complex environments with numerous integrations.
"Adopt GitOps for deployment management: By using Git as the source of truth for your deployments... you can streamline your CI/CD pipeline, improve auditability, and automate rollbacks." - Dan Garfield, VP of Open Source, Octopus Deploy
Network configurations are another critical area. Distinguish between internal and public-facing endpoints, and ensure firewall settings are aligned with the new release. Tools like traffic shadowing can simulate production loads without disrupting live traffic, allowing you to validate compatibility under actual conditions before committing to the update.
After confirming service dependencies, turn your attention to the database schema.
Validate Database Schema
Database schema mismatches can lead to some of the most disruptive deployment failures. Tools like Flyway and Liquibase simplify schema validation by tracking changes in a metadata table, such as flyway_schema_history.
"Flyway ensures that all environments (development, staging, production) share the same schema version." - Ali Hamza, Certified AWS DevOps Engineer
Perform dry-run migrations to review SQL code before deploying to production, and write idempotent DDL scripts with "IF NOT EXISTS" clauses to prevent errors.
Preconditions are another safeguard. Embed checks in your migration scripts to verify the database state before applying updates. For instance, confirm whether a table exists or run specific SQL checks to ensure the environment matches expectations. This is particularly useful in environments that may have drifted from the baseline.
"Preconditions let you specify security and standardization requirements for your changesets. If a precondition on a changeset fails, Liquibase does not deploy that changeset." - Liquibase Documentation
Regularly run commands like flyway info to detect drift - unauthorized or manual changes that cause environments to deviate from the versioned source of truth. Before making major schema updates, verify the integrity of your backups and test the restoration process to ensure you have a reliable rollback plan if needed.
Review Security and Compliance Settings
A thorough security review is non-negotiable. Updates often involve configuration changes that can unintentionally expose sensitive data or introduce vulnerabilities.
"The internet is a hostile environment. Before deploying... you should take some time to review your settings, with security, performance, and operations in mind." - Django Documentation
Automate security checks to catch vulnerabilities before they reach production. For example, Django's check --deploy command can flag issues like debug mode being enabled, which could expose sensitive details such as source code and local variables. Avoid hardcoding secrets like database passwords or API keys; instead, load them from environment variables or encrypted files to minimize risk.
Audit IAM roles and Security Groups to ensure permissions are appropriately scoped. Reduce excessive IAM grants for automated runners, and confirm that database users have the permissions they need - nothing more, nothing less. Liquibase also supports preconditions to verify the database user (runningAs) or security state before applying changesets.
For applications requiring strict compliance, implement Policy as Code using tools like Open Policy Agent (OPA) or Terratest. These tools can continuously test and enforce requirements like SOC 2, ISO 27001, or HIPAA within your CI/CD pipeline. This is particularly crucial for platforms that handle sensitive customer data, where compliance failures during updates could lead to serious issues like data breaches.
Ensure site-wide HTTPS is enabled, and set security flags on cookies (CSRF_COOKIE_SECURE, SESSION_COOKIE_SECURE) to prevent tokens from being transmitted insecurely. Additionally, configure web servers to validate host headers and block CSRF attacks before requests even reach your application.
Once security settings are in place, you’re ready to move on to rigorous testing and validation.
Testing and Validation Checklist
Once your environment configurations are verified, thorough testing ensures updates perform reliably under real-world conditions. Rigorous testing helps avoid costly production failures. Using automated testing tools can significantly reduce User Acceptance Testing (UAT) time by 50% and speed up business process testing by as much as 85%. These steps set the stage for smooth deployments and consistent performance across different environments.
Run Integration and Smoke Tests
Begin with integration tests in your development environment to confirm that all components interact as expected. Test every API endpoint your application uses and check for Cross-Origin Resource Sharing (CORS) issues that might block requests in the updated environment. Make sure webhook endpoints handle delays, duplicates, and out-of-order events without issues.
After integration tests, conduct smoke tests in the staging environment to catch critical failures early. Repeat these tests at each rollout stage. Confirm that submission data, variable names, and step IDs are accurate for analytics tracking. Also, test flows in incognito mode to ensure a clean user experience.
"We loved Panaya for its collaboration features. It is a user-friendly, cloud-based solution that offers easily repeatable test scenarios between similar projects." - Pam Brown, Senior Director, ERP Business Process Organization, Bruker
Once these initial tests are complete, proceed with full end-to-end testing.
Perform End-to-End Testing
End-to-end testing replicates real user scenarios from start to finish, ensuring that complex workflows function properly after updates. Validate branching logic, redirects, and error handling to mimic complete user journeys.
To avoid "environment drift" - where small configuration differences between staging and production cause unexpected issues - keep your staging and production environments as similar as possible. Check for consistency in styles and UI across various devices and browsers, as visual glitches can disrupt the user experience just as much as functional errors. When testing forms, ensure field mappings are correct and data flows into CRM systems without truncation or formatting problems.
Test CRM and Form Integrations
For platforms that integrate forms with CRM systems, such as Reform, test the endpoints connecting to CRM systems, marketing automation platforms, and form builders. Confirm that lead scoring triggers activate correctly when users complete specific actions, and ensure CRM fields sync seamlessly with marketing tools for personalized content updates. Studies show that 10% to 25% of B2B marketing database contacts contain critical errors, which can harm email reputation if not addressed during testing.
Test edge cases, such as incomplete records, invalid formats, or duplicate entries, to confirm robust error handling. For webhook integrations, verify that production endpoints can handle events arriving out of order or multiple times without creating duplicate records. If you use sandbox environments during development, match production IDs for objects like plans or products to avoid manual re-mapping when going live. Finally, rotate API keys before deploying to production to prevent insecure key usage.
sbb-itb-5f36581
Deployment and Rollout Checklist
Once testing confirms everything is functioning as expected, it’s time to deploy updates. Using validated configurations and test results as a foundation, the steps below outline how to ensure a smooth rollout into production. A controlled rollout is key - it minimizes downtime and reduces risks by making it easier to reverse changes quickly if something goes wrong.
Use a Blue-Green Deployment Strategy
Blue-green deployment is a method where two identical production environments - Blue (current version) and Green (new version) - operate side by side, with traffic directed to one at a time. This setup eliminates "mixed-version" states, a common source of compatibility issues in complex systems.
Here’s how it works: deploy the new version to the Green environment while the Blue environment continues handling live traffic. Tools like Infrastructure as Code (IaC) help maintain consistency between environments. Run smoke tests on the Green environment to ensure critical functions like form submissions or CRM workflows are working as intended.
When database changes are involved, use a backward-compatible approach like "expand then contract." This allows both the old and new application versions to interact with the database during the transition. Configure your load balancer, API gateway, or DNS to manage traffic routing between environments. Use connection draining to ensure in-flight requests are completed before shutting down the old environment.
Keep the Blue environment in a "warm" state for a set observation period. This allows for quick traffic redirection if any issues arise. For AWS CloudFormation users, remember that blue-green deployments have a total process limit of 36 hours, with individual stages in Amazon ECS capped at 24 hours.
"Blue-Green Deployment is a release technique that reduces downtime and risk by running two identical production environments - Blue (current) and Green (new) - and switching traffic between them." - Moss.sh
Once the Green environment is live, continuous monitoring ensures optimal performance and enables immediate rollback if needed.
Monitor Metrics During Rollout
Real-time monitoring is critical during deployment to catch problems before they escalate. Track a mix of infrastructure metrics (CPU, memory, I/O), application metrics (latency, error rates), and business KPIs (transaction volumes, conversion rates).
Pay close attention to latency metrics like P50, P95, and P99. For example, a spike in P99 latency could indicate that a small group of users is experiencing significant delays, even if average response times look fine. Platforms like Reform should monitor form submission rates and CRM integration endpoints to ensure data is processed correctly.
Use telemetry to correlate issues with specific deployment phases or environments (e.g., Blue vs. Green), which helps pinpoint the root cause faster. Label logs with version details so you can trace issues back to their environment. Maintain a "bake time", where both environments run concurrently, to observe performance before decommissioning the old version.
Set up alerts for threshold breaches. For instance, if error rates or latency spike, these alerts should trigger immediate investigation. Don’t rely solely on the absence of complaints - monitor usage metrics to confirm users can access the service and interact with it as expected.
Set Up Automated Rollback Processes
Rollback mechanisms act as a safety net during deployment. Ensure your load balancers, API gateways, or service meshes are configured to instantly redirect traffic back to the Blue environment if the Green environment encounters issues.
Automated triggers should handle rollbacks when metrics like error rates or latency exceed acceptable limits. For stateful components, use tools like point-in-time restores or backups to revert data to its last stable version.
Feature flags add an extra layer of protection. If a specific feature is problematic, disable it with a toggle instead of rolling back the entire codebase. Prepare and test rollback scripts in advance to reduce human error during emergencies. These scripts should cover routing changes, infrastructure adjustments, and feature toggles.
| Mitigation Strategy | Action Taken | Best Use Case |
|---|---|---|
| Rollback | Reverts systems to the last-known-good configuration | When the new code version is fundamentally broken |
| Fallback | Removes updated systems from traffic routing, directing it back to the old stack | Blue-green deployments where the previous stack remains available |
| Roll Forward (Hotfix) | Applies a quick fix to the new version during rollout | When a simple fix is sufficient, and the workload isn’t critical |
| Bypass | Uses feature flags to disable problematic features without a full rollback | When a specific, non-critical feature is causing issues |
Regularly rehearse rollback procedures in staging environments or through chaos engineering to identify gaps in your automation. Agree on what constitutes the "last known good" state before deployment begins to avoid confusion during recovery.
"A regressive update to a production environment can cause unplanned downtime and business impact, such as increased model latency and high error rates." - Amazon SageMaker AI
Post-Update Monitoring and Cleanup Checklist
Once you've completed the deployment or rollback process, it's essential to confirm the update's success and gather insights for future improvements. This phase ensures the new version operates as intended while helping you refine your approach for the next update cycle.
Configure Performance Alerts
Set up alerts to track performance benchmarks and detect anomalies in real time. Keep a close eye on application metrics like response times, error rates, and throughput, alongside infrastructure indicators such as CPU usage, memory consumption, disk I/O, and network bandwidth. It's equally important to monitor user experience metrics, including page load times and Application Not Responding (ANR) rates, to make sure the update hasn’t negatively impacted the frontend.
Compare these post-update metrics to pre-update baselines to quickly identify any deviations. For example, a major SaaS provider achieved 99.9% uptime by implementing an automated performance monitoring checklist to streamline its deployment and monitoring processes. Set threshold alerts so any unusual spikes in CPU usage or error rates trigger immediate investigations. Operational stability indicators like Mean Time to Repair (MTTR) and helpdesk ticket volumes can provide additional insights into user-facing issues. Pay special attention during the first 48 hours after deployment - anomalies in CPU or memory usage during this period often point to issues like data corruption or indexing errors.
Once performance stabilizes, shift your focus to validating data integrity.
Verify Data Integrity
Confirm data integrity and backward compatibility across all environments to avoid disruptions. Leverage automated tools to compare data consistency between the source and target environments, flagging any missing or altered records. Use database integrity commands, like CHECKDB, to verify the database structure. Perform row count comparisons and validate individual field values, formats, and data types. Additionally, check that foreign key relationships, database constraints, and orphaned records remain intact.
For added safety, set the previous database version to read-only for 24 hours after the update. This provides a stable reference point if any discrepancies are identified. Clearing system caches post-update ensures that validation tests reflect the most recent data and configurations. Finally, conduct User Acceptance Testing (UAT) to confirm that data transformations align with your business workflows.
Once data integrity is confirmed, focus on capturing insights to improve future updates.
Document Lessons Learned
Revise and update internal checklists and documentation to incorporate lessons from the current deployment. Conduct blameless postmortems to analyze any incidents or anomalies without attributing blame. These reviews are essential for identifying areas of improvement and creating smoother processes for future updates.
"When issues occur during deployments, ensure that blameless postmortems are part of your process to capture lessons about the incident." - Microsoft Power Platform Well-Architected
Update configuration management databases (CMDB) and inventory systems to reflect the post-update environment, including changes to IP addresses, CPU, and memory. Compare pre- and post-update performance metrics, documenting any anomalies to address in future cycles. Decommission temporary deployment resources, like unused cloud instances, to manage costs efficiently. Assign experienced staff to closely monitor workloads during this period, implementing shorter SLAs to quickly identify and document potential issues.
Conclusion
Managing updates across multiple environments can be predictable and dependable with the right approach. A well-structured checklist turns high-pressure deployment scenarios into manageable, repeatable processes. By systematically addressing dependencies, identifying security vulnerabilities, and meeting performance goals, you can catch potential issues before they reach users.
Real-world examples highlight the power of checklists. Netflix uses environment validation scripts before every release to avoid configuration mismatches between testing and production. GitHub created gh-ost, a tool for online schema migrations, enabling massive MySQL database updates without downtime. Shopify employs detailed performance and load testing checklists to prepare for peak traffic periods.
These strategies don’t just prevent disasters - they can also lead to significant cost and performance improvements. For instance, Vivid Racing saved around 35% on costs while enhancing performance by following a structured migration framework to DigitalOcean. By embedding checklist principles into your CI/CD pipeline - such as automated testing gates, security scans, and performance checks - you minimize human error and ensure developers and operations teams stay aligned.
To further streamline deployments, treat environment configurations as code, use feature flags to separate deployment from release, and maintain continuous feedback loops with all stakeholders. This shifts your workflow from reactive problem-solving to proactive issue prevention, ensuring environments stay consistent and every release builds confidence. By adopting these practices - from preparation to post-deployment monitoring - you can achieve reliable, consistent updates across all environments.
FAQs
What are the advantages of using a blue-green deployment strategy?
A blue-green deployment strategy is a method that lets teams update applications safely by using two identical production environments. One environment (green) handles active user traffic, while the other (blue) is used to stage the new version. This setup makes it possible to test updates in a live-like environment without interrupting the experience for actual users.
Switching between the two environments is typically as simple as making a quick routing change. This ensures minimal downtime and a smooth transition for users. If any issues pop up after deployment, traffic can be immediately redirected back to the previous environment, helping to maintain system stability and reduce risks.
This strategy improves the reliability of releases, allows for quick rollbacks when needed, and supports continuous delivery by enabling teams to confidently test and implement updates with little to no impact on users.
What steps should I take to ensure data integrity after an update?
To keep data integrity intact after an update, start by performing a full backup of your database and exporting essential configurations. This precaution ensures you'll have a safety net to restore your system if anything goes wrong. During deployment, rely on automated validation scripts to flag issues like duplicate records, missing fields, or violations of business rules. For applications with multiple users accessing the system simultaneously, use safeguards such as lock-based controls to avoid conflicts during the update process.
Once the update is complete, compare key data sets - like row counts or checksums - between the backup and the live system to confirm no data has been lost or altered. Dive into audit logs to monitor changes, spot irregularities, and ensure compliance with your policies. To maintain data quality over time, establish a routine schedule for data reviews. These steps will help you handle updates with confidence while preserving the reliability of your data across all environments.
Why should security checks be automated before performing updates?
Automating security checks before updates plays a crucial role in catching potential vulnerabilities early. This proactive approach helps prevent issues like downtime, data breaches, and a loss of user confidence. At the same time, it ensures your systems stay reliable and keeps deployment timelines on track.
By reducing the chance of human error and simplifying security processes, automated checks offer a reliable and efficient method to protect your systems during updates.
Related Blog Posts
Get new content delivered straight to your inbox

The Response
Updates on the Reform platform, insights on optimizing conversion rates, and tips to craft forms that convert.


Drive real results with form optimizations
Tested across hundreds of experiments, our strategies deliver a 215% lift in qualified leads for B2B and SaaS companies.
