
.webp)
How to Add Progress Bars to Multi-Step Forms


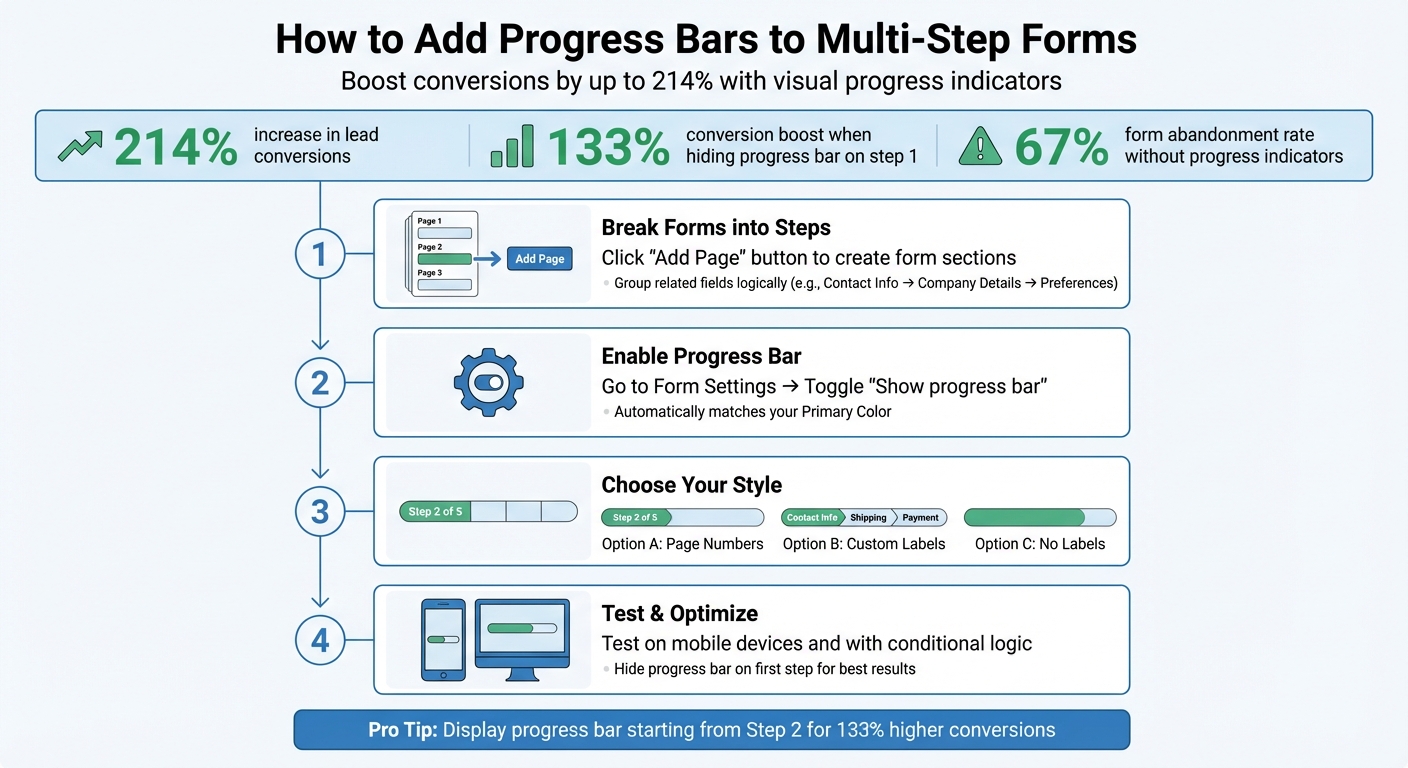
Progress bars can help reduce form abandonment by showing users where they are in the process and how much is left. Multi-step forms with progress indicators improve clarity and can boost lead conversions by up to 214%. However, displaying all steps upfront may discourage users. Instead, start showing the progress bar after the first step to increase conversions by 133%.
Here’s how to create effective progress bars:
- Break forms into steps: Use smaller sections to make forms feel less overwhelming.
- Add a progress bar: Enable it in the settings and choose a style - step numbers, custom labels, or a clean visual bar.
- Customize: Match the bar’s color to your branding or override settings for specific forms.
- Test on mobile devices: Ensure the bar works well on smaller screens and with conditional logic.
Progress bars improve user experience by making forms clear and manageable. You don’t need technical skills - just toggle the feature in Reform's settings and tailor it to your needs.
How to Add Progress Bars to Multi-Step Forms: 4-Step Setup Guide
How to make a Multi-Step Form (with a Progress Bar!)
sbb-itb-5f36581
Setting Up Multi-Step Forms in Reform

To include a progress bar in your form, start by breaking your form into distinct steps. This is done by clicking the "Add Page" button, which creates a new step in your form sequence. Dividing your form into smaller sections helps users focus on a few questions at a time, making the process less overwhelming. Let’s look at how to structure your form into clear steps before adding a progress bar.
Breaking Forms into Steps
After adding pages, you can reorganize your fields by dragging them to the appropriate page. Simply grab the six-dot icon next to a field and move it to the page where it fits best.
Each page can have its own heading and a specific set of fields. For instance, you might use the first page for basic contact details, the second for company information, and the third for specific needs or preferences. Reform also offers conditional logic to create dynamic form paths. Using the Page settings > Logic menu, you can set up rules that guide users based on their responses. For example, you could route users to additional qualification questions based on their education level or skip billing details for VIP users. Keep in mind that these advanced logic features are available with the Pro Plan ($35/month or $350/year).
Testing Form Navigation
Once your form is structured, it’s essential to test its navigation. Use Reform's preview mode to experience the form as a user and confirm that all logic and navigation settings work as intended. Pay close attention to "And" conditions (where all criteria must be met) and "Or" conditions (where any one criterion triggers an action) to ensure everything flows smoothly.
You can also fine-tune your navigation settings under "Behavior" in the Form Settings menu. Here, you can toggle navigation arrows, enable or disable a step counter at the bottom of the form, and adjust other settings. The "Save progress" button is particularly helpful for longer forms, as it allows users to pause and resume later via an emailed link. Note that this feature is only available on published forms. Once your multi-step structure is finalized and navigation is working seamlessly, you’re ready to add a progress bar to guide users visually through the form.
How to Add a Progress Bar in Reform
A progress bar is a simple yet effective way to guide users through a multi-step form, giving them a clear sense of how far they've come and how much is left. Once your multi-step form is ready, adding this feature is quick and straightforward. Progress bars are available for multi-page forms and are a great tool to improve user experience.
Enabling the Progress Bar Feature
To get started, head to Form Settings in the top-right corner of the form builder. Toggle on the "Show progress bar" option, and you’ll see the progress bar appear horizontally at the top of your form. It automatically matches your form’s Primary Color, keeping your branding consistent.
If you manage multiple forms and want a consistent setup across them, you can establish a default progress bar setting at the team level. Just go to Team Settings > Branding. Need a unique setup for a specific form? No problem - individual forms can override the team defaults for tailored configurations.
Selecting a Progress Bar Style
Reform provides three styles to suit different form designs and levels of complexity:
- Page Numbers: This default style displays the step count, such as "Step 2 of 5" or "Page 1." It’s ideal for general forms where users need a simple progress indicator.
- Custom Labels: Perfect for more detailed forms, this option allows you to name each step, like "Contact Info", "Shipping Details", or "Confirmation." It provides extra clarity for users navigating complex forms.
- No Labels: For a clean, minimalist look, this style removes text and shows only the visual progress bar. It works well for shorter forms or when simplicity is key.
On desktop, labels appear below the progress indicators, while mobile layouts are optimized for smaller screens. Choose the style that best fits your form’s design and complexity.
Customizing Colors and Labels
The progress bar’s color automatically matches your form’s Primary Color, ensuring it blends seamlessly with your branding. If you want a different look for a specific form, use the "Override Branding" feature in Form Settings to adjust the primary button color, which also updates the progress bar.
For forms using the Custom Labels style, you can define step names while organizing or editing pages in the form builder. This is where you’ll input the text that appears for each step. For even more control, advanced users can apply custom CSS styling through Reform’s element classes, allowing for deeper customization.
With these options, your progress bar can be both a functional guide and a polished part of your form’s design.
Best Practices for Progress Bars
A well-designed progress bar can guide users effectively, improving conversions and reducing form abandonment. These practices focus on creating a smoother user experience by combining thoughtful design with technical precision.
Organizing Fields into Clear Steps
Grouping related fields into logical steps helps design the perfect landing page form that feels less overwhelming. For example, in an e-commerce checkout process, keep "Shipping Information" separate from "Payment Details". This approach minimizes cognitive load and helps users navigate the form more easily.
Consider hiding the progress bar on the first step to lower initial perceived effort. A study by LeadCapture.io revealed that removing the progress bar from the first step led to an impressive 133% increase in conversion rates. Start displaying the progress bar from the second step onward for a more user-friendly experience.
For forms with many steps, avoid overwhelming users by grouping steps into broader categories. Instead of showing "Step 8 of 15", use categories like "Contact Info", "Business Details", or "Preferences". This approach simplifies the process and makes it feel more approachable.
Writing Clear Step Labels
Clear and descriptive labels are essential once the fields are grouped logically. Avoid generic terms and instead use labels like "Contact Info", "Shipping Details", or "Payment" to help users understand what information is required at each stage.
"Progress trackers are designed to help users through a multi-step process and it is vital that such trackers be well designed in order to keep users informed about what section they are currently on, what section they have completed, and what tasks remain." - Naoise Golden
Descriptive labels also help reduce errors. For instance, when users know they're entering "Credit Card Details", they can prepare their card in advance, avoiding delays or mistakes that contribute to a 67% abandonment rate.
Testing on Mobile Devices
Mobile optimization is crucial for progress bars. Mobile screens pose unique challenges, such as overlapping or awkwardly wrapped text when step labels are too long. Poorly adapted progress bars can increase perceived effort for mobile users.
To ensure a seamless experience, test progress bars on various devices. On mobile, consider hiding step labels to avoid clutter and reduce the size of progress indicators (e.g., from 40px on desktop to 28px on mobile). Maintain adequate spacing between the progress bar and navigation buttons to prevent accidental taps. Additionally, if your form uses conditional logic to skip steps, ensure the progress bar adjusts smoothly without confusing "jumps".
Wrapping It All Up
Progress bars are a game-changer when it comes to reducing form abandonment. By showing users exactly where they are in the process and how much is left, you make the experience feel manageable and less overwhelming. Splitting long forms into smaller, digestible sections with clear visual indicators helps users focus on one step at a time, making the process smoother and more engaging.
With Reform, integrating progress bars into your forms is as simple as a single click in the Form Settings. These bars automatically match your brand's primary color and come in three flexible styles: Page Numbers (e.g., "Step 2 of 5"), Custom Labels (e.g., "Contact Info", "Payment"), or a sleek, label-free visual bar.
Reform also ensures your forms stay on-brand with centralized settings, while still allowing for individual tweaks when necessary. This mix of automation and customization lets you craft professional, high-converting lead forms in no time.
For the best results, display the progress bar starting from the second step. This approach has been shown to boost conversion rates by an impressive 133%. Use descriptive labels for clarity and test your forms on mobile devices to ensure they adapt seamlessly, especially if you're using conditional logic to skip steps. Reform’s intuitive design makes it easy to apply these strategies, guiding users effortlessly through multi-step forms.
And the best part? You don’t need any technical skills. Reform’s code-free interface and powerful customization options put all these best practices at your fingertips.
FAQs
When should I show the progress bar?
When users start filling out a multi-step form, it's a good idea to display a progress bar. This feature allows users to see where they currently are in the process and how many steps remain. By providing this visual feedback, you make the experience clearer and help reduce the chances of users abandoning the form midway.
Make sure the progress bar updates dynamically as users move through each step or page, keeping them informed and engaged.
Which progress bar style should I use?
When you're designing a progress bar for your form, the best style depends on how it fits with your overall design and the kind of experience you want to create for users. Two popular choices are linear progress bars, which fill horizontally as users move through the form, and step indicators that display numbered or labeled steps to make the process clearer.
Pick a style that matches your branding, is simple to understand, and makes the form easier to use. Often, a clean and straightforward design works well for most forms, keeping the focus on functionality and user ease.
How do I handle conditional steps in the bar?
When working with conditional steps in a progress bar, you can use Reform's logic tools to adjust the flow based on user responses. By setting specific conditions (like particular answers), you can decide when to skip or jump between pages. The progress bar dynamically updates to match the user's path, accurately showing their progress - even when the form's sequence changes due to conditional logic.
Related Blog Posts
Get new content delivered straight to your inbox

The Response
Updates on the Reform platform, insights on optimizing conversion rates, and tips to craft forms that convert.


Drive real results with form optimizations
Tested across hundreds of experiments, our strategies deliver a 215% lift in qualified leads for B2B and SaaS companies.
