
.webp)
How to Use Postman for HubSpot API Testing


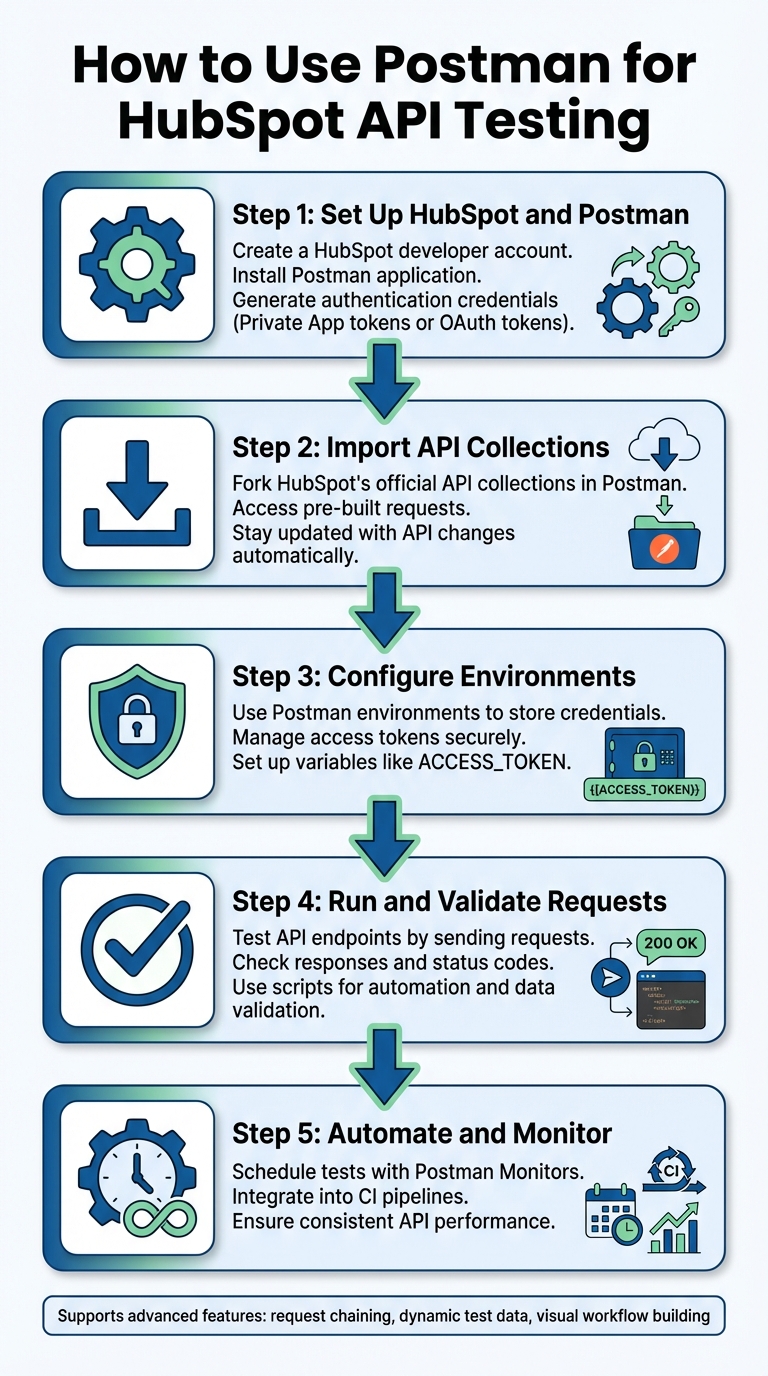
Postman simplifies HubSpot API testing by providing an intuitive interface for creating, sending, and validating API requests. Instead of relying on complex command-line tools, Postman allows you to test APIs visually, manage credentials securely, and automate workflows. Here’s how you can get started:
- Set Up HubSpot and Postman: Create a HubSpot developer account, install Postman, and generate authentication credentials (Private App tokens or OAuth tokens).
- Import API Collections: Fork HubSpot’s official API collections in Postman to access pre-built requests and stay updated with API changes.
- Configure Environments: Use Postman environments to store and manage credentials like access tokens securely.
- Run and Validate Requests: Test API endpoints by sending requests, checking responses, and using scripts for automation or data validation.
- Automate and Monitor: Schedule tests with Postman Monitors or integrate them into CI pipelines to ensure consistent API performance.
Postman also supports advanced features like request chaining, dynamic test data generation, and visual workflow building, making it a versatile tool for developers and non-technical users alike.
5-Step Process for Setting Up Postman for HubSpot API Testing
Using Postman with HubSpot Just Got Easier!
sbb-itb-5f36581
Prerequisites for HubSpot API Testing with Postman
To get started testing HubSpot APIs in Postman, you'll need a HubSpot developer account, the Postman app, and valid authentication credentials (either a Private App token or OAuth tokens).
Creating Your HubSpot Developer Account
Begin by signing up for a free HubSpot developer account on the HubSpot Developer Portal. This account is essential for managing apps and creating developer test accounts. These test accounts are sandbox environments that let you experiment with API calls without risking live customer data.
Once you've set up the developer account, create a developer test account. This sandbox mirrors a real HubSpot account but keeps your testing isolated from production systems. Also, ensure you have Super Admin permissions in any HubSpot account where you'll create apps or install integrations.
Installing Postman
Download the Postman app from its official website. You can use either the desktop version or the browser version, but if you choose the latter, make sure the Postman Agent is running. This agent is necessary for handling Cross-Origin Resource Sharing (CORS) requests.
Sign in to your Postman account and fork HubSpot's pre-built API collections into your workspace. If you're using Postman in a browser, confirm the Postman Agent is active by checking its icon in your system tray (Windows) or status menu (Mac).
Getting API Keys or OAuth Tokens from HubSpot
HubSpot offers two authentication methods: Private App tokens for single-account integrations and OAuth 2.0 for public apps that span multiple HubSpot accounts. For quick testing, a Private App token is usually the simplest option.
-
Private App Token:
To generate one, go to Settings > Integrations > Private Apps in your HubSpot account (not the developer account). Create a private app, give it a name, and select the scopes that align with the API endpoints you want to test (e.g.,crm.objects.contacts.read). Once you click Create app, copy the access token immediately, as you won’t be able to view it again. -
OAuth 2.0:
For OAuth, you'll need to create a public app in your developer account. This will provide you with a Client ID and Client Secret. Set up a Redirect URI in the app settings, and use these credentials in Postman’s OAuth 2.0 authorization flow. HubSpot advises using the newer OAuth v3 endpoints (https://api.hubapi.com/oauth/v3/token) for improved security. These endpoints require parameters in the request body instead of query strings, offering enhanced protection.
"HubSpot has released new OAuth v3 API endpoints with enhanced security features. The v1 OAuth API endpoints are now deprecated but remain operational. We recommend that all new integrations use v3." - HubSpot Developer Blog
Store your tokens securely in Postman by using environment variables, such as ACCESS_TOKEN, and marking them as "sensitive" to hide the values. Keep in mind, OAuth access tokens are valid for only 30 minutes (1,800 seconds). You'll need to use a refresh token for longer testing sessions.
| Authentication Method | Best Use Case | Key Credentials | Where to Create |
|---|---|---|---|
| Private App Token | Internal/Personal use | Access Token (Bearer) | Standard HubSpot Portals |
| OAuth 2.0 | Public apps/Multi-portal | Client ID, Client Secret, Refresh Token | Developer Accounts |
Once you’ve got your credentials, the next step is to import HubSpot’s API collections and set up environments in Postman to streamline your testing process.
Configuring Postman for HubSpot API Testing
Once you have your credentials ready, the next step is to set up Postman for testing HubSpot's APIs. This involves importing HubSpot’s API collections and creating environments to simplify the process. By doing this, you'll avoid manually building requests and streamline authentication for different testing scenarios. Here’s how to get started.
Importing HubSpot API Collections
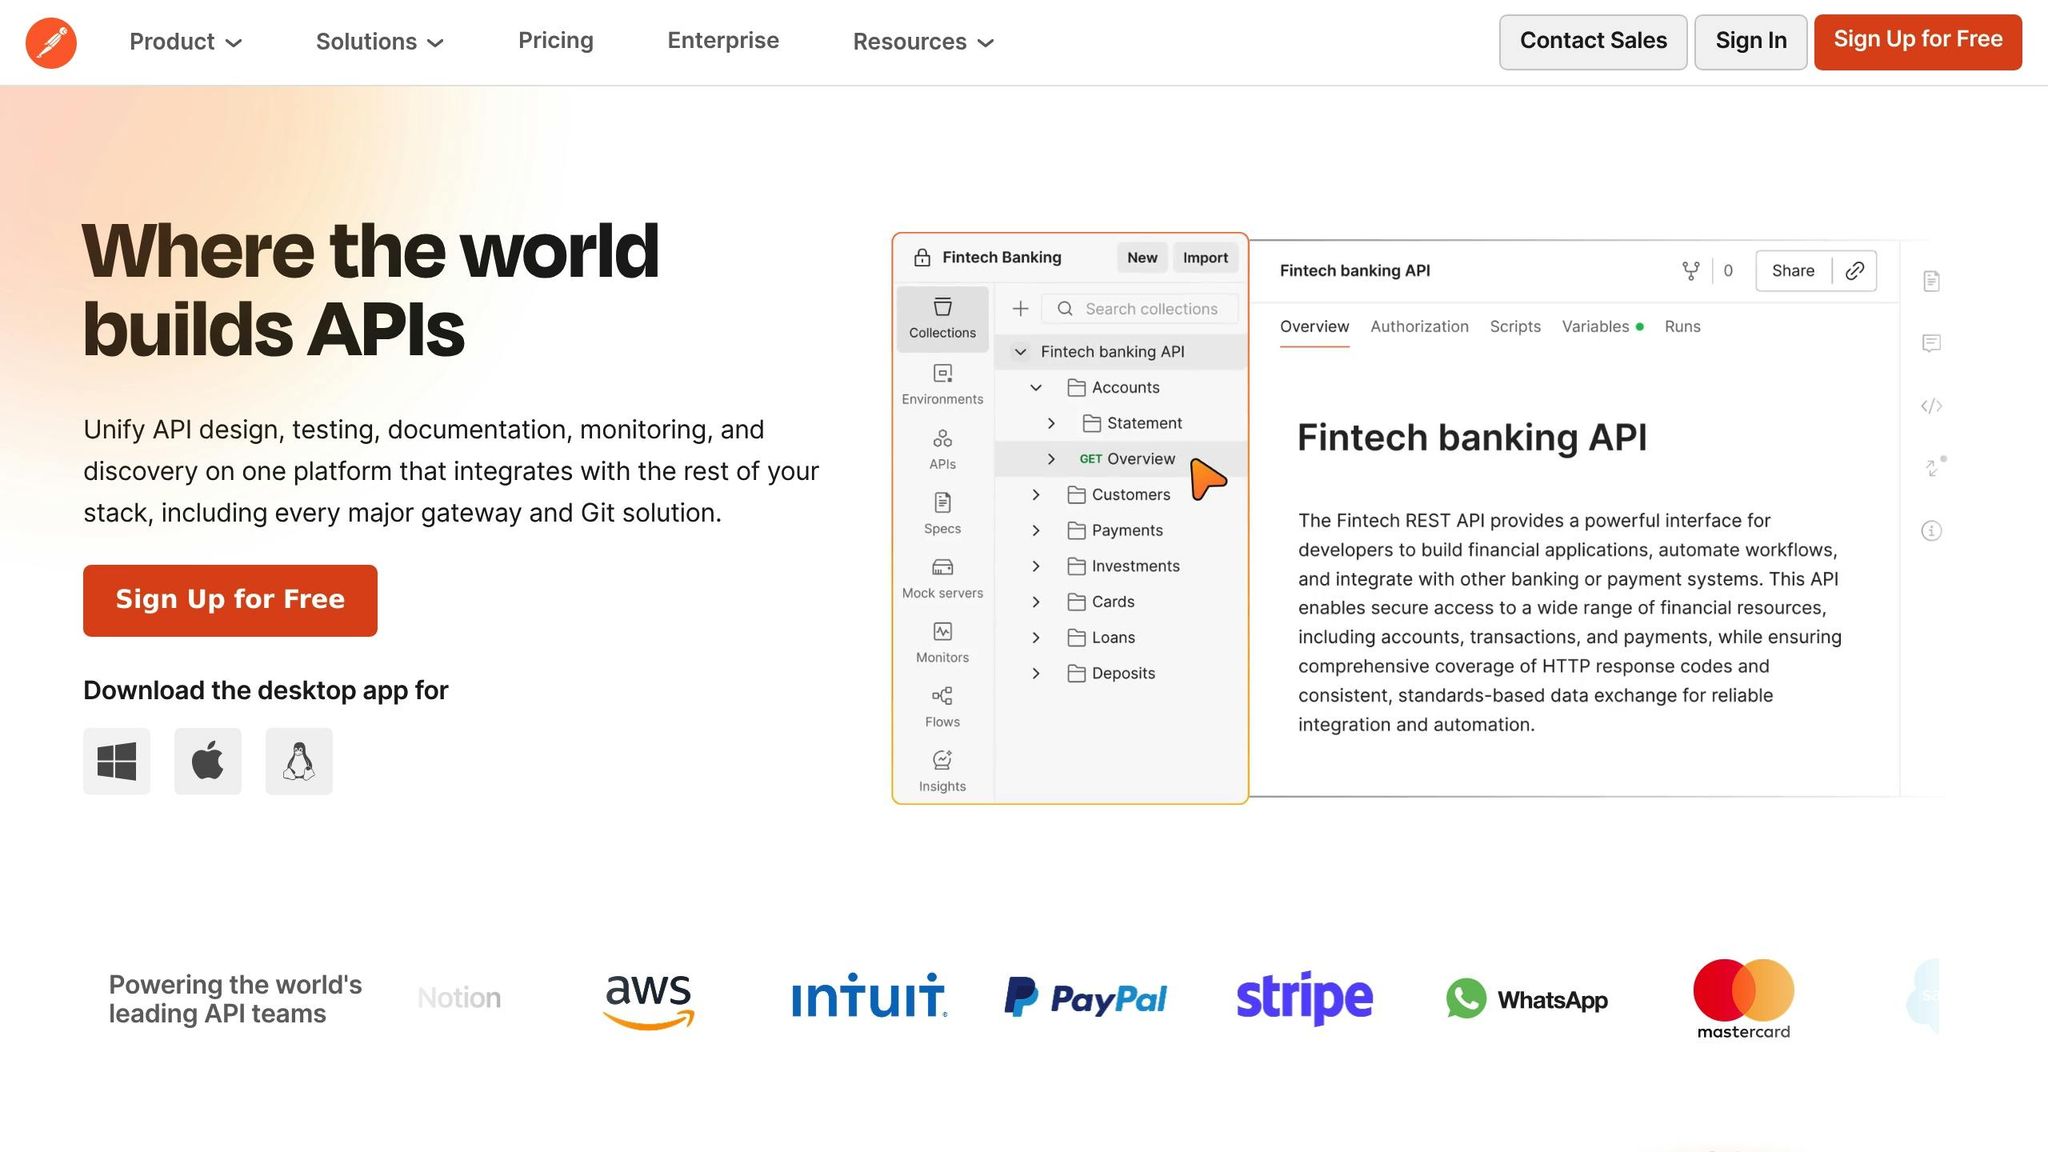
HubSpot provides a Public API Workspace in Postman, featuring official API collections organized by categories like CRM, CMS, and Settings. Instead of downloading these collections, you’ll fork them into your workspace. Forking ensures you always have the latest updates without needing to manually track changes.
To fork a collection:
- Visit the HubSpot Public API Workspace in Postman.
- Select the collection you need (e.g., the CRM API collection).
- Click Fork, add a label for easy identification in your workspace, and enable the Watch original collection option.
By watching the original collection, you’ll receive updates automatically. HubSpot integrates with GitHub to sync their Postman collections with OpenAPI 3.0 schemas in real-time.
"Consolidating HubSpot's public API definitions into a single repository eliminated the manual effort of constantly tracking schema changes and updating the Postman workspace." - Hannah Seligson, Senior Developer Advocate, HubSpot
In recognition of their efforts, HubSpot was awarded Postman’s "Top New API" award in 2024, highlighting the quality and reliability of these pre-built collections.
Setting Up Postman Environments for HubSpot
Postman environments allow you to securely store credentials like access tokens, making it easy to switch between testing and production without modifying individual requests.
Here’s how to set up an environment:
- Click Create Environment in Postman and name it something descriptive, such as "HubSpot Production" or "HubSpot Sandbox."
- Add a variable named
ACCESS_TOKENand input your token in the Current Value field. Using the "Current Value" ensures your token remains local to your session and doesn’t sync to Postman’s cloud. - Mark the variable as secret by clicking the key icon, which masks its value in the interface.
Next, configure your forked collection:
- Open the Authorization tab.
- Set the Auth Type to Bearer Token.
- Enter
{{ACCESS_TOKEN}}in the Token field to dynamically reference your environment variable.
This setup ensures all requests in the collection are authenticated automatically.
| Variable Name | Scope | Purpose |
|---|---|---|
ACCESS_TOKEN |
Environment | Stores the Private App or OAuth token for authentication |
portalId |
Environment | Stores the specific HubSpot Hub ID being tested |
countofContacts |
Collection | Used in scripts to create multiple test records |
With your collections and environments in place, you’re ready to start making and validating API requests. This setup not only saves time but also ensures a more organized testing process.
Running and Validating HubSpot API Requests
Once your collections and environments are set up, you can start running API requests and checking the results. This phase highlights how Postman simplifies HubSpot API validation. You can use the pre-configured forked HubSpot collections with the correct endpoints and parameters, or create custom requests by clicking "Add a request" within a collection. Choose the HTTP method (GET, POST, PUT, DELETE) and enter the HubSpot API URL, such as https://api.hubapi.com/crm/v3/objects/contacts.
Creating Requests in Postman
To build a request manually, select the HTTP method from the dropdown in the URL bar. For POST or PUT requests (used to create or update records), go to the Body tab, select "raw" with JSON format, and add your data payload. For GET requests, use the Params tab to add query parameters - Postman will automatically append these to the URL.
If you need dynamic test data, Postman’s built-in Faker library can help. Use syntax like {{$randomFirstName}} in pre-request scripts to generate realistic dummy data without any extra effort.
Once your request is ready, you can move on to validating the API responses.
Checking API Responses
Postman displays key response details, including the status code, response time, and JSON output. A successful request generally returns a 200 OK status, while creating a new object typically returns 201 Created. Check the JSON response to confirm that the fields, values, and data relationships meet your expectations.
For automated validation, you can write test scripts in the Scripts tab. For example, this simple script checks for a 200 status code:
pm.test("Status code is 200", function () {
  pm.response.to.have.status(200);
});
You can also capture response data for future requests using pm.collectionVariables.set, which ensures consistency across workflows.
"The Postman API Network, with its verification, provides assurance of high-quality HubSpot API assets. This confidence encourages innovation and creates a happier developer experience." - Hannah Seligson, Senior Developer Advocate, HubSpot
Always double-check your API actions in the HubSpot portal to verify that records were created or updated as expected.
Fixing Common Errors
When a request fails, Postman provides the error status code along with a response message from HubSpot. The most common issue is authentication failure, which happens if the Bearer Token is missing, expired, or doesn’t have the required scopes. Make sure your Private App includes the necessary permissions, such as crm.objects.deals.write or crm.objects.contacts.write, for creating records.
Another frequent issue is the 400 Bad Request error, often caused by placeholder text left in the URL or JSON body. Double-check that all placeholders are replaced with actual values from your HubSpot account. If an endpoint isn’t behaving as expected, your collection might be outdated - use the "Pull changes" option to sync with the latest HubSpot API schemas.
| Error Type | Common Cause | Solution |
|---|---|---|
| 401 Unauthorized | Missing or invalid access token | Verify that your access token is set correctly in your environment |
| 400 Bad Request | Placeholder text or malformed JSON | Replace all placeholders with real data and validate JSON syntax |
| 403 Forbidden | Insufficient scopes in Private App settings | Add required scopes (e.g., crm.objects.contacts.write) in HubSpot |
Postman’s built-in Console is a powerful tool for debugging persistent errors. It lets you inspect the exact headers and payloads being sent, helping you identify issues that might not be obvious in the standard interface.
From here, you can dive into advanced testing techniques to further streamline your HubSpot API validations.
Advanced HubSpot API Testing Methods
Postman’s scripting and automation tools make it easier to simulate integration scenarios, maintain API performance, and ensure your HubSpot connections work reliably over time.
Chaining Requests and Using Scripts
Chaining requests lets you pass data between multiple API calls, creating test scenarios that closely resemble actual integrations. For instance, after creating a company in HubSpot, you can capture its companyId using pm.collectionVariables.set('companyId', responseData.id) and reuse it in a follow-up contact creation request with {{companyId}}.
Paul Gaskin’s "HubSpot Data Builder" collection is a great example of automated CRM testing using chained requests and scripted data generation.
For more complex workflows, use pm.execution.setNextRequest("Request Name") to control which request runs next. This allows for conditional branching based on response data or even looping through requests multiple times. Be sure to include pm.execution.setNextRequest(null) at the end to avoid infinite loops.
These scripting techniques can significantly streamline your testing process, especially when combined with automation.
Automating API Tests and Monitoring
Postman Monitors let you automate test collections, running them on a schedule from the cloud. This ensures your HubSpot integrations stay functional without requiring constant manual checks. Monitors can alert you to issues like request failures or slow response times, helping you catch problems before they disrupt production systems.
To take it a step further, integrate your HubSpot API tests into a CI pipeline using the Postman CLI. Postbot can also help by generating or refining test scripts quickly.
"Integration testing makes sure that the different parts of your application are compatible with one another. It also tests how your application functions with other systems, like databases and third-party services." - Postman Docs
Once automation is in place, you can focus on validating specific integrations, such as those involving Reform, to ensure smooth data exchange.
Testing HubSpot Integrations with Reform

When linking Reform forms to HubSpot, Postman can confirm that data flows correctly between the platforms. Set up a test collection that mimics Reform’s submission process: send a POST request to HubSpot’s contacts endpoint with the same structure Reform uses. Then, use post-response scripts to verify that the contact was created with the expected properties. Capture the new contact’s ID using pm.collectionVariables and chain a GET request to confirm all fields were populated correctly.
For visual workflow testing, Postman Flows offers templates like "Create or update HubSpot contacts from new entries on Typeform", which can serve as a guide for similar form-based integrations.
Always test in your HubSpot developer sandbox first by switching Postman environments. Once everything works smoothly, validate the integration in production. This approach helps catch potential issues early, ensuring your Reform-to-HubSpot connection remains reliable even as you update either platform.
Conclusion
Summary of Key Points
This guide covered the key steps for testing HubSpot APIs using Postman. It began with setting up a HubSpot developer test account and installing Postman, followed by configuring authentication using either OAuth or private app access tokens. You also learned how to fork HubSpot's Public API collections, ensuring you always have the latest API definitions synced with GitHub.
Additionally, it explained how to validate API responses and manage credentials using Postman Environments. For more advanced testing, the guide introduced request chaining with scripts, using the Faker library to generate realistic dummy data, and leveraging automated testing features. These tools simplify the testing process and help ensure your integrations remain reliable over time.
With these foundational practices in place, you're ready to take your HubSpot integrations to the next level.
Next Steps for HubSpot Integrations
To keep your integrations running smoothly, consider implementing continuous monitoring. Postman Monitors can automatically run your test collections, helping you catch potential issues before they impact production systems. Enable the "Watch original collection" setting to get notifications whenever HubSpot updates its API schemas.
If your team handles lead generation workflows, integrating tools like Reform with HubSpot can streamline data capture and CRM synchronization. Reform’s forms, designed for better conversions with features like multi-step logic, lead enrichment, and spam prevention, integrate seamlessly with HubSpot through its Pro plan. You can test these integrations in Postman by simulating form submissions, verifying contact property updates, and ensuring data flows smoothly.
"The Postman API Platform enables developers to engage with and collaborate with HubSpot APIs, especially with the GitHub integration. We're seeing developer engagement continually increase." - Rohit Panicker, Software Engineer, HubSpot
As you build more advanced workflows, explore Postman Flows for visual API orchestration. Also, prioritize the use of the new OAuth v3 endpoints, which were released in January 2026, offering enhanced security. By taking advantage of Postman’s robust testing tools, you can maintain reliable and scalable HubSpot integrations that grow alongside your business.
FAQs
Private app token or OAuth?
When working with HubSpot APIs in Postman, using OAuth for authentication is the best approach. This process involves a few steps: setting up a developer account, configuring your app’s Client ID, Client Secret, and Redirect URI in Postman, selecting OAuth 2.0 as the authorization type, and then requesting an access token. While private app tokens are available, OAuth stands out as the preferred choice for both testing and production environments because it offers greater flexibility and enhanced security.
How do I store tokens safely in Postman?
To keep tokens safe in Postman, steer clear of hardcoding sensitive data in your requests or environment variables. Instead, take advantage of Postman’s security features, like the Secret Scanner, to safeguard your tokens. Use environment variables to store tokens, but ensure access is tightly controlled. Only share collections with trusted users, and make it a habit to rotate tokens regularly. For authentication, opt for private apps or OAuth, which provide scoped and secure access.
How do I chain HubSpot requests in Postman?
To link HubSpot requests in Postman, you can pass data between requests using variables. Here's how to do it:
In the "Tests" tab of your request, save response data as a variable with a command like this:
pm.environment.set("variable_name", pm.response.json().desiredField);
Then, use {{variable_name}} in the next request - whether in the URL, headers, or body - to streamline your workflow and automate the process.
Related Blog Posts
Get new content delivered straight to your inbox

The Response
Updates on the Reform platform, insights on optimizing conversion rates, and tips to craft forms that convert.


Drive real results with form optimizations
Tested across hundreds of experiments, our strategies deliver a 215% lift in qualified leads for B2B and SaaS companies.
