
.webp)
Testing Form Integrations After Software Updates


When software updates roll out, they can disrupt your form integrations, causing issues like data loss, failed submissions, or mismatched fields in CRMs. This can hurt your lead generation and customer trust. Regular testing after updates ensures your forms continue working seamlessly. Here's what you need to know:
- Why Test Integrations? Untested updates can lead to bugs in 40–60% of cases. For businesses, this might mean lost leads or broken workflows.
- How to Test: Use a staging environment to replicate your live setup, generate test submissions, and validate field mappings. Tools like Reform and Zapier can streamline this process.
- Key Steps: Document current settings, set up test environments, run integration tests, and review results for errors like data mismatches or failed triggers.
- Automate Testing: Embed tests into your CI/CD pipeline to catch issues early and monitor performance with real-time analytics.
- Common Problems: Watch for data format mismatches, expired API keys, and performance lags. Address issues with mapping strategies, refreshed credentials, and optimized queries.
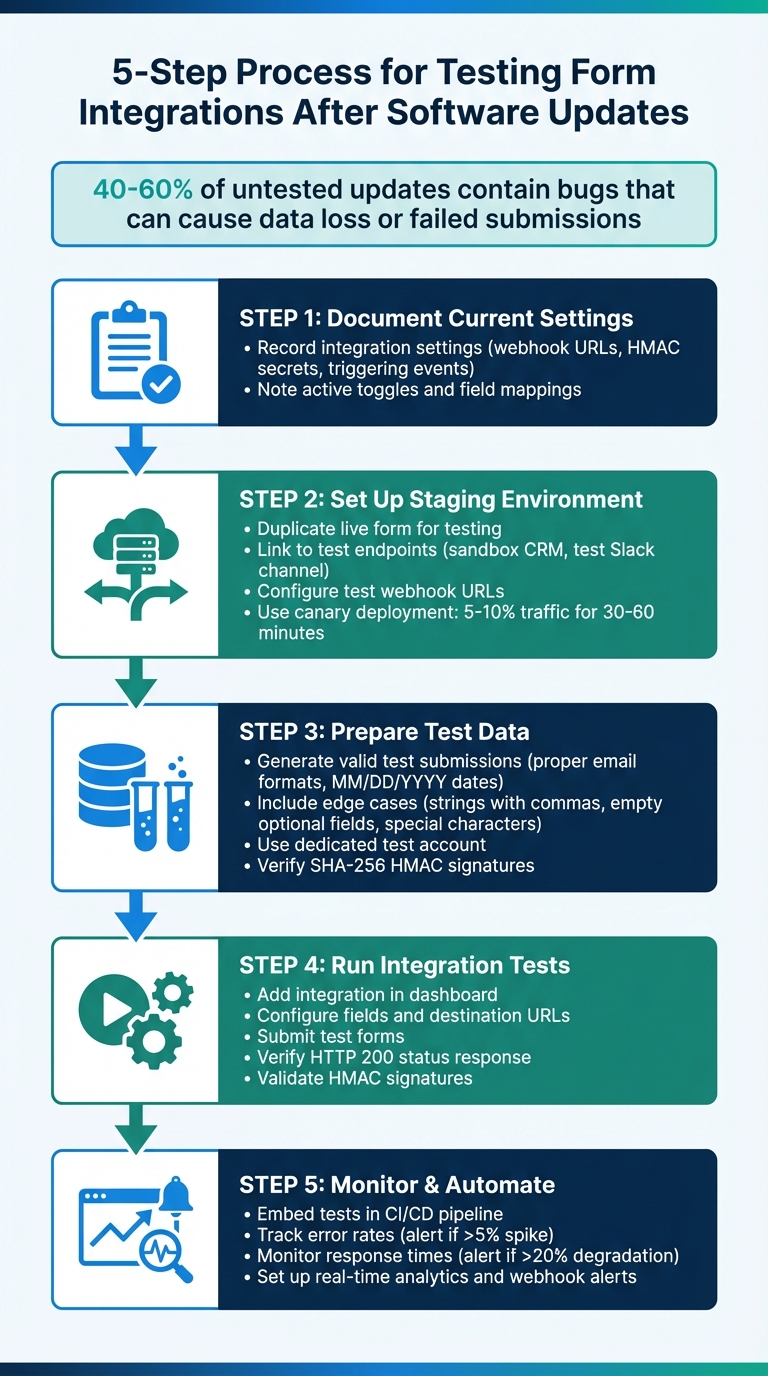
5-Step Process for Testing Form Integrations After Software Updates
Setting Up Your Testing Environment
Creating a testing environment is essential for isolating errors and keeping them away from real users and live production data. Start by documenting your current integration settings to ensure you can replicate them accurately in a staging setup.
Record Your Current Integration Settings
Take note of your existing Reform integration settings, including active toggles, webhook URLs, SHA-256 HMAC secrets, and triggering events like new submissions or updates. Having these details documented allows you to safely replicate your environment by setting up a dedicated staging instance.
Create a Staging Environment
Duplicate your live Reform form and link it to test endpoints. These could be sandbox CRM accounts, a test-specific Slack channel, or a "Test" tab in Google Sheets. Reform makes it easy to configure multiple webhook URLs at once, so you can route data to both a logging service and your test application. Use tools like Zapier's Test Trigger to confirm that field mappings are correct before going live.
For updates that carry higher risks, consider starting with a canary deployment. This method sends only 5-10% of traffic to the updated version for 30-60 minutes, giving you time to monitor for any issues.
| Environment Component | Production Configuration | Staging Configuration |
|---|---|---|
| Form Version | Published Live Form | Duplicate "Test" Form |
| Integration Endpoint | Production CRM / Live Zap | Sandbox CRM / Test Zap |
| Webhook Security | Active SHA-256 HMAC | Active SHA-256 HMAC (Test Secret) |
| Data Destination | Main Database / Client Folders | Test Database / "Catch Hook" |
| Traffic Volume | 100% of Users | 5-10% (Canary) or Internal Only |
Prepare Your Test Data
Generate test submissions that cover a variety of scenarios using valid data, such as proper email formats and U.S. date formats (MM/DD/YYYY). Don’t overlook edge cases - test strings with commas to check array handling, leave optional fields empty to ensure the integration doesn’t fail, and include special characters to test JSON formatting. Always use a dedicated test account to keep your production system free of clutter from fake data. Additionally, ensure your test data generates the correct SHA-256 HMAC signature to verify authenticity.
How to Test Form Integrations
Plan Your Integration Tests
Use your staging environment to mimic real-world conditions for testing. Start by listing all the tools connected to your Reform form, such as HubSpot, Zapier, Google Sheets, Slack, or any custom webhooks. Document each point where data is exchanged between systems. The focus here should be on how data flows between tools, rather than the internal workings of each platform.
Organize your test cases by their level of risk and importance. Assign P0 to critical functions like lead capture or payment processing, P1 for mid-level features, and P2 for lower-priority items. Structure your tests around specific form events, such as new submissions, updates, or conditional triggers based on user responses. Make sure your test scenarios reflect actual user behavior - for example, testing the entire process from form submission to data entry in your CRM.
Run Your Test Cases
Follow Reform's three-step webhook process to execute your tests:
- Add the integration: Start by selecting the tool you want to connect (e.g., HubSpot or a webhook) in the Reform dashboard.
- Configure the integration: Paste the destination URL, set up headers, and map the necessary fields to ensure compatibility with the receiving system.
- Activate the integration: Submit a test form to confirm everything is working. Reform will immediately send data to the connected tool via webhooks.
Once the test form is submitted, check the destination system to ensure the data fields are mapped correctly. Look for an HTTP status 200 response, which confirms the data was received successfully. Also, validate the SHA-256 HMAC signature in the "Signature" header to confirm the data's integrity and security.
| Step | Action | Success Criteria |
|---|---|---|
| Add | Select and connect the tool in Reform. | The integration appears in the active list. |
| Configure | Map fields and input destination details. | Headers and payloads align with the receiving system's needs. |
| Activate | Submit a test form. | Data instantly appears in the connected tool. |
| Verify | Check HMAC signatures and logs. | Data remains secure and unaltered. |
After completing these steps, move on to analyzing the results.
Review Your Test Results
Once the tests are complete, review the data flow and validation logs to ensure everything is consistent. Use Reform's real-time analytics to monitor submission data and pinpoint any issues in the data transfer process. Confirm that all test submissions show up in the destination systems with the correct field mappings and formatting.
Don’t overlook edge cases. Check how optional fields handle empty values and ensure special characters don’t disrupt the JSON formatting. If you’ve set up multiple webhook URLs, verify that a single form submission triggers actions across all connected systems simultaneously.
Finally, test the integration under typical submission volumes to ensure data is delivered reliably, even during high traffic. Document any failures, including the specific error messages, affected integrations, and the conditions that caused the problem. This will help you prioritize fixes based on their impact on the user experience.
Automating Tests and Monitoring After Updates
Add Tests to Your CI/CD Pipeline
Automating your testing process ensures that integration stability remains consistent. By embedding form integration tests into your CI/CD pipeline, you can validate the functionality and reliability of updates before they impact production users.
For those using the Zapier CLI, consider implementing canary testing to release updates gradually. Start by directing 5-10% of live traffic to the updated integration for a trial period of 30-60 minutes. You can initiate this test with the command zapier-platform canary:create. During this time, closely monitor error rates, and if they increase by more than 5%, use zapier-platform canary:delete to roll back the update.
Additionally, set up unit tests to confirm that your integration code behaves as expected before deployment. Automate the SHA-256 HMAC verification process for Reform webhooks to ensure data integrity during transfers. This step adds a layer of security to your data. Tools like Jenkins or Travis can be integrated into your pipeline to automatically trigger these tests with every code push.
Monitor Integration Performance
Once your tests are automated in the CI/CD pipeline, it’s crucial to continuously monitor the performance of your integrations. Reform’s real-time analytics dashboard offers immediate insights into submission data as it flows through your integrations. This makes it easier to identify issues like spikes in failed task rates, longer response times, or the appearance of new error types after updates.
For a more granular view, leverage Zapier's Monitoring page to track every API request made by your integrations. You can filter logs by timeframe, log type, or user email to locate the exact source of failures. If you’re working with custom code integrations, add z.console.log statements to the dashboard. This allows you to log specific input fields or data bundles, speeding up debugging. To stay proactive, set up webhook alerts to notify your team via Slack or other tools when form submissions fail or errors occur.
| Monitoring Focus | What to Track | Action Threshold |
|---|---|---|
| Error Rates | Failed Zaps & HTTP errors | Spike >5% from baseline |
| Response Times | Latency between submission and data delivery | Degradation >20% from average |
| Data Integrity | SHA-256 HMAC signature validation | Any verification failure |
| Submission Volume | Total form completions vs. abandoned sessions | Sudden drop >10% |
sbb-itb-5f36581
Fixing Common Integration Problems
When working with integrations, even the most well-thought-out testing framework can face challenges. Tackling these issues promptly ensures smoother operations.
Common Problems and Solutions
Integration problems often surface after updates, despite careful planning. For instance, data compatibility errors are a frequent headache. These occur when systems use different data formats or naming conventions, and updates can shift fields, leading to data loss during transfers. To avoid this, you should develop a mapping strategy that aligns fields across your forms and connected systems.
Another common issue is API version mismatches, which can break integrations when third-party providers update their APIs without notice or introduce changes that aren't backward-compatible. If your integration suddenly stops working, check the API documentation for version updates and adjust your endpoints as needed.
Authentication errors are another culprit, often showing up as 401 or 403 error codes. These failures typically stem from expired API keys, misconfigured OAuth settings, or mismatched encryption standards. To resolve this, refresh your credentials, audit role-based access permissions, and test authentication in a live environment. Keep in mind that some platforms don't persist tokens in development mode, so testing outside of staging is crucial.
Lastly, performance degradation can rear its head when new software versions demand more resources, causing bottlenecks that disrupt real-time data exchange. To mitigate this, optimize queries, implement load balancing, and monitor for resource conflicts, especially when updated components compete for shared memory or CPU resources.
Reference Table
| Failure Symptom | Likely Cause | Recommended Fix |
|---|---|---|
| Data loss or "undefined" fields | Data format/naming convention mismatch | Implement data mapping and validation checks |
| 401 or 403 Error Codes | Expired API keys or OAuth token issues | Refresh credentials; audit role-based access |
| System timeouts or lag | Resource bottlenecks or non-real-time sync | Optimize queries; implement load balancing |
| Integration stops working after update | Backwards-incompatible API change | Review API versioning and update endpoints |
| Request shows "Successful" but no data processed | API returned message without HTTP error code | Inspect JSON response body for error messages |
| Authentication expires or marked invalid | Tokens not persisted in testing UI | Test access/refresh token mechanism in live environment |
| Unable to create new test leads/records | Existing test data blocking new entries | Delete previous test lead/record and retry POST request |
| Erratic system behavior | Undefined state transitions or race conditions | Define explicit state machines and event frameworks |
Conclusion
Testing form integrations after an update doesn’t have to be complicated. Start by recording your settings, setting up a staging environment, and running planned test cases. Integrate automated tests into your CI/CD pipeline and keep an eye on performance. This process helps catch problems early - like renamed fields or mismatched API versions - before they can disrupt live forms or hurt conversions. Plus, it keeps testing cycles efficient, often under 10 minutes.
Automation and monitoring aren't just routine tasks - they can actually give you an edge. Tools like Reform make this easier with their no-code form builder and seamless marketing and CRM integrations. Features like lead enrichment, email validation, and real-time analytics help identify API mismatches quickly. Reform’s webhook system also stands out by instantly transmitting data instead of relying on periodic polling.
The importance of webhooks is clear:
"Webhooks provide real-time data transmission, which is crucial for timely actions and updates in external systems. Unlike polling methods that check for updates at intervals, webhooks push data instantly when events occur." – Reform
FAQs
What steps can I take to ensure my form integrations work properly after a software update?
To ensure your form integrations work seamlessly after a software update, thorough testing is key. Begin by checking that data flows correctly between your form and any connected systems. Keep an eye on performance to spot any slowdowns or errors, and take time to review updated API documentation to confirm everything is still compatible.
It's also a good idea to update your test scripts regularly to account for new features or changes introduced by the update. Testing early and frequently can help you catch and fix issues before they affect your users.
How do I set up a staging environment to test form integrations after software updates?
Setting up a staging environment is a smart way to test form integrations without risking your live setup. To get started, create an environment that closely mirrors your production system. Use test or mock data endpoints to ensure your live data stays untouched. If you're embedding forms, don't forget to whitelist your testing domains to avoid any display glitches. For local testing, tools like proxies can help you generate accessible URLs.
Once the staging environment is set up, test everything - form submissions, integrations, and workflows - to make sure they function as intended. After confirming everything works smoothly, deploy the changes to your live environment. Keep an eye on performance post-deployment to quickly address any potential issues. This approach ensures your users enjoy a seamless experience.
How can I automate testing for form integrations to quickly identify issues?
To streamline testing for form integrations and catch issues early, automated tools and scripts can be a game-changer. These tools allow you to simulate real-world scenarios, test form submissions, validate how data is transmitted, and keep an eye on API responses to make sure everything functions smoothly after updates.
With automated scripts, you can go a step further. They can handle routine API calls, verify authentication processes, and test how your system manages errors in different situations. By catching potential problems early, you can address them before they affect users. Pairing these automated tests with continuous monitoring not only keeps your form integrations dependable but also cuts down on the need for time-consuming manual checks.
Related Blog Posts
Get new content delivered straight to your inbox

The Response
Updates on the Reform platform, insights on optimizing conversion rates, and tips to craft forms that convert.


Drive real results with form optimizations
Tested across hundreds of experiments, our strategies deliver a 215% lift in qualified leads for B2B and SaaS companies.
