
.webp)
Zapier API Integration for Lead Forms: Step-by-Step Guide


Tired of manually managing leads? Zapier can automate your lead form submissions, saving you time and reducing errors.
By connecting Reform's high-converting lead forms to Zapier, you can automatically send lead data to CRMs, spreadsheets, or communication tools. This guide walks you through:
- Setting up Reform and Zapier accounts.
- Linking Reform to Zapier using API keys or webhooks.
- Creating automated workflows (Zaps) to handle lead data.
- Testing, activating, and monitoring your workflows for accuracy.
With Zapier, every form submission triggers real-time updates across your tools, ensuring your team can act promptly on new leads. No coding skills needed - just a few clicks to simplify your lead management process. For more advanced strategies, check out our lead conversions playbook.

Zapier API Integration Setup Process for Lead Forms
How To Connect Google Ads Lead Form To Zapier
sbb-itb-5f36581
Getting Started with Reform and Zapier
To automate your lead workflows, you'll need to set up and connect both Reform and Zapier. The process is simple - most users wrap it up in less than six minutes. Here's how to get started.
Setting Up Your Reform Account
First, sign up for a Reform account. Once you're logged in, head to the Integrations page in your dashboard. This is where you’ll manage all your external tool connections.
Make sure your Reform plan supports Zapier integration. The Basic plan ($15/month or $150/year) includes unlimited responses and conditional logic, while the Pro plan ($35/month or $350/year) offers additional advanced features.
Under the Zapier section, locate your API key and toggle the integration switch to "on."
Creating a Zapier Account
Next, visit Zapier and create a free account. The free plan includes basic automation tools, which are enough to get started with Reform.
Zapier’s interface is user-friendly and doesn’t require any coding skills. Plus, it offers a wide range of integrations to streamline your workflows.
Once your Zapier account is ready, return to Reform to connect the two platforms.
Connecting Reform to Zapier
With both accounts set up, it’s time to link Reform and Zapier.
In your Reform dashboard, find the invite link under the Zapier section on the Integrations page. Clicking this link will authenticate your Reform API key within Zapier, establishing the connection.
If you’d rather not use the invite link, you can connect via webhooks. Here’s how:
- In Zapier, create a new Zap and select "Webhooks by Zapier" with the "Catch Hook" event.
- Copy the unique webhook URL generated by Zapier.
- Return to Reform, go to the Integrations page, select Webhook, click "Add Integration," and paste the Zapier URL into the provided field.
After saving your settings, test the connection. Use Zapier’s "Test Trigger" function and submit a test form in Reform. If everything is set up correctly, your form submission data will appear in Zapier, confirming the platforms are successfully linked.
Creating and Configuring a Zap
Now that you've linked Reform to Zapier, it's time to set up your first Zap to streamline lead workflows. This involves creating a trigger to detect new form submissions, adding actions to direct the data, and optionally cleaning up the information before sending it to your chosen app.
Setting Up the Trigger: New Form Submission
To get started, create a new Zap in your Zapier dashboard. Select Reform as the trigger app and choose New Response as the event. This ensures that data is sent as soon as someone submits a form.
Next, connect your Reform account and pick the form you want to monitor from the dropdown list. Since each form has a unique ID, selecting the correct one ensures the Zap only activates for submissions from that specific form.
Click Test Trigger and submit a real entry on your Reform form. Zapier will then pull in sample data, showing all the form fields and their responses. To make things easier down the line, use clear field names (like "Email") instead of raw IDs for better field mapping.
With your trigger ready, you can move on to setting up how the lead data will be processed.
Adding Action Steps for Lead Automation
To add an action step, click the + button and choose your destination app. Popular options include HubSpot (Create Contact), Google Sheets (Create Spreadsheet Row), or Slack (Send Channel Message).
Connect the account for your selected app, then map the fields from your Reform form to the appropriate fields in the action step. For instance, if you're adding a contact to HubSpot, map the "Email" field from Reform to HubSpot's "Email" field and do the same for "Full Name" or other relevant fields. Always match the form's answers to the corresponding fields in your destination app, not the question IDs.
When testing your setup, include both required and optional fields to ensure the action can handle empty responses correctly. If the data needs to be refined before reaching the destination app, you can add a Formatter step.
Using Zapier Formatter for Data Cleaning
If your form data needs adjustments before being sent to your CRM or spreadsheet, Formatter by Zapier is a handy tool. This built-in feature can clean text, numbers, and dates without adding extra task usage on Professional plans.
Insert a Formatter step between the trigger and action to handle tasks like splitting full names, formatting phone numbers to E.164 (e.g., +16232349012), or converting dates into a standardized format. If your form uses multi-select checkboxes, Formatter can also break down comma-separated values into individual fields that your CRM can process. These adjustments ensure your data is clean and consistent, which is key for effective lead management.
When working with dates, be sure to manually set the "From Format" to avoid errors. Finally, map the Output field from the Formatter step to your action step so the cleaned data is passed along correctly.
Testing, Publishing, and Monitoring Your Zap
Running a Full Test
To ensure everything is set up correctly, start by submitting a test entry through your Reform form. This provides Zapier with real data to work with. In the Zapier editor, click 'Test run' to execute the workflow and confirm that your field mapping is accurate. When you test a trigger, Zapier retrieves data from Reform. Testing an action, on the other hand, creates or updates records in your destination app - whether that's Slack, your CRM, or another tool.
After submitting the test entry, compare the results in Zapier with the records in your connected app. If something doesn’t look right, Zapier’s AI troubleshooting tools can help by analyzing error messages and offering solutions. Keep in mind, the Publish button will stay grayed out until you’ve successfully tested the trigger and any additional steps like Filters or Paths. Once the data flow checks out, you’re ready to publish your Zap.
Publishing and Enabling the Zap
After testing is complete, the next step is to activate your Zap. Click 'Turn on Zap' in the Zapier editor. Then, head over to your Reform dashboard. Navigate to the Integrations page and make sure the toggle in the top-right corner is switched to "on." This enables data to flow seamlessly between your form and Zapier.
To double-check everything, submit a live entry through your Reform form. Then, review the Zap History in Zapier to confirm that the workflow processed the entry as expected. Also, verify that the connection label in the Zap editor corresponds to the correct Reform account. This step is crucial to avoid accidentally sending data to the wrong environment.
Monitoring and Optimizing Zap Performance
Once your Zap is active, regular monitoring is key to maintaining its performance and accuracy. Use the Zap History dashboard to track how your workflows are running. You may encounter different statuses, such as:
- Stopped: Indicates errors.
- Waiting: Tasks are delayed.
- Holding: Usage limits or billing issues are causing a pause.
- Safely Halted: The Zap stopped intentionally, like when a search yields no results.
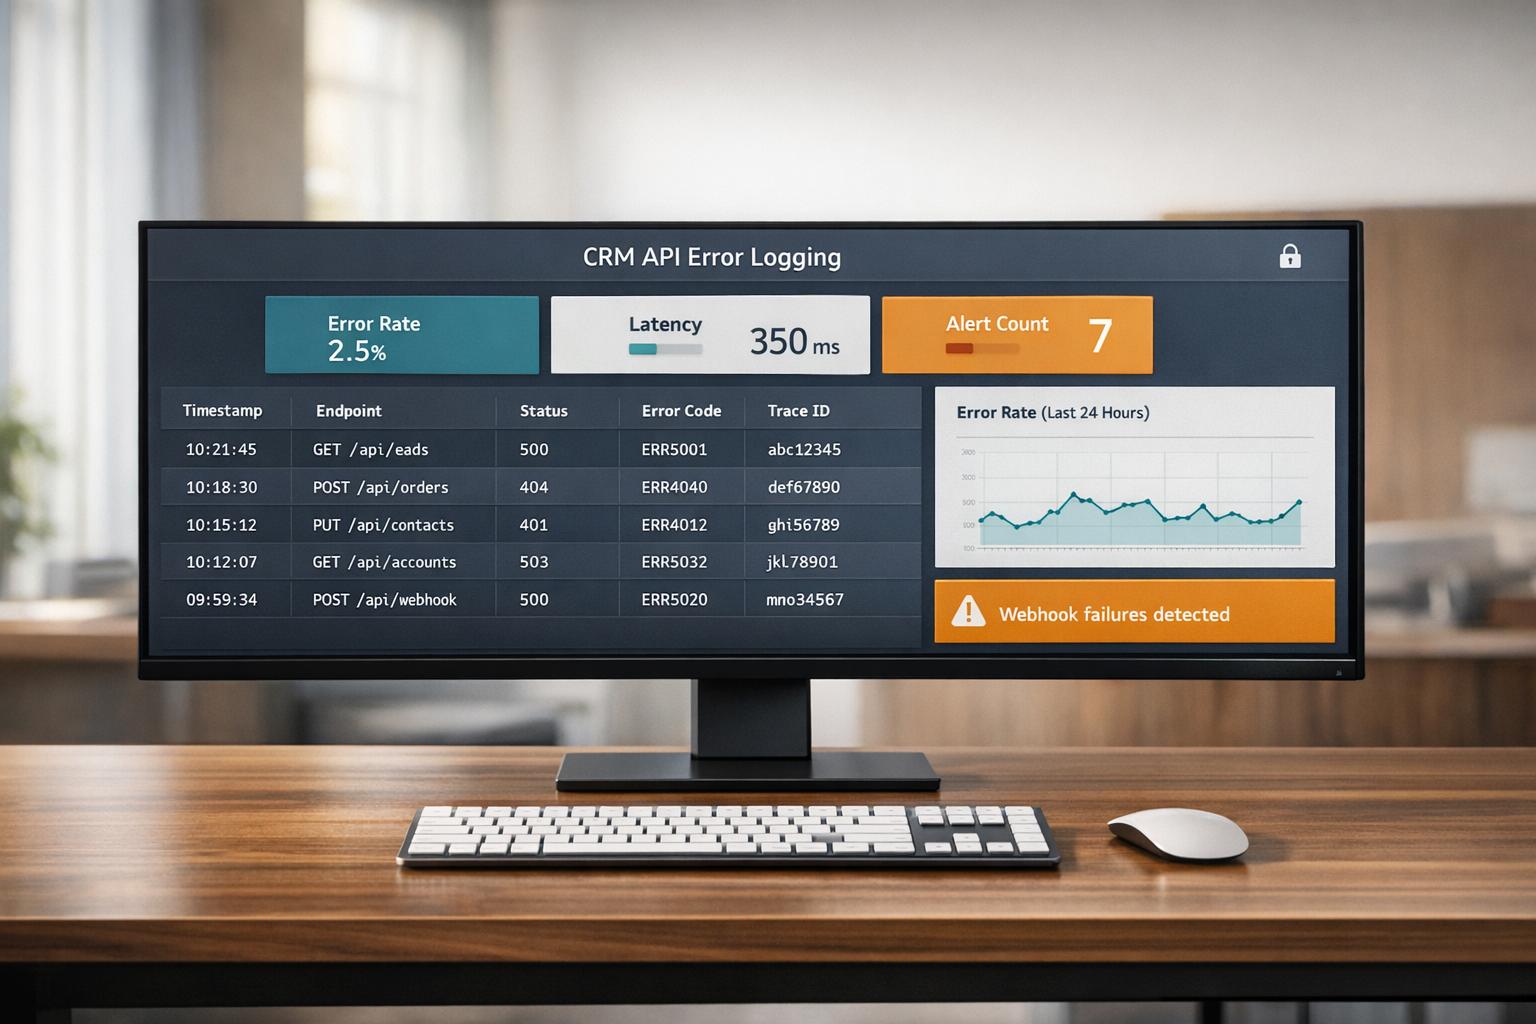
Zapier also sends automated email alerts if any issues arise with your live Zaps. To troubleshoot, click on a specific run in the Zap History dashboard. The Logs tab provides detailed insights, including HTTP status codes, error messages, API endpoints, and the request/response data. Compare "Data In" (what Zapier sent) with "Data Out" (what the app returned) to identify any mismatches. Once you’ve resolved the problem, you can manually replay any failed runs to ensure no data is lost.
"Measure twice, cut once... if you ensure everything is set up properly before you begin using it, you can spot - and fix - problems before they derail your automation." - Andy Wingrave, Zapier-certified Expert
Conclusion and Key Takeaways
Key Benefits of Reform and Zapier Integration
Integrating Reform with Zapier simplifies workflows by cutting out manual tasks and speeding up processes. With real-time triggers and a no-code setup, your team can automatically sync leads to CRMs, spreadsheets, and messaging platforms. This ensures data moves smoothly between apps, maintaining accuracy and reducing the risk of missed opportunities.
Reform's no-code platform empowers your team to create powerful workflows without needing a developer. Whether it's routing leads to ActiveCampaign, organizing data in Google Sheets, or notifying your sales team via Slack, this integration takes care of it seamlessly.
For businesses handling large datasets, Transfer by Zapier is a game-changer for bulk migrations - perfect for switching to a new CRM or consolidating older records. If your data needs more specific handling, Webhooks by Zapier allows you to filter JSON payloads to extract exactly what you need.
Next Steps for Scaling Automation
Now that the benefits are clear, it's time to plan your next steps toward deeper automation. Once your initial Zap is running smoothly, consider expanding with multi-step workflows. For example, a single form submission could simultaneously update your CRM, add new subscribers to your email list, and create tasks in your project management tool.
Take advantage of Zapier Tables to centralize form submissions across your organization. For advanced automation, Zapier Copilot can help design intricate systems using natural language, while Zapier Chatbots can engage leads immediately after they submit a form. If you're processing payments, integrate Stripe into your workflows for a seamless experience. As your business grows, paid Zapier features allow you to incorporate custom domains and branding, ensuring a polished, professional look across all interactions.
FAQs
Should I connect Reform to Zapier with an API key or a webhook?
When connecting Reform to Zapier, it's best to use webhooks rather than an API key. Webhooks offer better security and flexibility. To set this up, choose 'Webhooks by Zapier' as the trigger, then configure webhook URLs to handle form submissions. Both Reform and Zapier highlight this method as the go-to option for smooth and reliable automation.
How do I prevent duplicate leads when a Zap runs more than once?
To prevent duplicate leads, leverage Zapier's deduplication process, which filters out repeated entries using unique identifiers like an id field. Make sure your trigger lists items in reverse chronological order to ensure accuracy. Additionally, avoid setting up actions that update the same record and inadvertently retrigger the Zap, as this can cause loops. By configuring these settings correctly, you can ensure each lead is processed just once.
What should I check first if my Zap stops or shows errors?
If your Zap stops working or displays errors, start by checking its run status in your Zap history or editor. Pay attention to statuses like Errored, which indicate the run faced an issue and couldn’t finish. Understanding whether the run is errored, halted, on hold, or has a handled error will guide you in figuring out the best way to address the problem.
Related Blog Posts
Get new content delivered straight to your inbox

The Response
Updates on the Reform platform, insights on optimizing conversion rates, and tips to craft forms that convert.


Drive real results with form optimizations
Tested across hundreds of experiments, our strategies deliver a 215% lift in qualified leads for B2B and SaaS companies.
