
.webp)
Conditional Logic in Salesforce Multi-Step Forms


Conditional logic in Salesforce multi-step forms simplifies user experiences by dynamically showing or hiding fields, steps, or pages based on user responses. This approach ensures users only see relevant questions, reducing form abandonment and improving data quality. It also helps businesses qualify leads, routing high-value prospects to sales teams while directing others to self-service tools.
Key Takeaways:
- Conditional Logic Basics: Uses "if-then" rules to adjust forms in real-time.
- Core Features:
- Visibility Rules: Show/hide fields based on input.
- Branching: Route users to specific steps based on answers.
- Decision Elements: Automate navigation through logic nodes.
- Benefits: Reduces user overwhelm, improves data accuracy, and streamlines lead qualification.
- Setup Essentials:
- Permissions like "Manage Flow" or "Customize Application."
- Tools include Screen Flows, Dynamic Forms, and OmniStudio.
- Testing: Use Salesforce Debug Mode to preview and troubleshoot flows.
By tailoring forms to user inputs, Salesforce helps businesses collect cleaner data and guide users through more efficient, personalized interactions.
Conditional Logic Basics
What is Conditional Logic?
Conditional logic relies on if-then rules to make forms smarter by showing or hiding fields, sections, or steps based on what users input. Think of it as a dynamic formula: if a user selects a specific option, then the form adjusts - showing follow-up questions and hiding irrelevant ones.
"Conditional logic is a set of rules that implement interactivity. Each rule (or step) has two parts: conditions and actions." – Formcrafts Documentation
Each rule includes two key components: conditions (using operators like "Is Equal To" or "Contains") and actions (like displaying a field, marking it required, or redirecting users to another screen). For instance, in a Salesforce Trailhead project updated in 2026, the account record for Grand Hotels & Resorts Ltd used visibility filters to display fields such as "SLA Expiration Date", "SLA", and "SLA Serial Number" - but only when the "Active" field was toggled to "Yes".
In Salesforce multi-step forms, three concepts are central to how conditional logic works:
- Visibility Rules: Filters applied to specific fields or components to determine whether they appear on screen.
- Branching: Creates different form paths, like sending User A to Screen 2 and User B to Screen 3, depending on their answers.
- Decision Elements: Logic nodes in Salesforce Flows that evaluate variables to decide the next step for the user.
This structure provides a solid foundation for understanding how conditional logic makes forms more interactive and user-friendly, as explored in the benefits below.
Benefits of Conditional Logic in Multi-Step Forms
Conditional logic simplifies complex forms through progressive disclosure, revealing only the information users need at each step. Instead of overwhelming users with every possible field at once, forms adjust in real-time, making even lengthy processes feel easier to navigate.
This method also boosts data quality and accuracy. By showing users only the questions relevant to their situation, it encourages them to provide complete and precise answers. This reduces skipped fields or abandoned forms, resulting in cleaner, more useful data for sales and marketing teams. On mobile devices, conditional logic becomes even more valuable, cutting down unnecessary scrolling and ensuring users focus on the most important fields first.
sbb-itb-5f36581
[Tutorial] How to dynamically require fields using Salesforce Dynamic Forms
Prerequisites for Implementation
Before diving into adding conditional logic to Salesforce multi-step forms, make sure your organization has all the necessary licenses, permissions, and technical setups in place.
Most conditional logic tools, such as Screen Flows and Dynamic Forms, are included in standard Salesforce editions like Professional, Enterprise, and Unlimited without any additional costs. However, if you’re using OmniStudio (Omniscripts) for creating high-quality, consumer-focused forms, you’ll need an Industries-specific package like Financial Services Cloud, Health Cloud, or Public Sector Solutions.
For building and configuring flows, your admin account must have the "Manage Flow" and "View All Data" permissions. Dynamic Forms, on the other hand, require the "Customize Application" permission. Additionally, ensure that "Run Flows" is enabled for user profiles or granted through permission sets to allow proper interaction with the forms.
"We recommend letting Flow do the hard work for you, so that you can focus on the forms themselves instead of worrying about form state." – Salesforce Architects
With these foundational steps complete, you’re ready to move forward in tailoring your form’s functionality.
Planning Your Workflow
Start by mapping out your workflow and user requirements. Decide whether your form will interact with a single object (best suited for Dynamic Forms), multiple objects, or no objects at all - simply collecting data without linking directly to Salesforce fields. This choice determines which tool is the right fit for your needs. Implementing these changes can significantly reduce the perceived effort for your users.
Another key consideration is where and how the form will be used. For example:
- Screen Flows: These work seamlessly on mobile devices and external-facing sites, supporting both Aura and LWR Experience Cloud sites.
- Dynamic Forms: These are primarily designed for desktop use and are not compatible with Experience Cloud sites.
Determining the Run Context
Decide on the run context for your flow. Running in "User Context" ensures the form respects individual user permissions, while "System Context" bypasses permissions to guarantee the form completes successfully, regardless of access levels. Careful planning here helps avoid issues like logic overload or transaction errors - especially when combining database operations with external callouts.
Laying this groundwork ensures a smoother implementation process and fewer roadblocks as you build your forms.
Setting Up Multi-Step Forms with Conditional Logic
Salesforce Multi-Step Form Setup with Conditional Logic - Complete Implementation Guide
This section dives into configuring multi-step flows in Salesforce, building on the earlier discussion of conditional logic. Here’s how you can break it all down into manageable steps.
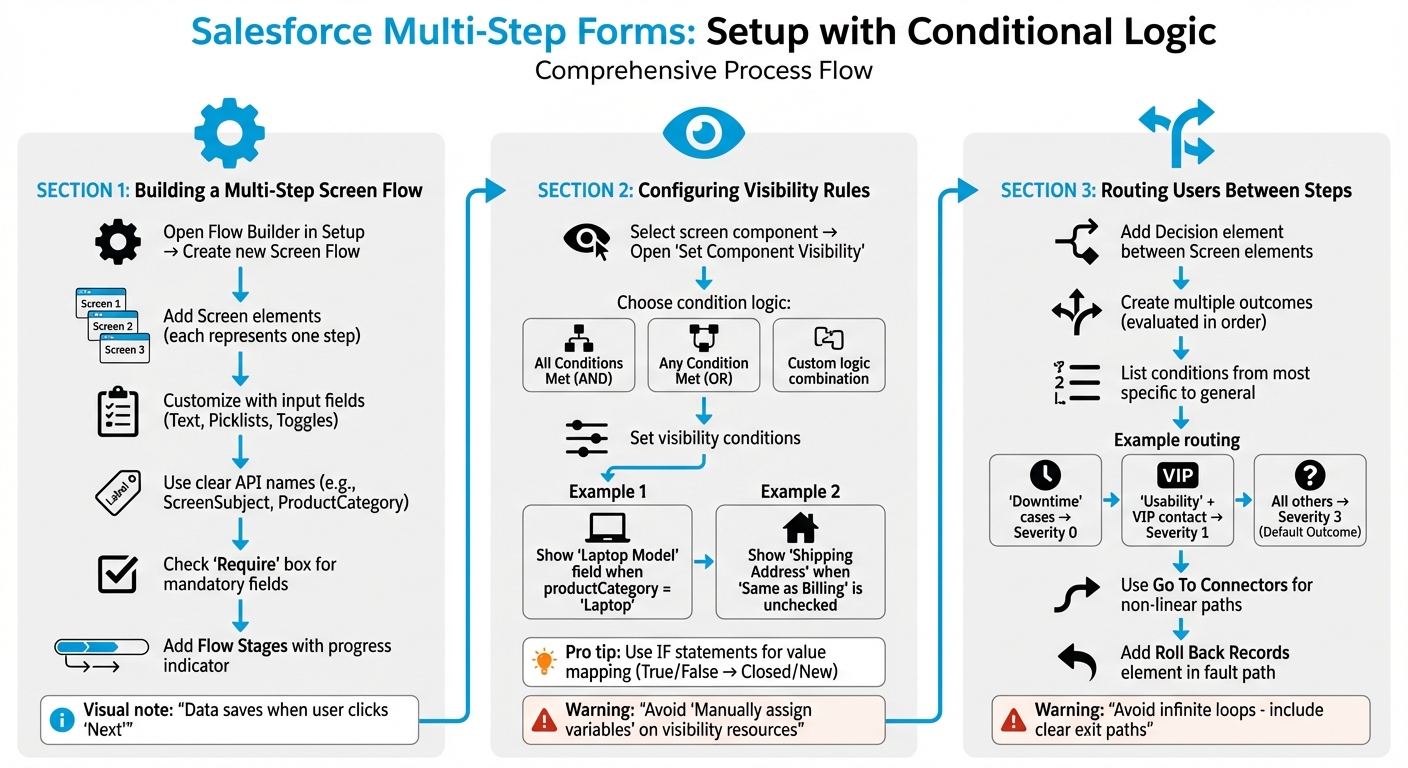
Building a Multi-Step Screen Flow
In Salesforce Flow Builder, each step in your form corresponds to a Screen element. The flow pauses at each screen, waiting for the user to click "Next" to move forward. To create a multi-step form, you’ll need to add multiple Screen elements and link them in sequence.
Start by opening Flow Builder in Setup and creating a new Screen Flow. Add your first Screen element and customize it with input fields like Text fields, Picklists, or Toggles to collect user information. Use clear API names for these components (e.g., ScreenSubject or ProductCategory) to make future updates easier.
For fields that are absolutely necessary, check the "Require" box to ensure users can’t proceed without completing them. To improve the user experience, consider adding Flow Stages with a progress indicator. This visual cue helps users track their position in the form process.
Remember, any data entered on a screen is saved when the user clicks "Next." Design your screens thoughtfully to ensure data integrity throughout the flow.
Configuring Field and Section Visibility Rules
To simplify your form and avoid creating too many screens, use Conditional Visibility rules. In Flow Builder, select a screen component and open the "Set Component Visibility" option in its properties. Here, you can set conditions that determine when a component appears. You can choose between "All Conditions Are Met (AND)", "Any Condition Is Met (OR)", or even combine multiple criteria with custom logic.
For instance, if you’re designing a product support form, you might show a "Laptop Model" field only when the user selects "Laptop" from a productCategory Picklist. Similarly, a "Shipping Address" section could appear only if a "Same as Billing" checkbox is unchecked. Visibility conditions can reference other screen components, flow variables, or calculated formulas.
Using IF statements in formulas is another way to simplify value mapping. For example, you can convert a Toggle’s True/False value into something more user-friendly, like "Closed" or "New". This approach is often quicker than setting up multiple Decision and Assignment elements for straightforward mappings.
One thing to watch out for: avoid enabling "Manually assign variables (advanced)" on a component if you plan to use it as a visibility resource on the same screen. This can cause logic conflicts.
Routing Users Between Steps
To add branching logic between steps, use a Decision element between Screen elements. This tool evaluates user inputs from the previous screen and routes the flow down different paths based on the conditions you define.
Each Decision element includes multiple outcomes, with each outcome representing a unique path. Salesforce evaluates these outcomes in the order they’re listed, following the first matching path. If none of the conditions are met, the flow defaults to the "Default Outcome" path.
For example, you might route "Downtime" cases to Severity 0, "Usability" cases with VIP contacts to Severity 1, and all other cases to Severity 3.
When setting up Decision outcomes, list the most specific conditions first and more general ones later to ensure proper routing. Always configure a Default Outcome to catch unexpected inputs or act as a fallback path.
For more advanced navigation, use Go To Connectors to create non-linear flow paths. These connectors let users revisit previous steps (like when validation fails) or skip ahead without cluttering the flow canvas. Just be cautious of infinite loops - always include a clear exit path to prevent exceeding Salesforce limits.
If your multi-step form creates records during the process, consider adding a Roll Back Records element in a fault path. This ensures that any database changes are reversed if a later step fails, preventing partial or incorrect data from being saved.
Once you’ve set up the routing logic, thoroughly test your flow to confirm smooth navigation for users.
Testing and Troubleshooting Your Forms
Previewing and Debugging Flows
Salesforce Debug Mode lets you test your flow’s conditional logic before it goes live. Open Flow Builder, click Debug, and walk through your form as if you were the end user. The debug panel gives you a real-time view of every step, showing which decision paths are followed and how variable values change during execution.
"This real-time insight is like having an x-ray of your flow's logic." - Nick Frates, Salesforce Developer
For safer testing, enable "Run in rollback mode" to avoid making permanent changes to your data during the process. If your flows depend on specific user permissions or profiles, turn on "Let admins debug flows as other users" in Process Automation Settings. This feature allows you to simulate the experience of a specific user, helping to catch permission-related issues.
Starting with the Winter '26 release, the debug panel now appears as a side panel, making it easier to navigate between the canvas and debug details simultaneously. When building, it’s smart to test in smaller sections rather than waiting to complete the entire flow. By tackling small pieces, you can quickly pinpoint and resolve issues as they arise.
Once errors are identified during debugging, use the following tips to address common logic problems effectively.
Fixing Common Logic Issues
Even after thorough testing, some common logic issues can still crop up. A systematic approach to debugging can help you resolve these problems and ensure smooth flow execution.
One frequent issue is null values, which can disrupt your logic. Check if your variables are being populated correctly, and adjust conditions to handle empty values. For example, if a field isn’t appearing or disappearing as expected, confirm that the API name of the controlling field matches your logic and that the operator (like "Equals" or "Contains") is correctly applied.
Another common problem involves permission gaps. In one Trailhead scenario, an admin discovered a "Create New Customer" flow worked fine for them but failed for a user named Mario Cruz. Debugging as Mario revealed missing object-level permissions. Assigning the "Create Opportunity" permission set fixed the issue.
To avoid flow crashes, always add Fault Paths (the red connectors) to Create, Update, Get, or Delete elements. Without these, a single validation error or permission issue can bring your flow to a halt. Fault Paths allow you to route users to helpful error messages instead of leaving them stuck. Also, test negative scenarios by inputting data that forces false conditions or hides fields.
Here’s a quick guide to address common problems:
| Common Issue | Likely Cause | Recommended Resolution |
|---|---|---|
| Flow fails for one user but not admin | Missing Object/Field permissions | Use "Run as another user" in Debug; check Profile/Permission Sets. |
| Field doesn't appear/disappear | Broken Visibility Rule | Check the API name of the controlling field and the logic operator (e.g., Equals vs. Contains). |
| "Unexpected Null Value" | Empty variable in logic | Use a "Get Records" element to ensure data exists or add a Decision element to check for nulls. |
| Logic takes the wrong path | Incorrect Decision criteria | Review Debug Details panel to see how each condition was evaluated (True/False). |
| Flow crashes on record update | Validation Rule conflict | Add a Fault Path to the Update element to capture and display the specific validation error. |
If a flow fails in production, Salesforce will notify the last modifying admin via email, including a direct link to the specific flow version and the failed element. Additionally, you can investigate issues through Paused and Failed Flow Interviews in Setup, which provides a snapshot of the flow’s state at the time of failure.
Conclusion
Conditional logic transforms static Salesforce multi-step forms into dynamic, user-focused experiences by tailoring the journey to each individual's specific needs. By using powerful form templates to reveal only the most relevant fields and guiding users through personalized paths, you minimize cognitive overload and help respondents stay on track. This streamlined approach reduces abandonment rates and keeps users engaged.
Beyond enhancing user experience, conditional logic improves lead management. By incorporating lead qualification and routing, you can prioritize high-value prospects early in the process. For instance, asking key qualifying questions upfront allows you to route top-tier leads directly to sales scheduling. This ensures your sales team focuses on prospects with the highest potential to convert.
Another standout benefit is the efficiency it brings to form completion. Tools like "Skip this page" and "Jump to" actions let users bypass unnecessary sections, speeding up the process and reducing frustration. This not only enhances the user experience but also simplifies data collection by removing the need for complex workarounds and ensuring cleaner results.
However, to fully capitalize on these benefits, effective form configuration is critical. Regular testing and updates are essential to maintaining functionality. Debug Mode and systematic troubleshooting can catch potential issues early, preventing disruptions for real users. Experts also suggest keeping logic rules manageable - aim for fewer than 50 rules for most forms, or up to 100 for more intricate setups - to maintain performance and simplicity.
FAQs
When should I use Screen Flows vs Dynamic Forms for conditional logic?
Dynamic Forms give you the power to fine-tune individual fields and sections on a Lightning record page. With these, you can create layouts that adapt to specific user needs by controlling visibility and customization. This makes it easier to deliver personalized and efficient user experiences.
On the other hand, Screen Flows are perfect for multi-step processes that feel like guided wizards. They’re especially useful for tasks like onboarding or surveys, where each step can change based on the user’s responses. With conditional routing and clear navigation, they simplify even the most complex workflows.
How can I avoid permission issues when users run a multi-step flow?
To prevent permission issues in Salesforce multi-step flows, it's crucial to ensure users have the appropriate permissions and access rights. Start by updating permission sets to align with the flow's components. Check whether the flow is configured to run in system mode or user mode, as this affects how permissions are applied during execution.
Leverage tools like flow debugging to simulate how the flow operates under different user profiles. This helps identify potential access issues before they arise. Adjust the flow's run context to follow security best practices, reducing risks such as privilege escalation.
What’s the safest way to test branching logic without saving records?
The safest way to check branching logic in Salesforce Flow without altering records is by using flow interview testing. This feature, accessed through the "Test" option in Flow Builder, allows you to validate the flow's behavior in a controlled environment. It ensures your logic and conditions function as expected without impacting any actual data.
Related Blog Posts
Get new content delivered straight to your inbox

The Response
Updates on the Reform platform, insights on optimizing conversion rates, and tips to craft forms that convert.


Drive real results with form optimizations
Tested across hundreds of experiments, our strategies deliver a 215% lift in qualified leads for B2B and SaaS companies.
