
.webp)
Constant Contact CRM Sync: Ultimate Guide


If your CRM and Constant Contact do not match, your team can email the wrong people, miss sales follow-up, and mishandle opt-outs. I’d set this up with three rules first: pick the right sync method, decide which system controls each field, and test unsubscribe flow before launch.
Here’s the short version:
- Constant Contact uses email address as the main contact identifier
- CAN-SPAM requires opt-outs to be honored within 10 business days
- Native integrations are fast to set up but often support fewer fields
- Third-party connectors add more logic but need review
- Custom API sync gives full control, but it takes more build time
- Most sync problems come from bad field mapping, duplicate records, and opt-out failures
- A small test group of 20–50 contacts can catch issues before they hit live campaigns
If I were setting this up, I’d keep the CRM in charge of identity and pipeline data and let Constant Contact control email permission status. I’d also clean form data before it enters either system, map only the fields I need, and check logs every week for failed records, duplicate spikes, and unsubscribe updates.
Below, I break down the setup, the sync options, the field rules, the unsubscribe process, the test plan, and the most common errors to watch for.
Salesforce and Constant Contact Integration with Sync Apps
sbb-itb-5f36581
Choose the Right Sync Method for Constant Contact
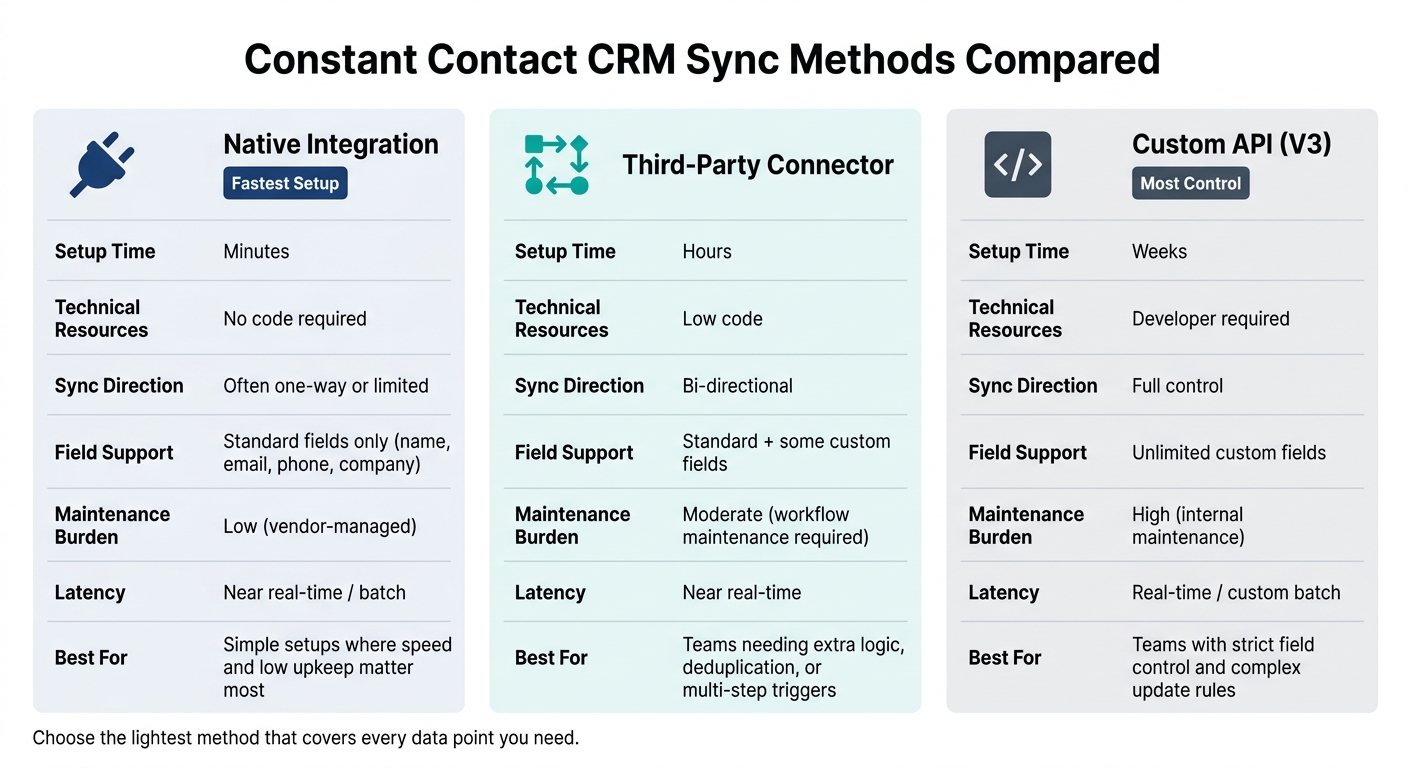
Constant Contact CRM Sync Methods Compared: Native vs Third-Party vs Custom API
Pick the sync method based on three things: your required fields, your duplicate rules, and the direction the data needs to move.
That sounds simple, but it matters a lot. The method you choose affects speed, upkeep, and how well custom fields are handled. In most cases, the best option is the lightest one that still covers every data point you need.
Native Integrations: What to Expect From Official Connectors
Native integrations - like those between Constant Contact and Salesforce or Pipedrive - are built to get you up and running fast. Setup usually takes minutes, not hours. You connect both accounts, map the standard fields in a guided setup, and switch the sync on.
The trade-off is field coverage. Native connectors usually focus on standard contact fields such as name, email, phone, and company. If your CRM includes custom fields like lead score, product interest, or territory, those fields often sit outside what the native connector can handle. Sync direction can also be one-way or only partly two-way, which creates gaps when you need more complete field coverage.
Native sync works well for simpler setups where speed and low upkeep matter more than deep field control.
Third-Party Connectors and Automation Workflows
When a native connector falls short, third-party tools like Zapier or Make can step in. These tools sit between Constant Contact and your CRM, trigger when something happens, and handle the next steps automatically.
This is a good fit when you need extra logic in the flow. For example:
- Deduplicate leads before they enter the CRM
- Send one form submission to multiple tools at the same time
- Push updates back to the source system
- Add custom routing logic or multi-step triggers
Setup is low-code and usually takes a few hours rather than days. That said, these workflows need check-ins from time to time. Automations drift. Field mappings change. A workflow that looked fine on day one can break quietly later if no one keeps an eye on it.
Here’s how the three methods stack up across the main decision points:
| Criteria | Native Integration | Third-Party Connector | Custom API (V3) |
|---|---|---|---|
| Setup Time | Minutes | Hours | Weeks |
| Technical Resources | No code | Low code | Developer required |
| Sync Direction | Often One-way/Limited | Bi-directional | Full Control |
| Field Support | Standard Fields | Standard + Some Custom | Unlimited Custom Fields |
| Maintenance Burden | Low (Vendor-managed) | Moderate (Workflow maintenance) | High (Internal maintenance) |
| Latency | Near Real-time / Batch | Near Real-time | Real-time / Custom Batch |
Custom API Sync for Teams With Specific Data Requirements
Use the Constant Contact V3 API only when prebuilt connectors can’t support your required fields or rules. This route gives you the deepest control over field normalization, OAuth authentication, and rate-limit planning. In plain terms, it’s the option for teams with strict field control and more involved update rules - not the default pick for everyone else.
The upside is flexibility. The downside is ownership. Your team handles the build, the fixes, and the upkeep over time.
Once you’ve picked a method, define your field mapping and contact rules before turning on the sync.
Set Up Field Mapping, Contact Rules, and Lead Capture
Map Standard and Custom Fields Without Creating Data Gaps
Before you turn on the sync, write down every field that needs to move and exactly where it should go in Constant Contact. That simple step helps you spot bad matches early, before they break automations or leave personalization fields empty.
Start with email. Constant Contact uses email as the contact key. After that, map standard fields like First Name, Last Name, Phone, and Company to the built-in contact fields. For lifecycle and attribution data, use tags, lists, or custom fields. That data can then power segmented sends and automation rules.
Keep date values in one sync format across systems, then display them in U.S. format when needed. And if an optional field is used in personalization, give it a fallback such as "Not specified" so your templates don't show blank content.
| CRM Field | Constant Contact Field | Type |
|---|---|---|
| Email Address | Standard | |
| First Name | First Name | Standard |
| Last Name | Last Name | Standard |
| Phone | Phone | Standard |
| Company | Company Name | Standard |
| Lead Status | Tag(s) | Custom |
| Lifecycle Stage | List Membership | Custom |
| Lead Source | Custom Field | Custom |
| Opt-in Consent Date | Custom Date Field | Custom |
Once the mapping is locked in, set rules for which system can create a record, update it, or block it.
Control Contact Creation, Updates, and Duplicate Records
Most duplicate issues start with people using more than one email address. If someone appears as jane.doe@company.com in your CRM and jane@company.com on a form, Constant Contact will treat them as two different contacts. The fix starts upstream: convert emails to lowercase, remove extra spaces, and set a clear rule for which address counts as the main one before the sync begins.
This works even better when form inputs are cleaned before submission.
For update rules, let the CRM handle identity and lifecycle data. Let Constant Contact handle marketing preferences and engagement data. In practice, that means your connector should allow Constant Contact to send fields like Email Opt-In, Last Email Open Date, Last Click Date, and Unsubscribe Reason back to the CRM, while leaving core identity fields such as First Name, Company, and Owner alone. If your connector supports it, use field-level rules like update if blank or never overwrite.
If you're using an API-based sync with the V3 API, fetch the current record first, merge the changes, and then send the full update.
Capture Better Leads From Forms Before They Enter the Sync
The cleanest sync starts at the form stage, before a record ever gets created. Good form data keeps bad records out of the sync. Using lead generation form templates helps standardize this process.
Only collect the fields the sync needs: email, first name, and consent. Validate the email format before submission, and use a clear consent checkbox with plain language, such as I agree to receive marketing emails from [Brand]. Skip pre-checked consent boxes. Also log consent metadata, including the timestamp and source, so you have a record of when the contact opted in. Save that consent timestamp in a custom Constant Contact field.
A few form controls can go a long way:
- Hidden fields
- Email validation
- Spam prevention
- Conditional routing
You can also pass fields like Lead Source, Campaign, or UTM parameters from the URL automatically. Then map them to custom Constant Contact fields or tags. That gives you segmentation and reporting data without adding extra friction for the user.
Handle Unsubscribes, Testing, and Common Sync Failures
After field mapping goes live, tighten permission sync, test each path, and get ready for errors.
Unsubscribe Sync, Consent Status, and Compliance Rules
When a contact clicks the SafeUnsubscribe® link in a Constant Contact email footer, Constant Contact marks that person as Unsubscribed at the contact level. Treat that contact as suppressed until a new opt-in is recorded.
Use Constant Contact as the source of truth for email permission. Map Email Opt-Out, Unsubscribe Timestamp, and Consent Source to CRM fields, and let ONLY Constant Contact update them. The CRM should mirror the opt-out flag, but Constant Contact should control the final permission state. In plain English: your connector can send fields like Email Opt-In, Last Email Open Date, Last Click Date, and Unsubscribe Reason back to the CRM, while leaving identity fields such as First Name, Company, and Owner untouched.
Honor unsubscribe requests within 10 business days, and keep the unsubscribe link active for 30 days after send. That said, pushing opt-outs through within minutes - not days - can help cut complaint risk and protect deliverability. If someone unsubscribes by replying to an email, log that request manually in Constant Contact.
Set this rule before you run a single test.
Run a Safe Test Plan Before Full Launch
Test the same route a live lead will take.
Run the full path: form submission, CRM creation, and any connector flow. Create a test list in Constant Contact and a matching CRM segment. Then put a small group of internal email addresses through each integration path.
Check each step in order:
- Confirm new contacts land in the right Constant Contact list with the right mapped fields.
- Update a field in the CRM and make sure the change appears in Constant Contact.
- If bidirectional sync is turned on, test the reverse direction too.
- Send a test campaign to the internal list, click the unsubscribe link for one test contact, and confirm Constant Contact marks that contact as Unsubscribed.
- Verify the CRM opt-out field updates inside the expected window.
- Try adding that same address again through a form submission and confirm it stays suppressed.
Do not launch until every step passes more than once.
Troubleshoot the Most Common Sync Errors
If a test breaks, go straight to the logs and find where the handoff failed.
Authentication issues are some of the most common. A 401 Unauthorized response means the access token or API key is invalid or expired. A 403 Forbidden response means the connected account does not have the needed permissions or scopes. For third-party connectors, assign the needed account role before you retry. In many cases, reconnecting the integration or assigning the right role fixes both problems fast.
Past auth issues, the next batch of common failures usually includes missing required fields, field type mismatches, list ID errors, duplicate conflicts, queue delays, and API rate limits. These often appear as record-level failures in import logs or connector dashboards. The table below shows the usual cause and the fastest fix.
| Error Type | Likely Cause | Where to Check | Fastest Fix |
|---|---|---|---|
| 401 Unauthorized | Expired or invalid access token / API key | API error logs, connector dashboard | Reconnect the integration and refresh the token |
| 403 Forbidden | Missing required role or incorrect app scopes | Constant Contact account role settings | Assign the correct role, adjust scopes, and reactivate the app |
| Missing required fields | Email or another required field is blank | Import activity report, connector logs | Enforce required fields in forms as part of your lead generation strategy or CRM workflows |
| Field type mismatch | Text sent to a date or numeric field | API or connector parsing errors | Normalize formats and correct the field mappings |
| List mismatch | Wrong list ID or a deleted list | Connector settings, sync job logs | Confirm list IDs and relink the connector to the correct list |
| Duplicate conflict | The same email is tied to multiple records | CRM duplicate reports, Constant Contact contact logs | Match by email first, then update the existing contact |
| Queue delays | Queue backlog or rate limits | Scheduler or queue dashboards | Reduce batch size, schedule during off-peak hours |
| API rate limit (429) | Too many requests in a short window | API monitoring, connector error logs | Add backoff and retry logic, and batch requests where possible |
For duplicate contacts, one small workflow change can save a lot of cleanup. Use a Find Contact step by email before trying to create a new record. If a match exists, route it to Update Contact instead. That move stops most duplicate conflicts before they happen.
Monitor Sync Health and Maintain It Over Time
Build a Simple Ongoing Monitoring Process
After setup and testing, monitoring is what keeps the sync accurate.
Syncs drift over time. Fields change. Forms get updated. Lists shift. What worked at launch can slowly fall out of line a few weeks later. That’s why, once the early setup issues are fixed, the job changes from troubleshooting to routine checks. A simple cadence helps you catch small issues before they hit campaigns.
On a weekly basis, review logs for:
- Failed records
- Duplicate spikes
- New unsubscribe activity
- Form submissions that aren’t reaching the CRM
On a monthly basis, check field mappings against current schemas and confirm that contact volume lines up with expected trends. Also run a validation check within 24 to 48 hours after any form, pipeline, or CRM change.
Ownership matters here. Assign one person to handle alerts, one to manage integration changes, and one reviewer to check workflow fit. Then document backup owners for each role. If someone is out, the process shouldn’t stall.
Before any major change, save the current config. Also write down how to pause submissions, restore the prior mapping, and reprocess affected records. When something breaks, speed matters. A rollback plan can save a lot of cleanup.
Conclusion: Core Rules for a Reliable Constant Contact CRM Sync
Once the sync is live, the main job is protecting field integrity and permission status.
A reliable sync depends on routine checks, clear ownership, and a fast rollback path. The setup, mapping, testing, and monitoring steps in this guide work as one connected process. Each step leans on the one before it.
Three rules cover the basics:
- Pick the right sync method
- Define the source of truth for each field
- Keep mappings, duplicates, and unsubscribe status under close review
Data quality shapes campaign performance and attribution. Reform can reduce bad records at the source with email validation, conditional routing, and spam prevention.
FAQs
Which sync method should I choose?
Choose based on your workflow complexity and engineering resources.
Use a native integration if you need standard fields, simple lead capture, and a fast, budget-friendly setup handled by the vendor. Go with a custom API integration only when native options don't cover what you need, like advanced lead scoring, real-time enrichment, complex routing, or custom objects.
How do I prevent duplicate contacts?
Use a clear deduplication strategy in your CRM sync. Pick one stable matching key, such as email address or CRM Record ID, and set the integration to update or create records instead of create-only.
It also helps to standardize field formats from the start. Use Reform’s validation and field mapping to clean up data before it lands in your CRM.
Before you roll this out, test duplicate submissions in a sandbox. Then check sync logs on a regular basis so you can catch issues early.
What should I test before launch?
Before launch, test the full end-to-end lead/contact flow with sample submissions that look like what your team will get in production. Don’t just check whether the form submits. Follow the data all the way through and make sure it lands in the CRM the way you expect.
Look closely at field mapping and formatting, required-field behavior, partial submissions, routing, ownership transfers, notifications, and deduplication. A small mismatch here can turn into a mess later. For example, a phone number field might pass through, but land in the wrong format. Or a lead might get created, but never reach the right owner.
It also helps to push on the awkward cases, not just the happy path. Test failed payloads, retries, unmatched routing rules, and rate limits. Those are the kinds of issues that stay hidden until launch day, and that’s when they hurt.
You’ll also want to confirm unsubscribe syncing, compare source and CRM record counts, and watch logs for sync lag and errors. If the numbers don’t line up, or records show up late, that’s a red flag worth digging into before traffic starts flowing.
Related Blog Posts
Get new content delivered straight to your inbox

The Response
Updates on the Reform platform, insights on optimizing conversion rates, and tips to craft forms that convert.




Drive real results with form optimizations
Tested across hundreds of experiments, our strategies deliver a 215% lift in qualified leads for B2B and SaaS companies.
