
.webp)
How to Personalize Multi-Step Email Form Workflows


Multi-step email form workflows simplify data collection and improve user engagement by breaking forms into smaller, focused steps. This approach increases completion rates and enables personalized follow-ups through automated email sequences tailored to user responses. Here's how you can use this strategy effectively:
- Why Multi-Step Forms Work: Users are more likely to complete shorter, segmented forms. Once they start, they’re likely to finish.
- Personalized Email Workflows: Gather specific details (e.g., industry, company size) to trigger tailored email campaigns.
- Reform's Tools: Use Reform's no-code builder to create multi-step forms with conditional logic, progress indicators, and direct email platform integrations.
- Dynamic Email Content: Pull user data into emails using Liquid templates for relevant, customized communication.
- Lead Enrichment: Enhance user data with company size, industry, or job title to refine targeting.
- Conditional Logic: Segment users based on their responses, directing them to specific workflows or outcomes.
- Testing and Analytics: Test workflows for accuracy, monitor drop-off points, and adjust based on real-time analytics to improve performance.
This method not only simplifies data collection but also ensures follow-ups are relevant, improving engagement and conversion rates.

Multi-Step Email Form Personalization Impact Statistics
Setting Up Multi-Step Forms in Reform
Building Your Multi-Step Form
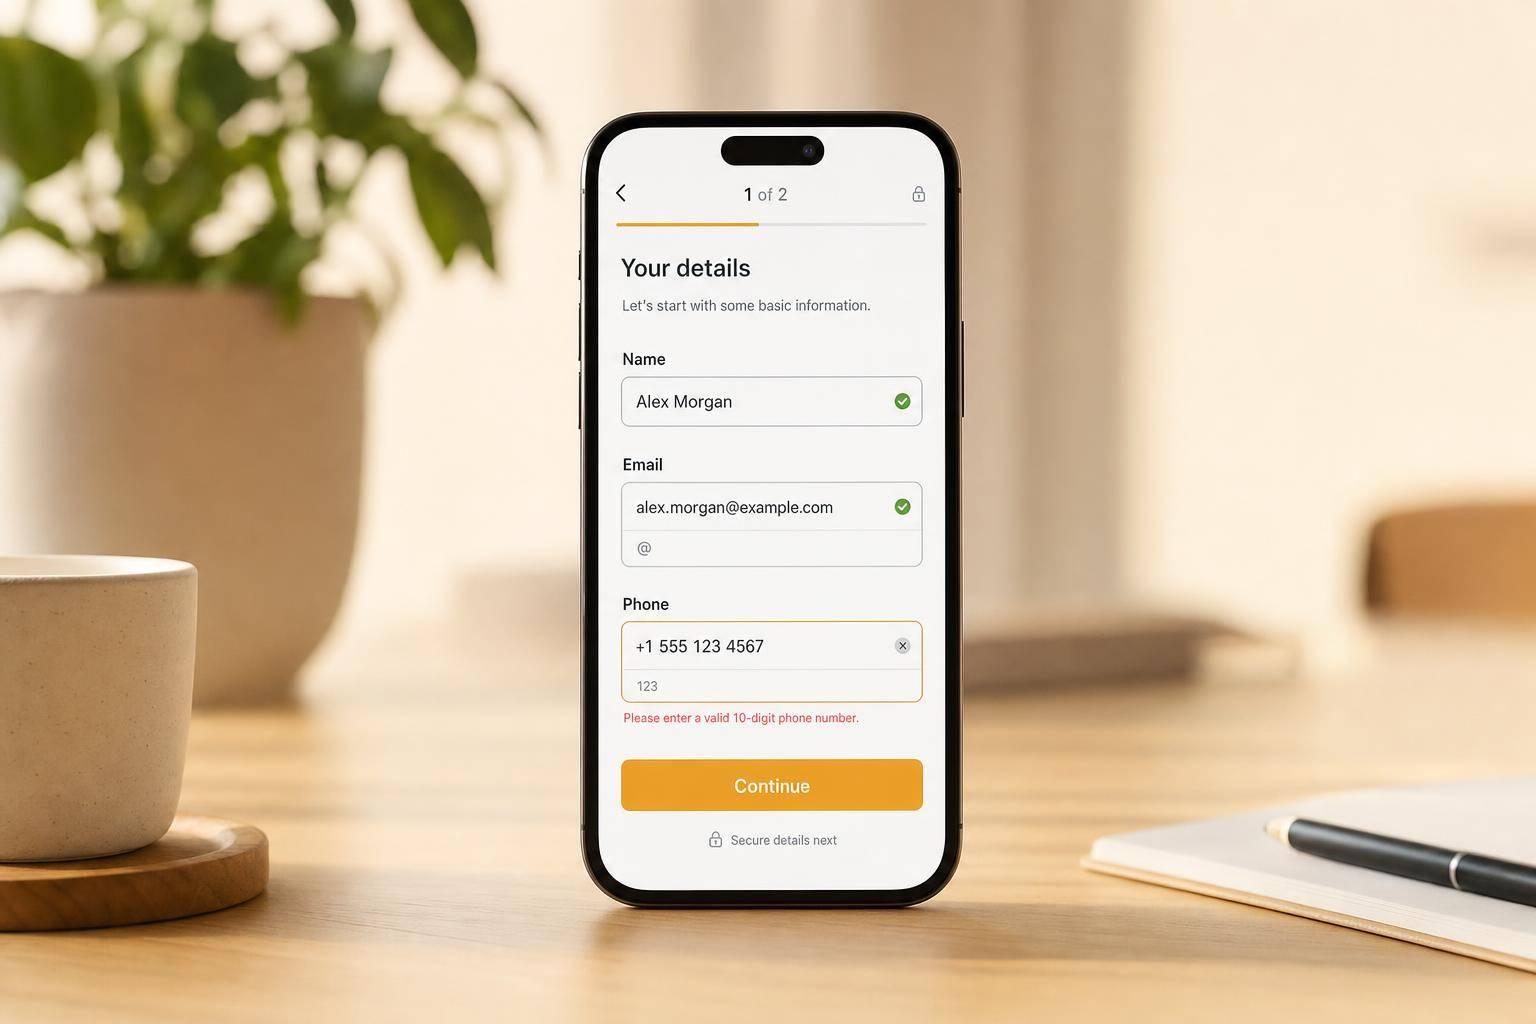
Reform uses a "Pages" system to organize multi-step forms, making it easy to divide complex workflows into smaller, more manageable steps - no coding required. Each page represents a single step in the process.
To add another step, simply click the "Add Page" button at the bottom of the form builder, just below your existing blocks and the CTA button. Once you've added multiple pages, you can rearrange blocks by grabbing the six-dot handle and dragging them to a different page.
You can also customize a progress bar in the Form Settings. Choose between step numbers or custom labels, and the progress bar will automatically match your primary color scheme.
For those using the Pro Plan, conditional logic unlocks even more flexibility. Through the Logic tab, you can set up rules to skip certain pages, jump to specific steps, display custom "Thank You" pages, or redirect users entirely. For instance, you might skip a payment page for VIP members or send high-revenue leads directly to a scheduling link, while routing others to self-service resources.
Once your multi-step form is complete, you’re ready to connect it with your email marketing tools to streamline follow-ups.
Connecting Forms to Email Marketing Platforms
After building your form, linking it to your email marketing tools ensures that personalized follow-up workflows kick in automatically. Reform integrates seamlessly with platforms like ConvertKit and Zapier, allowing form data to flow directly into your CRM or email marketing stack. This integration triggers tailored email sequences based on the information users provide.
To maintain consistency and ensure accurate personalization, map each form field to its corresponding field in your email platform. Collect key contact details in the early steps of the form so you can follow up even if a user doesn’t complete the entire process.
Use real-time validation and required fields to capture accurate information, and design a customized Outcome page with clear next steps. This helps set expectations and keeps users engaged.
sbb-itb-5f36581
Adding Dynamic Content to Email Workflows
Pulling Form Data into Email Content
Reform makes it easy to personalize your email workflows by using Liquid templates to pull specific user details into your emails. By referencing form responses with the format {{ answers.BLOCK_ID }} - where BLOCK_ID is the unique identifier for a form block - you can customize elements like the recipient's email address, subject line, and message body.
To find a block's ID, head to the Form Builder, click the gear icon next to the block you want, and select "Copy ID." Paste this ID into your email automation to dynamically include data, such as names or company details. For example, adding {{ answers.first_name }} to your subject line could turn a generic "Welcome" into something more engaging like "Welcome, Sarah."
Before launching your workflow, always send test emails to confirm the Liquid tags are functioning properly and that the email layout looks right. Double-check that each BLOCK_ID matches exactly what you see in the Form Builder to avoid errors. Additionally, you’ll need to request access through the "Integrations" tab in Reform.
Once your basic setup is working, you can take personalization further by incorporating lead enrichment.
Using Lead Enrichment for Better Personalization
To make your emails even more tailored, Reform’s lead enrichment feature automatically adds extra data, such as company size, industry, and job title, to your form responses. This feature is available on the Pro Plan and allows you to use Liquid syntax to create highly targeted content based on information users didn’t explicitly provide.
For example, you can keep your forms short while still gathering useful backend data. Map the enriched data to hidden fields, and if the system detects a lead from a company with over 500 employees, you can automatically route them to enterprise-specific email sequences. To streamline the user experience, you can enable the "Shorten Forms" option, which hides fields when data is already available, reducing the effort required from users.
Keep in mind that enrichment must be set up by a Team Owner at the team level. Additionally, using Reform’s shared API key, powered by ExactBuyer, requires a paid subscription.
Using Conditional Logic to Create Custom Workflows
Personalized workflows take user engagement to the next level by applying targeted conditional logic to refine interactions.
Configuring Conditional Rules
Reform's conditional routing allows you to segment users and trigger specific email sequences based on their form responses. This feature, available with the Pro Plan, applies logic at the page level through the Page settings menu.
Here are the four main types of conditional logic you can use:
- Skip this page: Skips a step when certain conditions are met.
- Jump to: Directs users to a specific page later in the form.
- Finish and show: Ends the form with a custom thank-you page.
- Redirect to: Sends users to an external URL.
For instance, if a respondent selects "More than $10 million" for annual revenue, they could be routed to a page with a direct sales scheduling link, while smaller companies might be directed to a self-service webinar invitation.
To set up these rules, open the form editor, select the target page, and click Add Condition in the logic panel. You can then choose operators like "is", "is not", "is empty", or "is not empty." To create branching workflows, combine multiple conditions using And (all conditions must be met) or Or (any single condition triggers the action). The Add action option enables you to stack multiple rules for more detailed segmentation.
Structuring and Testing Workflow Branches
Once your rules are in place, it’s crucial to ensure your workflow branches work as intended.
- Keep branches manageable, limiting them to 5–7 per form for clarity.
- Use clear, descriptive labels for each branch, such as "High Budget – Sales Email" or "Starter Plan Sequence", to make reviewing and updating easier.
Before launching, test all branches thoroughly. Use preview mode and trial submissions to confirm that every conditional outcome behaves as expected. Include a catch-all branch to handle unexpected inputs, and double-check that your And/Or conditions function correctly.
Once live, monitor Reform's real-time analytics to track how users move through the branches. Pay attention to conversion rates and identify any drop-off points that might need fine-tuning. This ongoing review helps ensure your workflows stay effective and responsive to user behavior.
Testing and Improving Your Workflows
Running Workflow Tests
Manually testing each part of your workflow is key to ensuring everything works as intended. Use a variety of input scenarios to catch potential issues. For instance, if you're using revenue-based routing, test with responses from high-revenue leads to confirm they're directed to the sales scheduling path. Then, try lower-revenue responses to verify those leads are routed to self-service resources instead.
Turn on the Progress Bar feature in Reform's Form Settings and use custom labels like "Contact Info" or "Details" to check if step indicators display correctly. This small step can help you quickly spot navigation problems.
Don’t forget to test edge cases. Try skipping optional fields or inputting unexpected answers to see how your workflow handles them. Setting up a catch-all branch for these situations ensures that every scenario is covered. Test each path multiple times to confirm that all conditional rules trigger the right actions.
Once you're confident in your manual testing, shift your attention to monitoring how your workflows perform in real-world conditions.
Analyzing Performance with Reform's Analytics
Reform's real-time analytics provide valuable insights for refining your workflows. Start by looking at abandonment rates between steps. Multi-step forms are designed to minimize drop-offs, so identifying the exact points where users exit can help you make changes that increase completion rates. If a specific step sees a lot of drop-offs, consider reducing the number of fields or simplifying the questions on that page.
Another key area to monitor is how users navigate through your conditional logic. For example, track the distribution between high-value leads routed to direct sales and lower-value leads directed to self-service paths. If too many high-potential leads are being misrouted, it’s time to adjust your conditional rules.
For a more detailed analysis, use histogram metrics to see how long users spend on each step. Pay attention to the 95th and 99th percentiles to identify steps that slow down your users the most. Additionally, monitor short-term rate-of-increase metrics - like changes over the last five minutes - to catch sudden spikes or drops in performance. Compare metrics such as completion times, conversion rates, and routing accuracy across different workflow versions. This continuous evaluation will help you fine-tune your workflows, turning them into a highly effective lead generation tool.
Conclusion
Personalization takes multi-step email form workflows from being basic lead capture tools to becoming powerful conversion drivers. By incorporating dynamic content and conditional logic, you can create tailored experiences that significantly improve engagement - boosting it by 20–30% - and increasing conversions by as much as 15%. For instance, while generic emails typically see an open rate of 20%, personalized multi-step workflows achieve an impressive 41% open rate and drive 6% click-through rates by using behavioral data gathered through your forms.
Reform makes this level of customization accessible to everyone, even without coding skills. Its no-code platform slashes setup time from weeks to just hours. With drag-and-drop simplicity, you can design multi-step forms featuring conditional routing and seamless integrations with your email marketing tools. Plus, features like lead enrichment can enhance data quality by 40%, and real-time analytics demonstrate a 25% boost in lead conversions when conditional workflows are used.
The strategies outlined in this guide - such as embedding form data into email content or branching workflows based on user responses - help you build a scalable system that performs exceptionally well. By integrating Reform’s multi-step forms with conditional logic and analytics, you’re not just collecting leads - you’re qualifying and nurturing them automatically, tailored to their specific needs and value.
Why wait? Try Reform’s free trial today and start building your first personalized workflow. Set up a simple multi-step form, incorporate conditional logic to guide users along different paths, sync it with your email marketing platform, and track the results with analytics. You can see initial results in less than a day, transforming your forms into a lead generation powerhouse that delivers the right message to the right audience at the perfect time.
FAQs
What should I ask on each step of a multi-step form?
For multi-step forms, focus on asking clear and relevant questions that guide users smoothly while collecting the necessary information. Begin with straightforward details like name and email address - this helps establish trust early on. Once that foundation is set, move on to more specific inquiries, such as preferences or company-related details.
Incorporate conditional logic to tailor questions based on earlier responses, making the experience feel personalized and intuitive. Adding progress indicators is also a smart move - they show users how far they've come, keeping them motivated and reducing the chances of them abandoning the form midway.
How do I use Liquid tags to personalize my emails with form answers?
To make your emails more tailored, you can use Liquid tags to embed dynamic content directly into your email templates. By referencing form responses with Liquid syntax, such as {{ fieldName }}, you can pull specific data submitted by respondents.
For example, if you want to include a respondent's email address, you would use {{ email }}. Just replace "fieldName" with the exact name of the form field you need, and your emails will automatically reflect the unique data submitted by each recipient. This approach ensures your messages feel more personal and relevant.
How can I prevent leads from being routed to the wrong workflow branch?
In a multi-step form, conditional logic is your best friend for keeping things on track. By setting up rules based on user responses, you can guide people down the right paths or steps. For example, you can create conditions tied to answers from key questions, ensuring each user is directed to the right workflow branch.
This method not only helps streamline the process but also reduces errors and improves lead qualification. When done correctly, it ensures every response lands exactly where it needs to, keeping your workflow smooth and efficient.
Related Blog Posts
Get new content delivered straight to your inbox

The Response
Updates on the Reform platform, insights on optimizing conversion rates, and tips to craft forms that convert.


Drive real results with form optimizations
Tested across hundreds of experiments, our strategies deliver a 215% lift in qualified leads for B2B and SaaS companies.
