
.webp)
How HubSpot API Prefills Form Fields



When it comes to reducing friction in form submissions, HubSpot's API is a game-changer. It allows businesses to prefill form fields with known user data, streamlining the process and improving user experience. Here’s how it works:
- Cookie-Based Prefill: Automatically recognizes returning users via browser cookies and fills in their details.
- Query Strings: Use URL parameters to prefill fields with specific data (e.g.,
?firstname=John&email=john@example.com). - Personalization Tokens: Dynamically insert CRM data into forms for email campaigns.
- External Forms with CRM API: Fetch user data programmatically for forms hosted outside HubSpot.
These methods help minimize form abandonment, improve data accuracy, and create a smoother experience for users. Whether you're using HubSpot's native forms or external builders like Reform, integrating prefill functionality is straightforward and effective.
Prerequisites and Key Concepts Before You Start
HubSpot Account and API Access Requirements

The Forms API is available in the free tiers of HubSpot’s Marketing Hub, Sales Hub, Service Hub, and Content Hub. However, advanced features like conditional logic require a Marketing Hub or Content Hub Professional subscription, and multi-step form editing is only accessible with a Starter plan or higher.
HubSpot provides two ways to authenticate:
- Private Apps: Ideal for single-portal use. You generate an access token in your account settings and include it as a Bearer token in the request headers.
- OAuth 2.0: Designed for multi-portal or public integrations. This method requires a process to refresh access tokens every 30 minutes using a refresh token.
Regardless of the method, make sure the forms scope is enabled during app setup. Without it, any API calls to form endpoints will fail with authorization errors.
Once your access is set up, the next step is understanding how HubSpot properties work to ensure proper data mapping for prefill.
Understanding HubSpot Properties
HubSpot properties are essential for setting up prefill. Each property has two identifiers: a label (like "First Name") for human readability and an internal name (like firstname) used in API calls. Always use the internal name when interacting with the API - labels won’t work.
Properties also have a type (data format) and a fieldType (UI element). For example:
- A
stringtype might render as atextinput ortextarea. - An
enumerationtype includes dropdowns, radio buttons, and checkboxes. For these fields, the prefill value must match the option's internalvalue, not its display label.
For date properties, values must be formatted as ISO 8601 strings (YYYY-MM-DD) or EPOCH timestamps in milliseconds.
Only properties with the formField attribute set to true can be used in forms. Some property types, like calculation fields, rich text properties, and custom email properties, are excluded entirely.
With this understanding of properties, you’re ready to integrate external form builders with HubSpot.
Using External Form Builders with HubSpot
External form builders can expand your prefill capabilities beyond HubSpot’s native forms, offering more design flexibility and workflow options. Tools like Reform connect to HubSpot through OAuth. Once authenticated in Reform’s integration settings, you can map each form block to a HubSpot property (Contact, Company, or Deal).
Reform supports URL-based prefill using query parameters. These parameters can be tied to either a custom field name or the field’s unique alphanumeric ID. Hidden fields are particularly handy - they allow you to capture data like user_id or UTM parameters without displaying them to users. This hidden data is submitted along with the rest of the form.
The Reform HubSpot integration is available on the Pro Plan.
sbb-itb-5f36581
How-to HubSpot: Pre-populate HubSpot forms to improve your form conversions
Methods to Prefill HubSpot Form Fields
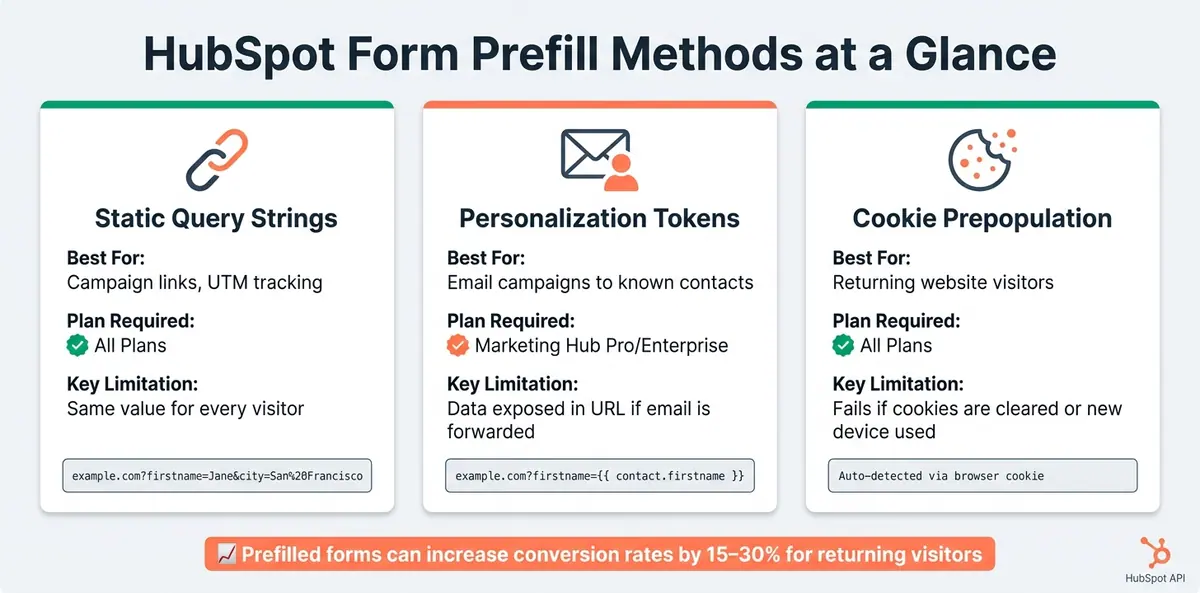
HubSpot Form Prefill Methods: Side-by-Side Comparison
HubSpot provides several ways to prefill form fields, making it easier for users to submit information while improving data accuracy. These methods are tailored to different use cases and can help create high-converting lead forms by streamlining lead capture efforts.
Prefilling Forms with Query Strings
Using query strings is one of the simplest ways to prefill form fields. By appending data as URL parameters, HubSpot automatically maps those values to the corresponding fields when the page loads.
Here’s how it works: begin with a ?, assign values using =, and separate multiple fields with &. For example:
https://yoursite.com/contact?firstname=Jane&city=San%20Francisco
Some important formatting rules include:
- Replace spaces with
%20. - Use
trueorfalsefor single checkbox fields. - Format dates as
YYYY-MM-DD(e.g.,2026-05-30). - Separate multiple checkbox values with semicolons (e.g.,
&interests=Sales;Marketing).
"By using query strings in HubSpot, you can auto-populate form fields with data you already have, making submissions faster, reducing drop-offs, and delivering a more personalized experience." - Jigar Thakker, CBO, INSIDEA
This method is available on all HubSpot plans and works well for scenarios like campaign tracking or UTM parameters. Just make sure to test your URLs in an incognito window to confirm the fields populate as expected.
Dynamic Prefill Using Personalization Tokens
Personalization tokens take the concept of query strings further by dynamically inserting CRM data into URLs. Tokens like {{ contact.firstname }} are replaced with actual values from the HubSpot CRM when an email is sent. For instance:
https://yoursite.com/contact?firstname={{ contact.firstname }}&company={{ contact.company }}
When a contact clicks the link in a marketing email, their name, company, or other properties are prefilled in the form fields. This method is ideal for email campaigns targeting known contacts but comes with a few caveats:
- It requires a Marketing Hub Professional or Enterprise subscription.
- It only works on HubSpot-hosted pages, not standalone form pages.
- If the email is forwarded, the recipient might see the original contact’s data.
"Keep in mind that when you use this method, all of this information is stored within the email. If the email is forwarded, for example, the recipient has all of this information on the contact." - Karsten Köhler, HubSpot Hall of Famer | Platinum Partner
While personalization tokens are powerful, they should be used carefully to avoid exposing sensitive data.
HubSpot's Built-In Prepopulation for Returning Visitors
For returning visitors, HubSpot uses cookies to automatically prefill form fields. This feature works seamlessly, provided the user hasn’t cleared their cookies or switched devices. It’s available on all HubSpot plans, but there are a few things to note:
- On shared devices, prefilled data may belong to a previous user. To address this, enable the "Add link to reset the form" option in the form settings. This adds a "Not you? Click here to reset" message, allowing users to clear the fields.
- Cookie-based prepopulation overrides any "Preselect values" set on a field but does not overwrite "Default values."
This method is convenient for returning visitors but has limitations if cookies are cleared or a new device is used.
Summary Table of Prefill Methods
| Method | Best For | Plan Required | Key Limitation |
|---|---|---|---|
| Static Query Strings | Campaign links, UTM tracking | All plans | Same value for every visitor |
| Personalization Tokens | Email campaigns to known contacts | Marketing Hub Pro/Enterprise | Data exposed in URL if the email is forwarded |
| Cookie Prepopulation | Returning website visitors | All plans | Fails if cookies are cleared or a new device is used |
Next, we’ll explore how these methods can be applied to external form integrations using the HubSpot API.
How to Use HubSpot API to Prefill Fields in External Forms
If your forms are hosted outside of HubSpot - on custom landing pages, third-party platforms, or tools like Reform - you can't rely on HubSpot's built-in cookie or personalization token methods alone. Instead, you'll need to tap into the HubSpot CRM API to fetch contact data and prefill form fields before the user even sees the page.
Planning the Prefill Flow
The process involves identifying the user, retrieving their data from HubSpot, and populating the form fields instantly. This expands HubSpot's prefill capabilities to work seamlessly with external platforms.
To identify a user, pass a unique identifier - such as their email address or HubSpot Record ID - through a query string in the form URL (e.g., ?email=jane@example.com). Once the identifier is captured from the URL, use it in a secure server-side API call to fetch their data. A hidden field can store the identifier without making it visible to the user.
For security, it's crucial to route API calls through a server-side proxy to protect your access token.
Connecting Reform to HubSpot
After planning your prefill flow, the next step is linking your external form builder to HubSpot. If you're using Reform, its native HubSpot integration simplifies much of this process, or you can opt for done-for-you forms to optimize your lead generation strategy. The integration uses OAuth, so you'll need admin permissions in HubSpot to authorize the connection.
Here’s how to set it up:
- Add a Hidden Field: In Reform, create a hidden field with a column name (e.g.,
user_idoremail) to capture the identifier from the query string. - Map Fields: Match each Reform block to the corresponding HubSpot property (e.g., use the internal name
firstnameinstead of "First Name"). - Construct the URL: Build your form URL with the identifier included as a query string, like
https://yourform.reform.app/form?email=jane@example.com. - Enable Tracking: In Reform's HubSpot settings, enable tracking and add
reform.appto your HubSpot analytics site domain list to avoid submissions being flagged as bot traffic.
"Integrating your forms with HubSpot allows you to seamlessly add or update contacts, companies, or deals in HubSpot whenever someone submits your form." - Reform Help
Making API Calls to Fetch Contact or Company Data
Once you have the identifier, your server can call the HubSpot CRM API to retrieve contact details. Here are the most common lookup methods:
| Lookup Method | Endpoint | Key Parameter |
|---|---|---|
| By Record ID | GET /crm/v3/objects/contacts/{recordId} |
properties (comma-separated list) |
| By Email Address | GET /crm/v3/objects/contacts/{email} |
idProperty=email, properties |
| Fetch All Properties | GET /crm/v3/properties/contacts |
N/A |
HubSpot's GET endpoints return only a few properties by default. Use the properties query parameter to specify the fields you need, like ?properties=firstname,lastname,company,city. If your form requires many fields, you can fetch the full property list once using GET /crm/v3/properties/contacts, cache it server-side, and dynamically build the properties parameter rather than hardcoding each field name.
After receiving the API's JSON response, extract the relevant values from the properties object and inject them into the form fields before the page loads. Ensure that the data is accurate and ready for submission.
Syncing Form Submissions Back to HubSpot
Once the user submits the prefilled form, the data needs to sync back to HubSpot. If you're using Reform's integration, the field mapping you set up earlier will handle this automatically - syncing the values to the correct HubSpot properties with every submission.
For direct API submissions, use the batch upsert endpoint: POST /crm/v3/objects/contacts/batch/upsert with idProperty: "email". This method updates the existing contact record if the email matches, avoiding duplicate entries. Make sure to use the internal names of properties in your payload (e.g., firstname instead of "First Name") and match HubSpot's expected data types - dates as UNIX timestamps in milliseconds, and multiple checkboxes as string arrays. To maintain attribution, map any UTM parameters captured in hidden fields to their corresponding HubSpot properties, like "Original Source Drill-Down 1".
Testing and Troubleshooting Prefilled Forms
After setting up your prefill methods, thorough testing and troubleshooting are key to ensuring everything runs smoothly. Whether you're using HubSpot's native forms or external tools like Reform, these steps will help you verify your setup.
Testing Query String and Dynamic Prefill
To test query string prefill, open an incognito window and paste your full URL with the necessary parameters, such as ?firstname=Jane&company=Acme%20Corp. Using a private window ensures no cookies interfere, so you’ll see exactly what a new visitor would experience. If the fields populate correctly, your setup is functioning as intended.
Here’s what to double-check during your tests:
- Ensure spaces are encoded as
%20. - Use the internal property name (e.g.,
firstname) instead of the display label (e.g., "First Name").
For dynamic prefill using personalization tokens, don’t manually copy and paste the URL. Instead, click the actual email link since tokens only resolve when the email is sent through HubSpot.
Validating API-Based Prefill in External Forms
If you're working with API-driven prefill on external forms, such as those built with Reform, validation involves a few specific steps. Start by confirming that your hidden identifier field (e.g., email or user_id) is capturing the query string value. You can inspect the field value in your browser's developer tools before submitting the form. Next, log the raw JSON response to verify the required properties are being returned.
A common pitfall is forgetting that HubSpot's GET contact endpoint only returns a limited set of properties by default. If fields appear blank, explicitly request them by adding ?properties=firstname,lastname,company,phone to your API call. After submitting a test form, check the contact’s timeline in HubSpot CRM to confirm the values are mapping correctly. If issues persist, refer to the troubleshooting steps below.
Fixing Common Prefill Issues
Prefill problems often boil down to a handful of recurring issues. The table below outlines frequent causes and their fixes:
| Issue | Common Cause | Fix |
|---|---|---|
| Fields stay blank | Internal name mismatch or toggle is OFF | Confirm the exact internal name in Settings > Properties; enable "Pre-populate fields with known values" for each field |
| Multi-checkbox fields fail | Values separated by commas | Use semicolons instead (e.g., &interests=Sales;Marketing) |
| Incorrect contact data appears | Shared device or stale cookie | Add a "Reset Form" link in your form settings so users can clear the session |
| API returns null values | Properties not explicitly requested | Include all needed properties in the ?properties= parameter of your GET call |
| Date fields don't populate | Wrong format | Use the YYYY-MM-DD format, such as &meeting_date=2026-05-30 |
Keep in mind that HubSpot's cookie-based prefill doesn’t work in incognito mode or across devices. This is intentional, as the system relies on browser cookies to identify returning visitors. Technical Consultant Tom Mahon explains:
"Auto-populate in HubSpot works from cookies... it doesn't allow you to enter an email and have a form pull information from HubSpot to populate your form [automatically] because it would essentially make all information in your CRM publicly available."
If incorrect data appears due to shared devices or stale cookies, clearing the browser cookies or using the reset link will reset the session and associate it with a clean record.
Conclusion: Better Lead Generation with Prefilled Forms
Using the HubSpot API to prefill form fields does more than just simplify the user experience - it actively improves conversion rates. Studies indicate that prefilled forms, especially those pulling data from a CRM for returning visitors, can increase conversion rates by 15–30%. Why? Because every additional field a returning lead has to complete increases the chance they’ll abandon the form altogether.
But it’s not just about reducing form abandonment. This method also enables progressive profiling, where fields you’ve already collected are hidden, and new, relevant questions take their place. Over time, this strategy creates a more complete contact profile without overwhelming users with lengthy forms.
For those relying on external form builders, integrating prefill functionality is straightforward. Tools like Reform make this process easier. Their Pro plan ($35/month) offers native HubSpot integration, allowing fields to be prepopulated using simple field names instead of complex field IDs. This small detail can save teams significant debugging time. Features like hidden fields, UTM tracking, and multi-step logic all complement the prefill setup, making Reform a solid choice for this workflow.
The bottom line? Choose the prefill method that aligns with your needs. Use query strings for email campaigns, personalization tokens for known contacts, and the HubSpot API for dynamic, real-time data integration in external forms. By implementing the right solution, you can turn form submissions into a smooth and engaging process.
FAQs
Is it safe to prefill HubSpot forms with query strings?
Using query strings to prefill form fields comes with security risks, especially for sensitive information. Since data in the URL is visible to anyone with access to the link, it’s not safe to include private details like payment information. If you decide to use query strings, make sure the values are properly URL-encoded to handle special characters without errors.
Why does HubSpot prefill work on one device but not another?
HubSpot forms utilize tracking cookies to recognize returning visitors and automatically fill out form fields. However, this functionality depends on the visitor using the same device and browser where they previously submitted a form. Since cookies are tied to specific browsers, the data won’t carry over if the visitor switches to a different device or browser. Additionally, if someone else uses the same device and submits a form, their information might prefill instead, as it's linked to their tracking cookie.
How do I prefill an external form from HubSpot without exposing my API token?
To prefill a form while keeping your API token secure, you can use URL query strings or JavaScript with the HubSpot embed code.
- If your setup is straightforward, you can append query strings to the URL. Use the internal property name followed by an equal sign and the value you want to prefill. Separate multiple fields with
&. - For more flexibility, leverage the embed code. This allows you to render raw HTML or use JavaScript with the
onFormReadycallback to set field values dynamically.
Related Blog Posts
Get new content delivered straight to your inbox

The Response
Updates on the Reform platform, insights on optimizing conversion rates, and tips to craft forms that convert.




Drive real results with form optimizations
Tested across hundreds of experiments, our strategies deliver a 215% lift in qualified leads for B2B and SaaS companies.
