
.webp)
Checklist for Setting Up HubSpot Forms API



The HubSpot Forms API lets you send form data directly to HubSpot CRM, skipping the need for native embed codes. Starting May 2026, the API uses a new versioned endpoint (/marketing/forms/2026-09-beta), replacing the older /marketing/v3/forms. This API supports four form types: standard HubSpot forms, captured forms from external HTML, pop-up flow forms, and blog comment forms.
Key Steps to Get Started:
-
Prerequisites:
- A HubSpot account (free or paid).
- API access via a private app or OAuth integration.
- Basic understanding of REST APIs and JSON.
-
Configuring API Access:
- Use a private app for authentication and generate a long-lasting token.
- Enable necessary scopes like
forms,crm.objects.contacts.write, andforms-uploaded-files.
-
Mapping Forms:
- Match form fields to HubSpot properties using internal names (e.g.,
firstnamefor "First Name"). - Leverage hidden fields for tracking data like UTM parameters.
- Match form fields to HubSpot properties using internal names (e.g.,
-
Submitting Data:
- Use the
POSTendpoint:https://api.hsforms.com/submissions/v3/integration/secure/submit/{portalId}/{formGuid}. - Include required headers (
Content-Type,Authorization) and contextual data (hutk,pageUri, etc.).
- Use the
-
Security Best Practices:
- Store tokens securely (e.g., environment variables).
- Enable reCAPTCHA and block specific email domains.
- Rotate tokens periodically for added safety.
-
Testing and Maintenance:
- Test high-converting lead forms thoroughly before deployment.
- Monitor API responses and update endpoints or tokens as needed.
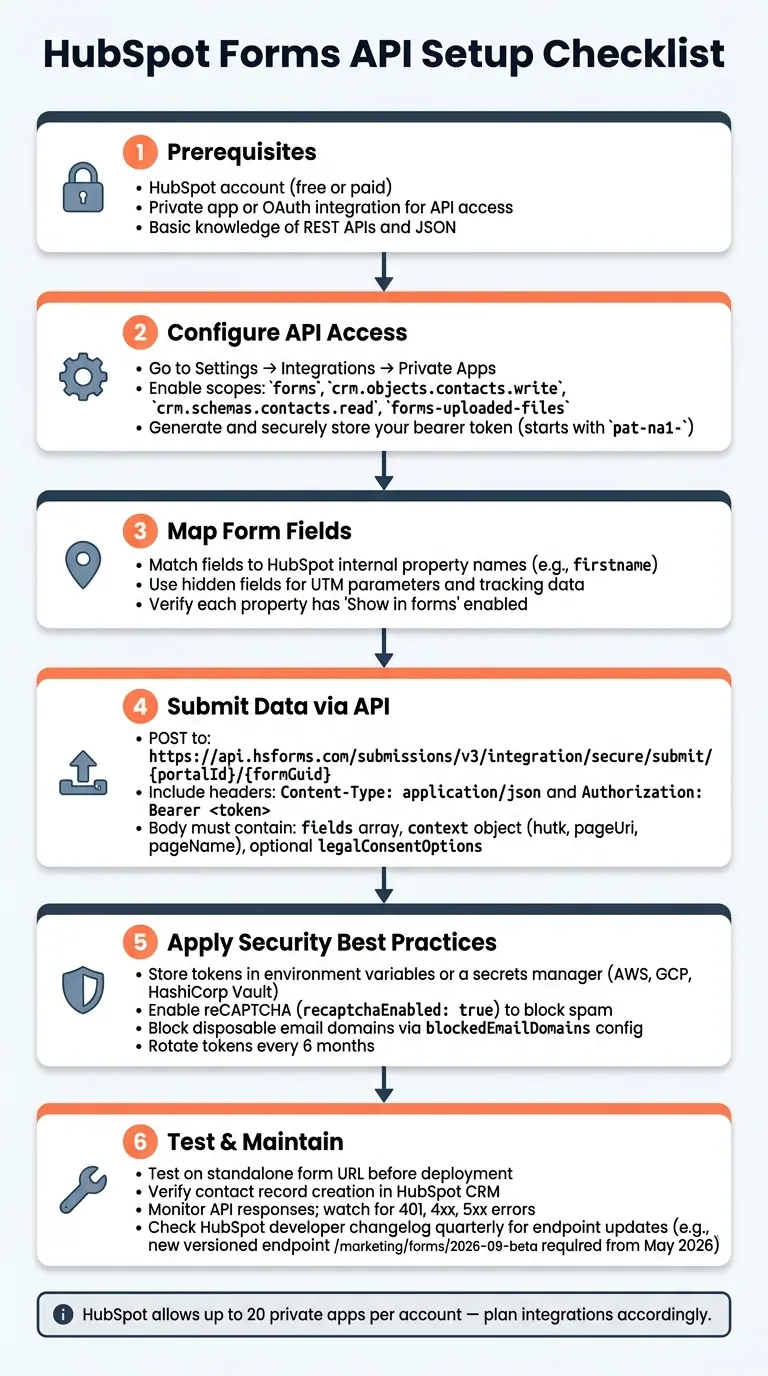
HubSpot Forms API Setup: Step-by-Step Checklist
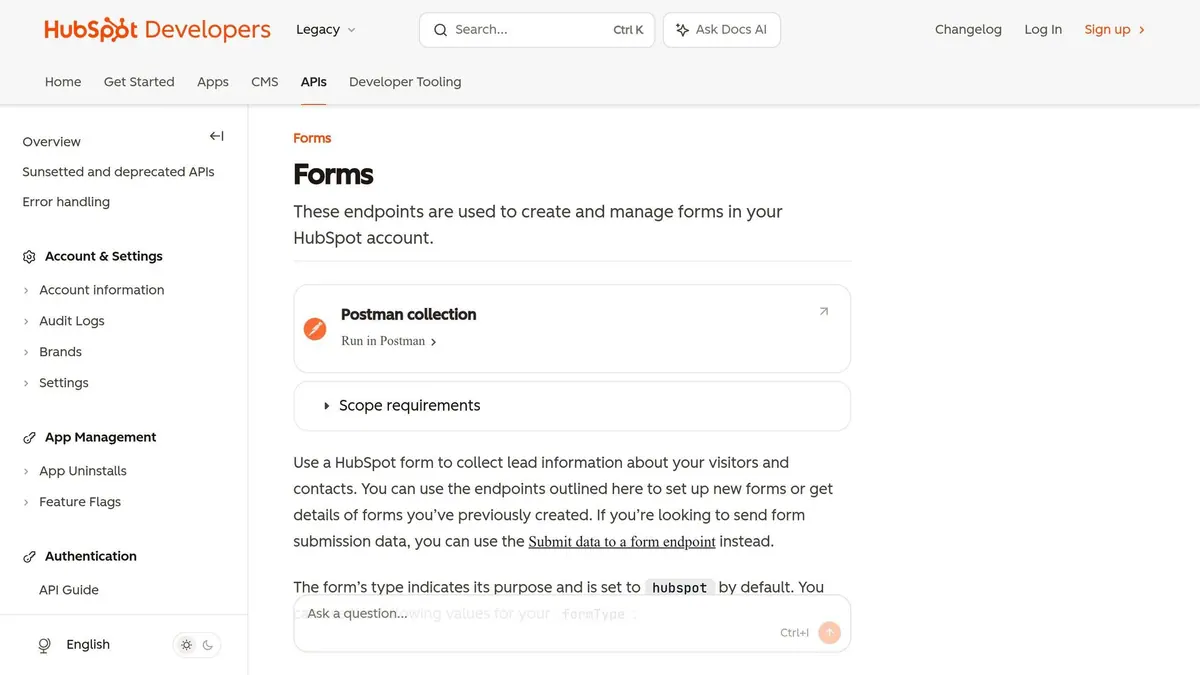
How to Build a Flow Framework with HubSpot Forms API | HubSpot.Extend() 2022
sbb-itb-5f36581
Setting Up API Access in HubSpot
Getting your API access set up correctly is a key step for ensuring smooth integration with the HubSpot Forms API.
Configuring a HubSpot Private App
Using a private app is the best way to authenticate your HubSpot Forms API calls. It generates a long-lasting access token tied directly to your HubSpot portal, so you can skip the hassle of an OAuth handshake. To get started, head to Settings → Integrations → Private Apps in your HubSpot dashboard. Keep in mind, you’ll need Super Admin permissions to access this section.
Click Create a private app, then fill in a name and, if you’d like, a description under the Basic Info tab. After that, move to the Scopes tab and select the permissions your integration requires. Here are the key scopes you’ll likely need:
| Scope | Purpose |
|---|---|
forms |
Grants access to Forms API endpoints |
crm.objects.contacts.write |
Allows creation and updates of contact records |
crm.schemas.contacts.read |
Enables fetching property metadata for field mapping |
forms-uploaded-files |
Needed if your forms accept file uploads |
Once you’ve configured these, click Create app. HubSpot will then generate your access token, which you can find under the Auth tab. The token typically starts with something like pat-na1-, where the region code (na1) matches your HubSpot portal's location. These tokens don’t expire unless you manually rotate or delete the app. Keep in mind, HubSpot allows up to 20 private apps per account, so plan your integrations wisely.
Make sure to secure your API credentials immediately after generating the token to protect your integration.
Securing API Credentials
Protecting your token is crucial.
"Never store tokens in plain text. Just don't. Not in your database, not in log files, not anywhere." - Hannah Seligson, HubSpot Developer Blog
The safest way to store your token is as an environment variable, like in a .env file or using Cloudflare Workers' wrangler secret put. When making API calls, include your token in the HTTP header: Authorization: Bearer [YOUR_TOKEN]. For production environments that handle sensitive data, consider using a secrets manager like AWS Secrets Manager, Google Cloud Secret Manager, or HashiCorp Vault.
To keep your token secure, never expose it in client-side code. Instead, route API calls through a backend server or serverless function.
For added security, rotate your token every six months. HubSpot offers a "Rotate and expire later" option, which gives you a 7-day grace period to update your code before the old token becomes invalid. If your token is compromised, use the "Rotate and expire now" option to immediately disable it.
Preparing and Mapping HubSpot Forms
With your API access set up, the next step is to align your forms with HubSpot properties. This means preparing and mapping your forms correctly to ensure smooth integration.
Choosing a Form Strategy
Before diving into integration, decide whether to use multi-step forms or static ones to best meet your needs. HubSpot supports four types:
hubspot: The default option, ideal for embedded or API-driven forms.captured: For tracking external HTML forms.flow: Used for pop-ups and slide-ins.blog_comment: Specifically for blog comment forms.
For most API integrations, the hubspot form type is the go-to choice.
Starting in May 2026, HubSpot requires the use of the versioned endpoint /marketing/forms/2026-09-beta for creating or managing forms via the API. This updated endpoint ensures your integration aligns with the latest HubSpot standards. Avoid older, unversioned endpoints to prevent potential issues later.
Mapping Form Fields to HubSpot Properties
Properly mapping your form fields to HubSpot properties is crucial to avoid integration hiccups. Each form field must correspond to a HubSpot property using its internal name rather than the display label. For instance, a field labeled "First Name" uses the internal name firstname. If you mistakenly use the display label, your submission may fail without any error message.
To find a property's internal name, navigate to Settings → Properties, select the property, and locate the "Internal name" field. These internal names remain constant, even if you change the property label later, making them a stable reference for API mapping.
Hidden fields are also handy for passing background data, such as UTM parameters. You can enable the "Hidden field" option in the form editor and either set a default value or populate it through the API during submission. For tracking attribution, map utm_source to HubSpot's Original Source Drill-Down 1 property. Here’s a quick reference table for common mappings:
| Field Type | HubSpot Property Example | Purpose |
|---|---|---|
| Standard field | firstname → First Name |
Captures basic contact information |
| Hidden field | utm_campaign → Campaign Name |
Tracks marketing attribution |
| Hidden field | hutk → HubSpot Tracked Cookie |
Links submissions to browser sessions |
| Object field | hs_ticket_priority → Priority |
Automatically creates a support ticket |
Validating Contact Properties
To ensure your forms function properly, verify that each property you use is enabled for forms. Go to Settings → Properties, open the relevant property, and check the Show property in forms box under the "Rules" tab. If this box isn’t checked, the property won’t appear in the form editor, and API submissions referencing it might fail.
Consistency in data types is equally important. For example:
- Single checkboxes should use
trueorfalseinstead of"yes"or"no". - Date pickers must follow the
YYYY-MM-DDformat. - For multiple-checkbox properties, separate values with semicolons (e.g.,
value1;value2) and ensure they match the available options exactly.
Be aware that some property types, like calculation, rich text, and custom email properties, cannot be used in forms. Using unsupported properties will lead to failures during submission.
Implementing the HubSpot Forms API
Building API Requests
Once you've mapped your fields and validated the properties, you're ready to send data to HubSpot. All submissions are directed to a single POST endpoint:
https://api.hsforms.com/submissions/v3/integration/secure/submit/{portalId}/{formGuid}
Here’s how it works: replace {portalId} with your HubSpot account ID (you can find this in your HubSpot URL) and {formGuid} with the unique ID of your form. Each request needs two key headers: Content-Type: application/json and Authorization. The Authorization header should look like this: Authorization: Bearer <your_private_app_token>.
The request body itself has three key parts:
fieldsarray: Contains each form field with anameandvalue.contextobject: Includes tracking data likehutk(the visitor’shubspotutkcookie),ipAddress,pageUri, andpageName.legalConsentOptionsobject: Optional but useful for managing GDPR consent preferences.
"If you're looking to send form submission data, you can use the Submit data to a form endpoint instead." - HubSpot Developer Docs
For accurate attribution, make sure the hubspotutk cookie is passed as hutk. Without it, HubSpot will categorize submissions as "Offline source", which disrupts web attribution reporting. You can also use the optional submittedAt field (a millisecond timestamp) to backdate submissions by up to 30 days.
Now that you've built your request, let’s talk about keeping your submissions secure.
Handling Form Submissions Securely
To use the secure endpoint, you'll need a Private App bearer token. However, there are additional steps you can take to ensure your data submissions are protected.
HubSpot automatically removes unsafe HTML from rich text fields, such as <script> tags and attributes like onmouseover, to prevent XSS attacks. Even so, it's smart to sanitize your inputs before sending API calls.
For added security:
- Enable reCAPTCHA: Set
recaptchaEnabled: truein your form configuration to block spam submissions. - Block specific email domains: Use the
blockedEmailDomainssetting to reject submissions from disposable or low-quality email providers. - File upload protection: HubSpot scans all uploaded files for viruses automatically.
When it comes to troubleshooting, a 401 error typically indicates an issue with your Authorization header. Before deploying, test your API request in a tool like Postman, which can help you spot and resolve formatting problems.
Here’s a quick breakdown of security measures:
| Security Layer | How to Enable | What It Prevents |
|---|---|---|
| Bearer Token Auth | Authorization: Bearer <token> |
Unauthorized API access |
| HTML Sanitization | Automatic by HubSpot | XSS via restricted tags/attributes |
| Bot Filtering | recaptchaEnabled: true |
Automated spam submissions |
| Domain Blocking | blockedEmailDomains config |
Low-quality or disposable emails |
| File Scanning | Automatic by HubSpot | Malicious file uploads |
While these practices strengthen your API setup, there’s an easier way to handle form submissions if coding feels overwhelming.
Integrating Reform with HubSpot for Better Forms
If managing raw API requests feels like too much work, you might want to explore a no-code solution like Reform. This form builder integrates directly with HubSpot, taking care of the submission process for you. Reform is available on its Pro Plan for $35 per month.
With Reform, you can map form fields to HubSpot properties - whether they’re contact, company, or deal properties, including custom ones. A standout feature is partial submissions: if a user abandons a multi-step form midway, Reform still sends the data to HubSpot, so you don’t lose potential leads.
To ensure proper attribution, add reform.app to your HubSpot analytics tracking domain list. This prevents Reform submissions from being flagged as bot traffic. You can also include hidden fields for UTM parameters and map them to HubSpot’s attribution properties. The process mirrors the field mapping steps you’d follow with raw JSON but is handled through Reform's user-friendly interface instead.
Testing and Maintaining Your Integration
Testing Your API Integration
Before going live, always test your form on its standalone URL. This helps identify whether any issues are coming from the form itself or from scripts on your site. If you find that a complex layout is causing friction, consider using multi-step form design to improve the user experience. Once you've submitted the form, check HubSpot's CRM to ensure a contact record has been created. If the submission is logged but no contact appears, it's likely because the Email field is missing.
To ensure proper analytics tracking, confirm that the hutk cookie and context parameters are present. If you use an email address that already exists in your CRM during testing, HubSpot will update the existing contact instead of creating a new one.
| Testing Element | How to Verify | Watch Out For |
|---|---|---|
| Contact Record | Check HubSpot CRM after submission | Existing email may update a record instead of creating a new one |
| Page Analytics | Check "Number of page views" on the contact | Missing or blocked hutk cookie |
| Submission Source | Review submission details for page URL | Errors caused by missing pageName or pageUrl |
| API Authentication | Look for a 200 OK response |
Expired token or missing scopes on the Private App |
Once submissions are working as expected, shift your attention to monitoring responses and addressing errors.
Monitoring and Error Handling
When your integration is live, log all API responses - not just failures. Regularly reviewing these logs can help you catch problems early. Keep an eye out for authentication errors and duplicate records. For real-time notifications, use webhook subscriptions through HubSpot's Webhooks API. These notify you about events like contact creation or property changes without needing constant polling.
If your endpoint times out or returns a 4xx or 5xx error, HubSpot will retry the notification up to 10 times over 24 hours. This gives you a chance to resolve issues while ensuring no data is lost.
Ongoing Maintenance and Updates
To keep your integration running smoothly, make regular updates part of your routine. For example, HubSpot recently updated the Forms API base path from /marketing/v3/forms to /marketing/forms/2026-09-beta. Checking HubSpot's developer changelog every quarter ensures your integration stays compatible with these kinds of changes.
Additionally, rotate your Private App token periodically - or immediately if there's any suspicion of exposure. While the endpoint URL stays the same, the token's secret changes. Also, keep your fields array in sync with your current HubSpot form definition. Submissions with fields not included in the form definition will result in a FIELD_NOT_IN_FORM_DEFINITION error. Regularly updating your API payload to match your form setup can prevent these silent failures.
Wrapping It All Up
By following this checklist, you can create an integration that's both efficient and dependable. With proper authentication and accurate field mapping to your HubSpot contact, company, or deal properties, you’ll build a smooth and reliable connection. Including page context with each submission ensures your analytics stay accurate, and leads are correctly attributed to their sources.
Once the setup is complete, refining your process can take lead quality to the next level. For example, capturing partial submissions from multi-step forms helps recover leads that might otherwise be lost if they abandon the form. Hidden UTM fields provide detailed attribution data, giving your marketing team better insights. Plus, automating lifecycle stage updates ensures leads move through your pipeline without requiring hands-on adjustments.
Even though this integration requires minimal upkeep, periodic testing and credential reviews are key to maintaining reliability and ensuring your data flow stays intact.
When done properly, a HubSpot Forms API integration streamlines your lead capture process and keeps your CRM data accurate without extra manual work. It reduces friction, eliminates unnecessary cleanup, and ensures your CRM remains a trusted source of truth.
FAQs
Which HubSpot endpoint should I use after May 2026?
After May 2026, switch to the 2026-09-beta Forms API endpoint (/marketing/forms/2026-09-beta) for creating, retrieving, updating, or deleting forms in HubSpot. This will ensure you're using the most up-to-date API version.
Why does my submission fail when I use field labels instead of internal names?
When submitting forms using the HubSpot Forms API, errors like FORM_FIELDS_NOT_VALID can occur if you use field labels instead of the internal property names. This happens because the API only recognizes the exact internal CRM property names, not the labels displayed on the form. To avoid this issue, make sure every submitted field corresponds to a CRM property, and that the field names in your submission match the internal property names exactly.
How do I maintain accurate HubSpot attribution with the hutk cookie?
To make sure HubSpot attribution works correctly, you need to include the hutk value from the hubspotutk cookie in the context parameter when submitting forms through the API. Start by retrieving this cookie from the visitor's browser. Before submitting, confirm that the cookie exists, and only include it if it's available. Additionally, ensure that the HubSpot tracking script is installed correctly, as it's responsible for creating the cookie. Be aware of potential challenges, such as users browsing in incognito mode or restrictions on cookies, which could impact tracking.
Related Blog Posts
Get new content delivered straight to your inbox

The Response
Updates on the Reform platform, insights on optimizing conversion rates, and tips to craft forms that convert.




Drive real results with form optimizations
Tested across hundreds of experiments, our strategies deliver a 215% lift in qualified leads for B2B and SaaS companies.
