
.webp)
HubSpot Webinar Signup Field Mapping Guide



If your HubSpot webinar form maps fields to the wrong properties, your data breaks on day one. I’d keep it simple: map name and email to HubSpot’s default contact fields, store consent and UTMs in separate custom properties, and never write over HubSpot’s system-managed source fields.
Here’s the short version:
- I’d use contact properties first for webinar signups
- I’d make first name, last name, and email required
- I’d leave company and job title optional unless sales needs them
- I’d keep webinar consent separate from email subscription status
- I’d store
webinar_slug,webinar_date, and UTM fields in custom properties - I’d test at least 1 full submission before publishing
- I’d check both HubSpot and the webinar platform after each test
A few points stand out fast:
- 3–5 required fields is the common sweet spot for B2B webinar forms
- Zoom sync is limited to first name, last name, and email
- HubSpot’s Original source should stay untouched
- Hidden fields can pass values like webinar ID, page URL, routing, and campaign tags
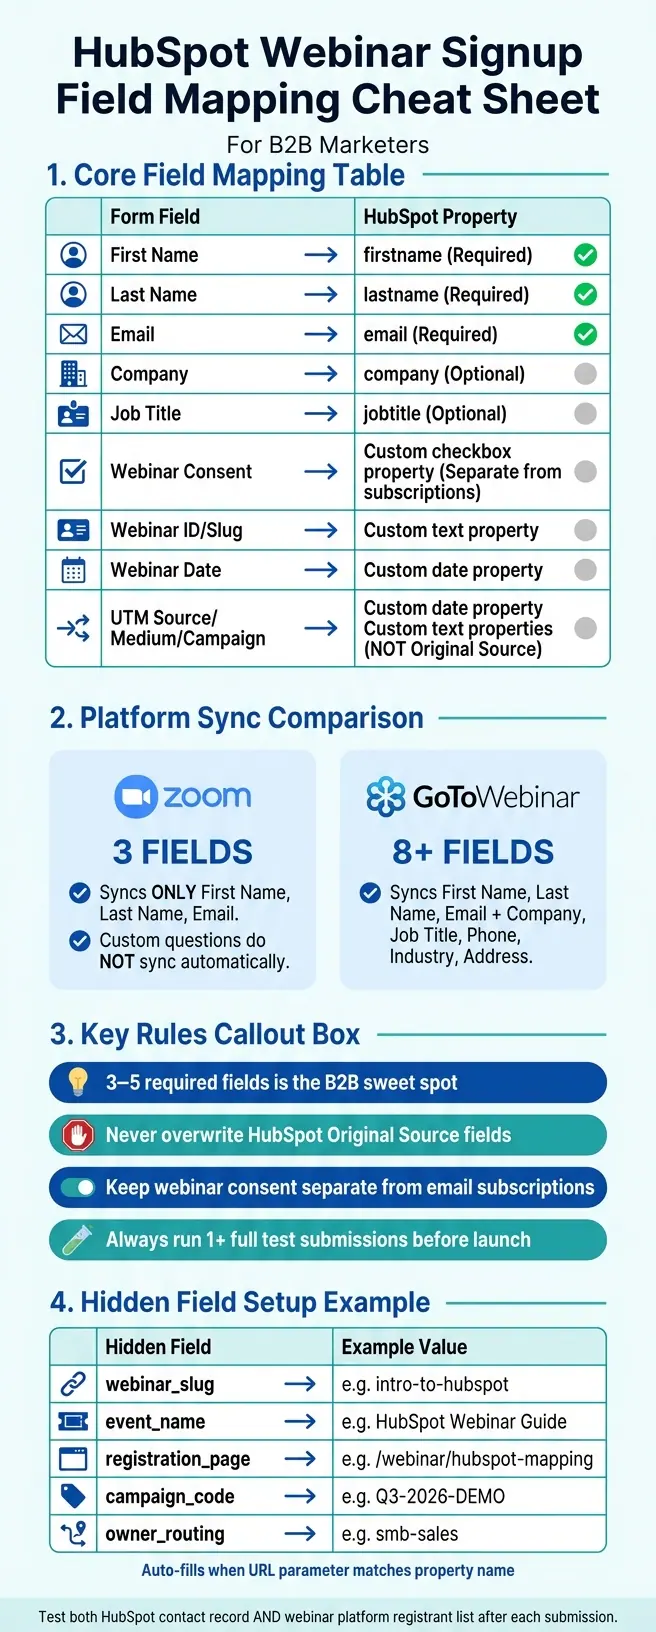
Here’s the map I’d follow at a glance:
| Form input | Where I’d send it in HubSpot | Notes |
|---|---|---|
| First name | firstname |
Required |
| Last name | lastname |
Required |
email |
Required; helps stop duplicates | |
| Company | company |
Optional for most forms |
| Job title | jobtitle |
Optional for most forms |
| Reminder/follow-up consent | Custom checkbox property | Keep separate from subscriptions |
| Webinar ID | Custom text property | Example: webinar_slug |
| Webinar date | Custom date property | Use date field type |
| UTM source/medium/campaign | Custom text properties | Do not use Original source |
Bottom line: I’d treat field mapping as a data setup task, not a form design task. If the property choices, field types, consent setup, and hidden tracking fields are right before launch, your follow-ups, lists, and reporting are far less likely to fail later.
HubSpot Webinar Field Mapping: Platform Comparison & Setup Cheat Sheet
HubSpot Webinar Integration Setup (Step-by-Step + Real Data Demo)
sbb-itb-5f36581
Choose the right HubSpot properties for webinar registration
Each HubSpot form field should map to the property that runs your workflows, lists, and attribution. Start with identity fields. Then add consent and tracking.
Map core registration fields to default contact properties
The standard webinar registration fields map straight to HubSpot’s default contact properties: First name → firstname, Last name → lastname, Email → email, Company → company, and Job title → jobtitle. Use clear labels on the form, but keep HubSpot’s default property names for these core fields so integrations and workflows keep working as expected.
For a public webinar, make first name, last name, and email required. Leave company and job title optional to cut friction and improve conversion rates. Only require company if the sales team has a clear need for it.
Don’t create duplicate properties like webinar_first_name next to firstname unless there’s a specific, documented reason. Storing identity data in HubSpot’s default contact properties keeps things clean across forms, lists, and automation.
After identity fields, handle consent on its own so webinar registration and marketing permission don’t get tangled up.
Add consent properties without mixing them with marketing preferences
Webinar consent and marketing subscription preferences are separate in HubSpot, and they should stay separate. Use a checkbox property such as webinar_communication_consent for reminders and follow-ups. Keep newsletter and product update opt-ins inside HubSpot’s subscription center.
HubSpot documentation notes that when notice and consent information is added to a form, the Legal basis for processing contact's data property can be set automatically to Freely given consent from contact. For U.S. audiences, use CAN-SPAM-safe wording and keep legal review involved.
Custom properties should be reserved for webinar data you’ll actually use in automation or attribution.
Create custom properties for webinar identifiers and campaign details
Use custom properties only for webinar data you plan to report on or automate. A small set is usually enough:
| Custom Property | HubSpot Field Type | Purpose |
|---|---|---|
webinar_slug |
Single-line text | Unique identifier for the event, such as ai-marketing-aug-2026 |
webinar_date |
Date | Drives time-based reminders and reporting |
registration_page |
Single-line text | Captures which URL collected the signup |
utm_source |
Single-line text | Campaign attribution |
utm_medium |
Single-line text | Channel-level attribution |
utm_campaign |
Single-line text | Specific campaign name |
Match each field to the right HubSpot type. webinar_date should use HubSpot’s Date type, while UTM fields should use single-line text. The right field types help prevent sync errors and keep U.S. reporting tidy, including dates shown as MM/DD/YYYY, such as 08/08/2026.
Set up field mapping in HubSpot forms and webinar integrations
Once your properties are in place, the next job is simple: make sure each form field connects to the right HubSpot property.
Build or edit the HubSpot webinar signup form
In the HubSpot form editor, use a Regular form on the Contact object so webinar signups create or update contact records.
As you add fields, click Search existing properties and check the gray property label before you save anything. For core fields like firstname, lastname, and email, you want the existing HubSpot property, not New property. If HubSpot suggests a new property with a similar name, stop there, cancel it, and search again. That small step helps you avoid duplicate fields that can turn reporting into a mess later.
Use the default and custom contact properties you already set up. Map the required fields to those existing properties, then test with one submission. After that, submit a test registration and confirm each value landed in the correct property.
Check field-type compatibility and naming conventions
Field types need to match exactly. In plain English, that means:
- Text goes to text
- Dropdown goes to dropdown or radio
- Consent checkboxes go to single checkbox
- Number input goes to Number
This matters more than it may seem. If you send dropdown, radio, or checkbox responses into a text field, HubSpot stores the display label, not the internal value. So if a workflow depends on something like customer_success, the target property should stay as a matching enumeration field.
It also helps to keep internal names steady and clean. A name like webinar_topic is easy to follow and easy to reuse. And once your webinar tools and workflows are live, don't change option internal values unless you have to. Those systems may rely on those values directly.
Connect webinar registration tools and confirm required mappings
Each webinar platform handles fields a bit differently, so check its rules before launch.
The Zoom–HubSpot integration syncs only first name, last name, and email. That's the whole set. Custom Zoom registration questions do not show up as HubSpot contact properties on their own. So if you need those answers inside HubSpot, collect them on your HubSpot form instead.
GoToWebinar gives you more room to work with. In addition to the three required fields, it can sync company name, job title, phone, industry, and address details as long as those fields exist and are mapped the right way in the integration settings.
Open the integration's Field mapping tab and check each platform field against the correct HubSpot property. Then run at least one full test registration for each webinar setup. Check both sides:
- The HubSpot contact record
- The webinar platform's registrant list
That way, you can confirm the data synced the way you expected before traffic starts coming in.
Once the core fields are syncing, move on to consent, hidden fields, and UTM capture.
Capture consent, hidden fields, and source tracking correctly
Add consent checkboxes and data privacy options
After you map the main registration fields, add consent and tracking fields.
Put separate consent checkboxes right above the submit button:
- one for consent to process
- one for consent to communicate
Keep the wording short and clear. For U.S. audiences, plain positive language usually works best, such as: I agree to receive webinar reminders and related marketing emails from [Company Name].
Skip vague lines like Keep me updated or Stay in the loop. They don't spell out what the person is agreeing to, and that makes consent harder to prove later.
Never pre-check consent boxes. And don't make communication consent required. HubSpot can log the consent text and timestamp on the contact record, which gives you an audit trail.
Use hidden fields for webinar metadata and routing
Use a static value for single-event forms and URL parameters for shared forms. HubSpot hidden fields auto-fill when the URL parameter name matches the internal property name. So if your link uses ?webinar_slug=intro-to-hubspot, every submission from that URL will carry that value.
A simple hidden-field setup for one webinar might look like this:
| Hidden Field | Example Value | Purpose |
|---|---|---|
webinar_slug |
intro-to-hubspot |
Identifies the specific webinar |
event_name |
HubSpot Webinar Signup Field Mapping Guide |
Used in workflows and list filters |
registration_page |
/webinar/hubspot-mapping |
Tracks which page converted the lead |
campaign_code |
Q3-2026-DEMO |
Links to internal campaign records |
owner_routing |
smb-sales |
Routes the contact to the right team |
Once those routing fields are set, map UTM values into dedicated properties.
Store UTM values without overwriting HubSpot source properties
Don't write UTM values into HubSpot's Original Source field. Instead, create custom hidden contact properties for each UTM parameter you want to track:
utm_sourceutm_mediumutm_campaignutm_contentutm_term
Map your hidden form fields to those custom properties. That lets you keep campaign context for each webinar registration without changing HubSpot's native attribution fields.
Once the values live in custom properties, you can use them for list segmentation, workflow branching, and channel-level reporting. Meanwhile, the Original Source data stays untouched for HubSpot's built-in dashboards.
Run a test submission with a live URL that includes UTM parameters. Then check that the values landed in your custom properties and that HubSpot's Original Source field stayed exactly the same. Use that same field map when you connect an external form source.
Map external webinar signup forms into HubSpot with Reform
For external webinar forms, map each field to the right HubSpot property. Reform connects to HubSpot and lets you handle that mapping without code. The HubSpot integration is available on Reform's Pro Plan. Where Reform stands out is in the mapping flow and how it handles hidden fields.
Map Reform fields to HubSpot contact properties
In the Reform form editor, click the gear icon next to the HubSpot integration to open the mapping settings. From there, use the same HubSpot property rules covered earlier in this guide, then apply Reform's settings for the fields that need special handling.
| Reform Field | HubSpot Object | HubSpot Property |
|---|---|---|
| Company | Company | Company Name |
| Consent Checkbox | Contact | Custom consent property, such as webinar_consent |
Map company fields in Configure company so they sync to the right HubSpot company property. For consent, keep the checkbox tied to a separate custom property like webinar_consent instead of HubSpot subscription status. That separation matters. It keeps webinar registration consent clean and easier to track later. Reform can also sync completed steps from multi-step forms.
Pass hidden fields and UTM values into HubSpot
Once the main fields are mapped, set up hidden fields for webinar details and attribution. In the Reform editor, create a hidden field for each value you want to collect behind the scenes. The field names should match the URL parameters so Reform can fill them in automatically when the form is submitted. Then map each hidden field to the matching custom HubSpot contact property you created earlier in this guide.
Before launch, turn on Enable tracking in Reform's HubSpot integration settings. Also add reform.app to your HubSpot analytics tracking site domain list.
Conclusion: Minimum mapping checklist for clean webinar data
Before the registration page goes live, check three things:
- Core fields map to the right HubSpot properties
- Consent checkboxes point to dedicated custom properties
- Hidden fields and UTM values flow into custom properties, not system-managed source fields
If those checks are in place, your Reform–HubSpot mapping is ready for production.
FAQs
What happens if I map fields to the wrong HubSpot properties?
Mapping fields to the wrong HubSpot properties can make your data messy fast. And once bad data gets into your CRM, it tends to spread.
That can trigger all kinds of problems downstream: failed automation, broken routing, off-base reporting, and records that get rejected, overwritten, or fail on submission.
Your CRM is supposed to be your source of truth. So when mappings are off, the damage doesn't stop at data entry. It can lead to marketing dollars going to the wrong places, sales teams reaching out in the wrong way, and email personalization that falls flat.
Should webinar consent be separate from email subscriptions?
Yes. Keep webinar consent separate from email subscriptions so users know exactly what they’re agreeing to.
Map each consent purpose to its own HubSpot property so you can record each choice the right way, support compliance, and manage preferences with less guesswork. Reform can connect separate checkboxes to the matching consent fields in your CRM.
How do I track UTMs without changing Original Source?
Map UTM values to custom HubSpot properties instead of the default Original Source fields.
Here’s the simple way to do it: use hidden fields in Reform to grab UTM parameters from the page URL, then send those values to custom HubSpot properties.
For example, you can map fields like utm_source and utm_campaign to matching custom properties in HubSpot. That way, you keep the full attribution data tied to the contact record without changing HubSpot’s built-in source tracking.
It’s a clean setup. HubSpot still handles Original Source the way it was designed to, while your custom properties store the campaign details you care about most.
Related Blog Posts
Get new content delivered straight to your inbox

The Response
Updates on the Reform platform, insights on optimizing conversion rates, and tips to craft forms that convert.




Drive real results with form optimizations
Tested across hundreds of experiments, our strategies deliver a 215% lift in qualified leads for B2B and SaaS companies.
