

Map custom fields to HubSpot properties



I map each form field to the right HubSpot object, property internal name, and value format - not just a matching label. Before publishing, I test 2 cases: a new contact and an existing contact.
Here’s my checklist for mapping Reform forms to HubSpot:
- Prepare properties: Choose Contact, Company, or Deal properties, add missing ones, and check write permissions.
- Match formats: Keep IDs as text, match select-option values, and convert numbers and dates as needed.
- Connect and map: Authorize the intended HubSpot account, map each form field, and save.
- Check results: Confirm record creation, updates, associations, and what happens when fields are blank or skipped.
- Fix errors: Check internal names, formats, permissions, and email matching if data is missing or duplicates appear.
My rule: <u>check the stored CRM data</u>, not just the connection status. Then retest whenever the form, mappings, or properties change - a passing test covers only the current setup.
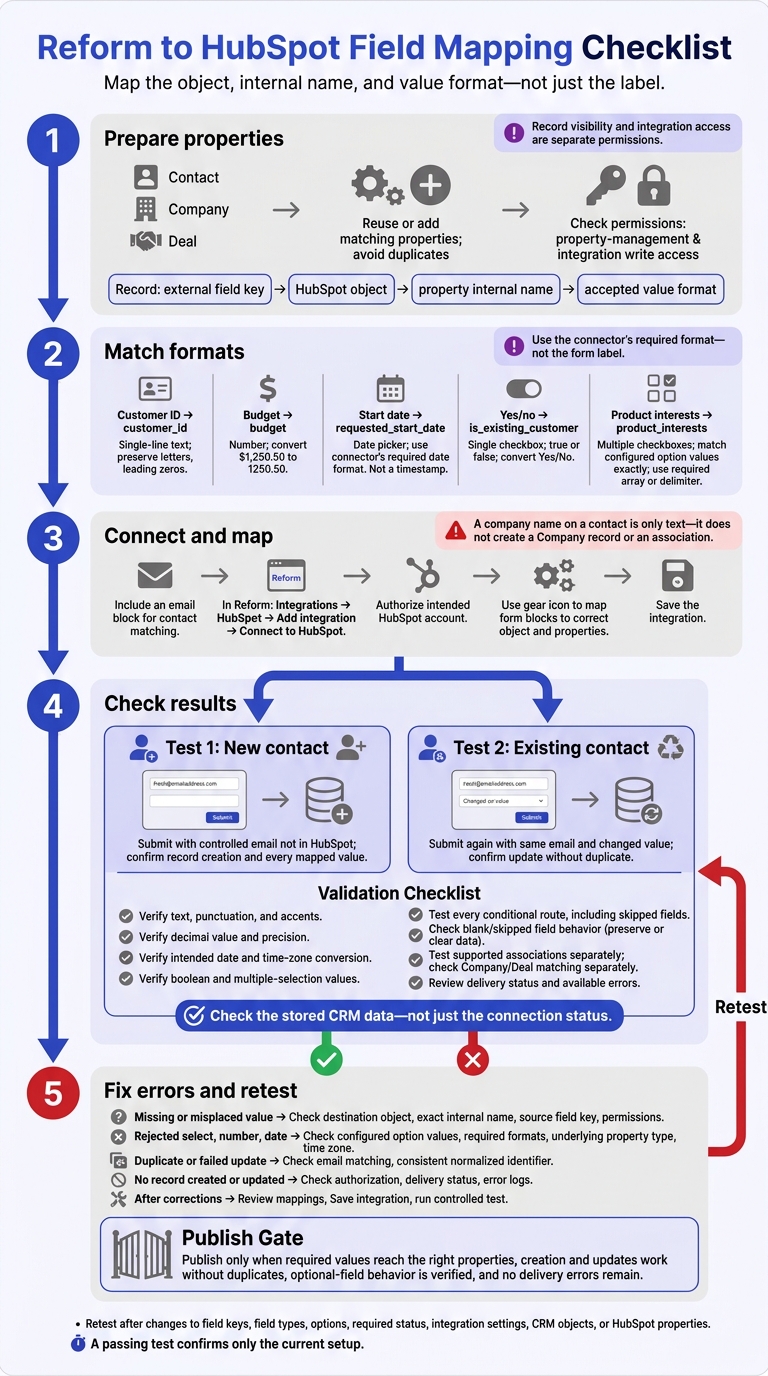
Reform to HubSpot Field Mapping Checklist
How to add Custom Fields to HubSpot Forms
sbb-itb-5f36581
1. Set up HubSpot properties
Match each external field to an existing HubSpot property before creating new ones.
Choose the CRM object and add missing properties
In HubSpot, go to Settings → Properties, choose the CRM object, and search for a matching property. Use Contacts for person-level data, Companies for organization-level data, and Deals for deal-level data. Don’t create duplicate properties for the same value. Reform supports mapping to Contact, Company, and Deal properties; don’t assume the integration supports other objects.
For each missing property, add a clear label, group, description, and field type. Check that your HubSpot user can manage properties and that the integration can write to the destination. Record visibility and integration access are separate permissions.
Once you’ve created the right property, finalize its label and internal name.
Check labels and internal names
Follow HubSpot’s internal-name rules in the editor. Use descriptive letters, numbers, and underscores. Avoid spaces, unsupported punctuation, and temporary terms, such as a year. Keep external form keys stable, and record each key alongside its HubSpot object and property internal name.
Match field types and value formats
Choose the storage type first, then match the input style. Store identifiers with leading zeros as text. A single checkbox stores one boolean value; multiple checkboxes store the selected option values.
External field HubSpot property HubSpot field type Expected value format Required conversion Customer ID customer_idSingle-line text Text, including letters and leading zeros Keep as text; don’t convert to a number Budget budgetNumber 1250.50Convert $1,250.50to1250.50Start date requested_start_dateDate picker Connector-specific date value Convert to the connector’s required format Yes/no is_existing_customerSingle checkbox trueorfalseConvert “Yes”/“No” if needed Product interests product_interestsMultiple checkboxes Configured option values Match option values; use the required array or delimiter
Use the connector’s required format - not the form label. Match option values exactly, send multi-selects as the required array or delimited format, and convert dates to a format HubSpot accepts.
With the properties and formats ready, connect your high-converting lead form and run a test submission.
2. Connect the form and test submissions
With your properties ready, map them in Reform. Then check that submissions reach the right fields in HubSpot.
Connect Reform and map fields
Build your form fields in Reform and include an email block for contact matching. In the form editor, open Integrations, find HubSpot, and select Add integration, then Connect to HubSpot. Choose the intended HubSpot account and authorize access.
Select the gear icon beside the integration to map each form block. Connect email, first name, last name, and phone to native HubSpot properties. Map the remaining fields to the matching custom properties on your selected object. A company name on a contact is only text - it doesn’t create a Company record or an association.
Check that each mapping uses the right object and field type before saving and testing the data flow.
Save mappings and check submitted values
Save the integration and send a test submission. Open the resulting HubSpot record, confirm the destination object, and check every mapped value.
| Test case | Expected result | Observed result | Fix required |
|---|---|---|---|
| Text values | All text, punctuation, and accents are retained. | ||
| Blank field | Behavior matches documented rules; existing data is not unintentionally cleared. | ||
| Decimal number | The intended numeric value and precision are retained. | ||
| Date | The intended day is stored, accounting for any time-zone conversion. | ||
| Boolean fields | The expected true/false, blank, or omitted behavior matches your setup. | ||
| Multiple selections | Every selected option reaches the property. |
Test record creation and updates
Submit using a test email address you control that isn’t already in HubSpot. Then submit again with the same address and a changed value. Check that HubSpot updates the existing contact instead of creating a duplicate. Reform matches contacts by email; check company and deal matching rules separately.
Test every conditional route, including one skipped field. Check whether blank and skipped fields preserve or clear existing values. HubSpot can clear a property when it receives an empty string.
Test supported associations separately, then review the delivery status and any available error details. If a test fails or a value reaches the wrong property, fix the mapping before moving on or publishing.
3. Fix mapping errors
Check missing properties and wrong destinations
If a test submission fails, pinpoint the object, field, or format behind the mismatch. Start by checking the destination object, internal name, and integration permissions. For a new property, save it, reload the integration, and reopen the mapping screen. Check form-level visibility rules only if they affect the submission path.
If a value lands in the wrong property, match the source field key to the exact internal name on the intended object. Look for accidental mappings to standard fields like email, phone, or company. If the destination is correct, check the value’s format next.
Fix select, number, and date formats
Convert rejected values to the format the destination property requires. For select, checkbox, and boolean responses, match option values exactly, including spelling and capitalization. Also check whether the property allows multiple selections. For numbers, strip out currency symbols, thousands separators, and other formatting. Check both the property’s underlying type and its display field type.
If a stored date shifts, check the submitted format and time zone. Don’t send a date-only field as a timestamp. If the format is correct but the record still fails, check identifier rules and update behavior.
Fix duplicates and failed updates
For duplicates or failed updates, confirm that the integration’s matching identifier is present. Send the same normalized identifier every time. Use property history and the record timeline to see what changed.
If only one field fails, treat it as a field-mapping issue. If no record is created or updated, check authorization, delivery status, and error logs. After making corrections, review the mappings, click Save integration, and run one controlled test. Keep the original payload, timestamp, destination object, and error message for troubleshooting.
Conclusion: Check mappings before publishing
Keep a mapping checklist that includes each external field key, HubSpot object, property internal name, and accepted value format. For integrations and API-based connections, use internal names, not labels. Check this list before every publish.
Publish only when required values reach the right properties, new records are created correctly, existing records update without duplicates, and no delivery errors remain. Also, test what happens when an optional field is empty. If a value lands in the wrong place, fix the mapping before going live.
Retest whenever you change field keys, field types, options, required status, integration settings, CRM objects, or HubSpot properties. A passing test confirms only the current setup.
FAQs
Can I map one form field to multiple HubSpot properties?
Not directly in the standard mapping interface. Each form field maps to one HubSpot property through that property’s internal name. Mapping a single field to multiple properties can lead to sync errors or scattered information.
To send the same input to multiple properties, set up your integration logic to distribute the data. Or use multiple hidden fields, each mapping the same value to a different property.
Will mapping changes affect past submissions?
No. Updating your mapping configuration won’t change past submission data already stored in HubSpot. Changes apply only to new form submissions.
If you change a field type or mapping, check that it meets your HubSpot property requirements to prevent future sync errors. Review your mappings periodically, and test new configurations with a sample submission to confirm that data appears correctly in your records.
How can I prevent blank fields from overwriting HubSpot data?
Configure your form integration to send only fields with values. Sending empty strings for blank fields may overwrite existing data in the corresponding HubSpot properties.
Check your form tool’s settings for an option to exclude empty fields from the API payload. If that option isn’t available, use a server-side validation or normalization layer to remove empty fields before sending the data to HubSpot.
Related Blog Posts
Get new content delivered straight to your inbox

The Response
Updates on the Reform platform, insights on optimizing conversion rates, and tips to craft forms that convert.




Drive real results with form optimizations
Tested across hundreds of experiments, our strategies deliver a 215% lift in qualified leads for B2B and SaaS companies.
