
.webp)
Salesforce Web-to-Lead API Setup Guide


Want to streamline lead generation on your website? Salesforce Web-to-Lead lets you send form submissions directly to Salesforce, creating new leads instantly - no manual input required. This feature is free with Sales Cloud and Service Cloud and supports up to 500 leads daily. Here's what you'll learn:
- Setup Essentials: Admin permissions, lead queues, and assignment rules.
- Spam Protection: Enable reCAPTCHA v2 to block unwanted submissions.
- Form Creation: Generate and customize HTML forms for your website.
- Testing & Troubleshooting: Ensure seamless lead processing and fix common issues.

Salesforce Web-to-Lead Setup Process: 4-Step Implementation Guide
Salesforce Web-to-Lead Forms Step-by-Step Guide
sbb-itb-5f36581
What You Need Before Starting
Before you dive into setting up Web-to-Lead, make sure you have the essentials covered: admin permissions, properly configured lead queues, and a public website ready to host your form. Skipping any of these steps can lead to errors or misrouted leads.
Salesforce Admin Permissions
Start by ensuring you have the right permissions. Full administrative access is necessary to navigate to Setup and enable Web-to-Lead. The Default Lead Creator - the user assigned to handle unassigned leads - needs specific permissions like "Modify All Data" and "Send Email". These can be granted through the user's profile or a permission set. Assign these permissions consistently to avoid potential setup issues.
If your Salesforce instance uses duplicate matching rules set to "Block", make sure to bypass them for the Default Lead Creator. This ensures valid lead submissions aren't mistakenly rejected.
Lead Queues and Assignment Rules
Once permissions are in place, focus on setting up lead queues and assignment rules. Lead queues act as holding areas for unassigned leads. Consider creating queues like:
- A "Disqualified" queue for leads that don’t meet your criteria
- Territory-based queues for regional routing
- An "Unsorted" queue for leads that don’t match any specific rule
"A good set of Lead Assignment Rules will buy you endless friends in both sales and marketing, and will make your incoming data sparkle and look perfect." - Stacy O'Leary, Certified Salesforce Consultant
Next, configure a single active Lead Assignment Rule. This rule should include multiple entries ordered by priority. Start with strict filters to catch spam, then move to specialized routing, and finally broader rules like territory-based assignments. If no rule applies, the lead will default to the Default Lead Owner specified in Lead Settings.
Pro tip: Add a hidden "Lead Source" field to your form's HTML and set it to "Web." This ensures assignment rules can easily identify and handle web-generated leads.
Public Site Access for Form Hosting
To collect submissions, you’ll need a public website to host your form. Visitors should be able to submit their details without requiring Salesforce login credentials.
Enable reCAPTCHA v2 in your Web-to-Lead settings to prevent spam. To set this up, register your hosting domain with Google to get a Site Key and Secret Key. Make sure the domain name you register matches your hosting domain exactly, or the captcha won’t work. You can also use tools like Reform (https://reform.app), which simplifies hosting and adds spam prevention features without needing manual HTML tweaks.
"Without Captcha or spam protection, these forms will get flooded with spam." - Nishant Agrawal, Product & Engineering, Formcrafts
Once these steps are complete, you’re ready to enable Web-to-Lead in Salesforce.
How to Enable Web-to-Lead in Salesforce
Once you've met the prerequisites, it's time to activate Web-to-Lead. This involves accessing the right settings, enabling spam protection, and assigning a user to manage incoming leads.
Accessing and Enabling Web-to-Lead
In Salesforce Lightning, start by clicking the Setup gear icon. Use the Quick Find bar to search for "Web-to-Lead", then select it. Click Edit, check the Web-to-Lead Enabled box, and save your changes to activate the feature.
Web-to-Lead is supported in Professional, Enterprise, Unlimited, and Developer editions, but it comes with a daily cap of 500 leads. If this limit is exceeded, additional submissions are queued and processed the next day when the limit resets.
To protect your form from spam, the next step is to set up reCAPTCHA verification.
Configuring reCAPTCHA Verification
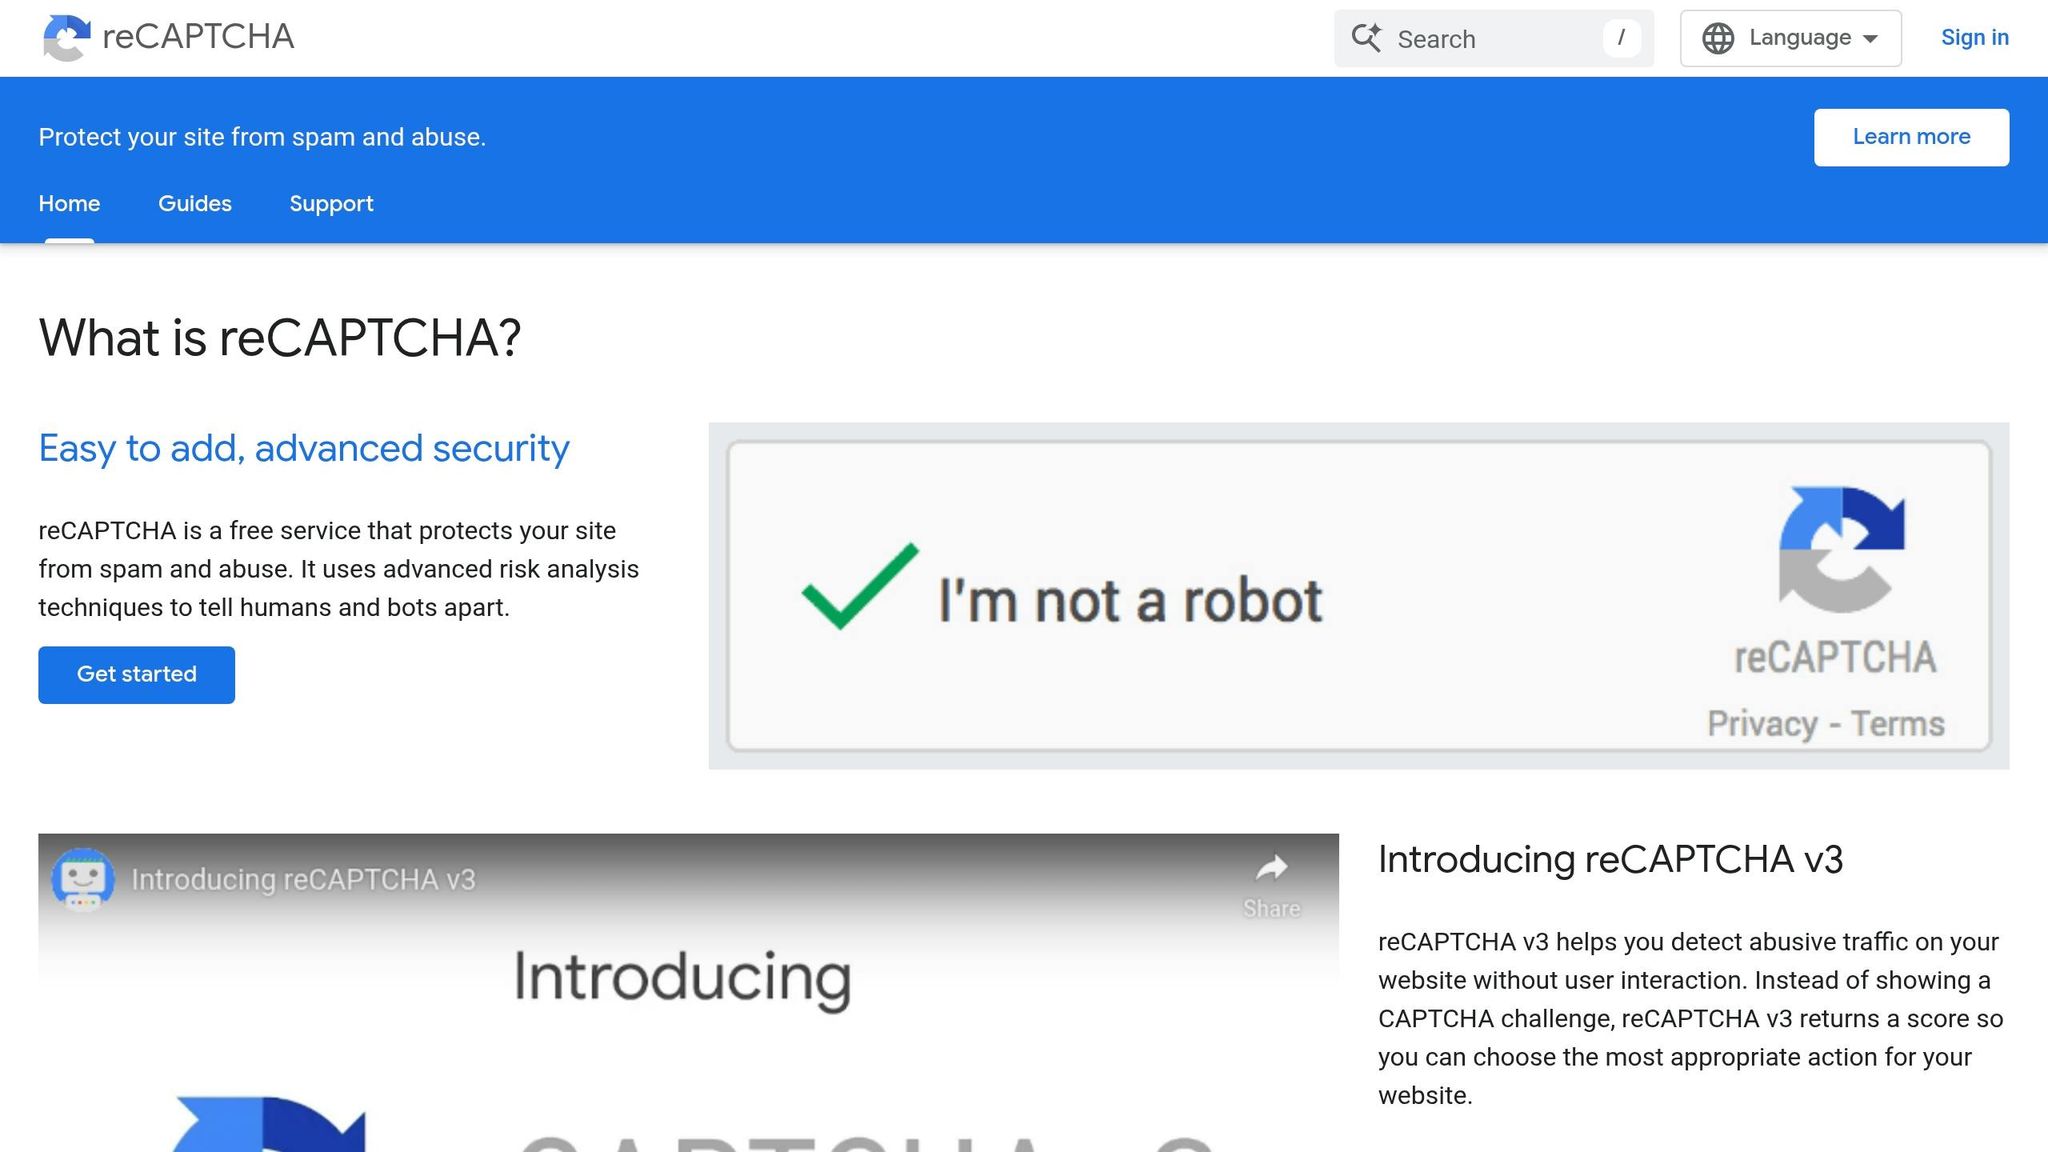
To filter out spam and bot submissions, enable the Require reCAPTCHA Verification option in the Web-to-Lead settings. You'll need to register your domain with Google to get a Site Key and Secret Key for reCAPTCHA v2, as Salesforce does not currently support v3.
Make sure the Show Quick Create option is enabled in Setup > User Interface to avoid permission-related issues. Once you've registered your API keys with Google, allow at least 30 minutes for activation before testing your form.
It's also a good idea to enable Server Fallback in your reCAPTCHA settings. This ensures that lead submissions will still process even if Google's servers experience downtime. This step is essential to maintain the reliability of your Web-to-Lead setup. Beyond technical reliability, focusing on multi-step form design can significantly improve user engagement.
With spam protection in place, the next step is to assign a user for lead creation.
Setting Default Lead Creator
The Default Lead Creator is the user who will be recorded as the creator of all leads generated through your web form. This user must have the "Modify All Data" and "Send Email" permissions.
If no assignment rules are applied, leads will default to the Default Lead Owner specified in your Lead Settings. This ensures that unassigned leads are handled consistently. Additionally, you can set a Default Response Template to automatically send confirmation emails to prospects after they submit their information. While optional, this feature can help create an immediate connection with potential customers.
Once all these settings are configured, you're ready to generate and customize high-converting lead forms for your Web-to-Lead setup.
Creating and Customizing Your Web-to-Lead Form
To get started with your Web-to-Lead form, head over to Setup > Web-to-Lead > Create Web-to-Lead Form in Salesforce.
Selecting Lead Fields
The form builder provides two columns: Available Fields and Selected Fields. To build your form, simply move the fields you want from the Available column to the Selected column. Standard fields like First Name, Last Name, Email, and Company are popular choices. You can also add any custom fields you've already created in your Lead object. For instance, if you have a custom product picklist, you can include that as well.
If your organization uses multiple currencies, consider adding the Lead Currency field. Similarly, if you're managing diverse lead types, include the Lead Record Type field to automatically assign categories to web-generated leads. Keep in mind that Rich Text Area fields aren't supported - any data entered in these fields will be converted to plain text.
Setting the Return URL
You’ll need to specify a full URL (including "https://") for your confirmation page. This creates a hidden input field in the HTML code, such as:
<input type="hidden" name="retURL" value="https://yourwebsite.com/thank-you">
"Using a dedicated thank you page is a best practice. That allows you to have a thank you message... as well as hidden conversion tracking codes for Google Ads." - David Hecht, Founder, CloudAmp
A dedicated confirmation page not only prevents duplicate submissions but also makes it easy to track conversions using tools like Google Ads or Meta through embedded tracking pixels.
Customizing the Form HTML
After setting your Return URL, you’ll generate the HTML for your form. Once you’ve selected the fields and added the Return URL, click Generate to produce the HTML code. By default, this code is unstyled, so you’ll need to customize it to align with your website’s design.
"The HTML code generated from Salesforce does not contain any validation or styling. Therefore it must be customized to include CSS, styling elements, form validation, hidden fields, and so on." - John Coppedge, Founder, Certified On Demand
To improve data quality and functionality, consider these adjustments:
- Add
required="true"to make fields mandatory. - Change
type="text"totype="email"for email input fields. - Include hidden fields for metadata, such as:
<input type="hidden" name="lead_source" value="Web">
<input type="hidden" name="Campaign_ID" value="[ID]">
Before deploying the form, ensure you’ve removed any debug lines to enable live lead creation. If you’re testing in a Sandbox environment, verify that the form’s action URL is pointing to your specific Sandbox instance (e.g., test.salesforce.com).
Deploying and Testing Your Form
Embedding Form on Your Website
After generating your HTML code, the next step is to integrate it into your website. This code includes a header section and the form itself, which is wrapped in <form> and </form> tags. If you're using WordPress, you can paste this code into an HTML Block or a Custom HTML element. For other platforms, embed the code directly into your website's source files.
To make the form visually appealing, you can add custom CSS to style the default HTML layout.
Testing Form Submissions
Once the form is embedded, you need to test its functionality. Before making it live, enable debug mode by uncommenting the hidden "debug" and "debugEmail" fields in your HTML code. This step ensures you receive detailed notifications from Salesforce if there are issues with lead creation. Testing the form locally is a good way to confirm everything works as expected.
Submit a test entry through the form and then check the Leads tab in Salesforce. Verify that your test record appears and that all fields are mapped correctly. Also, confirm that the form redirects users to your designated Return URL (like a "Thank You" page) upon successful submission.
Addressing Common Issues
If your testing uncovers any problems, here are some frequent issues and how to resolve them:
- Leads not appearing in Salesforce: This is often due to unchecked "Enable Web-to-Lead" settings, missing required fields in your HTML, or validation rules blocking the data. Enable debug mode and review the Debug Logs for specific errors.
- Spam submissions: These can be a significant problem. For example, a healthcare technology startup working with Mirketa faced over 500 spam submissions daily in June 2025. By integrating Google reCAPTCHA v2 and setting up geographic-based lead assignment rules, they reduced spam by 78% and saw a 34% increase in Marketing Qualified Leads (MQLs). Additionally, if you have duplicate matching rules set to "Block", adjust the rule to exclude the Default Web-to-Lead Creator user. This ensures legitimate web leads aren't mistakenly blocked.
| Issue | Common Cause | Recommended Fix |
|---|---|---|
| Form submits but no lead appears | Validation rules or missing required fields | Enable debug mode; review debug logs |
| High volume of fake leads | Bot attacks | Use reCAPTCHA v2 or a hidden "honeypot" field |
| Redirect fails after submission | Incorrect retURL value | Verify the retURL value matches your "Thank You" page |
| Leads assigned to wrong person | Inactive assignment rules | Check Setup > Lead Assignment Rules to ensure the correct rule is active |
Conclusion
This guide has walked you through every step needed to set up a smooth and effective lead capture process, from enabling Web-to-Lead to testing your form.
The Salesforce Web-to-Lead API simplifies lead capture by automating the process and eliminating manual data entry. By following steps like enabling the feature, adding reCAPTCHA, customizing your form, and testing submissions, you’ve created a system that captures leads in real time and feeds them directly into your sales pipeline.
Take this example: In June 2025, a fintech lending platform revamped its Web-to-Lead forms with smarter field visibility and automated routing. The result? A threefold boost in conversions and a 38% cut in closing time. Similarly, a telehealth startup slashed its average sales follow-up time from 48 hours to under 24 hours after automating its lead capture process.
Features like automated lead routing, quick auto-responses, and built-in reCAPTCHA make this setup scalable and efficient, giving your sales team more time to focus on turning leads into customers. Just don’t forget the 500-lead daily limit Salesforce enforces. If your campaigns generate more leads than this, keep a close eye on your submissions and explore additional tools to handle the overflow.
To maximize form completion rates, stick to essential fields and use hidden fields to track lead sources and campaign data without overwhelming users. A streamlined and user-friendly form will always perform better.
With your Web-to-Lead setup tested and live, you now have a system that captures leads effortlessly and integrates them into your sales process. This automation not only saves time but also ensures that no potential customer slips through the cracks.
FAQs
How do I route web leads to the right sales rep automatically?
To ensure web leads are directed to the right sales reps in Salesforce, you’ll need to set up and activate lead assignment rules. These rules allow you to establish criteria based on specific lead fields or attributes, ensuring each lead lands with the appropriate team member.
If you’re looking for more advanced automation, Salesforce also offers options like round-robin assignments or territory-based routing. These can be implemented through custom configurations or by integrating third-party tools, giving you even more flexibility in managing lead distribution.
What happens if my site gets more than 500 Web-to-Lead submissions in a day?
If your site processes more than 500 Web-to-Lead submissions in a single day, Salesforce will temporarily block any additional submissions until the 24-hour limit resets. Any leads beyond this cap will need to be entered manually. This restriction helps maintain system performance and protect data accuracy.
Why does my form submit but no lead shows up in Salesforce?
If your form submits but no lead shows up in Salesforce, there are a few things you should double-check:
- Web-to-Lead Configuration: Make sure the form is set up correctly, including proper field mapping and activation.
- HTML and Action URL: Verify that the form's HTML code and action URL are accurate and aligned with Salesforce's requirements.
- Spam Prevention Tools: Ensure tools like reCAPTCHA are correctly implemented to avoid issues with submission.
- Daily Submission Limits: Remember, Salesforce has a limit of 500 leads per day for Web-to-Lead forms.
- Lead Assignment and Auto-Response Rules: Check these rules for any conflicts that might prevent leads from being processed or assigned correctly.
These steps can help identify and resolve the problem quickly.
Related Blog Posts
Get new content delivered straight to your inbox

The Response
Updates on the Reform platform, insights on optimizing conversion rates, and tips to craft forms that convert.


Drive real results with form optimizations
Tested across hundreds of experiments, our strategies deliver a 215% lift in qualified leads for B2B and SaaS companies.
