
.webp)
How to Add Forms to WooCommerce


Adding forms to WooCommerce can streamline your store's operations and improve how you interact with customers. Whether you need to collect product customizations, manage bulk orders, or gather specific customer details, forms make it easier to handle these tasks without relying on email exchanges. Here's what you need to know:
- Why Add Forms? They help collect customer information upfront, simplify order customizations, and improve accuracy with structured inputs like dropdowns or checkboxes.
- Key Benefits: Forms can increase order values with upsells, reduce errors in complex orders, and save time by linking submissions directly to WooCommerce orders.
- Tools to Use: Reform is a no-code form builder that integrates with WooCommerce, offering features like multi-step forms, conditional logic, and spam prevention.
- Steps to Get Started:
- Install and set up WooCommerce.
- Create a Reform account to design your forms.
- Embed forms on product or checkout pages using Reform's embed code.
- Map form data to WooCommerce orders for seamless management.
- Test and refine your forms to improve user experience and performance.
Forms can transform how your WooCommerce store operates, making customizations and order management more efficient. Reform offers affordable plans starting at $15/month, making it a practical choice for building forms tailored to your needs.
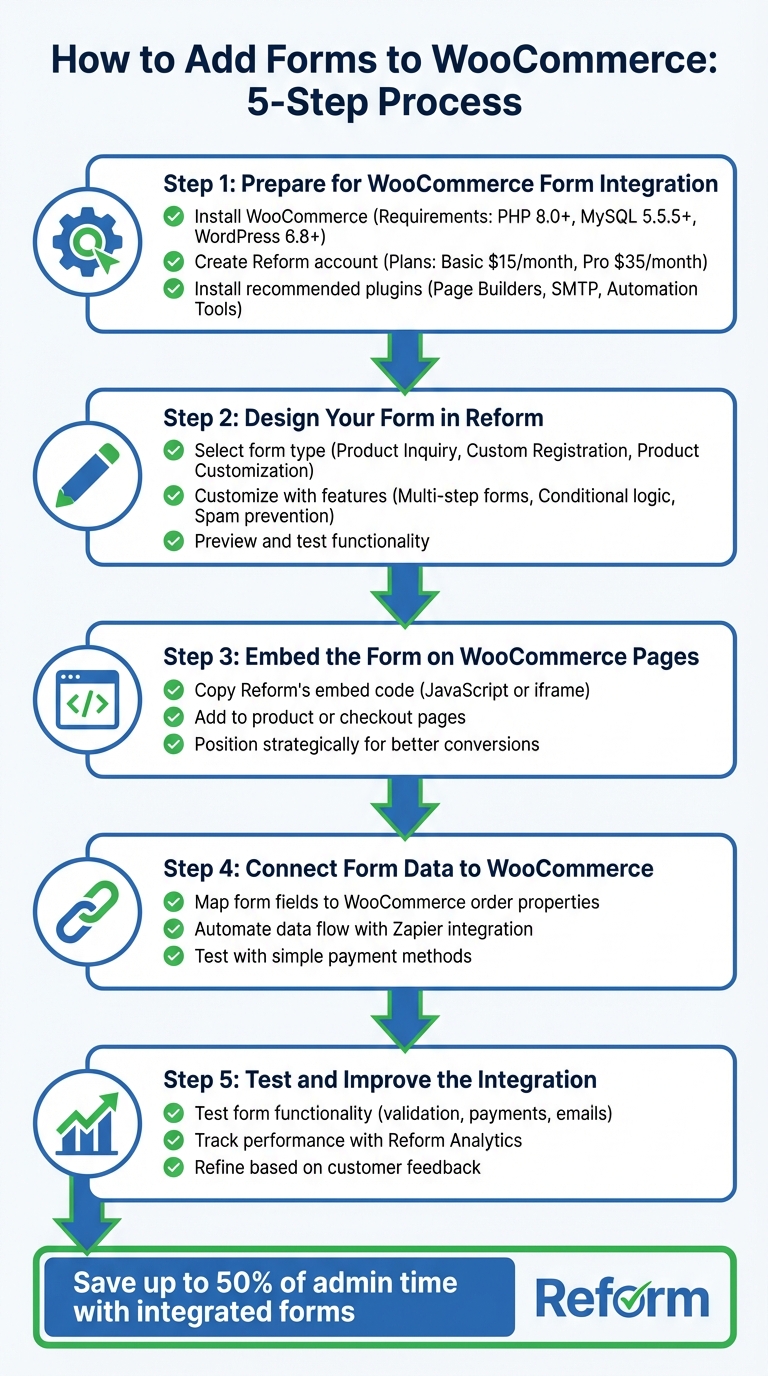
5-Step Process to Add Forms to WooCommerce
2024 - Easily Setup WooCommerce Order Form Plugin
sbb-itb-5f36581
Step 1: Prepare for WooCommerce Form Integration
Get everything ready to seamlessly integrate forms with your WooCommerce backend.
Install and Set Up WooCommerce
First, make sure your server meets the required specifications: PHP 8.0+ (or at least PHP 7.4), MySQL 5.5.5+, and WordPress 6.8+. Once confirmed, install WooCommerce by navigating to Plugins > Add New in your WordPress dashboard. The WooCommerce Setup Wizard will guide you through essential configurations like payment processors (e.g., Stripe, PayPal), shipping options, and tax settings.
After activating WooCommerce, double-check that every product in your store has a price - even if it's set to "$0" - to ensure forms display properly. If your shop pages are not loading as expected, refresh your permalinks and verify that all WooCommerce pages are accessible. Also, check your browser's Console for any JavaScript errors that might interfere with form rendering.
Once WooCommerce is up and running, you’re ready to move on to creating your forms.
Create a Reform Account

Now that WooCommerce is set up, head over to Reform and create an account. Reform offers two plans: the Basic Plan at $15/month and the Pro Plan at $35/month. The Pro Plan includes advanced features like multi-step forms, conditional routing, and custom CSS.
After logging in, you can start building forms using Reform's intuitive form builder. Features like built-in spam prevention, email validation, and abandoned submission tracking come standard, making your forms more efficient and user-friendly.
Recommended Plugins and Tools
While Reform handles the form creation, a few additional WordPress tools can simplify the integration process and enhance functionality:
- Page Builders: Use tools like Elementor, Divi, or Bricks to easily embed forms on your site.
- SMTP Plugin: Install a plugin like WP Mail SMTP to ensure reliable email delivery for form notifications.
- Automation Tools: Connect form submissions to WooCommerce orders using platforms like Zapier or Make.
One tip: avoid adding reCAPTCHA to your product pages. It can mistakenly flag legitimate users as bots, which could hurt conversions. With these tools in place, your WooCommerce forms will be set up for success.
Step 2: Design Your Form in Reform
With your WooCommerce store ready, the next step is to design your form. This is where you decide how customers will interact with your store, whether it's for inquiries, registrations, or product customizations.
Select the Right Form Type
The type of form you choose depends on your specific goals. Here’s a quick breakdown of popular options:
- Product Inquiry Forms: Perfect for collecting customer details directly on product pages without affecting the cart total. To achieve this, use a hidden field set to "$0".
- Custom Registration Forms: Ideal for B2B or wholesale operations, or for gathering customer preferences. For B2B use, include a dropdown for user roles (e.g., "Wholesale" or "B2B") to streamline account approvals and segment customers early on. For personalization, ask for details like favorite brands or shopping habits to enable targeted marketing.
- Product Customization Forms: If your products require personalization - like engraving or file uploads - opt for a form with conditional logic. This ensures only relevant fields appear based on customer choices.
Here’s a quick reference table to help match your needs with the right form type:
| Form Application | Recommended Form Type | Key Feature to Use |
|---|---|---|
| Product Inquiry | Simple Contact/Inquiry Form | Hidden fields for zero-price impact |
| B2B Registration | Custom Registration Form | User role dropdowns and admin approval |
| Product Customization | Pricing/Add-on Form | Conditional logic and calculation fields |
| User Profile Updates | Profile Form | Auto-populating billing/shipping metadata |
Customize Your Form with Reform Features
Once you've selected a form type, it's time to tailor it using Reform's builder. For complex forms, multi-step forms are a great option. They break down information into smaller sections, making it easier for users to complete - especially on mobile devices.
Reform also supports conditional routing, which lets you show or hide fields based on earlier responses. For example, you can display a phone number field only for customers in specific countries. Other features like spam prevention and email validation ensure your submissions stay clean and accurate.
Want to match your form to your store's branding? Use Reform's tools to customize colors, fonts, and logos. If you're on the Pro Plan ($35/month), you can even use custom CSS and JavaScript for advanced design tweaks.
Preview and Test Your Form
Before embedding your form, it’s crucial to test it thoroughly. Start by using Reform's internal preview feature or create a temporary WordPress page to see how the form behaves. Check that:
- Validation messages display properly when required fields are skipped or incorrect data is entered (e.g., an invalid email).
- Conditional logic functions as expected, with fields appearing or hiding based on user input.
- Notification emails arrive in the correct inbox and aren’t flagged as spam.
If you’ve integrated Reform with a CRM or marketing platform, make sure test submissions create new contacts in your external system. Lastly, test the form on a mobile browser to confirm it adapts well to smaller screens and remains user-friendly.
Step 3: Embed the Form on WooCommerce Pages
Now that your form is ready, it’s time to integrate it into your WooCommerce store. Where you place the form can make a big difference in how many customers notice and complete it, so this step plays a key role in increasing engagement.
Use Reform's Embed Code
Reform provides an embed code for every form you create. To add it to your WooCommerce site, start by copying the JavaScript or iframe code from your Reform dashboard. Then, navigate to the WooCommerce page or product where you want the form to appear.
If you're using the Classic Editor, switch to Text mode and paste the code. For Gutenberg users, add a Custom HTML block and insert the code there. If your form will appear across multiple pages - like an inquiry form in a sidebar or footer - go to Appearance » Widgets in WordPress. Add a Custom HTML widget to your chosen area and paste the embed code.
Next, think about which pages - such as product or checkout pages - will be most effective for your form.
Add Forms to Product or Checkout Pages
Product pages are a great spot for forms like inquiry requests, bulk order submissions, or customization options. Typically, these forms are embedded under the "Description" tab.
On checkout pages, consider placing forms before or after the billing and shipping sections. This is perfect for collecting delivery instructions, gift messages, or other special requests. If you want the same form to appear on every product page, add it to the "Single Product" template in the WordPress Site Editor instead of manually embedding it on each product.
Once your form is embedded, its placement can significantly influence how well it performs.
Position Forms for Better Conversions
Strategic placement of forms can make a big difference in customer interactions. For B2B or wholesale products, include quote request forms directly on the relevant product pages to encourage immediate inquiries. If your products involve customization - like engraving or color selection - consider adding a link near the product options that opens the form in a modal. This keeps the main page uncluttered while still offering easy access.
To capture potential leads, try using exit-intent triggers, which display forms when visitors are about to leave your site. For checkout forms, always enable validation for fields like email addresses and phone numbers. This helps prevent issues with order processing.
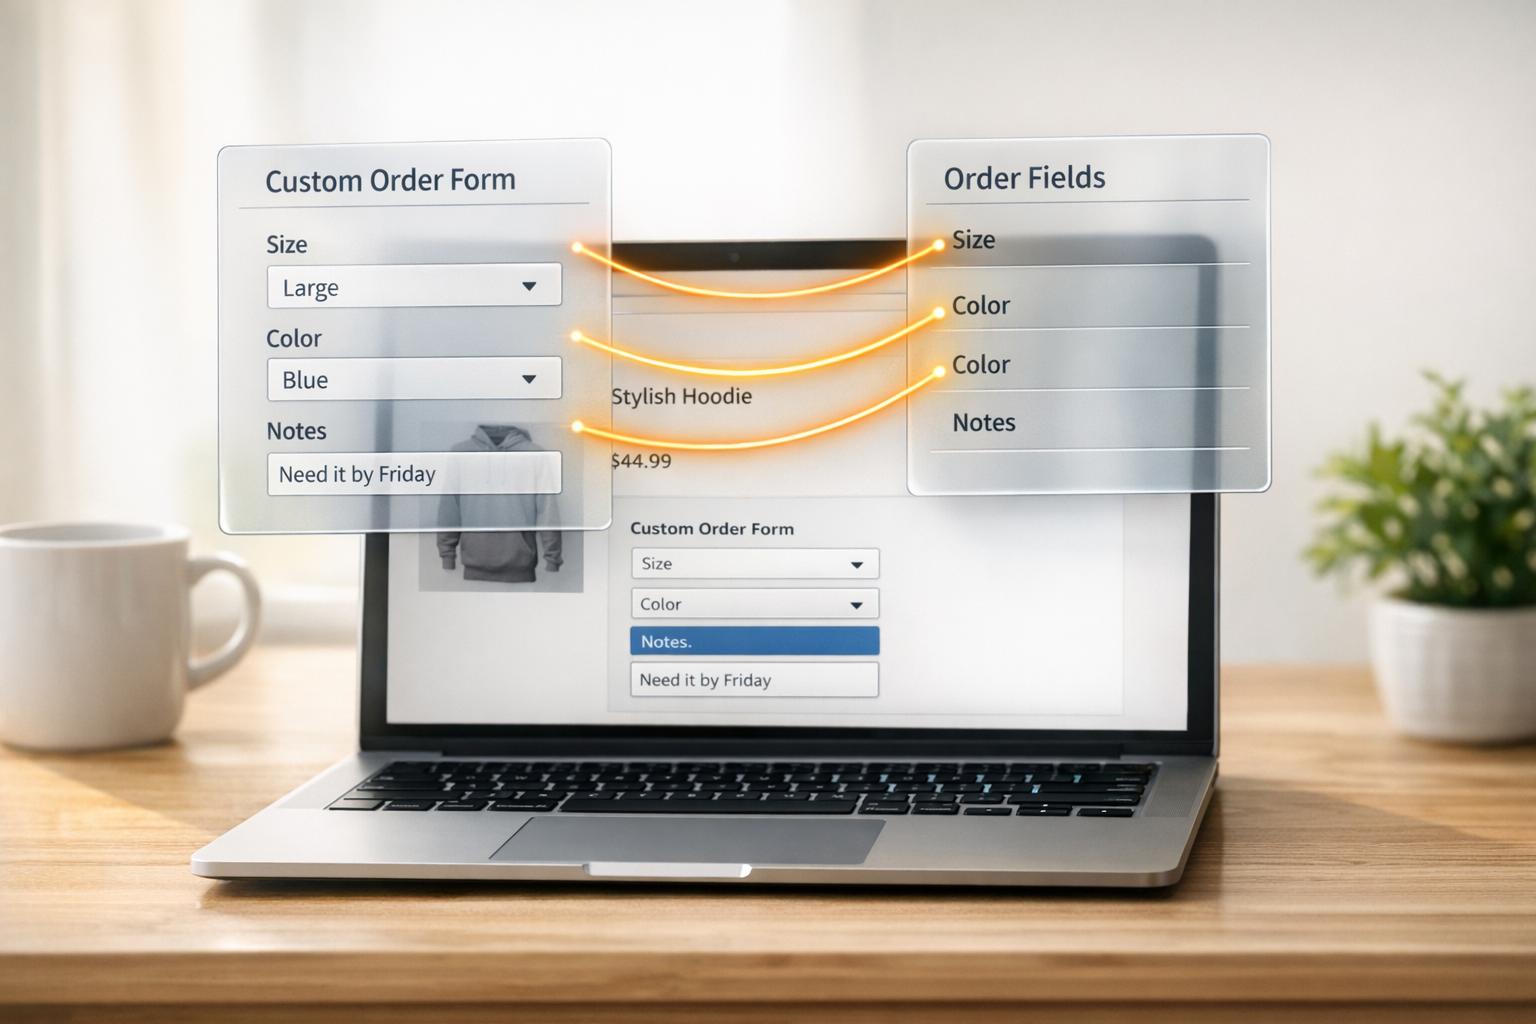
Step 4: Connect Form Data to WooCommerce
To keep your workflow seamless, you need to map the data from your forms directly to WooCommerce. This ensures every customer submission flows neatly into your order management system without any manual input.
Link Form Responses to WooCommerce Orders
Start by identifying which fields in your form correspond to WooCommerce order properties. For example, if you're collecting special instructions or delivery requests, these can be mapped to the "Customer Notes" section in WooCommerce. This way, all the important details are easily accessible on the order management screen.
| WooCommerce Order Property | Map These Form Fields |
|---|---|
| Billing Information | First Name, Last Name, Email, Phone, and Address fields |
| Customer Note | Special instructions, delivery preferences, or custom requests |
| Payment Details | Payment Method, Transaction ID, and Currency |
| Cart Details | Product selections, quantities, discount codes |
To ensure everything works as expected, test your setup with a simple payment method like Cash on Delivery. This helps confirm that form submissions are correctly generating WooCommerce orders.
Once you've tested the basics, you can take it a step further by automating the data flow.
Automate Data Flow with Integrations
Reform works seamlessly with Zapier, allowing you to automate the creation or updating of WooCommerce orders whenever a form is submitted.
"Zapier makes it easy to integrate WooCommerce with [forms] - no code necessary. See how you can get setup in minutes." - Zapier
Setting up this automation is quick - it typically takes under six minutes. After connecting Reform to WooCommerce through Zapier, you can map your form fields to the corresponding WooCommerce data points. You can even use conditional logic to trigger specific actions based on the information submitted.
For more complex workflows, you can set up automations that respond to order status changes. For instance, if a customer submits a cancellation request, you can configure the system to automatically mark the order as "Cancelled" without requiring manual updates. Additionally, Zapier can help prevent duplicate customer records by checking if an email already exists before creating a new account.
Step 5: Test and Improve the Integration
After embedding and automating your form data, the next step is to validate and fine-tune the integration. Testing isn’t a one-and-done activity - it’s an ongoing effort to catch potential issues early and identify ways to enhance performance.
Test Form Functionality
Start by submitting test entries to ensure every part of your form works as intended. Focus on these areas:
- Field validation: Check that required fields display error messages when left blank and that formats like email addresses or phone numbers are validated correctly .
- Payment processing: Use test or sandbox modes in Stripe or PayPal to confirm transactions process without charging real funds .
- Email delivery: Ensure notification emails arrive in the right inbox. Setting up SMTP can help prevent emails from being flagged as spam .
- Backend mapping: Verify that WordPress saves entries correctly and links them to the appropriate WooCommerce Order ID .
- Conditional logic: Test each rule manually to confirm fields show or hide based on user input.
- Mobile responsiveness: Double-check that forms display and function properly on mobile devices .
"Testing your form is the best way to ensure a smooth experience for you and your users." – WPForms Documentation
Don’t forget to clear your site cache and disable script minification during testing to avoid misleading results. If your form impacts pricing, confirm that selections update totals correctly on Cart, Checkout, and Order pages.
Once you’ve verified the basics, move on to analyzing performance with analytics tools.
Track Form Performance with Reform Analytics
With functionality confirmed, analytics can help you identify areas for improvement. Reform’s real-time dashboard offers insights into how users interact with your forms. For example:
- See which fields users skip or spend extra time on - these could be friction points that need simplifying.
- Track where users abandon the form to pinpoint sections causing drop-offs.
- Link form entries to WooCommerce Order IDs to measure how forms contribute to sales and revenue.
- Analyze which WooCommerce pages or marketing channels generate the most submissions, and adjust form placement accordingly.
- Use automated trend tracking to quickly spot technical issues if you notice a sudden drop in submissions.
Refine Forms Based on Customer Feedback
Leverage the data you’ve collected to make targeted changes. For instance:
- If customers repeatedly ask similar questions via the form, update instructions or product descriptions to address those upfront.
- When users report confusion, tweak form titles, descriptions, or placeholder text to provide better guidance.
- If long forms are driving abandonment, consider breaking them into multi-page layouts or adding section dividers to make them less intimidating.
- For more complex forms, enable a "Save and Resume" feature so users can finish their entries later.
- Use conditional logic to hide irrelevant fields based on previous answers, keeping the form concise and user-friendly.
- Spot recurring customer requests - like specific customizations - and integrate those as standard product options to simplify the process.
Wrapping It Up
Adding forms to your WooCommerce store does more than just make things easier - it creates a better experience for your customers.
Key Points to Remember
Forms in WooCommerce can improve how you interact with customers and handle orders. By gathering specific details upfront - like customizations, measurements, or bulk order information - forms help cut down on customer service inquiries and make the buying process smoother. This kind of personalization not only builds trust but also encourages more purchases.
To get the most out of WooCommerce forms, focus on three main strategies: use conditional logic for smarter customization, place forms strategically on important pages, and ensure accurate data mapping to WooCommerce Order IDs. Research shows that integrating forms with contact and quote tools can save up to 50% of admin time.
These steps make it easier to dive into creating your first form.
Start Building with Reform
Want to bring these benefits to life? Reform makes it simple to design forms that drive conversions - no coding required. With features like multi-step forms, conditional routing, real-time analytics, and seamless CRM integrations, you can create forms that align with your brand and collect the exact data you need. Plans start at $15/month and include unlimited responses, conditional logic, and integrations with tools like Google Sheets and Zapier.
Whether you’re handling custom engraving requests, managing wholesale quotes, or simplifying B2B orders, Reform gives you the tools to take your WooCommerce store to the next level and deliver a better customer experience. Get started today at https://reform.app.
FAQs
How can I use forms to boost order values in WooCommerce?
Forms are a powerful way to boost order values in WooCommerce. They let customers personalize their purchases, choose optional add-ons, or even explore upselling options. For instance, you could offer customization features like engraving, gift wrapping, or premium packaging directly through a form.
On top of that, forms can showcase related products or upgrades during checkout, gently nudging customers to add more to their cart. This approach not only makes the shopping experience more engaging but also helps increase your store's revenue.
What features does Reform offer for integrating forms with WooCommerce?
Reform offers a suite of tools to make adding forms to your WooCommerce store straightforward while improving the overall user experience. With multi-step forms, you can simplify complicated processes by breaking them into smaller, easier steps. This not only makes forms less overwhelming for users but also helps improve completion rates and ensures more accurate data collection. Plus, every form is fully customizable, so you can align them with your brand and specific requirements.
Reform integrates smoothly with your store, making it simple to embed forms on product pages, during checkout, or in other key areas of your site. Features like conditional routing ensure users are directed appropriately based on their input, while spam prevention and email validation maintain the quality of your leads. On top of that, real-time analytics give you the insights you need to track performance and make adjustments. These features are built to simplify customer interactions and help drive conversions in your WooCommerce setup.
How can I link form data to WooCommerce orders?
To link form data with WooCommerce orders, you can rely on plugins or extensions specifically built for this task. These tools make it possible to map form fields - like customer information, billing details, or order totals - directly to WooCommerce order properties. This way, any data submitted through your forms gets smoothly integrated into your orders.
For instance, some plugins allow you to set up forms that automatically fill in WooCommerce order fields. You can also use webhook integrations to automate the creation of orders based on form submissions. By configuring the mapping within your chosen tool, you ensure that form data syncs with WooCommerce orders without any hassle.
Related Blog Posts
Get new content delivered straight to your inbox

The Response
Updates on the Reform platform, insights on optimizing conversion rates, and tips to craft forms that convert.


Drive real results with form optimizations
Tested across hundreds of experiments, our strategies deliver a 215% lift in qualified leads for B2B and SaaS companies.
