
.webp)
Common Mailchimp Integration Issues and Fixes


Mailchimp integrations can break for many reasons, leading to lost leads and frustrated users. Here’s what you need to know to fix the most common issues:
- Authentication Problems: Invalid API keys, expired tokens, or permission issues often block connections. Check for hidden spaces in API keys, ensure proper roles, and test credentials using Mailchimp’s
/pingendpoint. - Data Sync Failures: Misconfigured fields, mismatched data types, or missing required fields (like "FNAME") can cause errors. Enable debug logging to identify issues and ensure fields are correctly mapped.
- Rate Limits: Mailchimp restricts API keys to 10 simultaneous connections. Exceeding this limit triggers errors like "429 Too Many Requests." Use batch requests or limit connections to avoid issues.
- Field Mapping Errors: Incorrect field types or mismatched dropdown options can block submissions. Using multi-step forms can help simplify complex data collection and reduce these errors. Align form fields with Mailchimp’s audience settings and use default values for required fields.
- Duplicate Contacts: Duplicates within multiple audiences increase costs. Use one primary audience and standardize email formats to prevent duplicates.
- Connection Drops: Firewall blocks, outdated credentials, or renamed audiences can disconnect integrations. Reconnect properly and verify field mappings to restore functionality.
Fixing these issues ensures smooth Mailchimp integrations, helping you avoid lost leads and maintain clean data. Let’s dive into the details!
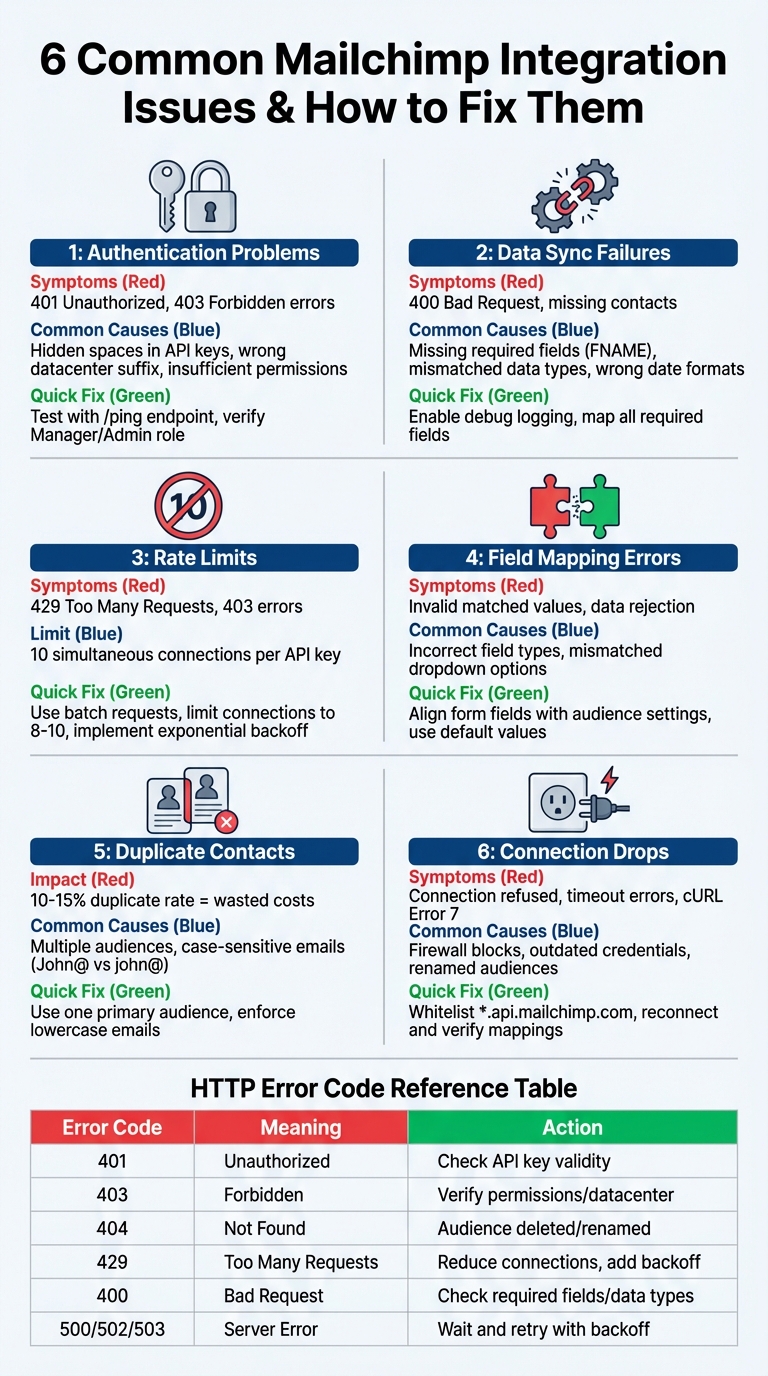
Common Mailchimp Integration Errors and HTTP Status Codes Quick Reference Guide
How to Fix MailChimp 'Your Merge Fields Were Invalid' Error
sbb-itb-5f36581
Authentication and API Key Problems
Running into authentication errors when connecting landing page forms to Mailchimp? These issues are common but often easy to resolve once you know what to look for.
Identifying Invalid API Key Errors
"Invalid key" errors are frequently caused by something as simple as hidden spaces or line breaks. To avoid this, paste your API key into a plain text editor to check for and remove any unwanted whitespace. Another key detail: ensure the datacenter suffix in your API key matches the endpoint you're using. For example, if your key is associated with us6, but you’re sending requests to a us1 endpoint, you’ll encounter a 403 Forbidden error even though the key itself is valid.
Permissions also play a role. Only users with Manager or Admin roles in Mailchimp can create or view full API keys. If you’re using a Viewer or Author account, you won’t have the necessary access. To confirm your API key’s status, go to Account > Extras > API keys in the Mailchimp dashboard and check if the key is marked as "Active."
Here’s a quick diagnostic tip: use the curl command to test the /ping endpoint (https://<dc>.api.mailchimp.com/3.0/ping). A successful response will return a 200 HTTP status and the message {"health_status": "Everything's Chimpy!"}. If it fails, the issue lies with your credentials, not your application code.
Now, let’s look at token-related challenges that can disrupt authentication.
Fixing Expired or Revoked Tokens
If your API key has been revoked, you’ll need to generate a new one. Mailchimp also removes API keys when a user’s account access is revoked, which can unexpectedly break integrations after team changes.
For integrations using OAuth 2.0, tokens typically expire after one hour. When this happens, you’ll encounter 401 Unauthorized or 403 Forbidden errors. The solution? Use your stored refresh token to request a new access token. If the refresh fails, users will need to manually re-authorize their connection.
To avoid downtime when replacing a key, create the new key first, update your integration settings, and only then revoke the old key. This ensures continuity. Also, ensure your server’s system clock is accurate - clock discrepancies can cause tokens to appear expired prematurely due to "clock skew".
Once your tokens are sorted, the next step is addressing connection stability.
Fixing Connection Drops
Mailchimp limits each API key to 10 simultaneous connections. If your server or form builder exceeds this limit, you’ll run into dropped TCP connections or 429 Too Many Requests errors. To prevent this, configure your HTTP client to limit the connection pool to 8–10 sockets.
Another potential issue is firewall blocks. Your server must whitelist https://*.api.mailchimp.com to avoid "Connection refused" or "Connection timed out" errors. Additionally, ensure the PHP cURL extension is installed and updated to at least version 7.35.
If Mailchimp’s Akamai firewall blocks your server’s IP address - often due to repeated 404 errors or a poor IP reputation - you’ll receive an "Access Denied" page instead of a JSON error. In this case, you may need to request a new static IP from your hosting provider or use a proxy.
For temporary server errors like 500, 502, or 503 status codes, implement exponential backoff with jitter. Start with a 1-second delay, then double it (2, 4, 8, and so on) up to 16 seconds between retries. This prevents overloading Mailchimp’s servers during outages. You can also check status.mailchimp.com for any ongoing service disruptions before diving deeper into troubleshooting.
Addressing these issues ensures your forms stay connected to Mailchimp, keeping your lead capture process running smoothly.
Data Sync and Transfer Issues
Accurate data syncing is a must for smooth Mailchimp integration, but it's not always straightforward.
Problems with data sync often arise from mismatched fields, incompatible data types, or connection limits. For instance, if your Mailchimp audience has a required field like "FNAME" but your form doesn't map or include it, the entire submission will fail. Similarly, sending text to a "Number" field or using an incorrect date format (e.g., YYYY-MM-DD instead of MM/DD for birthdays) will cause Mailchimp to reject the data.
Addressing Sync Interruptions
Start by enabling debug logging to capture JSON error messages, such as 400: FNAME must be provided. Then, check your Mailchimp audience settings to ensure all required fields are correctly mapped.
Double Opt-in settings can also cause issues. Subscribers remain in a pending state until they confirm via email. To locate these contacts, filter your audience by "Non-subscribed" or "Pending".
If you're facing server-side blocking, check that your hosting firewall or security plugins (like Wordfence) aren't preventing outgoing cURL requests to api.mailchimp.com. You might need to whitelist *.api.mailchimp.com on port 443. Additionally, be aware of caching issues - stale security nonces from full-page caching can lead to submission failures after 12–24 hours.
Fixing Rate Limiting Errors
Mailchimp enforces a strict limit of 10 simultaneous connections per API key. Exceeding this limit results in HTTP 429 (Too Many Requests) or 403 errors, often accompanied by details about the connection cap. You can monitor your X-RateLimit-Remaining header; once it hits 0, you've reached the limit.
To avoid this, keep parallel connections below 8 to leave some buffer room. Adjust your HTTP client's connection pooling settings - for example, set maxSockets: 10 in Node.js or pool_maxsize=10 in Python requests. For large data transfers, consider using the Batch Operations API (POST /batches), which consolidates multiple operations into a single request, bypassing the concurrent connection restrictions.
If you encounter a 429 error, use exponential backoff starting at 1 second and doubling up to 60 seconds, with a random jitter of up to 500ms. Always honor the Retry-After header in 503 or 429 responses before attempting another request.
Verifying Complete Data Transfer
Before syncing large datasets, clean up your data. Remove extra spaces and ensure dates follow the MM/DD/YYYY format. Mailchimp also filters out role-based email addresses (like admin@ or support@) to reduce bounce rates. Syntax errors, such as "gamil.com" instead of "gmail.com", will block contacts from being added.
Keep in mind that file imports are capped at 200MB or roughly one million contacts.
| Mailchimp Field Type | Format | Common Error |
|---|---|---|
| Number | Numeric digits (e.g., 25) | Sending text (e.g., "Twenty-Five") |
| Date | MM/DD/YYYY | Using separators or formats like "Jan 1st" |
| Birthday | MM/DD | Including the year (e.g., YYYY-MM-DD) |
| Phone | Standard digits (e.g., 555-123-4567) | Sending text |
After syncing, check your Mailchimp audience to ensure the expected number of contacts has been added. If there's a mismatch, review your debug logs for error codes. A 400 error usually points to missing fields or invalid data formats, while a 429 error indicates you've hit the connection limit.
Once data transfer is verified, the next step is resolving any field mapping conflicts.
Field Mapping and Required Field Conflicts
After resolving data sync issues, it's important to ensure that your form fields are properly aligned with Mailchimp's audience settings. This alignment is essential for smooth data transfer.
Field mapping errors occur when your form's structure doesn't match Mailchimp's audience settings. These errors can result from mismatches in required fields, data types, or even option spelling, which can block submissions entirely.
Data type mismatches are another common issue. For example, sending text to a Date field or submitting a multi-select response to a single-value field will cause Mailchimp to reject the data outright. It's also critical that dropdown and radio button options exactly match Mailchimp's predefined choices in both spelling and capitalization. Even a minor typo or mismatch in labels can trigger an "Invalid matched values" error.
Mailchimp's standard audiences allow up to 30 data fields per contact, while Premium plans expand this limit to 80 fields. Additionally, text field values are capped at 255 bytes, and field labels cannot exceed 50 bytes. Once an audience field is created in Mailchimp, its data type cannot be changed. If a mismatch is identified, you'll need to delete the field and recreate it with the correct type.
Fixing Field Mapping Errors
To address field mapping issues, go to Audience > Settings > Audience fields and |MERGE| tags in Mailchimp. Check that each field type (e.g., Number, Date, Birthday) matches the input type used in your form. The Email field is mandatory and must always map to the "EMAIL" tag - without it, your integration will fail.
Address fields require special attention. Mailchimp expects the entire address to be in a single field of the "address" type, using the merge tag "ADDRESS." Each line of the address must be under 45 characters. Using a text field instead of the correct "address" type can lead to default values (e.g., "US") or disrupt segmentation. For CSV imports, use the "Update existing contacts" feature to fix data issues.
For dropdown and radio button fields, Mailchimp's "Predefined choice lists" feature can help ensure that options like states or countries match exactly. This eliminates the risk of spelling variations that could disrupt your sync.
| Mailchimp Field Type | Correct Format / Input | Common Mismatch / Error |
|---|---|---|
| Must map to "EMAIL" merge tag | Integration failure (mandatory field) | |
| Address | Single field of type "address" with merge tag "ADDRESS" | Data split across multiple fields or incorrect format |
| Date | YYYY-MM-DD or MM/DD/YYYY | Incorrect text format (e.g., "Jan 1st, 1990") |
| Dropdown | Values must match Mailchimp options exactly | "Invalid matched values" error |
| Text | Limited to 255 bytes | Data truncation |
Once you've corrected field mapping errors, move on to resolving any conflicts with required fields to finalize your integration setup.
Fixing Required Field Issues
A real-world example highlights how inconsistent field naming - like using "First Name" instead of "Full Name" - can lead to required field errors. Standardizing field names resolved the problem and prevented sync failures [Source: Zapier Community Troubleshooting, 2022].
To avoid similar issues, uncheck the "Required" box for all fields except the Email Address in Audience > Settings > Audience fields and |MERGE| tags. If a field must remain required, set a default merge value (e.g., "Friend" for a First Name field) to ensure the field is never blank during a sync. For embedded forms, make sure no required fields are set as input type="hidden", as this will block submissions.
If you're using third-party sync tools, look for a "Skip merge validation" option. This feature can prevent the entire sync from failing due to a single field error. Additionally, when auto-updating contacts, ensure that no fields in your import file are blank. Empty fields in the import file can overwrite and delete existing contact data in Mailchimp.
Duplicate Contacts and Audience Management Problems
Getting field mapping to work correctly is just the first step. Managing duplicate contacts and staying within audience limits is equally important to avoid unnecessary charges and maintain clean, accurate data. These issues can directly affect both your budget and the quality of your contact database.
Mailchimp helps by automatically blocking duplicates within a single audience, but it doesn’t do the same across multiple audiences. For example, if "john@company.com" is in two separate audiences, Mailchimp treats them as two distinct contacts, meaning you’re paying twice for the same person. This can add up quickly - duplicate rates of 10-15% could waste subscription dollars and eat up 5–10 hours of IT resources every month.
One common culprit? Email case sensitivity. For instance, "John@Company.com" and "john@company.com" are seen as two different contacts. CRM systems add to the problem when they sync conflicting records, such as when someone exists as both a Lead and a Contact in Salesforce. Timing can also make things worse: if a record is created in both your CRM and Mailchimp before the next sync runs, duplicates can slip in before deduplication happens.
"Email case sensitivity is the #1 cause - enforce lowercase standardization in Salesforce." Using multi-step form design can also help by validating data at the point of entry. - MassMailer
Let’s look at how you can prevent these issues from draining your time and budget.
Preventing Duplicate Contacts
The best way to avoid duplicates is to stick with one primary audience and organize contacts using groups or tags rather than creating separate audiences. This ensures Mailchimp’s duplicate detection works across your entire database.
Another key step is enforcing lowercase email addresses in your CRM to prevent case-sensitive duplicates. Adjust integration settings to match records by email alone, not by combining name and email fields.
Before importing large datasets, clean up your email addresses in Excel or Google Sheets by trimming extra spaces. If you’re running multiple sync queries for different segments, double-check that no contact fits the criteria for more than one query - this can cause a single contact to sync multiple times. Also, avoid manual list imports while automated syncs are running, as this almost always results in duplicates.
Managing Audience Limits
Duplicate prevention is just one piece of the puzzle. Mailchimp charges based on the total number of contacts across all audiences. However, archived and cleaned contacts don’t count toward this total, making archiving an effective way to manage audience size without losing data.
To find duplicates across multiple audiences, export all contacts to Excel and use the "Remove Duplicates" tool. Once identified, archive duplicates in Mailchimp. You can also use Mailchimp’s Combine Audiences tool to merge multiple audiences into one. This automatically removes duplicates, though it may result in the loss of opt-in timestamps. Keep in mind that bulk actions like deleting or combining audiences are restricted for seven days after sending an email or during active automation flows.
If your audience grows beyond 100,000 contacts, certain features like searching and sorting may become limited. To avoid this, regularly archive inactive contacts who don’t engage with your content. Archiving keeps their data and history intact while removing them from your billing count. Remember, Standard plans support up to 30 data fields per contact, while Premium plans allow up to 80 fields.
| Action | Impact on Billing | Data Retention |
|---|---|---|
| Archive | Removes from billing count | Retains all contact data and history |
| Delete | Removes from billing count | Permanently loses all data |
| Combine Audiences | Removes duplicates | Consolidates but may lose opt-in timestamps |
Reconnecting and Fixing Disconnections
When it comes to Mailchimp integration, unexpected disconnections can throw a wrench in the process. The usual suspects? Expired API keys, deleted or renamed audiences, or server firewall blocks that prevent your site from accessing api.mailchimp.com. Even simple mistakes, like extra spaces in your API key or using a key tied to the wrong account, can cause the connection to fail.
To troubleshoot, start by checking the connection status in Mailchimp. Head to the Integrations icon - a green icon means you're good to go. If you see a "Connect" or "Authorize Connection" button instead, the integration has been disconnected. For cases where the integration appears connected but isn't working, hit the "Test Connection" button to confirm its status. Once you've pinpointed the issue, reset the connection to get things running smoothly again.
How to Disconnect and Reconnect Integrations
After identifying connection issues, follow these steps to restore the integration. Always begin by clearing outdated credentials. In your form builder or CRM, select "Disconnect" to remove the broken connection. Then, click "Connect" or "Authenticate" and log in with your current Mailchimp credentials. Be sure to pick the correct audience for syncing and, most importantly, verify your field mappings - this step is often overlooked but critical.
Once reconnected, update your audience fields by selecting the "Connect and Fetch Your Mailing Lists" option. This step ensures Mailchimp recognizes any new required fields you've added. Skipping this can result in "400 Bad Request" errors when users try to submit forms.
Refreshing Fields and Checking Status
If fields aren’t syncing properly, refresh the field mappings. Any field marked as "Required" in Mailchimp must have a corresponding field mapped in your form; otherwise, submissions will fail without any visible error. To dig deeper, enable a debug logger in your integration settings. This can help identify specific HTTP error codes - here's what they mean:
- 401: Invalid or expired API key
- 403: API key doesn't have the necessary permissions
- 404: Audience or List ID has been deleted or renamed
To confirm server connectivity, send a test request to https://us21.api.mailchimp.com/3.0/. If you get a "401" response, your server can reach Mailchimp. No response at all? That’s likely a firewall issue. For embedded forms, ensure the "Disable all Javascript" checkbox is unchecked in Mailchimp's form builder. If it's checked, the JavaScript needed for validation and data submission won’t work.
| Error Code | Meaning | Common Cause |
|---|---|---|
| 401 | Unauthorized | Expired, revoked, or improperly formatted API key |
| 403 | Forbidden | API key lacks permissions for the audience |
| 404 | Not Found | Audience or List ID was deleted or renamed |
| cURL Error 7 | Failed to Connect | Server firewall is blocking outgoing connections |
| 400 | Bad Request | Missing required field or data type mismatch |
Conclusion
Mailchimp integration issues can seriously disrupt lead generation efforts. One of the most frustrating problems is silent rejections - when forms appear to work but the data never makes it into Mailchimp. This leaves potential leads thinking they've signed up, while in reality, they’re nowhere to be found in your audience.
"CRM integration failures are one of the most frustrating technical issues for high-growth teams because they directly impact your lead capture and follow-up speed. Every minute your integration stays broken, potential customers slip through the cracks." - Orbit Forms
The solutions outlined here tackle common problems like authentication errors, field mapping issues, and data transfer failures. When these glitches occur, your marketing pipeline grinds to a halt, often requiring manual fixes that waste time and delay follow-ups.
Reform offers a dependable Mailchimp integration that takes care of field mapping, authentication, and data transfer without a hitch. With added features like email validation, spam prevention, and real-time analytics, Reform ensures your forms work as intended, improving lead quality and boosting conversions. Whether you're on the Basic plan for $15/month or the Pro plan for $35/month, you can count on its technical reliability to avoid submission errors and keep your leads flowing smoothly.
Staying proactive is key. Regularly check API logs, test your connectivity, and verify field mappings to keep your integration running smoothly. Promptly addressing issues helps maintain clean contact lists and strong deliverability rates, ensuring your marketing efforts deliver real results.
FAQs
How can I tell if Mailchimp is silently rejecting my form submissions?
To figure out if Mailchimp is quietly rejecting your form submissions, start by reviewing the Import History page or checking the error logs. These will highlight issues such as syntax errors or configuration problems. By examining these logs, you can pinpoint what went wrong and take steps to fix the issue.
What’s the fastest way to confirm my API key and datacenter are correct?
To verify your API key and datacenter, check that the datacenter suffix in your API endpoint URL matches the suffix in your Mailchimp API key. You can locate your API key in the settings section of your Mailchimp account. This simple check is crucial for resolving 403 errors that often stem from mismatched datacenter prefixes.
How can I stop duplicate contacts across multiple Mailchimp audiences?
To avoid duplicate contacts in Mailchimp, stick to managing a single primary audience. Mailchimp automatically checks for duplicates within one audience, but it doesn’t do this across multiple audiences.
If you’ve been using multiple audiences, you can consolidate them by using the "combine audiences" tool. Alternatively, you can export contacts from your existing audiences and import them into your primary audience.
Once your contacts are in one place, use tags to organize and segment them. Tags allow you to categorize contacts effectively without creating duplicates, making it easier to manage and target your audience.
Related Blog Posts
Get new content delivered straight to your inbox

The Response
Updates on the Reform platform, insights on optimizing conversion rates, and tips to craft forms that convert.


Drive real results with form optimizations
Tested across hundreds of experiments, our strategies deliver a 215% lift in qualified leads for B2B and SaaS companies.
