

Connect Forms to ActiveCampaign Webhook



To connect Reform forms to ActiveCampaign, I use my own HTTPS webhook endpoint - not an ActiveCampaign webhook. ActiveCampaign webhooks send data out; they don’t receive form submissions.
I set up the connection in 3 steps:
- Map the fields. Match Reform question IDs to ActiveCampaign fields, including email and consent.
- Verify and sync. Check Reform’s webhook signature, then use
/api/3/contact/syncto create or update the contact. Add lists and tags through separate requests, and subscribe only with explicit opt-in. - Test and track. Check new and existing contacts, record each step’s result, and retry only failed steps.
My final check: <u>confirm the records in ActiveCampaign</u>. A delivered webhook isn’t proof that every step worked.
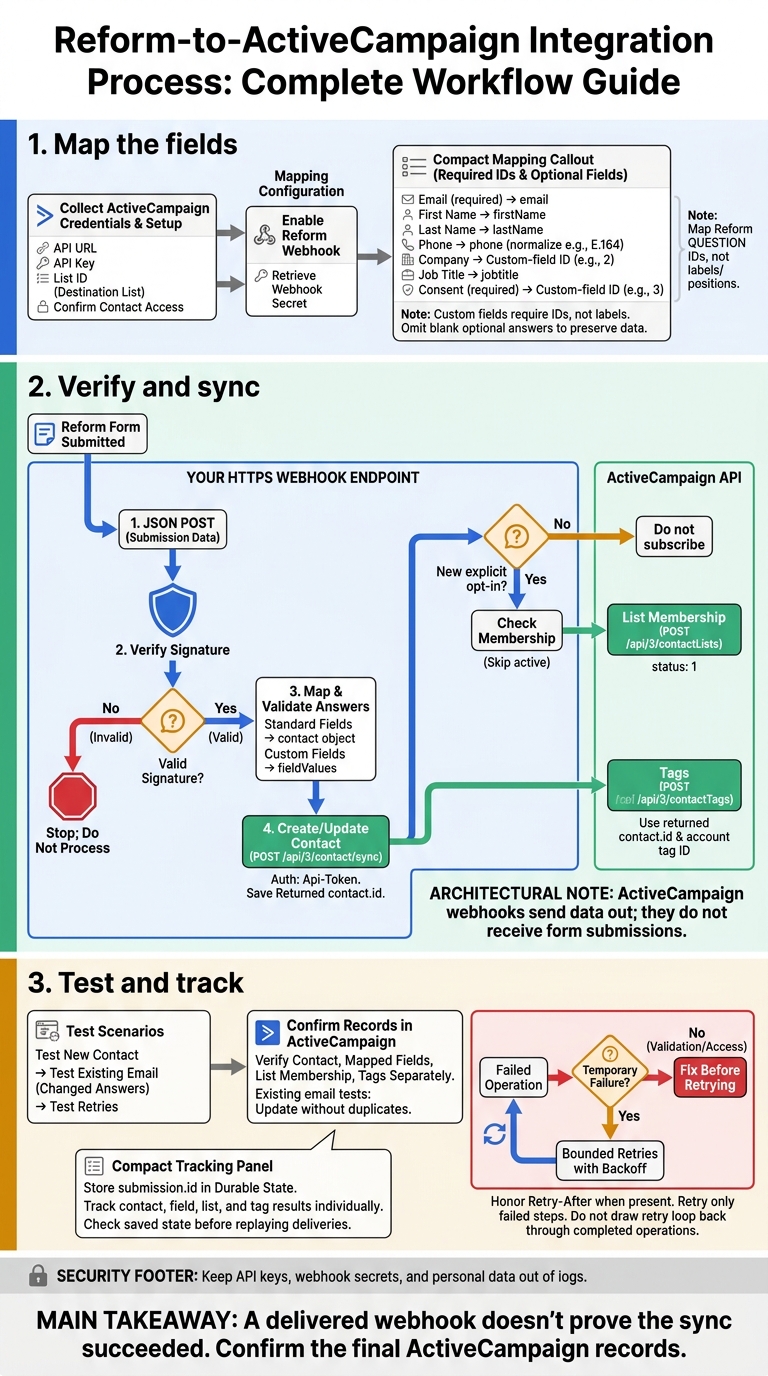
Reform to ActiveCampaign: Secure Webhook Workflow
1. Prepare ActiveCampaign and Map Your Fields
Check Account Access and Webhook Support
In ActiveCampaign, collect your API URL, API key, and destination list ID. Check that your account can create and update contacts, especially if you use multi-step forms to capture lead data.
In Reform, open Integrations and check that you can enable Webhook for your form. Set up an HTTPS webhook URL to receive submissions, then retrieve the webhook secret. Before processing any submission, verify Reform’s Signature header using SHA-256 HMAC.
Create Custom Fields and Get Their IDs
Use ActiveCampaign’s standard contact fields where they fit, and create custom fields for Company and Consent. Get the custom-field IDs and allowed values from the ActiveCampaign API. Custom fields require IDs, not labels.
Build a Field-Mapping Table
Map email, name, company, job title, consent, and phone using the table below. Replace the custom-field placeholders with IDs from your account. For Reform answers, use each question ID, not the question’s label or position. Store each question ID alongside its ActiveCampaign destination field ID.
| Form field | ActiveCampaign property or field ID | Format | Required? |
|---|---|---|---|
email |
Email string | Required | |
| First name | firstName |
Text | Optional |
| Last name | lastName |
Text | Optional |
| Phone | phone |
Normalize to one format, such as E.164 | Optional |
| Company | Company custom-field ID | Text | Optional |
| Job title | jobtitle |
Text | Optional |
| Consent | Consent custom-field ID | Text or allowed option value | Required |
Leave blank optional answers out of your requests so they don’t overwrite existing contact data. If your form collects a full name in one field, split it into first and last name before sending it.
For consent, define the exact allowed values and keep a timestamp where supported. Only subscribe contacts who explicitly opt in. Use this field mapping when building the webhook request to ActiveCampaign.
sbb-itb-5f36581
2. Set Up the Webhook and API Requests
Add Your Webhook URL in Reform
In Reform, open Integrations, enable Webhook, and paste your HTTPS endpoint URL. Reform sends a JSON POST to that endpoint when someone submits a form. Once the endpoint is live, map each verified submission to ActiveCampaign fields.
Map Submission Data to Contact Fields
Read the email, name, and custom answers from the verified payload using each answer’s ID. Follow your field-mapping table: put standard fields in the contact object and custom fields in its fieldValues array.
Map only contact fields here. Lists and tags need separate requests. Leave out blank values so you don’t overwrite existing data, and format phone numbers and dates to match what the destination field accepts.
{
  "email": "reader@example.com",
  "firstName": "Alex",
  "lastName": "Morgan",
  "fieldValues": [
    {"field": "12", "value": "Example Company"},
    {"field": "15", "value": "Yes"}
  ]
}
Create or Update an ActiveCampaign Contact
Send the mapped data to ActiveCampaign’s account-specific API URL with the Api-Token header. Use POST /api/3/contact/sync to create or update the contact, with the standard and custom fields in the request body.
Save the returned contact.id before sending any follow-up requests.
POST /api/3/contact/sync
Api-Token: YOUR_SERVER_STORED_API_KEY
Content-Type: application/json
{ "contact": { "email": "reader@example.com", "firstName": "Alex", "lastName": "Morgan", "fieldValues": [ {"field": "12", "value": "Example Company"}, {"field": "15", "value": "Yes"} ] } }
Set List Membership and Tags
Contact sync only creates or updates the contact. After it succeeds, send separate authenticated requests for lists and tags using the returned contact ID.
In the example below, 123 is that contact ID. Check the list and tag IDs in your account before sending the requests. Status 1 requests an active list subscription.
POST /api/3/contactLists{"contactList":{"contact":"123","list":"7","status":1}}POST /api/3/contactTags{"contactTag":{"contact":"123","tag":"9"}}
Subscribe only with a new opt-in. Skip subscriptions that are already active, and handle list and tag errors separately.
3. Test the Sync and Fix Errors
Test New and Existing Contacts
Once mapping and request setup are complete, run live submissions to test the full sync path. Submit the form using an email you control, with every mapped field filled in. Verify the Signature header against the raw body using your webhook secret, and log the submission.id to trace the submission from start to finish.
Check each step: Confirm webhook receipt, signature validation, mapped fields, and every HTTP response. Then check the contact, field, list, and tag records separately in ActiveCampaign. Submit the same email again with different answers and confirm that the existing contact updates without creating a duplicate.
Fix Field-Mapping and Access Errors
If a test fails, use the logs to find where it stopped: the webhook, field mapping, or ActiveCampaign request. Compare answer IDs, the mapped request, and the API error response in redacted logs. Keep API keys, webhook secrets, and personal data out of logs. Include the submission.id and any request IDs at each step so a successful contact sync doesn't mask a failed tag or list request.
| Symptom | Likely cause | Verification | Correction |
|---|---|---|---|
| Webhook not received | Webhook integration disabled | Check Reform’s active webhooks | Enable the webhook in Reform |
| Signature verification fails | Incorrect webhook secret | Compare the HMAC with Signature |
Use the secret from Reform’s webhook settings |
| Missing or incorrect field | Wrong answer ID mapping | Check the UUID in payload.submission.answers |
Map the exact Reform answer ID |
| Auth or permission error | Invalid credentials or limited access | Check the API error response | Verify the API URL, key, and permissions |
| Invalid data | Unsupported type or value | Compare the value with the field’s type and allowed values | Validate or transform before syncing |
| Missing tags or list membership | Follow-up request failed | Check the list or tag response | Fix the error and retry that step |
| Duplicate contacts | Create-only sync logic | Compare the submitted email and returned contact | Use create-or-update logic keyed to email |
Handle Timeouts, Rate Limits, and Failed Steps
If the flow works once but fails under load or during a retry, check each step separately. Store the stable submission.id in durable state, and track contact, field, tag, and list operations individually. Check saved state before replaying any delivery - even after a timeout.
For temporary failures, use bounded retries with backoff and honor Retry-After when present. Fix validation and access errors before retrying. Retry only failed steps, and check that completed steps don't run again.
How to Connect API in ActiveCampaign (Step By Step)
Conclusion: Check the Form-to-Contact Workflow
Before publishing, check webhook access, signature checks, and answer-to-field mapping. Treat contact sync, list membership, and tags as separate steps.
Publish only after create, update, and retry tests pass. Then monitor live submissions and review the final ActiveCampaign records. Retest whenever fields, answer options, or settings change. A delivered webhook doesn’t prove the sync succeeded.
FAQs
Where should I host my Reform webhook endpoint?
You can host your Reform webhook endpoint on any server or web application that accepts HTTP POST requests with JSON payloads. There’s no required programming language or hosting setup. The endpoint just needs to be reachable, running, and able to process incoming data.
Use your own application, a dedicated server, or a cloud-based integration service. Make sure your host supports HTTPS to secure data in transit.
How can I prevent retries from triggering duplicate automations?
Send a stable idempotency key, such as a distinct submission ID, with each request. Reuse that key for retries so your CRM can spot repeat requests and avoid processing them twice.
Use an update-or-create (upsert) flow, with email as the stable contact identifier, to update existing contacts instead of creating duplicates.
Retry only temporary errors, such as 5xx responses or timeouts. Retrying 400 or 403 errors won’t fix the underlying issue.
How should I handle previously unsubscribed contacts?
Your webhook setup should respect each contact’s unsubscribe status in ActiveCampaign. ActiveCampaign identifies contacts by email address, so a form submission from an existing contact updates their record instead of creating a duplicate.
Check your CRM’s automation rules to support compliance and honor contact preferences. Form submissions shouldn’t override an unsubscribe flag or trigger restricted marketing messages to contacts who’ve opted out.
Related Blog Posts
Get new content delivered straight to your inbox

The Response
Updates on the Reform platform, insights on optimizing conversion rates, and tips to craft forms that convert.



Drive real results with form optimizations
Tested across hundreds of experiments, our strategies deliver a 215% lift in qualified leads for B2B and SaaS companies.
