
.webp)
JWT and RBAC in APIs



If your API can tell who a user is but not what they can do, you only solved half the problem.
I’d sum this up like this: JWT proves identity, RBAC controls access, and short-lived tokens limit stale access risk. In one request, the API should first validate the token and return 401 if it fails. Then it should check roles or permissions and return 403 if the user lacks access.
Here’s the whole model in plain English:
- JWT handles sign-in state without a session lookup on every request
- RBAC maps users to roles or permissions like
billing_writeoradmin - Middleware should enforce checks before the route handler runs
- Access tokens should stay short-lived, often 5 to 15 minutes
- Role changes do not update old JWTs until refresh or expiration
- High-risk routes should use a server-side permission check
A few points matter most:
- Put only the claims the API needs into the token
- Never place secrets or private data in JWT payloads
- Keep role names and claim names consistent across services
- Treat the JWT as a snapshot of access at login time
- Reload roles when issuing a new access token through refresh
- Use direct lookups for actions like billing, deletion, or permission changes
| Check | What it answers | Common failure |
|---|---|---|
| JWT validation | Who is calling? | 401 Unauthorized |
| RBAC check | What can they do? | 403 Forbidden |
In short, I’d use JWT for identity, permissions for route checks, and short token lifetimes to cut stale-role exposure. That gives you a clean API flow without trusting old claims for sensitive actions.
Secure Your API: Role Based Access Control with JWTs
sbb-itb-5f36581
JWT Basics for API Authentication
JWTs usually travel in the Authorization header as Bearer <token>. The API checks the token locally, which works well for stateless request handling. Then it uses the token's claims as input for RBAC decisions.
JWTs are signed, not encrypted. That means anyone who gets the token can read its payload, so you should never put secrets or sensitive personal data inside it. Always use HTTPS to protect the token while it's moving between client and server.
Claims That Matter for Access Control
A JWT has three parts - header, payload, and signature - separated by dots. The header names the signing algorithm, such as RS256. The payload holds claims about the caller. The signature lets the server check integrity and issuer trust.
RBAC reads the claims in the payload.
| JWT Part | What It Contains | Role in Access Control |
|---|---|---|
| Header | Token type and signing algorithm | Tells the server how to verify the token |
| Payload | Claims about the user | Carries identity and access data |
| Signature | Created from the encoded header and payload with the signing key | Proves integrity and issuer trust |
Standard claims include sub (the user's unique identifier), iss (who issued the token), aud (the intended recipient), and exp (when the token expires). APIs often add custom claims for tenant ID, roles, or permissions. Claims like roles and tenant_id give the API the context it needs for authorization. As Jon P Smith, software architect and author, notes:
"This approach is very efficient as the Permission data is available as a claim (i.e., no database accesses needed)."
What JWT Verification Actually Checks
Getting a token is not the same as trusting it. Every API needs to run a few checks before it treats that token as valid.
Signature validation comes first. The server uses the signing key to confirm the token hasn't changed since it was signed. If the signature doesn't match, the API rejects the request right away.
After that, the API checks claims like iss, aud, and exp. It should also reject malformed tokens, including any that use the none algorithm.
A valid token proves identity and trust in the issuer. RBAC still handles the next step: deciding what the caller is allowed to do. Once verification passes, the API uses the token's claims to map the caller to roles and permissions.
Designing Roles and Permissions in the Token Model
Once the token is verified, the next step is deciding where role data should live. After JWT verification, authorization comes down to that choice. Your database or identity service should be the source of truth. The JWT should be treated as a snapshot created at login.
Roles in JWT Claims vs. Roles Loaded Server-Side
The main tradeoff is simple: speed vs. freshness.
If you put roles or permissions straight into the token, the API can authorize requests without hitting the database again and again. That makes things fast. If you load roles on every request, permissions stay current, but you pay for it with more latency and extra load on your identity service. Caching can help take the edge off.
| Feature | Roles in JWT Claims | Roles Loaded Server-Side |
|---|---|---|
| Speed | High - no external lookups | Lower - DB or cache hit required |
| Freshness | Stale until token refresh | Real-time |
| Token Size | Larger | Smaller |
| Scalability | High - ideal for microservices | Moderate - DB can bottleneck |
This setup fits well when you want stateless authorization and can live with a short delay before access changes take effect. Short-lived access tokens, plus refresh flows, help cut down the window where stale roles remain in play.
Coarse Roles vs. Fine-Grained Permissions
That storage choice also affects how exact your authorization rules can get.
Broad roles like admin, manager, or sales_manager keep tokens small and easier to manage. A common setup is to use broad roles for administration, then map those roles to finer permissions for API checks. For example, you might assign roles in your identity service, then turn them into permission claims like sales_read or sales_sell when the token is issued.
That way, the API checks permission claims, not just the role name. And your admins can update role-to-permission mappings in the database or identity UI without changing application code.
The main limit here is token size. If you stuff too many permission strings into a JWT, it starts to bloat. So keep permission codes short. A single string or enum-based value is often better than a long array of labels. Those permission claims are what API middleware should check on each request.
Enforcing RBAC in API Middleware
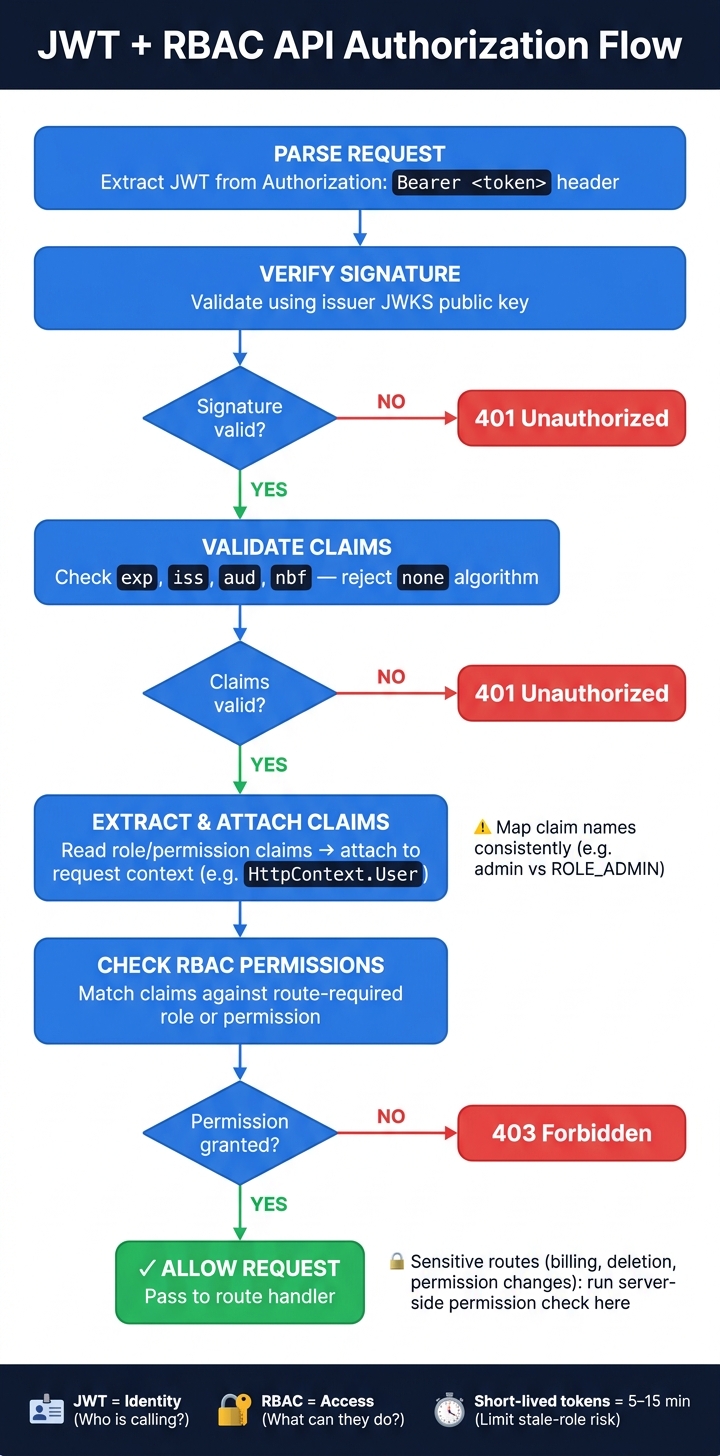
JWT + RBAC API Authorization Flow: From Token to Access Decision
RBAC only works if middleware checks permission claims before the route handler runs. JWT carries the claims. Middleware is what turns those claims into actual access control. Once the token includes roles or permissions, middleware becomes the place where requests are allowed or blocked.
Middleware Flow: From Token Parsing to Access Decision
The flow is pretty simple, but the order matters:
- Parse: Pull the JWT from the
Authorization: Bearer <token>header. - Verify and validate: Check the signature with the issuer's JWKS public key. Then validate
exp,iss,aud, andnbf, with a small allowance for clock skew. - Extract and attach: Read the role or permission claims from the token payload and attach them to the request context - for example,
HttpContext.Userin .NET or Spring Security's security context - so downstream handlers can use them without parsing the token again. - Authorize: Match the claims against the route's required role or permission, then allow or deny the request.
A common failure point comes next: claim mapping. A token can be valid and still fail authorization if the claim names don't line up with what the app expects, like admin versus ROLE_ADMIN. Authentication can succeed before claims are mapped into the app's security context, so middleware needs to map custom JWT claims into the application's internal role model.
If a claim is missing or named the wrong way, the request should stop with 403 Forbidden before the route handler runs. If you get a 403 even though the token is valid, log the extracted claims right before the authorization check. That usually makes the mismatch easy to spot.
AuthN verifies the token. AuthZ checks those claims against the endpoint rule.
There's one more risk: freshness. A valid token can still hold old roles. Even correct middleware can't fix a token that still reflects outdated access.
Refresh Tokens, Role Changes, and Stale-Data Risk
That gap in freshness is exactly why refresh tokens matter. A common setup is to use short-lived access tokens - usually 5 to 15 minutes - plus a separate refresh token that issues a new access token after the old one expires. At refresh time, the server should load the user's current roles and permissions again, then place those updated values into the new JWT. That way, token claims stay in step with the role store instead of drifting out of date.
Why Role Changes Do Not Instantly Update Existing JWTs
JWT claims are fixed at the moment the token is issued. Once the server accepts a signed token as valid, it keeps accepting it until expiration. So if someone’s role changes in the database after that point, the token already sitting on the client does not change with it.
That can create a risky window. A user who was offboarded, downgraded, or moved to a different plan may still be able to make requests with the old token until it expires. Jon P Smith puts it well:
"Typically, when you log in to an ASP.NET Core web app the things you can do, known as authorization, is 'frozen', i.e. it is fixed for however long you stay logged in." - Jon P Smith, The Reformed Programmer
Put simply: the longer the access token lives, the longer that stale-role window stays open.
Ways to Reduce Stale-Role Exposure
| Strategy | Freshness | Performance | Security Impact |
|---|---|---|---|
| Short-lived Access Tokens | Low - stale until expiry | High (no DB lookup per request) | Reduces the window of misuse for stolen tokens |
| Refresh Token Reloading | Moderate (syncs at refresh) | Moderate (DB hit only on refresh) | Keeps roles current across sessions |
| Server-side Role Lookups | Real-time - always current | Lower (DB or cache hit per request) | Highest; prevents stale-data risk |
For most APIs, the best tradeoff is short access-token lifetimes plus role reloading during refresh. Each time the client swaps a refresh token for a new access token, the issuance flow should query the database for the user's current roles and embed them in the new JWT.
In practice, most routes can lean on refresh-time role updates. But sensitive actions are different. For things like billing changes, data deletion, and permission management, use direct server-side permission checks and trust the current permission state over old embedded claims.
For revocation, store refresh tokens on the server so you can revoke them at once during offboarding or after a security incident. Once that refresh token is revoked, no new access tokens can be issued after the current access token expires.
Conclusion: A Practical Model for JWT and RBAC in APIs
Once verification, role mapping, and refresh strategy are in place, the last job is pretty simple: apply the rule the same way every time. JWT handles identity. RBAC decides access. Build both at the same time, not as separate pieces.
Use roles for assignment and permissions for enforcement. That setup works well until roles change. And that's exactly why token freshness matters.
JWTs always carry a snapshot. So if a user's role changes, the token may still reflect the old state for a while. Short-lived access tokens and reloads at refresh time help cut stale-role risk.
For sensitive routes, don't rely only on claims stored in the token. Use a server-side permission check or a cache-backed override instead.
Standardize role names early - such as ADMIN or ROLE_ADMIN - and keep that same mapping across services.
The model is straightforward: short-lived tokens, clean middleware separation, and server-side checks where the route is sensitive.
FAQs
When should I use 401 vs. 403?
Use 401 Unauthorized when the user is not authenticated or when the token is invalid or expired. It tells the client that valid authentication is required to continue.
Use 403 Forbidden when the user is authenticated but does not have the needed role or permission. The server understands the request but refuses to authorize it.
Should roles live in the JWT or the database?
Putting roles in the JWT lets you handle authorization without storing session state on the server. In practice, that means middleware can check a user’s permissions on each API request without hitting the database every time.
The catch is stale data. If a user’s role changes in the database, that change won’t show up until the current token expires and the user signs in again. To lower that risk, keep access tokens short-lived - ideally 30 minutes or less - and use refresh tokens to issue updated tokens.
How do I handle role changes before a token expires?
Because JWTs can't be changed after they're issued, role or permission updates need a refresh claims flow.
A simple way to do this is to store a last updated timestamp any time a user's roles or permissions change, then add that same value as a claim in the token.
On each request, middleware checks the timestamp in the token against the current timestamp. If the token is older, the app recalculates the user's permissions and replaces the claims principal.
You probably don't want to hit the database on every single request just to do that check. That's where a distributed cache comes in. It lets you look up the current timestamp fast, without putting extra load on your database.
Related Blog Posts
Get new content delivered straight to your inbox

The Response
Updates on the Reform platform, insights on optimizing conversion rates, and tips to craft forms that convert.



Drive real results with form optimizations
Tested across hundreds of experiments, our strategies deliver a 215% lift in qualified leads for B2B and SaaS companies.
