
.webp)
OAuth 2.0 Setup Checklist for SaaS API Access



If your OAuth setup is wrong at launch, you can end up with code interception, CSRF, token replay, or bad redirects on day one. My short take is simple: match the app type to the right flow, lock redirect URIs, require state and PKCE for public clients, keep tokens short-lived, rotate refresh tokens, and test every failure path in sandbox before production.
Here’s the article in plain English:
- I need to choose the right flow for the app type:
- SPA: Authorization Code + PKCE
- Mobile app: Authorization Code + PKCE
- Server-side web app: Authorization Code
- Service-to-service job: Client Credentials
- I should split dev, staging, and production into separate app registrations.
- I should allow exact redirect URIs only and use HTTPS outside localhost.
- I need a new
statevalue on every auth request and must reject any callback with a missing or bad match. - For public clients, I should require PKCE with
S256, neverplain. - I should keep:
- access tokens short-lived, around 15 minutes
- refresh tokens encrypted and rotated on each use
- client secrets in a vault or KMS-backed store
- I should keep tokens out of browser JavaScript when possible, such as with HTTP-only Secure cookies or a BFF pattern.
- My API should check token signature, issuer, audience,
nbf, andexp, with only a few seconds of clock skew. - I should log events, not raw secrets or tokens. If I need traceability, I should log a SHA-256 hash instead.
- Before launch, I should test bad redirects, bad state, PKCE mismatch, revoked tokens, refresh token reuse, and safe 401/403/429 error handling.
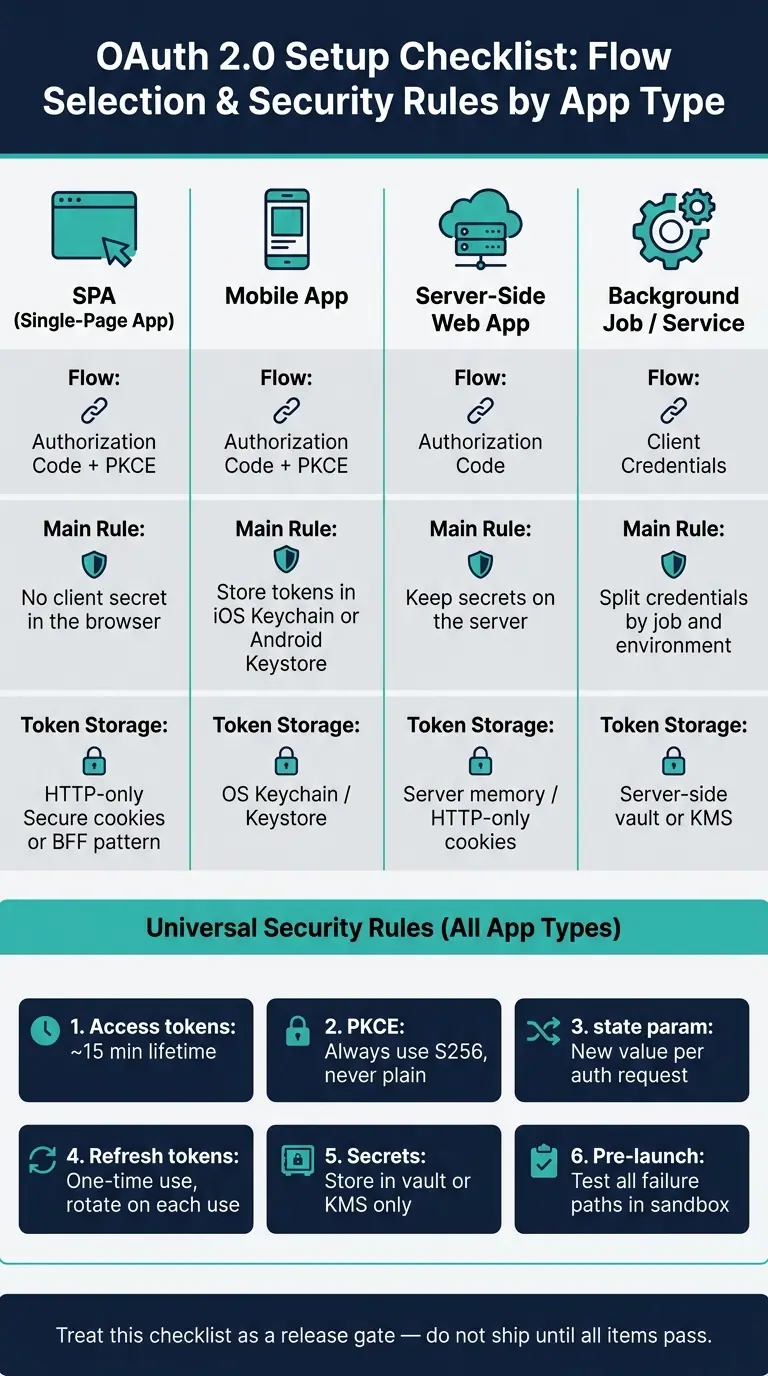
OAuth 2.0 Flow Selection Guide by App Type
Quick comparison
| App type | Flow | Main rule |
|---|---|---|
| SPA | Authorization Code + PKCE | No client secret in the browser |
| Mobile app | Authorization Code + PKCE | Store tokens in iOS Keychain or Android Keystore |
| Server-side web app | Authorization Code | Keep secrets on the server |
| Background job | Client Credentials | Split credentials by job and environment |
Bottom line: I’d treat this checklist as a release gate. If redirects, PKCE, token storage, revocation, logging, and sandbox tests are not done, I would not ship.
sbb-itb-5f36581
Checklist 1: Register the OAuth app and lock down redirect settings
Once you've picked the right OAuth flow, register each OAuth app with strict environment boundaries. That means one app for dev, one for staging, one for production. Don’t lump them together. Set redirect URIs, scopes, and token lifetimes before development begins.
As Ashley Taylor, Product Manager at Cleverence, puts it:
"If you deploy across multiple environments, issue per-environment credentials so you can revoke one environment without touching others."
Set redirect URIs, scopes, and token lifetimes
Register only exact redirect URIs. Don’t use wildcards or partial matches. That kind of shortcut can open the door to redirect abuse. For local development, http://localhost:[port]/callback is usually allowed. Everywhere else, use HTTPS.
Scopes should map cleanly to features. One scope, one job. For example, inventory.read should stay separate from inventory.write. That way, you grant only the access a feature needs, nothing more. Access tokens should also be short-lived.
Generate client secrets and limit who can manage them
After redirect rules and scopes are set, tighten secret handling. Store client secrets only in server-side vaults or KMS-managed secrets. Keep console access limited. Track who approved each scope, when it happened, and what approval covered it. If the grant involves high-privilege access or tenant-wide consent, tie it to an internal ticket reference.
Set a rotation schedule, then stick to it. Rotate secrets whenever access changes too. As Ashley Taylor, Product Manager at Cleverence, puts it:
"Rotate secrets on a schedule, and whenever staff with access to them change roles. Treat rotation as a normal operation, not an emergency-only event."
Keep the grant registry current.
Checklist 2: Implement state, PKCE, and secure token storage
After registration, tighten the flow itself: state, PKCE, and token storage. Once registration is locked down, the next step is protecting the authorization request.
Use the state parameter correctly on every authorization request
The state parameter is your main guard against CSRF attacks during the OAuth flow. Generate a cryptographically strong random value for every new authorization request. Tie that value to the user’s session before you redirect.
When the callback comes back, compare the returned state with the one you stored right away. If it’s missing or doesn’t match, reject the request and stop the token exchange completely.
"The state parameter guards against CSRF and helps you match the response to a session." - Ashley Taylor, Product Manager, Cleverence
Require PKCE with S256 for public clients
For public clients, use PKCE with the S256 challenge method.
Set code_challenge_method=S256 on purpose. Never use plain. The code_verifier should be a high-entropy random string created for each request, deleted after the token exchange, and never written to logs or shown in error output.
Create the S256 challenge with a standard cryptographic library. After the code exchange, store each credential only in its approved location.
Store secrets and tokens only in approved locations
| Credential Type | Approved Storage | Key Rule |
|---|---|---|
| Refresh Tokens | Encrypted database / OS Keychain | Encrypted at rest, rotation on use |
| Access Tokens | Server memory / HTTP-only cookies | Short-lived, redacted from logs |
| PKCE Verifier | Secure server-side session | Deleted immediately after token exchange |
For web apps, keep raw tokens off the browser by using HTTP-only, Secure cookies or a BFF pattern. On mobile, store refresh tokens in the iOS Keychain or Android Keystore.
Checklist 3: Set token rotation, revocation, and API validation rules
With storage in place, the next job is runtime control: token lifetime, refresh behavior, and API validation. After that, check logging and run launch tests before production.
Keep access tokens short-lived and enforce least privilege
Keep access tokens short-lived - about 15 minutes - and treat them as opaque on the client side.
On the API side, every incoming token needs a full check before you allow access. Verify the signature with JWKS. Then check iss, aud, nbf, and exp. Allow only a few seconds of clock skew, and no more.
"Be strict with audience, issuer, not-before, and expiry checks. Clock skew handling of a few seconds is wise, but do not extend beyond that." - Ashley Taylor, Product Manager, Cleverence
After the core claim checks, enforce authorization at the scope level for each API action. Check only the scopes needed for that specific request. Stay away from broad scopes, and document why each scope exists.
For Client Credentials, use separate credentials for each job type and each environment. That way, if one credential is exposed, the damage stays limited.
Enable refresh token rotation and explicit revocation
Now move to refresh token behavior after issuance. Make refresh tokens one-time use and rotate them on every refresh. If your authorization server sees a previously rotated token used again, treat that as a compromise and invalidate the entire token family tied to that grant.
When a user logs out, or when an admin disables an app, call the revocation endpoint and push that revocation across all services. Then test logout the simple way: call the API with the old token and make sure it gets rejected.
| Control | Requirement | How to Test |
|---|---|---|
| Refresh Tokens | One-time use; encrypted at rest; server-side only | Reuse an old refresh token and confirm it fails and revokes the session |
| Revocation | Call the revocation endpoint on logout; wipe local caches | Log out and immediately call the API with the old token |
To avoid refresh spikes, use centralized token management, caching, and jittered refresh timing.
The last step here is logging and launch checks before production.
Checklist 4: Logging rules and pre-launch OAuth 2.0 tests
Once token rotation and revocation are set, the last step before launch is simple: watch what happens and test the whole flow in sandbox.
Log OAuth events without exposing tokens
Log every OAuth event in structured records with:
- timestamp
- client ID
- user ID
- requested scopes
- granted scopes
- IP address
- outcome
- correlation ID
That gives you a clean trail when something breaks. You can trace a failed exchange, spot scope issues, and connect events across systems without guessing.
But there’s a hard line here: never log raw tokens, client secrets, or code verifiers. If you need a token reference for debugging, store only a SHA-256 hash of the token for correlation.
"Never log entire raw tokens. Consider storing only a hash of the token for correlation." - Ashley Taylor, Product Manager, Cleverence
If Reform forms are part of sign-up or account creation, send OAuth through secure middleware. The form itself should never handle tokens.
With logging set, move to full-flow checks in sandbox before launch.
Run the pre-launch test checklist before going to production
After logs are in place, run the full pre-launch test set in sandbox only.
| Test Case | Expected Outcome | Failure Impact |
|---|---|---|
| Redirect URI validation | Reject nonmatching redirect URIs | Open redirect, token theft |
| Missing or invalid state | Reject the request | CSRF vulnerability |
| PKCE verifier mismatch | Reject the token exchange | Authorization code interception |
| Revoked token access | Reject reused tokens | Unauthorized access |
| Refresh token rotation | Invalidate the old token; issue a new one | Token replay |
| OAuth error responses | Return actionable 401, 403, and 429 responses without secrets or internals | Information disclosure |
Also add metrics to your token acquisition calls. Track latency, success rates, and error types. A spike in 401 or 403 responses is often the first sign that a secret expired or scopes were set up wrong.
"Authentication that looks fine in a unit test can misbehave in production without robust observability. Instrument your token acquisition calls with metrics for latency, success rates, and error categories." - Ashley Taylor, Product Manager, Cleverence
Conclusion: The minimum secure baseline to confirm before launch
Treat this checklist like a release gate, not a nice-to-have. Don’t go live until redirect URIs, state, PKCE, storage, rotation, logs, and sandbox tests all pass.
FAQs
Which OAuth flow fits my app?
First, figure out who’s signing in. If a human user is part of the flow, use OAuth. If it’s system-to-system traffic, go with API keys or mTLS.
For user-delegated access in browsers, mobile apps, or single-page apps, use the Authorization Code flow with PKCE. That setup helps the app act on behalf of the user without exposing more than it should.
For trusted server-side background tasks with no user present, use Client Credentials. Some apps need both: one path for system access, and another for per-user audit attribution.
Why do I need both PKCE and state?
You need both because they guard against different risks.
state helps stop CSRF by checking that the authorization response matches the request the user started.
PKCE helps stop authorization code interception. That way, only the app that began the flow can trade the code for an access token.
Put simply, state protects the request, while PKCE protects the code exchange.
What should I test before launch?
Before launch, break the flow on purpose and see what happens. That’s often the fastest way to spot weak points.
Check that your redirect URIs match the registered setup exactly. Then make sure your system deals with expired-token 401 responses the right way, runs silent rotation, and starts re-authentication when it has to.
You’ll also want to confirm that refresh tokens are stored securely on the server side, not left in client-side local storage. On top of that, verify your setup supports least-privilege scoping, steady secret rotation, and solid observability.
Related Blog Posts
Get new content delivered straight to your inbox

The Response
Updates on the Reform platform, insights on optimizing conversion rates, and tips to craft forms that convert.




Drive real results with form optimizations
Tested across hundreds of experiments, our strategies deliver a 215% lift in qualified leads for B2B and SaaS companies.
