
.webp)
Conditional Logic for User Journey Forms



A good form should ask less, route better, and match the user's stage. I’d set it up so the first 1–2 questions sort people into the right path, then only show fields tied to that path.
Here’s the core idea in simple terms:
- Use one early router question to split users by need, status, or buying stage
- Keep the first step short with basic contact details only
- Show extra questions only when they fit
- Send each path to the right outcome, like a demo calendar, support flow, or thank-you page
- Track results by path, not just one overall conversion rate
- Review logic every quarter and after changes to pricing, routing, or compliance
A few numbers from the piece stand out:
- Keep segments to 2–4 main paths
- Place the first branch within the first 1–2 questions
- Review fields based on whether your team will use them in 24–48 hours
- Watch low-use branches that appear in under 3%–5% of submissions
- Compare conversion by branch, like 48% vs. 17%, to find path-level issues
I’d think about the form in five stages:
- Map the journey stage
- Pick the router question
- Build short multi-step paths
- Test every branch and validation rule
- Measure drop-off, completions, and lead quality by path
If I had to boil the whole article down to one rule, it’d be this: ask only what the user is ready to answer right now, then use their answers to decide what happens next.
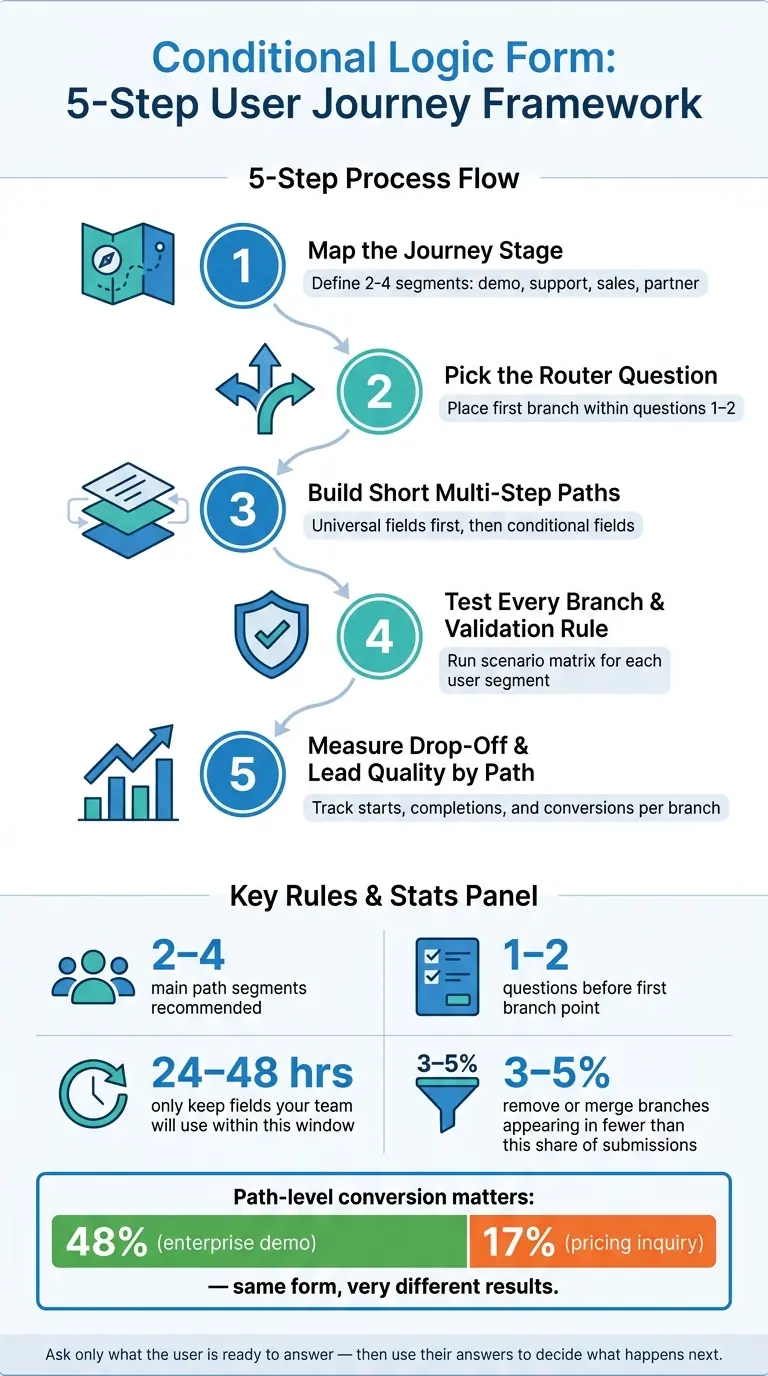
Conditional Logic Form: 5-Step User Journey Framework
Building a form with conditional logic, calculations, multiple actions, & dynamic data using WS Form
sbb-itb-5f36581
Map User Journey Stages Before You Build the Form
Use the stage map above to turn intent into clear form paths. Before you build anything, map your segments, goals, and required fields. Each journey stage should become its own path with its own questions and outcome. In plain English: one stage, one path.
Define Your Segments, Goals, and Required Data
Keep your segments tight. In most cases, 2–4 is enough: demo requests, support cases, sales-qualified buyers, and partner leads.
Give each path one main goal. That could be booking a demo, sending a support ticket to the right team, or qualifying a partner lead. Then trim the fields down to what your team will actually use within 24–48 hours. If a field won’t help someone take action in that window, it probably doesn’t belong there.
For a demo request, ask for:
- Name
- Business email
- Company name
- Role
- Budget band
You can show optional fields like current tools or preferred demo date only when the user shows higher intent. That keeps the path short and manageable for most people without losing detail when it matters.
For a support path, require account ID and issue category. Browser details and file uploads can stay optional.
Sketch the Flow Using Router Questions
Once each segment has a goal and field set, add a router question to send users down the right path. A simple model works well here: Start → Router Question → Branch → Outcome. Each path should end with a clear result, like a scheduled call, a submitted ticket, a sales handoff, or a partner intake.
Router questions work best when the answers are closed-ended and each option points to one clear next step. That keeps branching clean and predictable. Strong B2B router questions often focus on current customer status, role, company size, and purchase timeline.
Put the first branching question early, within the first 1–2 questions. Then leave deeper routing for later steps. Geography, timelines, and integration questions can come later, once the user is already on the right track.
| Router Question | Example Options | Why It Works |
|---|---|---|
| Current customer status | Yes / No | Separates support from acquisition paths |
| Purchase timeline | 0–30 days / 1–3 months / 3–12 months | Shows urgency without asking for budget up front |
| Company size | 1–50 / 51–250 / 251–1,000 / 1,001+ | Helps set qualification tier and routing |
| Estimated annual budget | Under $10,000 / $10,000–$25,000 / Over $25,000 | Sends leads to the right sales tier |
| U.S. state | Dropdown (CA, TX, NY, etc.) | Sends leads to regional teams |
Build a Multi-Step Form Around Each Journey Path
Once a router question sends a user down a path, turn that path into its own short form. That’s the whole point of a multi-step form design: users only see questions that fit their situation. You can then use that path to decide what shows up first, what comes next, and what only appears for people who qualify.
Separate Universal Fields From Conditional Fields
Start with the bare minimum contact fields needed for every path. Put those in the first step before any branching starts.
After that, make the next layer conditional. Fields like team size, budget range, product interest, use case, and launch timeline should only show up when earlier answers make them relevant. For example, a SaaS demo request form might always ask for company and email. But it should only ask about expected seats, current tools, and launch timeline if someone lands on a sales-ready path.
That keeps the form short for most people while still pulling in deeper lead data from the users sales cares about most.
Keep only the fields you need for routing or follow-up.
Group Steps by Intent, Context, and Qualification
Set the order of each branch based on user effort, not internal team preference.
Ask the easiest things first, then move into the harder stuff: intent, then context, then qualification. Intent questions tell you what the user wants to do. Context questions fill in the background, like company size, industry, or team type. Qualification details should come last and stay limited to what sales or marketing actually needs, such as budget range, launch timeline, or buying authority.
A demo-request form can start with the same base fields for everyone, then split into a longer qualification path for enterprise buyers. That path might ask for team size, current solution, and launch timeline. Smaller teams or early-stage evaluators can move through a shorter path that focuses more on fit and follow-up.
Use Reform for No-Code Conditional Routing
Use the same branch logic inside the builder so each path stays short and easy to follow.
Reform lets you set up that branching without code. Its conditional routing supports Skip this page, Jump to, Finish and show, and Redirect to actions based on user answers. So a high-intent lead can move straight to a deeper qualification step, while a lower-intent visitor can skip that section and land on a lighter outcome page.
| Logic Action | What It Does | Example Use Case |
|---|---|---|
| Skip this page | Bypasses a step when conditions are met | Skipping a payment page for VIPs |
| Jump to | Moves the user to a specific future step | Sending enterprise leads to a budget and timeline page |
| Finish and show | Ends the form with a tailored thank-you page | Showing a booking link to high-revenue leads |
| Redirect to | Sends the user to an external URL on completion | Redirecting to a scheduling calendar for sales-qualified leads |
Reform also supports branding and progress bars with clear step labels, so users always know where they are in the flow.
Set Up and Test Your Conditional Logic Rules
Once your paths are mapped, turn them into rules and test every branch before launch.
Set Triggers, Conditions, and Actions
Build the full form first. Then add the logic layer.
Start with closed-ended trigger fields that line up cleanly with a stage in the user journey. Good examples include "Are you currently a customer?", company size, and budget range. These fields are easier to control because the answers are fixed.
Match the trigger type to the field type:
- Use equals for radio buttons and dropdowns
- Use greater than or less than for numeric fields
- Use contains for multi-select checkboxes
Each rule follows the same structure: trigger, condition, action.
For example, if "Are you currently a customer?" equals "Yes," you might hide sales qualification fields, show support- or expansion-related questions, and move the user past the early lead qualification step entirely.
You can also combine conditions with And or Or. And you can add separate actions to the same step for different outcomes.
Compare Common Conditional Logic Patterns
The table below covers the four most common patterns, so you can pick the right one for each part of the journey.
| Pattern | Ease of Setup | UX Impact | Effect on Lead Quality | Key Risks |
|---|---|---|---|---|
| Field show/hide | High | Moderate to high - reduces visual clutter | Positive - collects relevant data per segment | Hidden required fields causing validation issues; rule conflicts across many fields |
| Step show/hide | Medium | High - shortens or tailors the perceived flow | Mixed to positive - can omit data if conditions are too loose | Maintenance overhead when business logic changes; segments accidentally skipping critical steps |
| Skip/jump logic | Medium | High - the form feels adaptive and personal | Mixed - boosts completion but can reduce detail if jumps are too aggressive | Hard-to-detect gaps where required questions are skipped; complex debugging when multiple jumps interact |
| End-of-flow routing | Medium | Low to moderate - the change happens mostly after submission | High positive - routes leads to the right team or funnel | Routing misalignment with current sales or support processes; higher maintenance as the organization evolves |
Test Every Path for Accuracy and Accessibility
Use your journey map as the test script. A simple scenario matrix helps here. List your main segments - like "new prospect, low intent," "existing enterprise customer," and "self-serve SMB ready to purchase." Then note the expected path for each one: which steps should appear, which fields should be required, and which confirmation message should show at the end.
Run each scenario by hand. Check that the right fields appear, required validation works, and the confirmation message or redirect matches the segment. Also test U.S. phone, date, and currency formats, along with both valid and invalid inputs, on every branch.
Then go one step further. Complete each path using ONLY the keyboard. Check focus order, mobile layout, and screen-reader clarity when steps are skipped. Reform's progress bar with custom step labels - such as "Contact Info" and "Details" - can help users stay oriented even when the path isn't linear.
Measure Results and Keep Your Logic Up to Date
Track Drop-Off and Conversion by Path
Once the form is live, look at path-level data to see which branches work and how to create high-converting lead forms by cutting back the ones that don't. Each branch should be treated like its own funnel within the larger journey. That means tracking starts, drop-off, completions, time to complete, and qualified leads for every path on its own.
That kind of view helps you spot issues fast. If a form converts at 48% on the "enterprise demo" path but only 17% on the "pricing inquiry" path, you're not looking at a general form problem. You're looking at a path-specific issue worth fixing.
Reform's real-time analytics and abandonment tracking make this much easier to manage. If people on one path keep leaving at the same step, you can see which fields they completed before they dropped off. That's a lot more useful than staring at one overall completion rate. Clean submissions also help keep your path data accurate.
Simplify Rules and Audit the Form on a Schedule
Use what the data tells you to cut paths that no longer justify the extra logic. Review the form every quarter, and also after changes to pricing, qualification, territory, or compliance. Segments shift. Routing changes. Your form logic needs to keep up.
It also helps to review the logic with sales and marketing so the form still matches how leads are segmented and prioritized.
Watch for branches that show up in under 3–5% of submissions. If those branches rarely convert, remove them or fold them into another path. Keep narrow-use questions conditional so most people never have to see them. That keeps the form shorter for everyone else.
Conclusion: Keep Forms Relevant, Short, and Measurable
The best journey forms stay relevant, short, and measurable. Map each path, ask only for the fields that stage needs, and cut anything the data shows you don't need.
FAQs
How do I choose the best router question?
Choose a field that clearly splits your audience and guides what happens next. The best router questions use a high-impact filter, like annual revenue, user intent, or membership status, to send people down the path that fits them best.
Then test each path by picking different answers and checking that every route leads to the personalized experience you planned before you publish the form.
When should a field be conditional?
Use conditional logic for any field that doesn’t apply to every respondent. Extra questions add small bits of friction, and those little slowdowns can push people to abandon the form.
Conditional fields hide questions that don’t fit and show only what matches the user’s path. That saves time, makes the form feel more intuitive, and helps build trust.
How can I tell if a branch is underperforming?
Test every branch by submitting the form a few times with different answer combinations. That’s the simplest way to check that the logic works the way you expect and catch weak spots before launch.
If one branch has a high abandonment rate, take a close look at its fields. Extra steps, unclear wording, or too many required inputs can add friction and cause people to leave before they finish.
Related Blog Posts
Get new content delivered straight to your inbox

The Response
Updates on the Reform platform, insights on optimizing conversion rates, and tips to craft forms that convert.




Drive real results with form optimizations
Tested across hundreds of experiments, our strategies deliver a 215% lift in qualified leads for B2B and SaaS companies.
