
.webp)
Conditional Logic in Shopify Multi-Step Forms


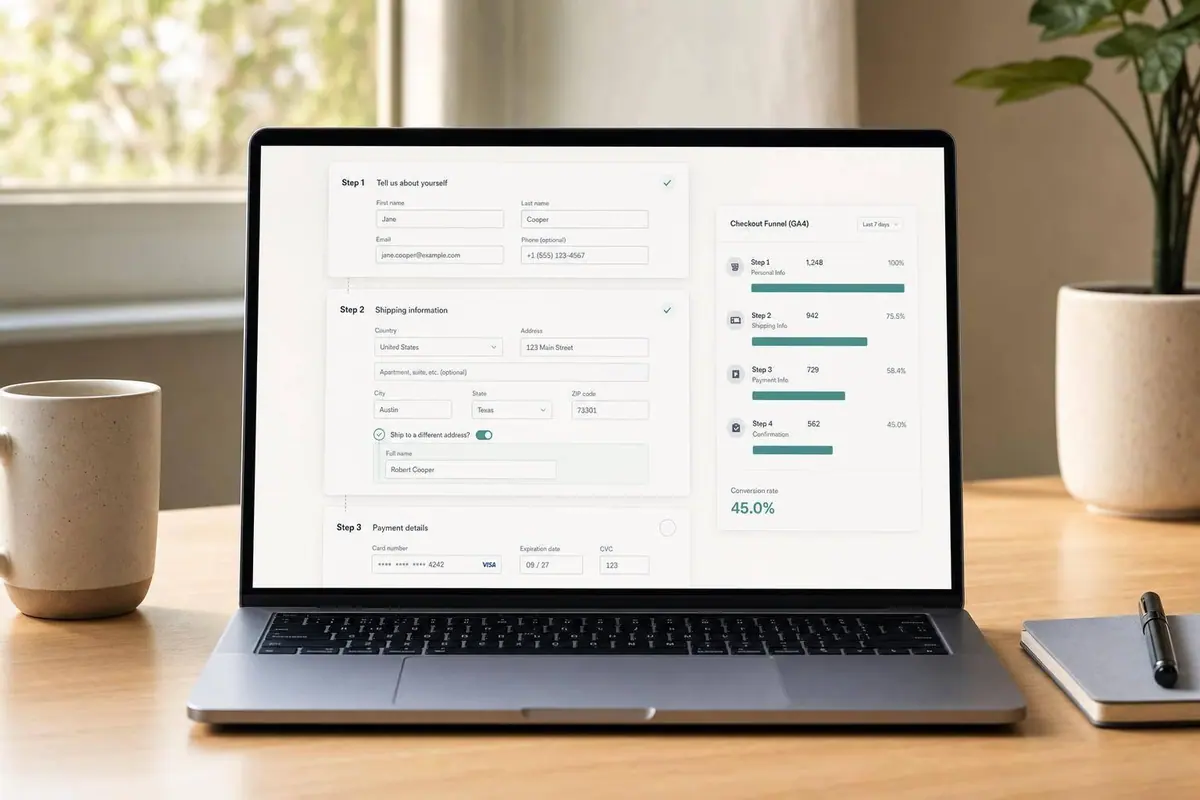
If your Shopify form shows every question to every visitor, you’re losing completions and getting messier data than you need to.
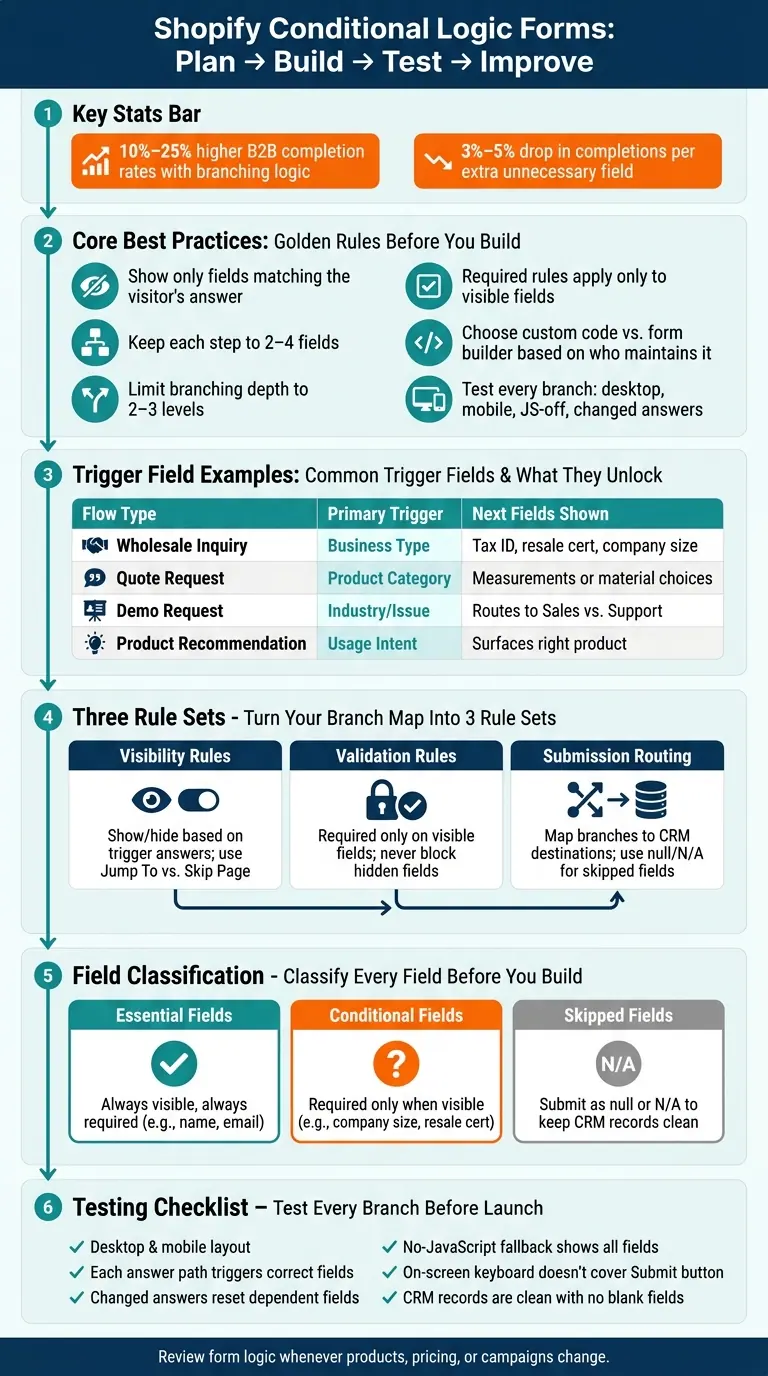
I’d boil the article down to this: use simple trigger fields, split follow-up questions into short steps, make hidden fields optional unless shown, and test every branch before launch. That matters because branching can improve B2B form completion rates by 10%–25%, while each extra field can reduce completion by 3%–5%.
Here’s the short version:
- I’d use conditional logic to show only the fields that match a visitor’s answer.
- I’d keep each step to 2–4 fields.
- I’d limit branching depth to 2–3 levels.
- I’d make required rules apply only to visible fields.
- I’d choose between custom code and a form builder based on who will maintain the form.
- I’d test desktop, mobile, changed answers, skipped steps, and no-JavaScript fallback.
- I’d track step drop-off in GA4 and watch CRM records for blank or broken submissions.
Shopify’s native contact form does not support multi-step logic or branching on its own, so you need either theme code or an app. That’s the core setup decision, and everything else comes down to clean rules for visibility, validation, routing, and maintenance.
Shopify Multi-Step Form Conditional Logic: Build, Test & Optimize
Create conditional logic on a form | Powerful Form Builder | Shopify App Tutorial

sbb-itb-5f36581
Plan the logic before you build
Start with the logic map. Then turn that map into steps, rules, and field states.
Choose the fields that should trigger branching
Not every field should act as a trigger. The best trigger fields are the ones that change what you need to ask next in a big way. You can think of them as high-impact fields: answers that split visitors into clearly different paths. A good trigger changes both the experience someone gets and the data you collect.
Common trigger fields include:
| Flow Type | Primary Trigger | Next Fields |
|---|---|---|
| Wholesale Inquiry | Business Type (Retailer, Online, etc.) | Tax ID, resale certificate upload, company size |
| Quote Request | Product Category or Customization | Measurement fields or material choices |
| Demo Request | Support Issue or Industry | Routes submission to Sales vs. Support |
| Product Recommendation | Usage intent (trip type, climate, activity) | Rules that surface the right product |
Stick with simple, low-friction inputs for triggers, like radio buttons or single-select fields. They’re easy to answer and keep the form moving. Once those trigger fields are in place, group the follow-up questions into steps that fit each path.
Group dependent questions into clear steps
Give each step one job and keep it tight: 2–4 fields per step. That’s usually enough to move things forward without making the form feel heavy.
A wholesale inquiry form might work like this: Step 1 asks for business type. Step 2 collects company details if “Business” was selected. Step 3 gathers contact information. Step 4 covers the request itself.
That structure does two things. It keeps the flow easy to follow, and it stops one branch from turning into a messy pile of unrelated questions.
A few rules help here:
- Keep each step focused on one purpose
- Use 2–4 fields per step
- Stop at three condition levels
- If the logic gets deeper than that, start a new step
It also helps to front-load easy questions, like radio buttons or other simple multiple-choice inputs. That builds momentum. Save long text boxes, file uploads, and sensitive details for later, once the visitor has already decided to continue.
Handle hidden and skipped fields without data gaps
This is where form logic often falls apart. Hidden fields may seem harmless, but they can quietly damage data quality if you don’t plan for them up front.
When a field stays hidden because a visitor took another branch, decide ahead of time what should happen in the submission data. Don’t leave it fuzzy.
Skipped fields can create holes in lead scoring and reporting, so classify every field before you build:
- Essential fields like name and email should always be visible and always required
- Conditional fields like company size or resale certificate should be required only when visible, never when hidden
- Skipped fields should submit as null or "N/A" so the CRM record stays clean and consistent
A hidden required field can block form submission for people who never even saw that field. And that kind of issue is hard to catch unless you test every branch. Set the rule first, then assign required status to each conditional field.
That field map becomes the blueprint for validation and routing.
Build conditional logic in Shopify
You have two main ways to set this up in Shopify: build it in the theme, or use a no-code form builder. Which one makes sense comes down to two things: how complex your branching is and who's going to maintain it.
Use custom HTML, Liquid, and JavaScript in the theme
A custom build gives you full control over how the form looks and behaves. You can handle show/hide rules, step changes, and validation with Liquid and JavaScript. Your field map becomes the blueprint, so each branch turns into a clear set of rules in code.
That tradeoff tends to work for technical teams with stable forms. But there’s still upkeep. Theme updates can affect behavior, and every new branch means more testing. If JavaScript is unavailable, show all fields instead of blocking submission.
Use a no-code form builder for multi-step logic and routing
A no-code builder makes it much easier to build and update branching rules without touching code. You can set up branching, route submissions, and send leads to your CRM without digging into the theme.
Reform supports multi-step forms, conditional routing, and submission routing to your CRM or marketing tools. Advanced logic actions such as "Skip page" and "Jump to" are available on the Pro Plan.
Embed forms on Shopify pages, product pages, and landing pages
Where you place the form matters. Put it where the visitor’s intent is strongest.
Product pages are a good fit for guided shopping flows, like engraving, material choices, or add-on selections. In most cases, the conditional logic here is pretty light, with one or two triggers that reveal the next set of questions.
Landing pages and contact pages are better for higher-intent forms, like wholesale applications or more detailed service inquiries. These forms can support deeper branching, including step routing that sends different visitors down different paths based on their profile.
Once the form structure is in place, define how each branch validates and submits.
Set rules for validation, routing, and submissions
Once your branch map is done, turn it into three rule sets: visibility, validation, and submission routing.
That keeps the form easier to build and much easier to check later. Instead of mixing everything together, you separate what people see, what they must fill out, and where their submission goes.
Define show-hide rules and step-jump rules clearly
Start with one trigger field that uses fixed answer choices. Then add AND/OR logic only when a branch needs more than one condition.
This matters because simple branching is easier to follow. If every path has its own stack of conditions, things can get messy fast.
"Jump to" sends the respondent to a specific future step, while "Skip this page" bypasses an irrelevant step, such as shipping for a digital-only order.
That’s a small difference, but it has a big effect on how the form behaves. Jump to is like taking a shortcut to a later stop. Skip this page just steps around something that doesn’t apply.
Try to keep branch depth to 2–3 layers. Beyond that, paths get hard to debug and even harder to trust.
Validate only visible fields
After the branch path is set, connect validation only to fields the visitor can actually see.
Required validation should apply only after a field becomes visible.
That prevents a common headache: someone gets blocked by a field hidden somewhere in the form. If a person can’t see it, they shouldn’t be forced to fill it out.
Capture clean data for CRM and reporting
Once validation matches visible fields, map each branch to a clean submission destination.
Consistent field naming helps keep CRM and reporting clean.
It also makes life easier when you’re sorting leads, checking form performance, or passing data into another system. Route each branch to the right inbox or thank-you page so submissions land where they should.
Test, maintain, and improve over time
Test every branch and edge case across devices
Once validation and routing are in place, test every single branch in real conditions. Your branch map should act like a checklist. Go path by path, pick each answer in every branching question, and make sure the right fields appear, the right steps are skipped, and the form submits without errors.
Don’t stop at desktop. Test on mobile too. Animations can act differently on touch screens, and the on-screen keyboard can cover the Next or Submit button.
There’s another easy one to miss: when someone changes an earlier answer, any dependent fields and steps should reset. If they don’t, old branch data can stick around and pollute the submission.
If your form uses custom JavaScript, test it with JavaScript turned off. The fallback should show all fields instead of leaving people with a broken form.
After the form clears manual testing, shift your attention to live submissions. That’s where odd failures tend to show up.
Watch for broken paths and inconsistent submissions
Live data tells you which branches hold up and which ones fall apart in production. Set up GA4 custom events for each step change, like form_step_2, so you can build a funnel report and see where users drop off and reduce the friction of completing a lengthy form. If one step suddenly has a big drop, that usually points to a logic error, a confusing question, or validation that’s too strict.
CRM data can also tell you when something is off. Missing fields or messy records after launch often mean a branch is misfiring - either hiding a field it should show or skipping validation it should enforce. If one branch keeps producing incomplete submissions while the others look fine, that path needs a closer look.
Reform’s real-time analytics and abandoned submission tracking make this easier. You can spot the steps losing respondents without digging through manual exports.
Update logic as offers and qualifiers change
After launch, treat form logic like something that needs regular upkeep, not a set-it-and-forget-it job. Conditional forms get stale fast. A product gets discontinued, a campaign ends, or the sales team changes the qualification threshold. Then one branch starts sending the wrong leads to the wrong place.
Review the logic any time a product line, pricing tier, or campaign changes. Clone the form first, then test the updated version in preview before you publish it. Remove branches you no longer use, revise answer choices tied to old offers, and confirm that each active path still routes to the right CRM destination or thank-you page. That simple check can save you weeks of bad data. To avoid these issues from the start, you can use powerful form templates designed for high-conversion lead generation.
FAQs
When should I use branching in a Shopify form?
Use branching when you need to split users into different paths, add context, or collect details based on earlier answers. It keeps irrelevant fields out of the way, makes the form feel lighter, and can help cut down on form abandonment.
It’s especially helpful for qualifying leads, routing product-specific inquiries, and giving people a more personal path through the form. With Reform, you can skip steps, jump to certain pages, or redirect users based on their answers.
How do I prevent hidden fields from breaking submissions?
Don’t hide fields that your team needs for routing or downstream processing, like customer type or required contact details.
Here’s the catch: hidden fields are often left out of submission data. So if you hide a required field, you can stop key data from being collected in the first place.
Check your conditional logic closely. Any field your CRM or marketing integration needs should stay visible whenever it’s required.
What should I track after launching a multi-step form?
Track performance with funnel tracking in GA4 so you can see where people drop off. Set up a custom event for each step change. That gives you a clear view of completion rates at every stage.
Also review your submission dashboard every week. Check that pathways are working as expected, data is mapping into your tracking logs correctly, completion times look healthy, and admin alerts are set up the right way.
Related Blog Posts
Get new content delivered straight to your inbox

The Response
Updates on the Reform platform, insights on optimizing conversion rates, and tips to craft forms that convert.




Drive real results with form optimizations
Tested across hundreds of experiments, our strategies deliver a 215% lift in qualified leads for B2B and SaaS companies.
