
.webp)
How to Set Up Lead Routing in HubSpot


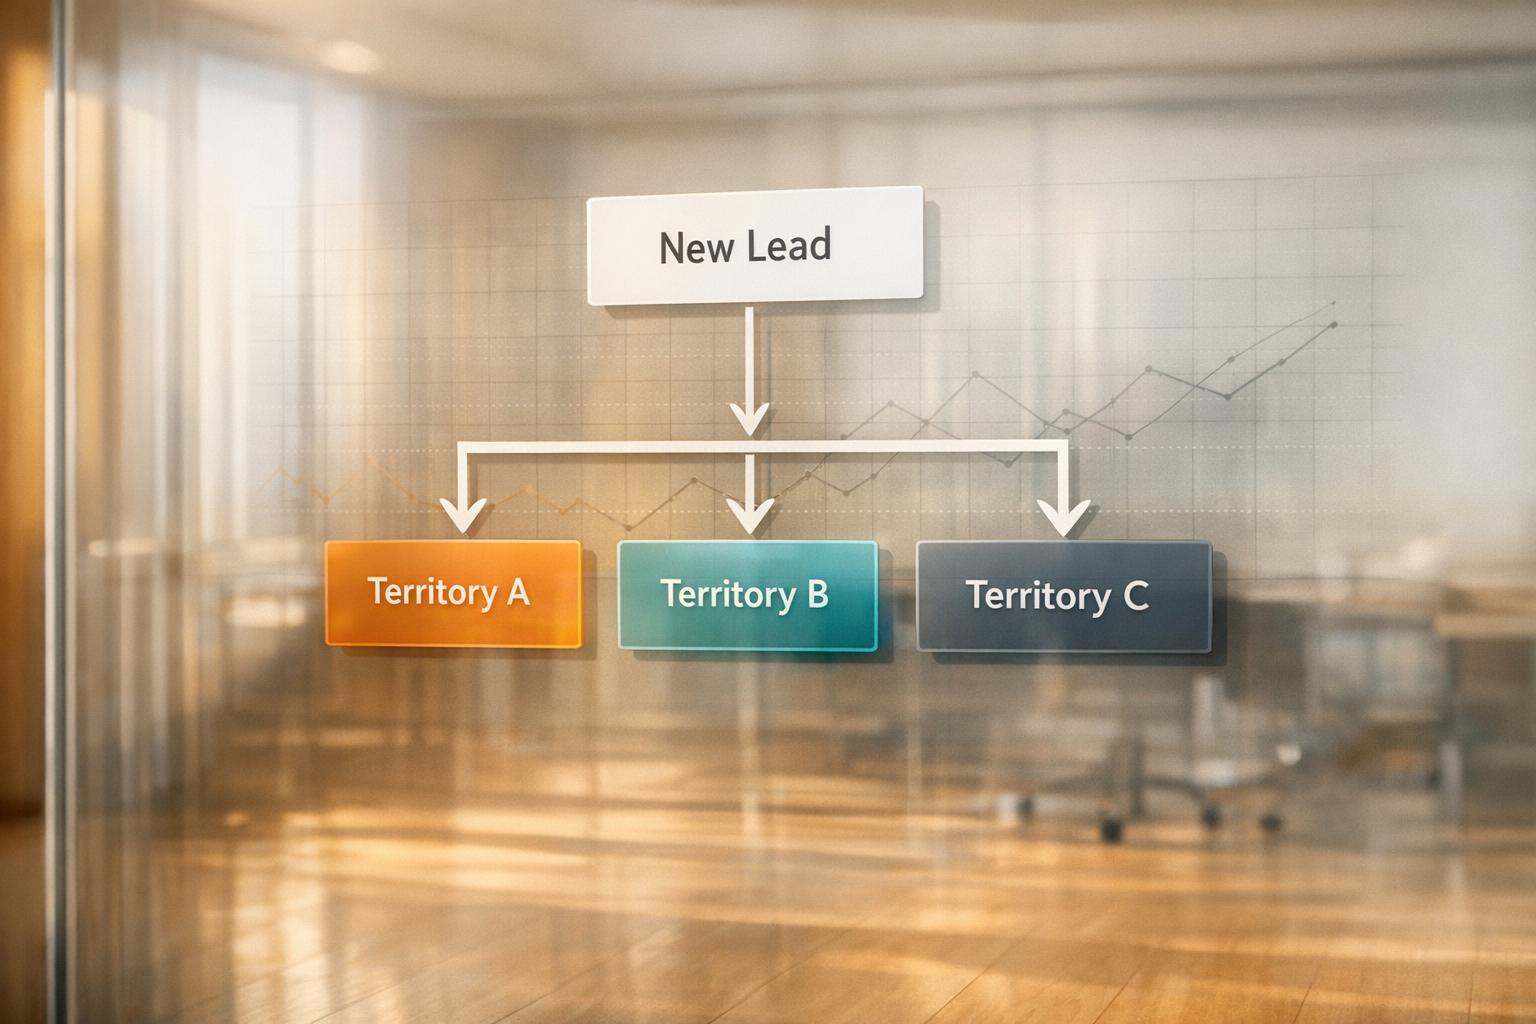
Lead routing in HubSpot automates assigning leads to sales reps based on criteria like geography, company size, or lead score. This process reduces response times, prevents lost leads, and improves conversion rates. For example, companies using automated routing have cut response times by up to 90%, boosting conversions significantly.
Key Steps:
- Define Routing Criteria: Use factors like location, lead score, or team expertise.
- Clean CRM Data: Ensure accurate and consistent data for smooth workflows. This preparation is a core part of a successful lead conversions playbook.
- Check HubSpot Subscription: Features like "Rotate record to owner" require specific plans.
- Build Workflows: Create triggers, set conditions, and assign leads using HubSpot's tools.
- Test and Optimize: Run tests to verify routing logic, then monitor and adjust regularly.
By automating lead routing, you save time, improve follow-up speed, and align leads with the right reps to close more deals.
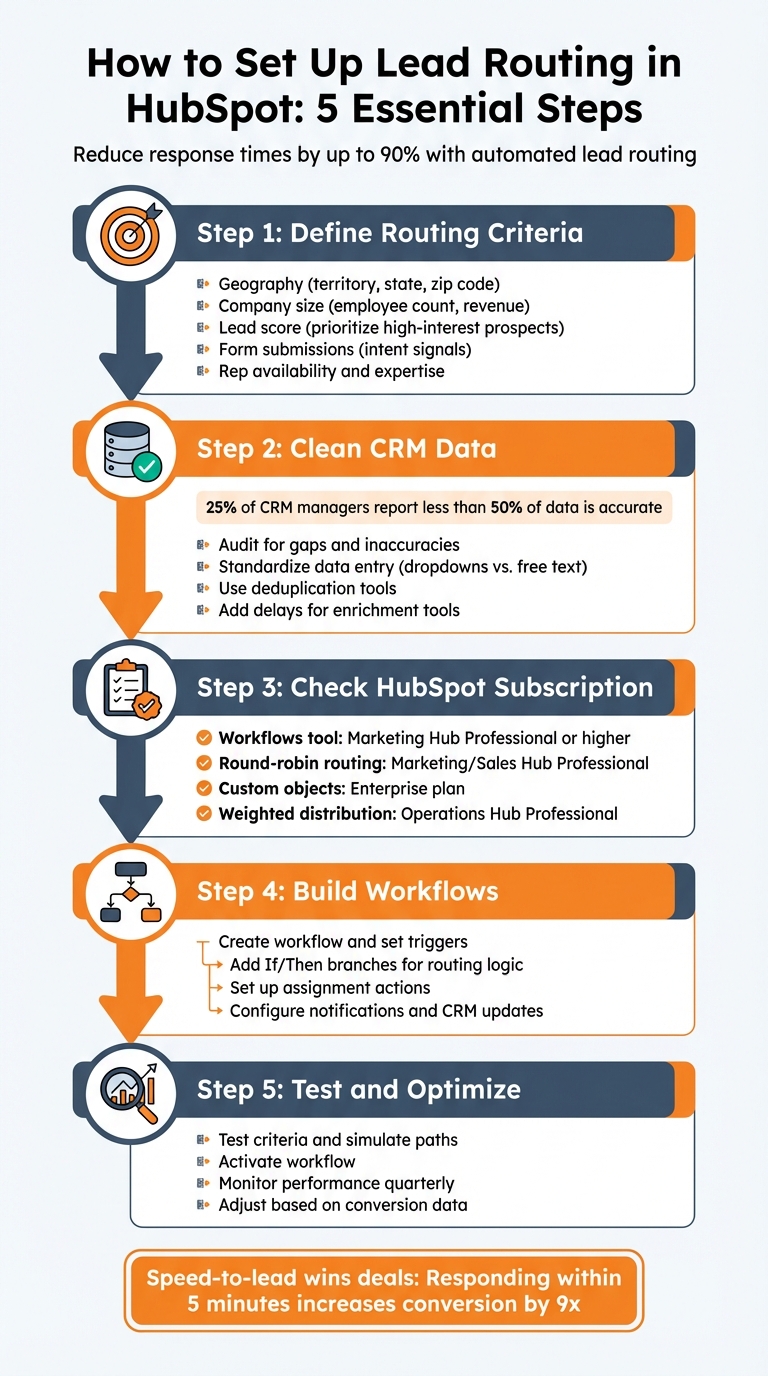
5-Step HubSpot Lead Routing Setup Process
Route Leads to Sales Reps with HubSpot Workflows
sbb-itb-5f36581
Preparing to Set Up Lead Routing in HubSpot
Getting your lead routing right starts with proper preparation. Skipping these steps can lead to misplaced leads, frustrated sales teams, and missed opportunities. Here's how to set the stage for success.
Define Your Lead Routing Criteria
Before diving into workflows, decide how you'll route leads. Geography is a popular starting point - assigning leads based on territory, state, or zip code can speed up responses and help build local connections. Beyond location, consider factors like company size (e.g., employee count or annual revenue) to match leads with the right sales team, whether that's SMB, mid-market, or enterprise. Lead scores can help prioritize high-interest prospects for immediate follow-up, while specific high-converting form submissions (like "Request a Demo") can highlight intent to purchase.
"Lead routing is the logic and method used to determine who gets which leads and why." - Alex Umbhau, Senior Operations Strategist, New Breed
Don't forget rep-specific factors like availability, workload, and expertise. Leads tied to existing accounts should go to their current owner to preserve continuity in customer interactions. Make sure to document every way a lead enters your CRM - whether through forms, imports, or integrations - to ensure no entry point is overlooked in your workflow setup.
Clean Up Your CRM Data
Clean data is the backbone of effective lead routing. Missing or inconsistent fields like "Number of Employees" or "Industry" can disrupt workflows. Alarmingly, 25% of CRM managers report that less than 50% of their data is accurate and complete. Before activating any workflows, audit your CRM to identify gaps or inaccuracies.
To maintain consistency, standardize data entry. For example, ensure "NY" and "New York" aren't used interchangeably when routing by state. Use dropdown menus instead of free-text fields for properties like "Country" or "Industry". Deduplication tools can help eliminate duplicate contacts. If you're using lead enrichment tools to fill in missing data, add a "Delay" action at the start of your workflow to allow time for the tool to sync before routing begins.
These precautions will help your routing rules work seamlessly when it's time to implement them.
Check Your HubSpot Subscription Level
Automated lead routing relies on the Workflows tool, which is only available with Marketing Hub Professional or higher. To access the "Rotate record to owner" action for round-robin distribution, you'll need at least Marketing Hub Professional or Sales Hub Professional. If you're routing custom objects (beyond contacts, companies, or deals), an Enterprise plan is necessary. Advanced options like weighted round-robin distribution - where senior reps receive more leads - require Operations Hub Professional to use custom code actions.
Double-check your subscription level to confirm it supports your automation needs. With this groundwork in place, you'll be ready to build your lead routing workflows with confidence.
Step 1: Create a Lead Routing Workflow
Open the Workflows Tool
Start by logging in to HubSpot. From the top navigation bar, head to the Automation menu and select Workflows. Depending on your interface version, the navigation might vary slightly, so keep an eye out for adjustments. Before diving in, double-check that you have administrative permissions - these are often required to access and adjust workflow settings. Also, make sure your HubSpot subscription includes this feature. Once you're in and ready, it’s time to set up your workflow type and object.
"The Workflows tool in HubSpot is powerful, but it can be challenging for the uninitiated." – Stan Rymkiewicz, Head of Growth, Default
Select Workflow Type and Object
Inside the Workflows tool, click Create workflow and choose From scratch. This option gives you complete control over your routing logic. Next, select Contact-based as your workflow type, since you’ll be managing leads as contacts. Then, opt for Blank workflow to build your routing system from scratch. This setup ensures that leads are assigned as soon as they enter your system, whether through form submissions or other triggers.
Name Your Workflow
Use the pencil icon in the editor to give your workflow a clear and descriptive name. Include details like the lead source, territory, or intent to make it easy to identify - examples might be "Lead Form Routing – Demo Requests" or "Contact Form Lead Assignment – North America." As your workflows grow more complex, a consistent naming convention will help your RevOps and sales teams quickly understand each workflow’s purpose. This small step can save a lot of time and prevent confusion down the line.
Step 2: Set Up Enrollment Triggers
Use Form Submissions as Triggers
Once your workflow is ready, the next step is to add an enrollment trigger. Start by clicking the plus icon, then choose Form submission from the options. You can either select Any form submission to capture all incoming leads or focus on specific, high-intent forms like "Request a Demo" or "Contact Sales." This approach helps you prioritize qualified leads, routing them directly to your sales team, while managing lower-intent submissions separately.
Speed is critical - contacting leads within minutes can significantly boost your chances of conversion. With form submissions as triggers, HubSpot automatically enrolls contacts the moment they submit a form, eliminating delays from manual reviews. This rapid response can often be the deciding factor in winning or losing a deal to a competitor.
If you’re managing multiple forms, use OR logic to include several forms in a single workflow. This simplifies your lead management by consolidating routing rules into one place, avoiding the complexity of maintaining multiple workflows.
For those using tools like Reform (https://reform.app), its integration with HubSpot ensures that every high-quality form submission is captured in real time, further streamlining your lead routing process.
Once you've set up your enrollment triggers, it's essential to configure re-enrollment settings to keep your workflow updated.
Configure Re-enrollment Settings
After defining your initial triggers, fine-tune your re-enrollment settings to account for repeat form submissions or updated lead information. By default, contacts only enroll once. To capture ongoing interactions, enable re-enrollment for situations like additional form submissions or changes to lead properties.
In the workflow settings under the Re-enrollment section, check the box for Form submission to ensure contacts are reprocessed every time they submit a form. This keeps your routing logic up-to-date, ensuring leads are directed to the appropriate representative based on their most recent details. You can also enable re-enrollment for property filters, such as region or company size, to tailor your workflow further.
When reactivating a workflow after making edits, proceed carefully. Choose "Save and don't enroll existing contacts" to avoid accidentally re-routing a large number of leads already in the system.
Step 3: Build Your Routing Logic
Add If/Then Branches
Now it’s time to set up the conditional logic that connects your enrollment triggers to final assignment actions, ensuring a smooth flow for your leads. In your workflow editor, click the + icon and choose Branch (or If/then branch) to create decision points.
Design branches based on how your team is structured. For instance, geography is a common criterion - use lead properties like "Country", "State", or "IP country" to route leads by location. Let’s say your team is divided between the East Coast and West Coast. You can create a branch that checks the "State/Region" property and routes leads accordingly.
Company size is another useful filter. You could set up a branch to check employee count, separating SMB leads from Enterprise ones. For example, leads with "Company size > 50" can go to your enterprise team, while smaller companies are routed to SMB reps. Lead score is also a great way to prioritize. High-intent leads with scores of 50 or above can be sent directly to sales, while lower scores might enter a nurture sequence.
For more detailed routing, you can nest branches. Start by splitting leads by region, then narrow it down further by industry or product interest. HubSpot lets you create simple "Yes/No" branches or more complex paths based on multiple property values. Don’t forget to include a "None Met" fallback branch to catch any leads that don’t meet your criteria - this keeps them from slipping through the cracks.
One important tip: add a short delay or enrichment step before your first branch to ensure all key lead properties are populated.
Set Up Lead Assignment Actions
Once your branches are ready, it’s time to assign leads. Use the "Rotate record to owner" action for round-robin distribution, which evenly assigns leads across a specific team. Note that this feature requires HubSpot Sales Professional or Enterprise.
If you need to assign a lead to a specific person, the "Set property value" action lets you update the "HubSpot owner" field directly.
For leads that come back after going cold, enable the "Overwrite lead rotations" setting. This ensures the lead gets reassigned to a new owner, giving them a fresh start. You can also use the "Enroll in Sequence" action to automatically place newly assigned leads into a predefined sales sequence.
Here’s a quick summary of common routing criteria and actions:
| Routing Criteria | Property Example | Typical Action |
|---|---|---|
| Territory | IP Country, State/Region | Assign to Regional AE |
| Lead Value | Lead Score, Annual Revenue | Route to Senior AE or SDR |
| Specialization | Industry, Product Interest | Route to Product Specialist |
| Account Status | Lifecycle Stage, Existing Owner | Assign to current CSM/Account Owner |
Add Notifications and CRM Updates
Once leads are assigned, notify your team immediately to ensure quick follow-up. Use the "Send internal email notification" action to alert the lead owner via email. For even faster responses, set up Slack notifications to ping your team in real time.
To keep follow-ups on track, add a "Create task" action. This will place a reminder on the rep’s HubSpot task list, complete with a deadline and relevant details. Since responding to a lead within 5 minutes of their inquiry increases conversion chances by 9x, these instant notifications are crucial.
Because HubSpot doesn’t have a built-in routing log, consider creating a custom "Routing History" property. Use the "Set property value" action in each branch to record the path a lead took. This makes it easier to troubleshoot and refine your routing logic later on.
Before activating your workflow, double-check that all team members have their notification settings properly configured in HubSpot. Workflow-triggered alerts can be blocked at the user level, so it’s worth verifying. For high-priority forms like "Request a Demo", set up dedicated Slack notifications to ensure these leads get immediate attention.
Step 4: Activate and Monitor Your Workflow
Test Your Workflow
Before launching your workflow, it’s crucial to test everything to catch potential routing errors. HubSpot offers two tools for this: the Test criteria tool and a general Test simulation. These allow you to verify enrollment triggers and preview the workflow’s path without performing real actions.
Here’s how they work:
- Test criteria: Select a specific contact to check if they meet the enrollment requirements. A green panel means they qualify, while a red one indicates they don’t.
- Test simulation: This highlights the contact's workflow path in green and predicts timestamps for each action. For If/Then branches, HubSpot forecasts outcomes based on the contact’s current state, but you can manually explore other branches to see alternative paths.
To get a clear view of your workflow’s structure, open the minimap. Once you’re confident everything is set up correctly, click Review and publish to finalize the settings and enrollment criteria. Double-check timing settings - actions might be delayed if enrollment happens outside of designated business hours.
Once everything runs smoothly during testing, you’re ready to activate the workflow.
Turn On the Workflow
Before activating, ensure every branch ends with a clear action - like assigning leads to a representative or pausing unqualified leads for nurturing. Then, click Review and publish to turn on the workflow for new contacts.
You can also schedule pauses for holidays or set specific business hours in the workflow settings. This ensures leads are only assigned when team members are available to handle them.
Track Performance and Make Adjustments
Once your workflow is live, monitoring its performance becomes key to keeping things running smoothly.
Use the Analyze tab to track metrics - note that this feature supports up to 20 workflows per account. HubSpot highlights the most-used workflow path in green, which helps you quickly identify which branches are getting the most traffic.
Pay close attention to:
- Conversion rates: Review how each branch performs and identify any bottlenecks.
- Error icons: These indicate where your routing logic might be failing.
- Matching enrollments: Check this for each step to troubleshoot any routing issues.
Since 25% of CRM managers report that less than half of their data is accurate and complete, keeping your CRM data clean is essential for effective routing.
"Continuously evaluate and refine your lead routing rules to match current performance metrics and business conditions." – Routera Team
Make it a habit to review your lead routing performance at least once every quarter. This ensures lead assignments stay balanced and that leads are reaching the right representatives. If you need to update an active workflow’s enrollment criteria, always choose Save and don't enroll existing contacts to avoid accidentally re-routing old leads.
Conclusion
Lead routing in HubSpot boils down to four key steps: defining criteria, creating workflows, building conditional logic, and thoroughly testing before launch. These steps, outlined earlier, are the foundation of a strong lead routing strategy. Automating this process eliminates the delays and errors of manual assignments, which can significantly improve response times and boost conversion rates.
The beauty of lead routing lies in its flexibility. For instance, a round-robin system is excellent for teams where every member has similar skills, while territory-based routing works better for regional sales setups. If you're dealing with a high volume of inbound leads, pairing lead routing with lead scoring ensures that senior reps can prioritize high-value opportunities.
"Speed-to-lead wins deals. Routing leads instantly improves conversion by reducing time-to-contact." – Bastien Paul, Lead Management Expert, Hublead
To get the most out of your workflows, customize them to your specific business needs. Start with a few essential criteria - like region or product interest - and refine them over time. Regularly review your routing logic, ideally every 30–60 days, to identify and fix bottlenecks as your business evolves . And don’t overlook the importance of maintaining clean CRM data - accurate routing depends on it, so make data hygiene a regular practice.
When done right, efficient lead routing doesn’t just make your team faster - it allows them to focus on what really matters: closing deals. By streamlining processes, your team can spend less time on manual tasks and more time driving revenue. To take things a step further, consider using tools like Reform, a no-code form builder designed to capture high-quality leads and integrate seamlessly with HubSpot.
FAQs
Which HubSpot plan do I need for lead routing?
To use advanced lead routing features in HubSpot, you'll need the Sales Hub Professional plan. This plan provides tools to set up detailed assignment rules and automate lead workflows, helping streamline your sales process.
How do I stop leads from being misrouted due to bad data?
To avoid lead misrouting due to inaccurate data, make it a habit to audit and clean your CRM regularly. This involves tackling outdated, incomplete, or inconsistent records to prevent routing mistakes. By keeping your CRM data accurate and up-to-date, you ensure that lead routing rules - whether based on factors like location or lead score - work smoothly and deliver leads to the right place every time. Consistent maintenance is key to keeping the process efficient and error-free.
How can I track where each lead was routed?
Tracking lead routing in HubSpot is straightforward with its built-in reporting tools. These tools allow you to monitor how leads are distributed and measure response metrics effectively. You can also create custom properties or fields to log routing details, making it easier to trace each lead's journey. Plus, HubSpot’s workflows and automation features provide tracking mechanisms that record routing actions, offering clear insights into how leads are assigned within your team.
Related Blog Posts
Get new content delivered straight to your inbox

The Response
Updates on the Reform platform, insights on optimizing conversion rates, and tips to craft forms that convert.


Drive real results with form optimizations
Tested across hundreds of experiments, our strategies deliver a 215% lift in qualified leads for B2B and SaaS companies.
