
.webp)
Triggering Klaviyo Flows with Forms


Effortlessly connect your forms to Klaviyo email flows to send personalized messages at the right time. Here's how it works:
- Forms trigger flows: When someone submits a form, Klaviyo can send automated follow-ups like welcome emails or discounts.
- Integration setup: Use Reform to create forms and link them to Klaviyo via API keys. Map fields like email and name for seamless data transfer.
- Custom targeting: Add hidden fields (e.g.,
$source) to identify form types and enable specific flows. - Testing and optimization: Submit test entries to confirm the setup. Use analytics to refine form performance and email campaigns.

How to Connect Reform Forms to Klaviyo Flows: Complete Integration Workflow
The 6 Basic Klaviyo Automations
sbb-itb-5f36581
Setting Up Prerequisites for Klaviyo and Reform Integration
To connect Reform and Klaviyo seamlessly, you'll need to configure a few key settings. Let’s walk through the steps to set up your Reform account and integrate it with Klaviyo for smooth automation.
Creating and Configuring a Reform Account
First, head to Reform's website and sign up for an account. Their Basic Plan starts at $15/month (or $150/year) and includes unlimited form responses, conditional logic, and essential integrations like Klaviyo. Once logged in, go to the Integrations menu, where you can connect external tools like Klaviyo. Reform’s no-code interface makes it simple to create and customize forms without needing a developer - everything is handled visually.
Once your Reform account is ready, you’ll need to configure Klaviyo to receive form data.
Enabling Klaviyo Flows
Klaviyo comes equipped with flows by default, but you'll need to set it up to accept data from Reform. Start by navigating to Settings > API Keys in your Klaviyo account. Copy your Public API Key, which you'll use to link Reform to Klaviyo. Next, create or select a List in Klaviyo where your form submissions will be directed. This list acts as the trigger for your flows.
As David To from Klaviyo explains:
Typically, to trigger a flow when a contact fills out a form, you'll want to create a Welcome Series flow, which is triggered by a list that the subscriber is being added to from the signup form.
By default, Klaviyo lists use a double opt-in process, but you can switch to single opt-in if preferred.
Activating Reform's Klaviyo Integration
In Reform, go to your form's Integrations section and select Klaviyo. Enter your Public API Key and choose the target Klaviyo List ID. Reform automatically maps standard fields like email, first name, and last name to Klaviyo. It also sets a hidden $source field, which you can use to filter flows in Klaviyo.
After saving the integration, submit a test entry through your form. As Brett_Gatsby explains:
Klaviyo events / triggers / filters are created after at least one such event has taken place.
This test ensures that the list is active and that the $source property appears in Klaviyo’s Flow Builder. From there, you’ll be ready to configure targeted automations in the next steps.
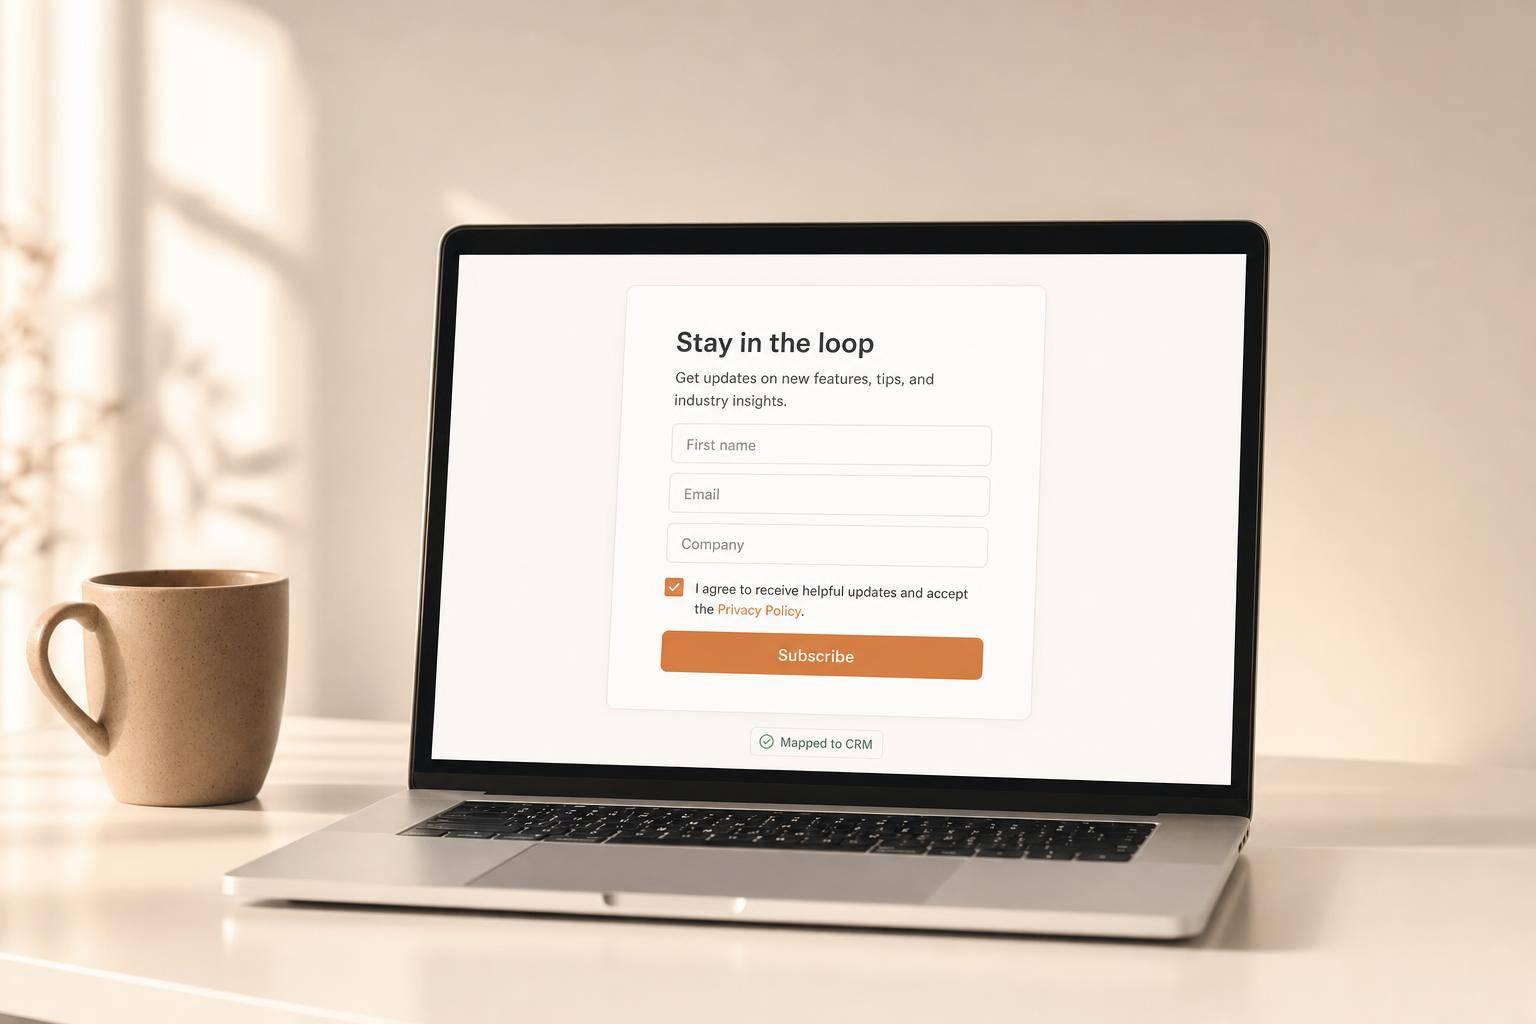
Building a Lead Capture Form in Reform
Start creating your lead capture form to collect targeted data for Klaviyo. Reform’s no-code interface makes it quick and easy to add fields and tailor the form to your needs.
Customizing Form Fields for Targeted Campaigns
Once the integration is set up, focus on tailoring your form to gather the right data. Begin with the basics: email, first name, and last name. It's important to note that Klaviyo requires separate input fields for first and last names. As Maxbuzz from Klaviyo's Partner team explains:
Regarding the name fields, you will need to have separate inputs for first and last name due to a limitation in the Platform.
Beyond contact basics, consider adding custom fields such as "Company Size" or "Industry" to enable better segmentation in Klaviyo. These fields can be mapped as Klaviyo profile properties. Don’t forget to include a hidden field for the $source property. This field identifies which form a user submitted, making it easier to filter flows. Dov, a Klaviyo Alum, highlights:
You will actually create a flow filter that specifies the $source value of that particular signup-form. This essentially 'segments the list' because each signup form has a unique $source value associated with it.
If you're using Reform's Pro Plan ($35/month or $350/year), you can enable data enrichment powered by ExactBuyer. This feature can auto-fill fields like company name or job title based on the user’s email, reducing the number of questions you need to ask. You can also enable the "Shorten Forms" option to hide enriched fields; if enrichment fails, these fields remain visible for manual input.
Configuring Form Settings for Klaviyo Integration
In the Integrations section of your form, ensure Klaviyo is connected and that the "List to Submit" matches the list you’ve set as the trigger for your flow in Klaviyo. This alignment is crucial - if the list IDs don’t match, your flow won’t activate. Use the Add Mapping button to link enriched data fields to specific Klaviyo properties, ensuring custom fields like "Lead Inquiry" or "Message" sync correctly .
Once mappings are confirmed, shift your attention to optimizing the design and usability of your form.
Best Practices for High-Converting Forms
To maximize form completion rates, keep your forms simple. Break complex questions into smaller parts using multi-step forms to reduce cognitive load. Personalize the "Thank You" message (Outcome) to deliver immediate value, like a download link or next steps. Always preview your form before publishing to verify basic validations, such as email format checks.
| Feature | Function | Benefit |
|---|---|---|
| Multi-step Forms | Divides forms into smaller sections | Reduces user fatigue and boosts completion rates |
| Form Shortening | Hides fields when enrichment data is found | Makes forms shorter and easier to complete |
| Hidden Fields | Collects data invisibly | Useful for CRM syncing, routing, and segmentation |
| Custom Branding | Allows logo and color customization | Ensures forms align with your brand identity |
With a well-designed form that captures accurate data, you’re ready to move on to triggering and configuring Klaviyo flows using the submitted information.
Triggering and Configuring Klaviyo Flows with Reform Form Data
Once your form is live, the next step is setting up a Klaviyo flow to work with it. Unlike Klaviyo’s native forms, which often rely on list-based triggers, Reform form submissions typically trigger flows through specific metrics or events. This allows contacts to enter the flow every time they submit the form, not just once.
Using your Reform and Klaviyo integration, you can configure a flow to trigger with each form submission.
Creating a New Flow in Klaviyo
Start by submitting a test entry to activate the "Submitted Form" metric in Klaviyo's dropdown menu. As Brett_Gatsby, a Klaviyo Champion & Partner, explains:
Klaviyo creates events and filters only after a successful test submission.
After completing the test submission, log in to Klaviyo and go to Flows > Create Flow > Create From Scratch. For the trigger, select Metric and choose "Submitted Form" (or "Filled Out Form," depending on how your integration labels it). If you’re managing multiple Reform forms, add a flow filter where $source matches your specific form’s name. As Dov, a former Klaviyo team member, shares:
Each signup form has a unique $source value associated with it to distinguish it from all other Klaviyo forms.
Also, ensure that your form’s "List to Submit" aligns with the flow’s target list as previously set up. If your Klaviyo list uses double opt-in, keep in mind that the flow won’t trigger until the respondent confirms their subscription via the confirmation email.
Mapping Form Data to Klaviyo Profile Properties
Reform automatically syncs standard fields like Email, First Name, and Last Name with Klaviyo’s profile properties. For custom fields - like "Industry" or company size - you’ll need to manually map them using the Add Mapping button. This ensures custom data is correctly linked to Klaviyo profiles, enabling personalized emails and targeted segmentation.
Reform also sets a hidden $source property (based on your form’s name or ID) to help filter flows. Keep in mind, this property updates with each new submission. As alex.hong, a Klaviyo Alum, explains:
The $source property will be overwritten if a new sign-up form is used after initially subscribing.
If you want to track a subscriber’s full form journey, consider creating custom profile properties for each submission. For more advanced needs - like saving event-specific data (e.g., "booking city") to a permanent profile field - you can use a Webhook action within your Klaviyo flow to interact with the Klaviyo Profiles API.
| Reform Form Field | Klaviyo Profile Property | Mapping Type |
|---|---|---|
| Email Address | $email |
Standard (Required) |
| First Name | $first_name |
Standard |
| Last Name | $last_name |
Standard |
| Form Name/ID | $source |
System/Hidden |
| Consent Checkbox | Subscribed / Unsubscribed |
Consent Status |
| Custom Questions | Custom Property | Manual Mapping |
Once you’ve mapped the fields, test the integration by searching for your test email in Klaviyo. You should see a "Filled Out Form" or "Submitted Form" event in the profile’s activity feed. After confirming the field mapping, your Klaviyo flow will be ready to send tailored emails based on the form data.
Testing and Optimizing the Integration
Testing Form Submissions and Flow Activation
To ensure everything is working properly, submit a test entry using a new and unique email address while browsing in incognito mode. This avoids conflicts caused by Klaviyo's browser cookies, which can last up to a year and may interfere with testing. As noted by the Klaviyo Help Center:
When testing a sign-up form, use a unique email address (i.e., one that you haven't used for this form before) for best results.
After submitting, check your connected list's Activity Feed in Klaviyo to confirm the profile has been added. Keep in mind that flows won't activate until subscribers complete the double opt-in process.
If you don’t see your form's name listed under the $source property in the flow builder dropdown, it’s likely because Klaviyo doesn’t create events or filters until at least one successful submission has occurred. If the test submission doesn’t activate the flow, you may need to troubleshoot using the steps below.
Troubleshooting Common Integration Issues
One frequent issue is a mismatch between the "List to Submit" in your Reform form and the intended Klaviyo list. Double-check this alignment to ensure proper integration. Also, revisit your API configurations and integration settings as outlined earlier. Remember to set all messages in your flow to "Live" status - draft messages won’t send, and manual messages require approval before they’re dispatched.
Keep in mind that data sync delays can also affect flow triggers. Data from third-party integrations usually syncs every 30 to 60 minutes. However, if there’s a delay of six hours or more between the form submission timestamp and when Klaviyo records it, the flow won’t trigger. Transactional flows are an exception, allowing up to seven days. According to the Klaviyo Help Center:
If there is a delay of 6 hours or more between the event's timestamp and Klaviyo's recorded timestamp, the event will not trigger a metric-triggered flow.
If your website uses security tools like Cloudflare or Sucuri, make sure to whitelist Klaviyo's user agent (Klaviyo/1.0) to avoid blocked communications. For profiles that should have entered a flow but didn’t, check the Recipient Activity > Skipped section in Klaviyo to see if they failed to meet your flow filters.
Once you've addressed any technical issues, focus on performance tracking through analytics.
Using Analytics to Refine Campaigns
Reform’s real-time submission analytics, combined with Klaviyo’s Forms Performance dashboard, can help you monitor key metrics like submit rates, revenue, and engagement. For popup and flyout forms, aim for a submit rate of at least 3%. If your forms aren’t hitting this benchmark, test one variable at a time - such as design, copy, offers, or display timing - and wait for enough data before making changes.
For multi-step forms, review the completion funnel to identify where users drop off. Beyond submit rates, tracking metrics like conversion rates and revenue from your welcome series can reveal the quality of leads captured.
| Metric | What It Measures | Why It Matters |
|---|---|---|
| Submit Rate | Total submissions ÷ total views | Shows how effectively the form converts visitors |
| Engagement Rate | Percentage of visitors interacting with a field | Indicates whether the form content sparks interest |
| Total Revenue | Revenue attributed to subscribers | Highlights the financial impact of lead capture |
| Average Order Value | Average purchase amount from subscribers | Assesses lead quality and purchase intent |
| Step Funnel | Engagement breakdown per step in multi-step form | Identifies where users abandon the process |
Conclusion and Next Steps
Key Takeaways
Integrating Reform forms with Klaviyo flows simplifies how you collect data and manage email campaigns. The process revolves around connecting each form to a specific Klaviyo list, which acts as the main trigger for your flows. By mapping form fields to Klaviyo profile properties (like email, first_name, and custom attributes), you can deliver tailored messages to your audience. Additionally, using the $source property as a flow filter allows you to distinguish between different forms feeding into the same list, ensuring subscribers receive relevant content.
It's worth noting that Klaviyo events only show up after a successful test submission. To confirm the integration works, use incognito mode and a unique email address for testing.
For easier management and improved email deliverability, it's recommended to funnel multiple forms into a single main newsletter list instead of creating separate lists for each form. As alex.hong, a Klaviyo alum, puts it:
Streamlining your contacts into a single main list is a best practice to analyze your owned marketing strategy and optimize deliverability.
With these steps in mind, you’re ready to take the integration live.
Getting Started with Reform and Klaviyo
To kick off your campaign, Reform’s no-code builder lets you create effective, high-converting forms that seamlessly integrate with Klaviyo. Features like multi-step forms, conditional routing, and real-time analytics complement Klaviyo’s automation tools to help you capture quality leads and nurture them through personalized email sequences.
Begin by designing a Reform form and linking it to your desired Klaviyo list. Set up a simple welcome flow triggered by the "Joined a List" metric, then test the integration by submitting a live form entry. Monitor performance using Reform’s submission analytics. Once comfortable, explore more advanced setups - such as mapping custom profile properties to track preferences or creating flows triggered by specific metrics for ongoing engagement. This streamlined approach takes you from lead capture to personalized email automation, completing the process outlined above.
FAQs
Should my flow trigger by list or metric?
Klaviyo flows are activated by metrics (specific customer actions, such as placing an order) or lists/segments (when someone joins a particular group). If your flow is tied to a customer’s action, go with a metric trigger. On the other hand, if it’s about targeting a group of people, choose a list or segment trigger. The key is understanding that these triggers rely on customer actions or data, not measurement units like 'list' or 'metric.'
Why isn’t my form submission triggering the flow?
If your form submission isn't triggering a flow, it could be due to a few common setup issues. Here's what to double-check:
- Link to a Klaviyo List or Segment: Ensure your form is connected to a specific list or segment that initiates the flow.
- Flow Status: Confirm that the flow is set to "Live" and not in Draft or Manual mode.
- Filters for New Contacts: Make sure the flow includes filters that account for new subscribers or contacts.
- Proper Integration: Verify the form is correctly integrated with Klaviyo to avoid connection problems.
- Warnings or Blocking Filters: Look for any warnings or filters in the flow that could be preventing activation.
- Test the Form: Submit the form using a unique email address to see if it triggers the flow as expected.
These steps should help identify and resolve any issues preventing your form from working as intended.
How do I stop $source from being overwritten?
To avoid overwriting the $source property in Klaviyo, adjust the form's hidden property to use a different value instead of $source. This helps preserve the original source data without any changes.
You can also apply flow filters to exclude contacts under certain conditions, like "has received email zero times." This ensures contacts don’t unintentionally re-enter flows when the $source property changes.
Related Blog Posts
Get new content delivered straight to your inbox

The Response
Updates on the Reform platform, insights on optimizing conversion rates, and tips to craft forms that convert.


Drive real results with form optimizations
Tested across hundreds of experiments, our strategies deliver a 215% lift in qualified leads for B2B and SaaS companies.
