
.webp)
Embedding Klaviyo Signup Forms in WooCommerce


Embedding Klaviyo signup forms into your WooCommerce store can help you collect customer data, grow your email list, and increase sales. Here's the process in a nutshell:
- Why it matters: These forms sync in real-time with Klaviyo, enabling automated emails like welcome messages or cart reminders. You can also gather extra data (like birthdays or preferences) to personalize campaigns.
- How to integrate: Install the Klaviyo plugin via WooCommerce or WordPress, connect your accounts, and verify that data syncs properly.
- Where to place forms: Add forms to product pages, the footer, or the checkout flow using Klaviyo's form builder and embed code.
- Testing: Ensure forms display correctly and submissions sync with Klaviyo. Troubleshoot any issues like caching conflicts or styling problems.
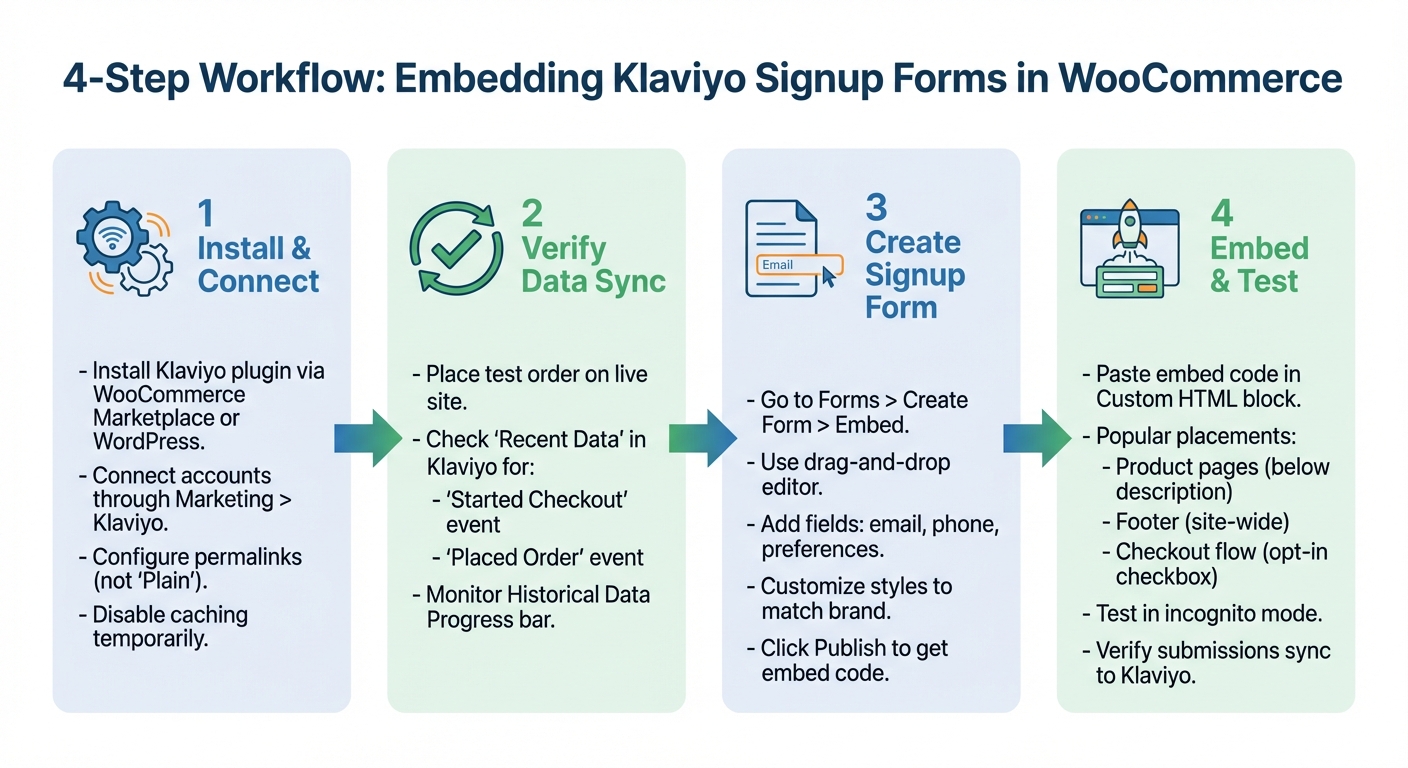
How to Embed Klaviyo Signup Forms in WooCommerce: 4-Step Integration Process
Integrate Klaviyo with WooCommerce: Step-by-Step Guide

sbb-itb-5f36581
Setting Up Klaviyo and WooCommerce Integration
Before embedding signup forms, you’ll need to connect Klaviyo to your WooCommerce store. The process is straightforward and requires just a few steps. Start by installing the Klaviyo plugin to establish the connection.
Installing the Klaviyo WooCommerce Plugin
You can install the Klaviyo plugin using two methods. The WooCommerce Marketplace method is often the easiest. Log in to your WooCommerce account, head to Extensions, and search for "Klaviyo for WooCommerce." Click Add to cart, complete the free checkout, and then select Add to Site on the confirmation page. Enter your store URL or choose your site from the dropdown menu. After that, go to Plugins in your WordPress admin area, locate Klaviyo, and click Activate.
Alternatively, you can install it directly through WordPress. In your WordPress dashboard, navigate to Plugins > Add New, search for "Klaviyo", and click Install Now, then Activate. Be sure to adjust your WordPress Permalinks under Settings > Permalinks to any structure other than "Plain" - this is necessary for WooCommerce authentication. Also, temporarily disable caching or redirect plugins to avoid any issues during the initial connection.
Connecting Your Klaviyo and WooCommerce Accounts
Once the plugin is activated, go to Marketing > Klaviyo in your WooCommerce admin sidebar and click Connect Account. This will launch an authorization process where you’ll log in to Klaviyo and approve the connection. During setup, you can customize options such as email and SMS consent checkboxes, subscriber list preferences, and currency settings. Once configured, click Complete setup.
The integration will automatically install klaviyo.js (a JavaScript file) on your site, which tracks customer behavior and powers your signup forms. Using a no-code form creator can further simplify this process. The plugin also works seamlessly with High Performance Order Storage (HPOS), ensuring compatibility. To stay up to date with the latest features and security updates, consider enabling auto-updates for the Klaviyo plugin in the WordPress Plugins tab.
Verifying Data Sync
After connecting your accounts, it’s important to verify that data is syncing properly. Visit your live website, add an item to your cart, and proceed to the checkout page. Enter your email address and place a test order. Then, check the Recent Data section in Klaviyo - you should see a "Started Checkout" event and a "Placed Order" event logged. If these events appear, your integration is working as expected.
You can also track progress using the Historical Data Progress bar in your integration settings. This shows the status of past customer and order data being synced to Klaviyo. If you encounter issues, such as missing events, check that your firewall or Cloudflare settings aren’t blocking Klaviyo’s API requests. Also, ensure your store has a valid SSL certificate.
Creating Signup Forms in Klaviyo
Once your account is connected and data sync is verified, the next step is to create tailored signup forms. These forms should align with your brand and help you collect the right data. Klaviyo's form builder makes it easy to design forms that complement your WooCommerce store.
Building an Embeddable Form
To get started, log in to Klaviyo and head to the Forms section. Click Create Form and choose Embed as the form type. This option is ideal for placing forms on product pages or in your site's footer.
Using the drag-and-drop editor, you can add various blocks like text, images, buttons, and input fields. Include fields for email addresses, phone numbers, and even more specific options like radio buttons, multi-checkboxes, or dropdown menus. For instance, a multi-checkbox could ask about product preferences - options like "Coffee", "Tea", or "Equipment" can help you better segment your audience and personalize future campaigns.
To fine-tune the look of your form, use the Styles tab. This allows you to adjust background colors, fonts, borders, and input field designs to match your WooCommerce store's theme. You can also add your logo using an Image block or set a background image. For faster loading, keep images between 50–100 KB.
"Small, human touches like this brand's copy and images can be the difference between whether your customer smiles at or ignores your popup".
Consider using multi-step forms to gather more information efficiently. For example, you can first capture an email address and then ask for additional details like SMS consent or a birthday. This method helps collect multiple data points without overwhelming users.
Once your form is ready, you'll need to embed it into your WooCommerce site.
Getting the Embed Code
When your form design is complete, click Publish to generate an HTML embed code. This code will appear as a <div> snippet that you can copy by clicking the Copy Code button.
To add the form to your WooCommerce site, paste the embed code into a Custom HTML widget in your WordPress theme customizer or directly into product page templates. The embed code includes the necessary JavaScript (klaviyo.js) to ensure the form displays properly and syncs submissions with Klaviyo. Double-check that the code contains your unique form ID and verify that ad blockers aren't interfering with klaviyo.js functionality.
Embedding Forms in WooCommerce
You can easily embed your Klaviyo signup form on your WooCommerce site. Two prime spots to consider are product pages and checkout flows, each playing a distinct role in the customer journey.
Adding Forms to Product Pages
Product pages are a great place to capture leads while they're actively browsing. To embed a form on a product page, open the page in the block editor. Add a Custom HTML block where you want the form to appear - popular spots include below the product description or near the "Add to Cart" button. Then, paste your Klaviyo embed code into the block and update the page.
"If you're using the block editor you can just drag in a 'Custom HTML' block where you'd like the form, and paste the form's embed code." - Brian Turcotte, Klaviyo Alum
For broader placement, consider using WordPress Widgets. Go to Customize your site > Widgets in your WooCommerce dashboard. Choose a widget area, like a sidebar or footer, and add a Custom HTML widget with the embed code. This approach works well for forms that should show across multiple product pages.
"Collecting subscribers with a footer form is a Klaviyo best practice for list growth." - Klaviyo Help Center
If you're running targeted campaigns, Klaviyo's targeting settings allow you to limit forms to specific URLs. Note that, starting December 6, 2024, Klaviyo will only log a "view" when the form actually enters the visitor’s viewport. This change could lead to higher reported submission rates for forms placed lower on the page.
While product pages are great for capturing interest, the checkout process is another key opportunity for effective data collection.
Adding Forms to Checkout Flows
The checkout page is your last chance to gather customer data before they complete their purchase. The easiest way to do this is by using the Klaviyo WooCommerce plugin's built-in setting. Head to the Klaviyo plugin settings in WooCommerce and enable the option: "Enable customers to opt-in to email marketing via WooCommerce during checkout". This adds a simple checkbox that allows customers to opt in without disrupting their purchase.
For custom embed forms at checkout, ensure that Klaviyo.js is active. Be aware that some third-party checkout plugins may block its automatic inclusion.
"Naturally, the Klaviyo extension for WooCommerce handles adding .js script to the checkout page, which would allow forms to publish on the page. However, there can be issues if you are using a 3rd party plugin app for checkouts which may be preventing the script from being added automatically." - Taylor Tarpley, Community Manager, Klaviyo
If the native integration doesn't work, use the Install Code Snippet button in the Klaviyo form builder to manually add the code to your checkout template. For checkout forms, focus on capturing only essential details like an email address or an optional phone number to keep the process smooth and friction-free, or using multi-step form design to reduce perceived effort.
Testing and Troubleshooting
It's crucial to test your embedded forms right away. To bypass Klaviyo's one-year cookie limit, use incognito mode during testing. Also, make sure to use a unique email address for every test submission so the system recognizes you as a new subscriber.
Testing Form Display and Data Sync
Start by confirming that your form is marked as Live (look for the green arrow indicator). Then, in incognito mode, visit the product pages or checkout flow where you’ve placed the form to ensure it appears as expected. Double-check that the Targeting & Behavior settings match the URLs you intended. After submitting the form, verify that the subscriber appears in your Klaviyo list. If the list requires double opt-in, remember that the subscriber will only show up after confirming their email. Lastly, in the Klaviyo form editor, confirm that the submit button's action is set to Submit Form and that it’s linked to the correct target list.
Fixing Common Problems
If your tests uncover issues, here’s how to address them:
- Form Not Appearing: Check for unnecessary spaces in the Public API key.
- WP Rocket Conflicts: If you're using WP Rocket, exclude "static.klaviyo.com" and "/wp-content/plugins/klaviyo/(.*).js" from JavaScript concatenation. Alternatively, disable the "Combine JavaScript Files" option.
"One feature of WP Rocket is File Concatenation... which unfortunately breaks Klaviyo's onsite JavaScript and, as a result, signup forms and onsite tracking will not work." - Jessie Sigler, Technical Writer, Klaviyo
- WordPress Permalinks: Avoid using the "Plain" structure; switch to any other permalink format.
- Cloudflare Issues: If you're using Cloudflare, either disable "Bot Fight Mode" or allowlist Klaviyo integration traffic to prevent blocked requests.
- Style Discrepancies: If the form looks different on your site compared to the editor, inspect your site's CSS for any
!importanttags that might be overriding Klaviyo's styles.
These steps should help you identify and resolve most common issues with your embedded forms. If you need help scaling your strategy, consider expert form strategies to optimize lead generation.
Conclusion
Adding Klaviyo forms to your WooCommerce store creates valuable opportunities to gather customer data. Well-placed forms throughout your site can help grow your email list consistently and support more targeted marketing efforts.
The information collected - like email addresses, SMS opt-ins, birthdays, or product preferences - fuels everything from automated welcome emails to highly personalized campaigns. Interestingly, studies show that asking for up to five additional data fields doesn’t harm conversion rates, allowing you to collect meaningful zero-party data without impacting performance.
One standout feature of this integration is the real-time synchronization between WooCommerce and Klaviyo. This ensures that events, like abandoned carts or purchases, trigger immediately, allowing you to send timely follow-ups. Embedding forms on pages like order confirmations lets you engage customers when their interest is highest, gathering insights to create tailored campaigns.
To achieve the best results, test and refine your approach. Experiment with form placement, tweak your messaging, or try different incentives. For example, Edinburgh Skincare’s A/B test revealed that a giveaway popup performed as well as a discount offer, helping them maintain profit margins. These small adjustments can lead to noticeable improvements in both engagement and conversion rates over time.
FAQs
Why isn’t my Klaviyo form showing up on WooCommerce pages?
If your Klaviyo form isn’t showing up, it could be due to integration or embedding problems. First, double-check that the form has been created, published, and that its embed code is correctly added to your site’s files. Also, ensure your WooCommerce integration is fully set up and that sign-up forms are enabled.
Another common issue involves conflicts with certain plugins, especially caching tools. These plugins can sometimes block the form from appearing. To troubleshoot, try temporarily disabling these plugins and confirm that the embed code is placed correctly.
How do I confirm form submissions and events are syncing to Klaviyo?
To make sure form submissions and events are syncing with Klaviyo, first confirm that your sign-up forms are active and your WooCommerce integration is properly configured. You can test this by checking if new subscribers or events show up in your Klaviyo dashboard. If something isn't working, double-check that the embed code is correctly placed in your site's HTML and ensure the integration is fully enabled.
How can I add an email opt-in at checkout without slowing conversions?
To include an email opt-in at checkout without impacting conversions, try using Klaviyo's WooCommerce integration. This tool allows you to add a customizable checkbox directly in the checkout process, enabling customers to subscribe to marketing emails effortlessly.
Position the checkbox thoughtfully - somewhere visible but unobtrusive - so it doesn’t disrupt the flow. This method not only helps grow your email list but also ensures a smooth checkout experience while staying compliant with GDPR and similar regulations.
Related Blog Posts
Get new content delivered straight to your inbox

The Response
Updates on the Reform platform, insights on optimizing conversion rates, and tips to craft forms that convert.


Drive real results with form optimizations
Tested across hundreds of experiments, our strategies deliver a 215% lift in qualified leads for B2B and SaaS companies.
