
.webp)
8 HubSpot API checks for secure form lead sync



One bad sync setup can block leads, create duplicate contacts, or lose consent data. If I were launching a form-to-HubSpot sync today, I’d check 8 things before going live: scopes, endpoint setup, rate limits, retries, logging, spam filtering, email validation, and consent handling.
Here’s the short version:
- I’d keep API access limited to only the scopes the sync uses.
- I’d test the exact HubSpot form endpoint, portal ID, form GUID, and field mappings.
- I’d compare peak traffic to HubSpot limits, since HTTP 429 errors can block submissions during spikes.
- I’d retry only temporary failures like timeouts,
429, and5xxerrors. - I’d log each attempt without storing raw personal data.
- I’d block bots and junk before they hit the API.
- I’d validate emails before contact creation, since 20% to 30% of unverified lists can contain invalid addresses.
- I’d map and protect consent fields so opt-in records don’t get lost or overwritten later.
The main idea is simple: don’t treat a successful API response as proof that your lead process is safe. I’d review the full path from form submit to contact record, then use these checks as a pass/fail list before launch.
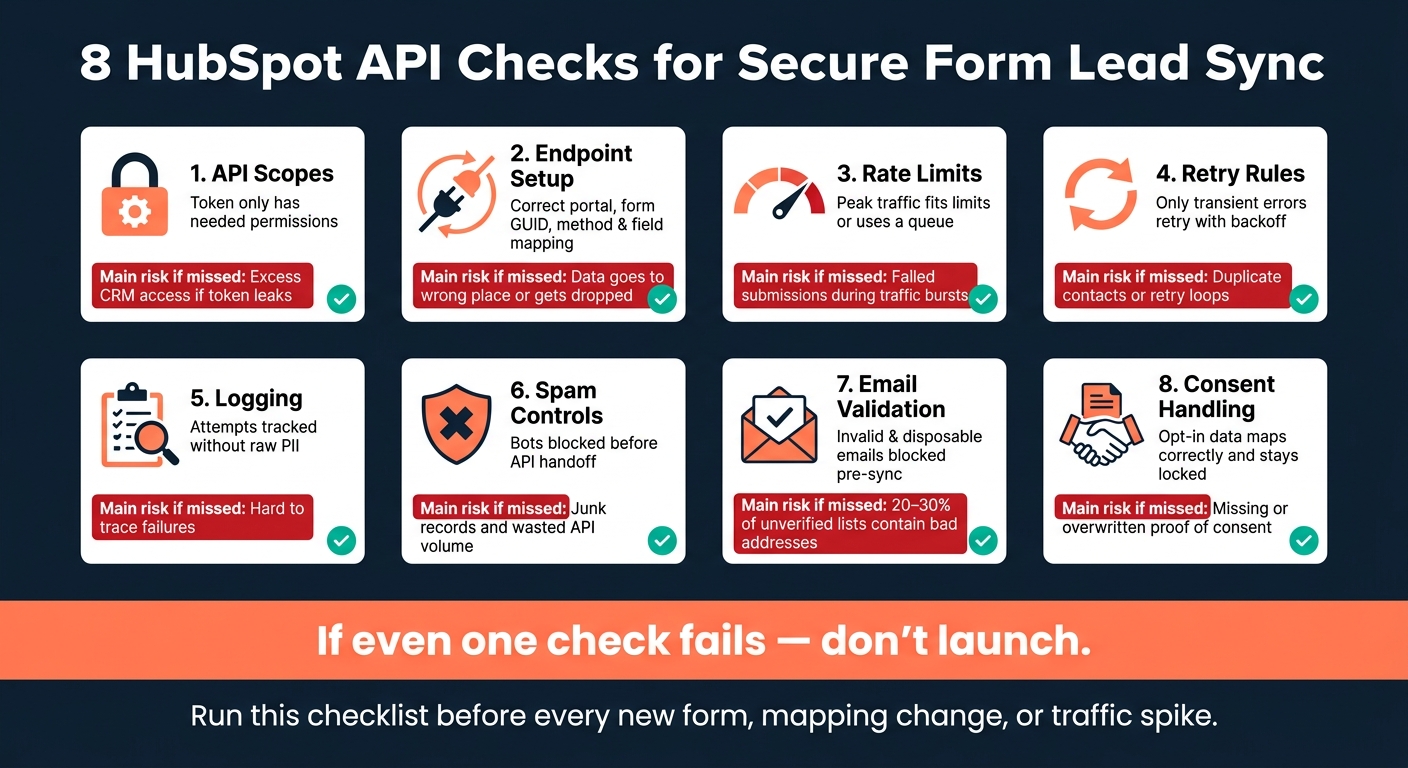
8 HubSpot API Security Checks Before Form Lead Sync Goes Live
How to Build a Flow Framework with HubSpot Forms API | HubSpot.Extend() 2022
sbb-itb-5f36581
Quick comparison
| Check | What I’d confirm | Main risk if missed |
|---|---|---|
| API scopes | Token only has needed permissions | Too much CRM access if token leaks |
| Endpoint setup | Correct portal, form, method, and mapping | Data goes to wrong place or gets dropped |
| Rate limits | Peak traffic fits limits or uses a queue | Failed submissions during bursts |
| Retry rules | Only temporary errors retry | Duplicate contacts or retry loops |
| Logging | Attempts tracked without raw PII | Hard to trace failures |
| Spam controls | Bots stopped before API handoff | Junk records and wasted API volume |
| Email validation | Bad emails blocked before sync | Bad records and bounce issues |
| Consent handling | Opt-in data maps and stays locked | Missing proof of consent |
If I couldn’t mark all eight as pass, I wouldn’t launch yet.
1. Review HubSpot API scopes before sending form data
Start by checking that the token has only the scopes your sync needs. Every extra scope adds risk if the token is leaked or misused. A stolen token could expose contact data or let someone change subscription status.
HubSpot recommends least-privilege access: add only the scopes the integration uses.
Review token type and least-privilege access
First, confirm whether the sync uses an OAuth app or a private app token. For an internal form sync, a private app token acts like a long-lived bearer token, so secret handling matters a lot. Store it in an environment variable or a secrets manager. Never put it in client-side code or a public repo. If you think it may have been exposed, rotate it.
Once you know the token type, match each API call to the exact permission it needs. Open the app settings in HubSpot and review every enabled scope. Then remove anything the sync doesn't use. If a scope isn't part of the form-capture flow, leave it off unless there's a written reason to keep it.
Match scopes to the exact lead sync actions
Map each HubSpot API endpoint your integration calls to the scope that covers it. For example, crm.objects.contacts.write lets you create or update contact records. crm.objects.contacts.read is only needed if the sync checks for an existing contact before an upsert. If you use HubSpot's forms or submissions endpoint, use the forms scope. If the sync also handles consent or subscription settings, add the matching communication preferences scope.
Put each endpoint, required scope, and business reason into one matrix. It keeps audits simpler and helps stop permission creep when someone updates the integration later.
| Sync Action | Required Scope |
|---|---|
| Create a new contact | crm.objects.contacts.write |
| Update an existing contact | crm.objects.contacts.write |
| Check for duplicate before upsert | crm.objects.contacts.read |
| Submit via HubSpot forms or submissions endpoint | forms |
| Read/write subscription preferences | communication_preferences.read / communication_preferences.write |
If an item isn't in your endpoint-scope matrix, turn it off. Test with the minimum scopes first. Then, if a call fails, add only the scope tied to that failure. That's a clean way to spot hidden dependencies before they hit production.
With scopes locked down, confirm the authenticated endpoint and request structure next.
2. Confirm the authenticated submission endpoint and request structure
Use HubSpot's authenticated submission endpoint for secure form lead sync. Send your private app token in the Authorization: Bearer <token> header over HTTPS. The endpoint accepts JSON payloads and consent fields. Before you send live submissions, double-check the endpoint path and payload format.
Confirm form IDs, field mapping, and request method
Two IDs need to be in the endpoint path: your portal ID and your form GUID. If either one is wrong, the submission can end up in the wrong account or the wrong form. Check both in the HubSpot Form details page before you wire anything up.
Field mapping is where quiet problems tend to show up. Match incoming field names to HubSpot property internal names like firstname, lastname, email, and company. If someone changes a label or field name on the front end, the data might land in submission logs but never make it onto the contact record. That's why it's smart to review the expected field definitions in HubSpot before launch.
There's one more limit to watch for. For non-HubSpot forms, fields only auto-map to single-line text properties. If you need to fill other property types, like boolean, enumeration, or date fields, handle that mapping in your integration logic instead of leaning on auto-map behavior.
Test external form setup before going live
Before live traffic starts, run a test submission from the same production environment that will handle actual leads, not just localhost or a staging copy. Use a test email address that's easy to spot and delete later.
Then check these four items in HubSpot:
- The contact was created under the correct portal
- The submission shows up in the right form history
- Mapped properties are filled in correctly
- The timestamp looks right
If any of those checks fail, fix the endpoint path, form GUID, or field names before launch.
Once delivery works, check whether your expected traffic fits HubSpot's rate limits.
3. Check rate limits and payload volume
Once you've confirmed the endpoint and mapping, the next step is simple: make sure it can handle your busiest moments.
HubSpot applies API rate limits, and if you go over them, you'll get HTTP 429 responses. In practice, most sync issues don't come from normal daily volume. They come from short traffic bursts. That's why you need to plan for launch spikes before going live.
Measure normal and peak submission traffic
Check both your baseline traffic and your peak submission rate ahead of launch. Write down the rate cap tied to your account and endpoint so there's no guessing later.
If you're using the unauthenticated forms submission endpoint, repeated 429s can trigger a temporary one-minute block. That's a small window, but during a busy campaign, it can create a mess fast. If your peak traffic may go past the cap, put a queue in place before launch.
Also, track peak volume at the page level, not just total submissions per day. One high-traffic landing page can cause trouble even when daily totals look fine.
Decide whether to send submissions one by one or queue them
Direct submission works best when traffic is low and steady. A queue makes more sense for campaigns, webinars, or paid traffic spikes.
If you choose a queue, spell out the operating rules in advance:
- Batch size
- Send interval
- Retry order
- Backlog handling
- Priority rules, such as whether a high-intent demo request should move ahead of a newsletter signup
Set up alerts on 429 count, queue depth, and retry volume before your next launch, not after. That's one of those things that's easy to skip when everything looks calm.
| Approach | Best for | Main risk |
|---|---|---|
| Direct | Low, predictable traffic | Sync failures during bursts |
| Queued | Campaigns, webinars, paid spikes | Slight delay in lead availability |
Next, define retry rules for temporary failures.
4. Set retry rules for timeouts and temporary failures
When a submission fails, don't retry everything. Retry only the errors that may clear on their own.
That usually means timeouts, dropped connections, 408, 429, and temporary 5xx errors. But if the issue is a malformed email, a missing required field, an invalid property value, or a schema mismatch, fail right away. Sending the same bad request again just adds noise. Worse, it can quietly create duplicate contacts in your CRM.
Use exponential backoff and respect Retry-After headers
After the first failure, wait a short time before trying again, usually around 1 to 2 seconds. Then double the delay with each new attempt.
A simple pattern looks like this:
- 2 seconds
- 4 seconds
- 8 seconds
- 16 seconds
It also helps to add a small random delay. That way, if many submissions fail at once, they won't all retry at the exact same moment and hit the API again like a traffic jam at a single on-ramp.
If HubSpot returns a 429, check for a Retry-After header. If it's there, use that value as the minimum wait time before the next attempt. For that request, it should take priority over your default backoff timing.
Keep the retry limit tight, usually 3 to 5 attempts. After that, mark the submission as failed and send it to review.
Separate transient errors from permanent validation failures
First classify the error. Then decide whether it should retry.
When HubSpot returns an error, inspect both the status code and the error body before you choose the next step.
| Error type | Examples | Action |
|---|---|---|
| Transient | Timeout, network drop, 408, 429, temporary 5xx | Retry with exponential backoff |
| Permanent | Malformed email, missing required field, invalid property value | Fail immediately, log for review |
| Unclear | Repeated 5xx beyond retry budget | Stop retrying, alert your team |
Permanent failures should go to a failed-submission queue or a manual review flow, not back into the retry queue.
HubSpot error responses can include validation details such as INVALID_EMAIL, PROPERTY_DOES_NOT_EXIST, or VALUE_OUT_OF_RANGE. Once you parse the response body, the right path is usually pretty clear.
5. Set up logging and post-submit verification
Once retries are working, check what actually made it into HubSpot. This part matters more than it seems.
A 200 response only tells you HubSpot received the request. It does not confirm the lead was created the right way. And even when the request goes through, some fields or related metadata can still be missing or sent to the wrong place.
Log each submission attempt without storing sensitive data
For each submission attempt, log the basics you need to trace problems:
- timestamp
- endpoint
- method
- status
- error code
- correlation ID
- retry count
- a short failure reason, like
"missing email"or"rate limit"
That gives you enough to investigate failed submissions without exposing PII.
Do not store raw PII or full payloads. If you need something you can trace later, use a hashed or tokenized value instead. Redact sensitive data before writing anything to logs. And keep verbose logging off by default.
Then use those logs to compare your app’s record against what shows up in HubSpot.
Verify contact creation, property mapping, and timestamps in HubSpot
After each test submission or live submission, confirm the contact exists in HubSpot, the mapped properties match, and the created and updated timestamps line up with your submission log. If records are missing or delayed in a way that looks odd, flag them right away.
Also check that source fields match the form source. If the form collects consent, verify those fields too, and make sure downstream automation doesn’t overwrite them.
Track every lead with a clear status, such as:
- delivered
- failed
- queued
- filtered
You should also track error rate against your launch baseline.
If submission quality is still weak, the next step is to check spam controls before the API call.
6. Add spam controls before traffic reaches the API
If your logs show suspicious submissions, stop that traffic at the form layer before it ever hits HubSpot. Spam and bot fills can dirty up HubSpot records, kick off workflows for fake contacts, and eat into API capacity.
Block bot and junk submissions at the form layer
Put your checks in front of the form handoff. Invisible CAPTCHA, honeypots, disposable-domain blocks, and IP/referrer rules can weed out a lot of junk before it moves downstream.
Here’s the basic idea:
- Reject triggered honeypots right away
- Block flagged domains and known malicious IPs
- Send borderline submissions to review
- Let clean submissions pass to HubSpot as usual
That setup keeps obvious junk out while giving you a place to inspect the gray-area cases.
Use form tooling that supports higher-quality submissions
Building your own filters works, but it adds upkeep. Reform comes with spam prevention built in, including honeypot detection, domain filters, and behavioral checks. It also supports conditional routing, so suspicious submissions can go somewhere else while only high-confidence leads move into HubSpot.
For teams sending forms straight into HubSpot, that upstream filtering means fewer bad submissions reach the API and less cleanup later.
Next, validate email addresses before they create bad HubSpot records.
7. Validate email addresses before submission
Once you block the obvious junk, the next step is to check the email before it ever hits HubSpot. That part matters more than it may seem.
A bad email doesn't just sit there harmlessly. It can create messy HubSpot records, fire the wrong automation, and throw off lifecycle reporting. That's why email validation should happen before contact creation, not after.
Catch formatting errors and disposable addresses early
Use front-end checks to catch simple typos. Things like missing @ symbols or broken formatting are easy to stop right away. But don't stop there.
You should still run server-side validation before the HubSpot API call. That check should look at:
- syntax
- domain validity
- disposable domains
- role-based inboxes like
info@orsupport@when those leads aren't useful
Reform can catch syntax errors and disposable addresses before submission.
Next, stop invalid addresses from turning into CRM records.
Prevent invalid emails from creating bad HubSpot records
If validation fails, skip the API call and log the submission for review. That one step can save a lot of cleanup later.
Keeping a bad email out of the main contact record helps you avoid:
- inflated HubSpot contact tiers
- broken automated sequences
- skewed lifecycle reporting
Log each failure with the timestamp, form source, and triggered rule.
8. Check consent fields and data privacy handling
The last security check is consent: what people agreed to, where that data goes, and who can change it. Consent needs to hold up after form submission, syncs, and any downstream automation.
Map consent text, lawful basis details, and subscription choices
Map every consent checkbox, notice version ID, lawful basis, and source field from each form or channel to its own HubSpot property. If you're using hidden notice-version fields, map them directly. Don't dump them into free-text notes.
Once the data lands in HubSpot, make sure it stays put.
Subscription choices should map to HubSpot's actual subscription types, not loose fields like Lead source or Form notes. If someone opts in to marketing email and SMS alerts, treat those as two separate, channel-level values. That way, each channel follows the person's stated choice. Email consent and SMS consent should stay separate because they follow different rules.
Protect consent data from being lost or overwritten
After mapping, lock these fields down. Consent properties should be write-protected. Only form submissions and preference-center updates should be allowed to write to them.
Why so strict? Because a lot can go wrong fast. Bulk imports, third-party enrichment tools, deduplication merges, and workflow edits can all overwrite opt-in status if access isn't tightly controlled.
If two records disagree during a merge, the merge rule should default to the opt-out state. Enrichment tools shouldn't be allowed to touch those properties.
| Risk | Source | Prevention |
|---|---|---|
| Opt-in overwritten to "unknown" | Bulk import without consent columns | Require consent fields in all import templates |
| Opt-out flipped to opted-in | Workflow triggered by lifecycle change | Restrict workflow write access to consent properties |
| Consent lost during merge | Deduplication keeping the wrong primary record | Default to opt-out state on merge |
| Enrichment tool overwrites preferences | Third-party provider writing to all fields | Allowlist which fields each integration can update |
Log the consent timestamp, source form, notice version, and selected channels with every submission.
Conclusion: Use all 8 checks to make lead sync reliable and secure
Once you’ve gone through the eight checks above, use this recap as your final go/no-go review. Think of it as a simple pass/fail gate before any form lead sync goes live.
Use this checklist as the last pre-launch gate before any lead sync goes live.
Key takeaways to review before launch
| Check | Pass criteria |
|---|---|
| Token scopes | Least-privilege token only. |
| Endpoint setup | Test submission lands in the right form with expected mappings. |
| Rate limits | Peak traffic fits HubSpot limits or queueing is in place. |
| Retry logic | Backoff works; permanent 4XXs do not retry. |
| Logging | Attempts logged without PII. |
| Spam controls | Bot traffic blocked before the API call. |
| Email validation | Invalid and disposable emails blocked before submission. |
| Consent mapping | Consent maps correctly and stays unchanged. |
If even one check fails, don’t launch until it’s fixed. Save test logs, HubSpot screenshots, and error samples for audit trails.
Run the checklist again before every new form, mapping change, consent update, or traffic spike.
FAQs
Which HubSpot API errors should I retry?
Retry temporary errors like HTTP 429 and HTTP 5xx. If you hit a 429, check the Retry-After header first. Then use exponential backoff with jitter so your retries don’t all fire at the same moment.
Skip retries for permanent failures such as HTTP 401, 403, or invalid tokens. Those usually mean you need to reauthorize or update credentials, not try again.
When you do retry, send an idempotency key. That helps prevent duplicate records if the first request partly went through.
When do I need a queue for form submissions?
Use a queue for high-volume campaigns. It paces CRM writes more reliably than synchronous per-submission API calls.
With exponential backoff, it also helps handle temporary 429 rate-limit errors, absorb traffic spikes, and avoid failed submissions by staying within HubSpot API limits.
How should I store consent proof in HubSpot?
Use HubSpot’s legalConsentOptions object when you submit form data through the API.
For extra protection, a Super Admin can turn on Sensitive Properties in Privacy and Consent settings for sensitive consent data. You should also keep clear consent logs for audits, including the admin’s identity, granted scopes, and the exact date and time.
Related Blog Posts
Get new content delivered straight to your inbox

The Response
Updates on the Reform platform, insights on optimizing conversion rates, and tips to craft forms that convert.




Drive real results with form optimizations
Tested across hundreds of experiments, our strategies deliver a 215% lift in qualified leads for B2B and SaaS companies.
