
.webp)
How Third-Party Forms Connect to HubSpot API



If you want third-party form submissions to show up in HubSpot the right way, I’d keep it simple: pick the right endpoint, map fields to HubSpot property names, send tracking and consent data, and test before launch.
Here’s the short version:
- I’d use the Form Submissions API when I want form reports, page attribution, and form-based workflows.
- I’d use the CRM Contacts API when I only need to create or update contact records.
- For browser-based forms, I’d use HubSpot’s unauthenticated form submit endpoint. Using form templates can help ensure these fields are structured correctly from the start.
- For backend or serverless flows, I’d use the secure submit endpoint with a private app token.
- I’d map every field to the internal HubSpot property name like
email,firstname, andcompany. - I’d pass
hutk, page URL, and UTM data if I want cleaner attribution. - I’d log every request, because 400, 401, 403, 404, and 429 errors are the ones most teams run into.
- I’d send
legalConsentOptionsso opt-in status does not end up asNOT_SPECIFIED.
A few numbers matter here. The browser-friendly submit endpoint is limited to 50 requests per 10 seconds, and repeat submissions with the same email usually update the existing contact instead of making a new one.
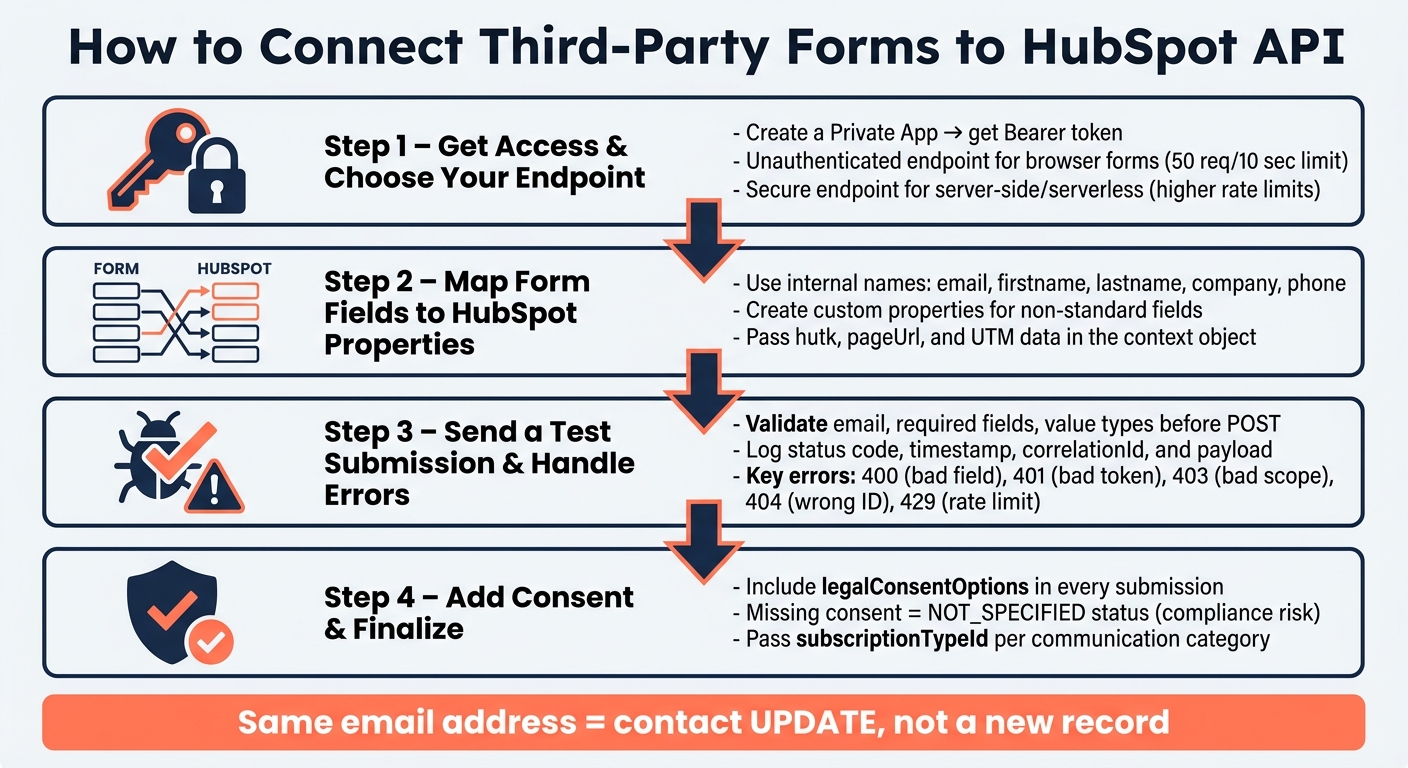
How to Connect Third-Party Forms to HubSpot API: 4-Step Process
How to Build a Flow Framework with HubSpot Forms API | HubSpot.Extend() 2022
sbb-itb-5f36581
Quick Comparison
| Option | Best use | Form analytics | Workflows | Auth |
|---|---|---|---|---|
| Form Submissions API | Marketing forms and lead capture | Yes | Yes | Optional, based on endpoint |
| CRM Contacts API | Backend contact sync | No | Property-based only | Yes |
| Non-HubSpot form tracking | Basic HTML forms | Limited | Limited | No custom API setup |
What this comes down to is simple: if the form feeds sales or marketing follow-up, I would not rely on passive tracking alone. I’d send the data to HubSpot on purpose, with field mapping, consent, and error logging in place.
Step 1: Get HubSpot Access and Choose the Right Endpoint
Required Permissions, Private App Access, Portal ID, and Form GUID
Before you write any code, get two things in place: the right account access and the IDs every API request will need.
For form setup, grant Marketing access. For contact properties, grant CRM access. If you're using the CRM Contacts API or the secure submit endpoint, create a private app in Settings → Integrations → Private Apps. From there, give it only the contact scopes you need, usually crm.objects.contacts.read and crm.objects.contacts.write.
After you create the private app, HubSpot gives you a Bearer token for authenticated requests. Your portal ID (Hub ID) shows up in the account URL. For example, in https://app.hubspot.com/contacts/1234567/..., the portal ID is 1234567. The form GUID is in the form builder under the Share or Embed options.
You need both values in the Form Submissions API path: /submissions/v3/integration/submit/{portalId}/{formGuid}.
A simple rule here: keep the portal ID and form GUID in config, and keep the Bearer token in a secrets manager. Don't leave credentials lying around in app code.
Once access is set, the next job is simple: match each form field to the HubSpot property it should update.
Authenticated vs. Unauthenticated Submissions
Use the unauthenticated endpoint for browser posts. Use the secure endpoint for server-side submissions.
The unauthenticated submit endpoint (/submissions/v3/integration/submit/{portalId}/{formGuid}) does not need a Bearer token, so it can be called from browser code. HubSpot recommends this option for browser-based submissions to avoid CORS issues. If a field or value fails validation, HubSpot returns a 400 response with a detailed errors array. The rate limit is 50 requests per 10 seconds.
The secure submit endpoint (/submissions/v3/integration/secure/submit/{portalId}/{formGuid}) has higher rate limits. It's the better fit when the request comes from a backend service or serverless function. In that case, send the token in the Authorization: Bearer {token} header. Keep that token on the server ONLY - never in front-end JavaScript.
Endpoint Comparison Table
| Endpoint | When to use | Auth | Rate limit |
|---|---|---|---|
Unauthenticated submit /submissions/v3/integration/submit/{portalId}/{formGuid} |
Browser-based form posts | No token required | 50 requests per 10 seconds |
Secure submit /submissions/v3/integration/secure/submit/{portalId}/{formGuid} |
Server-side or serverless submissions | Bearer token; server-side only | Higher limits |
Next, map the form fields and values to HubSpot properties.
Step 2: Map Third-Party Form Fields to HubSpot Properties
Match Form Fields to Standard and Custom Contact Properties
HubSpot uses internal property names, not the labels you see in the UI. So if your form says “Work Email,” it still needs to map to email.
| Form Field Label | HubSpot Internal Property Name |
|---|---|
| First Name | firstname |
| Last Name | lastname |
| Email / Work Email | email |
| Phone / Business Phone | phone |
| Mobile Number | mobilephone |
| Company / Company Name | company |
If a field doesn’t match a standard property, create a custom contact property for it. Common examples include product interest or budget. Go to Settings → Properties → Create property, set the object type to Contact, and pick the field type that fits the data.
For example:
- Use select or checkbox for product interest
- Use number for budget values
- Use single-line text for open-text details
HubSpot will generate an internal name like budget_usd or product_interest. That’s the name you’ll send in your API payload.
Format Field Values the Way HubSpot Expects
Before you submit anything, clean up the values so HubSpot stores and filters them the right way. Send numbers as raw values like 15000, convert dates to the target format, and normalize phone numbers to E.164, such as +14155551234.
A small normalization layer helps a lot here. It can strip $ signs, remove comma separators, and convert messy date strings before the data hits HubSpot. That one step saves a lot of cleanup later.
Add Context Data for Attribution and Tracking
The HubSpot Forms API also accepts an optional context object along with your field values. The three fields that matter most are pageUrl, pageName, and hutk.
The hutk value comes from the hubspotutk cookie set by HubSpot’s tracking script in the visitor’s browser. When you send that value with the submission, HubSpot can connect the new contact record to that visitor’s earlier page activity. Here’s a basic example:
"context": {
  "pageUrl": "https://example.com/demo-request",
  "pageName": "Demo Request",
  "hutk": "abc123hubspottoken"
}
You’ll also want to pass tracking values through hidden fields. Use hidden fields for utm_source, utm_medium, and utm_campaign, then map them to your source-tracking properties. Keep the hidden field names exactly the same as the query parameters.
One more thing: add your form’s domain to HubSpot’s analytics tracking site domain list. If you skip that, some submissions may get flagged as bot traffic.
With the field mapping, value formatting, and tracking data set up, you’re ready for a test submission.
Step 3: Send a Test Submission and Check for Errors
Basic Submission Flow from Form to HubSpot
A visitor fills out the form. Your server gets the data, checks the required fields and email format, builds the JSON payload, and sends a POST request to the HubSpot endpoint you picked in Step 1.
Route the submission through your server so you can handle logging, retries, and business-rule checks before anything hits HubSpot.
Before sending the POST, verify a few basics:
- A valid email is present
- Required fields aren't empty
- Value types match what HubSpot expects
- Dates use ISO 8601 format, such as
2026-09-18T10:30:00Z
These checks stop the most common 400-level errors before they start.
How to Verify the Contact and Submission Inside HubSpot
Use a test contact like test@example.com, API Test, and Test Integration LLC so it's easy to spot and remove later.
Once you get a successful response, check three places in HubSpot.
First, go to Contacts and search for the test email. Open the record and click View all properties. Make sure every mapped field, both standard and custom, contains the value you sent.
Second, review the contact's Activity timeline. You want to see that a form submission or API event shows up there.
Third, check whether any workflow tied to this form enrolled the test contact.
Also confirm that the conversion page URL and mapped UTM properties appear correctly in the contact record.
Common API Errors and How to Log Them
Log every outbound request: the status code, timestamp, and response body. HubSpot error responses include a correlationId, which makes it much easier to trace a failed request. Save the original payload with each log entry too. That way, you can replay failed submissions after you fix the issue.
Here are the errors that tend to show up most during testing and the fastest way to fix them.
| Error type | Likely cause | Fastest fix |
|---|---|---|
| 400 – Missing required field | email or another required property is absent or empty |
Add server-side checks to enforce required fields before POST |
| 400 – Invalid property name | Using a display label instead of the internal name, or the property doesn't exist | Confirm internal names in HubSpot Settings → Properties |
| 400 – Invalid property value | Value format doesn't match the property type (e.g., text sent to a number field, wrong date format) | Normalize values before sending - ISO dates and numeric types |
400 – FORM_HAS_RECAPTCHA_ENABLED |
CAPTCHA is enabled on the HubSpot form, blocking API posts | Disable CAPTCHA on the form |
| 401 – Unauthorized | Missing or expired access token, or wrong authorization header | Refresh the private app token and verify the Authorization: Bearer header |
| 403 – Forbidden | Private app lacks required scopes | Verify the token scopes |
| 404 – Not Found | Incorrect Portal ID or Form GUID in the endpoint URL | Double-check both values in HubSpot account settings and the form editor |
| 429 – Rate limit exceeded | Too many requests in a short window | Add exponential backoff and retry logic; batch submissions where possible |
One thing to expect: HubSpot matches contacts by email. So if you submit the same email again, HubSpot updates the existing record instead of making a new one.
If the test passes, pass consent and subscription preferences in Step 4.
Step 4: Handle Consent Fields and Finalize the Setup
Pass Marketing Consent and Subscription Preferences to HubSpot
Once your test submission works, add consent to that same payload.
Include an unchecked consent checkbox and send legalConsentOptions with every submission. If you skip this, HubSpot records consent as NOT_SPECIFIED. That leaves marketing teams without a clear opt-in record and can add compliance risk under privacy rules.
A common label is: "I agree to receive marketing emails from [Company Name]"
Your submission can look like this:
{
  "fields": [
    { "name": "email", "value": "user@example.com" }
  ],
  "context": {
    "ipAddress": "203.0.113.5",
    "pageUri": "https://example.com/pricing",
    "pageName": "Pricing Page"
  },
  "legalConsentOptions": {
    "consent": {
      "consentToProcess": true,
      "text": "I agree to receive marketing emails from Example Inc.",
      "communications": [
        {
          "subscriptionTypeId": 999,
          "value": true,
          "text": "Subscribe to our product updates"
        }
      ]
    }
  }
}
The subscriptionTypeId should match a subscription type set up in your HubSpot portal. If you send more than one kind of message, use separate entries for each category, like:
- Newsletters
- Product updates
- Event invitations
It also helps to pass the IP address and page URL. If consent ever gets reviewed, that gives you a clear audit trail.
And one more thing: send this same consent payload through your form backend or webhook layer too. You don't want the checkbox on the front end and then forget to pass it along behind the scenes.
Once that mapping is in place, you can optimize lead generation with a final launch check.
Pre-Launch Checklist
- Portal ID, Form GUID, token, and scopes are correct
legalConsentOptionsmaps to the right subscription type IDs- Consent-related custom properties exist in HubSpot
- Test submission and logging both work
Conclusion: The Shortest Reliable Path from External Form to HubSpot
The shortest reliable path is simple: use the right endpoint, map fields correctly, test submissions, and pass explicit consent.
FAQs
Which HubSpot API should I use?
Choose the endpoint based on what you're trying to do.
If you need to collect third-party form submissions and keep the HubSpot tracking cookie plus analytics context, use the Forms API.
If you're syncing records on the backend, use the Contacts API.
And if you need to create or manage forms, use the versioned Forms API endpoint /marketing/forms/2026-09-beta. In that case, make sure the request path includes your portal ID and form GUID.
What data should I send with each submission?
Send a JSON payload with three main parts:
- fields: each form field, using the HubSpot internal property name as
nameand the submitted input asvalue - context:
pageUri,pageName, andhutkfor web attribution - legalConsentOptions: optional, for GDPR preferences
Post it to the correct endpoint and authorize the request with your private app token.
Why isn’t my form submission showing in HubSpot?
First, check the Submissions tab for that form in HubSpot. Processing can take a few minutes, so it may not show up right away.
If the submission still isn’t there, look at a few likely trouble spots:
- Field mappings between your form and HubSpot
- The API payload, including
pageUriandpageName - Authentication issues, such as 401 or 403 errors
- Portal settings for external form submissions
- Whether your domain is listed in HubSpot tracking settings
It also helps to send a standalone test submission. That’s a simple way to rule out site-specific conflicts.
Related Blog Posts
Get new content delivered straight to your inbox

The Response
Updates on the Reform platform, insights on optimizing conversion rates, and tips to craft forms that convert.




Drive real results with form optimizations
Tested across hundreds of experiments, our strategies deliver a 215% lift in qualified leads for B2B and SaaS companies.
