
.webp)
Klaviyo Integration With WordPress: Setup Guide


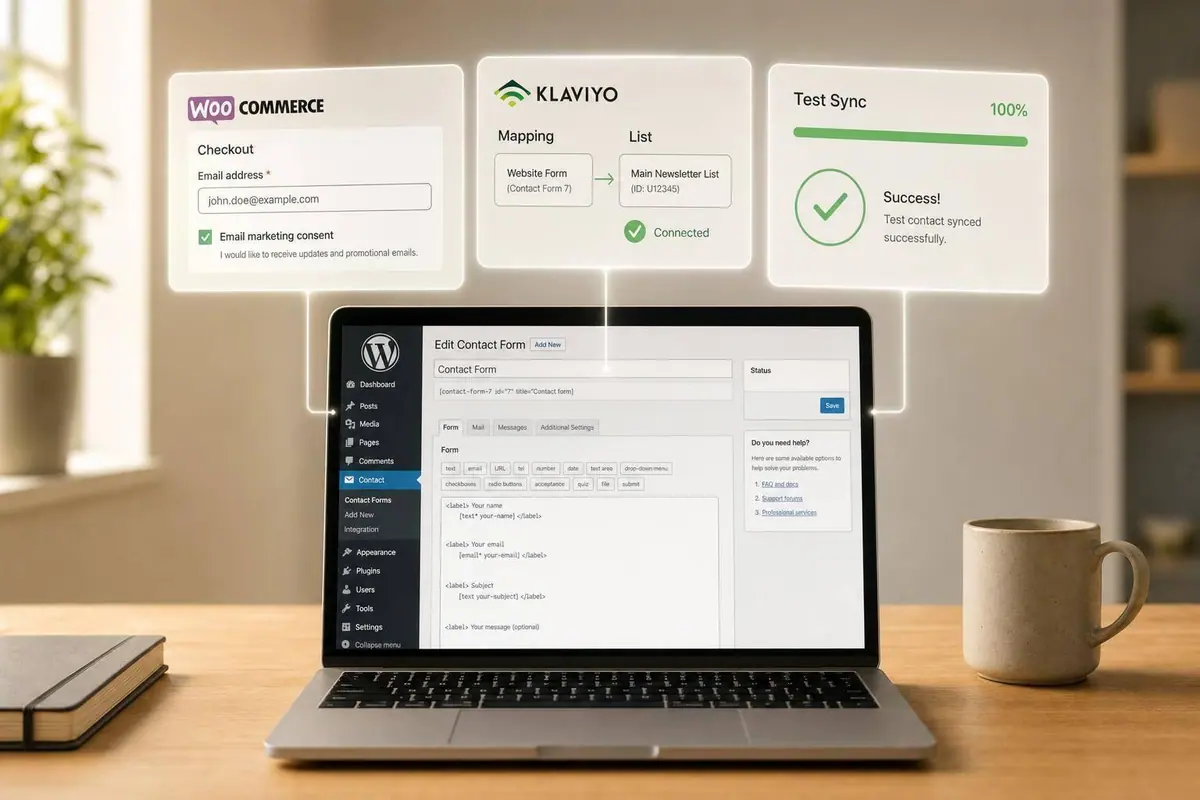
You can connect WordPress to Klaviyo in a few steps: install the plugin, add your Klaviyo key, link forms to lists, and test a live signup. If WooCommerce is part of your site, you can also send order and customer events into Klaviyo.
Here’s the short version of what I’d check first:
- WordPress admin access
- Klaviyo account access
- Klaviyo Site ID and API keys
- WooCommerce REST API keys if you want store event sync
- Form-to-list mapping
- Consent wording and opt-in settings
- A live test submission to confirm data lands in the right place
A missed setting is often what breaks the setup. In many cases, the issue comes down to 1 of 5 things: the wrong API key, the wrong list, an unpublished form, a flow still in draft mode, or a script blocked by caching.
If I were setting this up, I’d keep one goal in mind: every signup should go to the right list, with the right consent, and trigger the right email flow. That’s what this guide covers, along with plugin setup, WooCommerce sync, form placement, and the most common fixes.
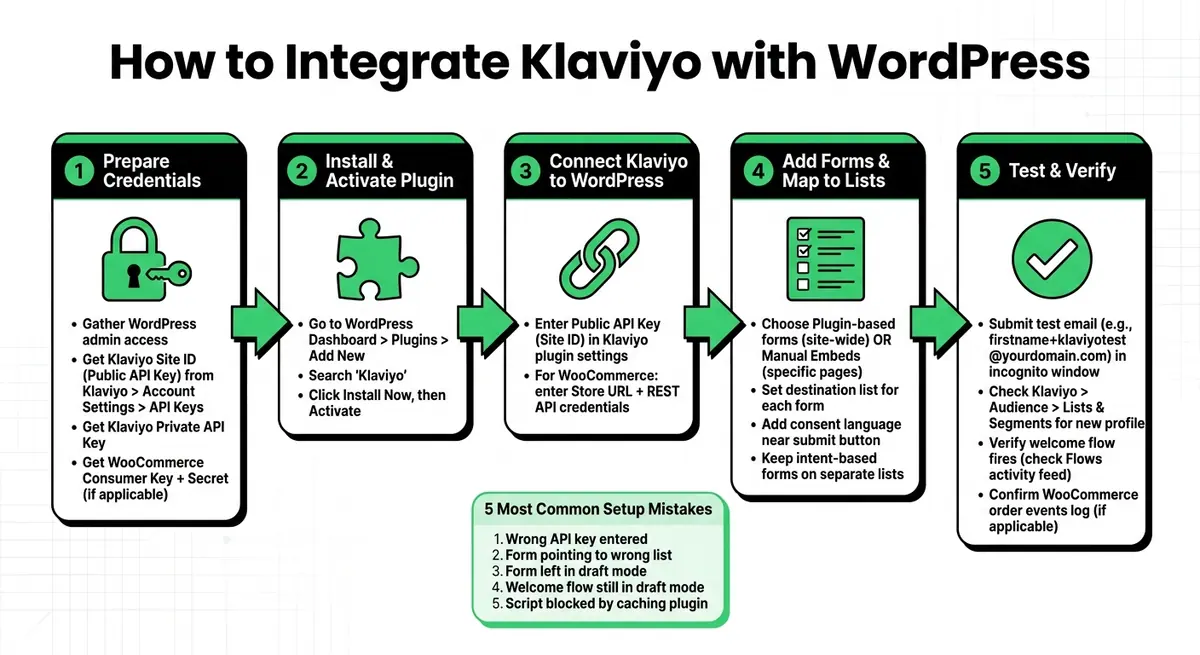
Klaviyo WordPress Integration: Step-by-Step Setup Process
How to Connect WordPress Forms to Klaviyo (Email Automation Setup)
Prepare Your Klaviyo and WordPress Accounts
Before you install the plugin, gather your Klaviyo and WordPress login details and API credentials. It’s a small step, but it can save you from connection issues later.
Find Your Klaviyo API Keys and Form Settings
Klaviyo uses different keys for different jobs. Your Public API Key, also called your Site ID, is used for onsite tracking and Klaviyo signup forms. Your Private API Key is used for secure data sync, like pulling WooCommerce order data into Klaviyo.
You can find both in Klaviyo > Account Settings > API Keys.
If you use Sign-up Forms, check each form’s destination list too. That way, you know exactly where new subscribers will go during setup.
Check Your WordPress and WooCommerce Configuration
In WordPress, make sure your Site URL matches the domain in Klaviyo. Also check your timezone under Settings > General. If the timezone is off, event times can shift and flows may fire at the wrong time.
If you plan to sync WooCommerce store data, create REST API credentials in WooCommerce > Settings > Advanced > REST API. Add a new key and set the permissions to Read/Write. This allows Klaviyo to sync orders and customer events.
Be sure to save the Consumer Key and Consumer Secret somewhere easy to access for setup.
| Credential | Where to Find It | Used For |
|---|---|---|
| Site ID (Public API Key) | Klaviyo > Account Settings > API Keys | Onsite tracking and signup forms |
| Private API Key | Klaviyo > Account Settings > API Keys | Secure data sync (e.g., WooCommerce) |
| WooCommerce Consumer Key + Secret | WooCommerce > Settings > Advanced > REST API | Syncing orders and customer data |
Next, install the Klaviyo plugin and connect it using these details.
Install the Klaviyo Plugin and Connect Your Account
Start by installing the WordPress plugin, then connect Klaviyo so form submissions and site events sync on their own.
Install and Activate the Official Klaviyo Plugin
In your WordPress dashboard, go to Plugins > Add New, search for "Klaviyo," then click Install Now and Activate.
Use a WordPress Administrator account and a Klaviyo account that has permission to view API keys. After activation, open the Klaviyo settings to finish the connection.
Connect Klaviyo Using Your Site ID or API Key
Open the Klaviyo settings in WordPress, enter your Public API Key (Site ID) in the marked field, and save your changes.
This allows Klaviyo to load forms and track onsite activity through WordPress. After the account is connected, add your forms and map each one to a list.
Add WooCommerce Details for Event Sync
If you use WooCommerce, enter your Store URL and REST API credentials in the Klaviyo plugin settings. This syncs orders and customer events to Klaviyo.
After that, connect each form to the right Klaviyo list.
sbb-itb-5f36581
Add Klaviyo Forms to WordPress and Map Subscribers to Lists
Plugin-Based Forms vs. Manual Embeds: Which to Use
Once your Klaviyo account is connected, you have two practical ways to show signup forms on your WordPress site.
The plugin can display Klaviyo popups, flyouts, and full-page forms on its own. You don't need separate embed code for each form. Manual embeds use Klaviyo's code inside a WordPress Custom HTML block or a theme template. That route gives you tighter control over where a form appears on a page.
| Feature | Plugin | Embed |
|---|---|---|
| Setup Time | Very fast - publish in Klaviyo, then display the form on your site | Moderate - copy the embed code and paste it into the right WordPress location |
| Placement Control | Best for site-wide display | Best for specific inline locations, such as a landing page section or blog post |
| Maintenance | Low - updates made in Klaviyo reflect automatically | Moderate - requires manual updates |
| Best Use Case | General newsletter capture and promotional offers | Demo request pages, gated content, and custom landing pages |
Use the plugin for site-wide forms. Use embeds when you need a form locked into a set spot on a page. After you choose how the form will appear, set it to the right list.
Set the Destination List for Each Form
Open the form settings and choose the destination list. This step decides which automations fire after someone signs up.
Match the list to the form's purpose, like a newsletter, demo request, or checkout opt-in. Keep intent-based forms on separate lists so each follow-up flow stays tied to what the person asked for. If someone signs up for a demo, they shouldn't drop into the same path as a general newsletter reader.
Send form submissions to lists, not segments. Use segments to group people by behavior or profile data after they've been added.
Your list choice affects delivery, and consent affects who can be added.
Handle Consent and Signup Behavior Correctly
Consent language should sit right below the form fields, close to the submit button, and clearly state what subscribers are agreeing to. Keep the wording plain and direct so people know exactly what they're signing up for.
For B2B forms, separate transactional follow-up from marketing opt-ins. A simple checkbox can draw that line. If you're collecting SMS consent along with email, add clear disclosure language and opt-out instructions on the form itself.
In WooCommerce, subscribe only users who actively opt in. Keep transactional order emails separate from marketing consent.
Once your consent setup and list rules are in place, run a live submission and confirm the contact lands in the right spot.
Test the Integration and Confirm Data Is Syncing
Once list mapping is done, run a live test to make sure WordPress data is reaching Klaviyo the way it should.
Run a Live Form Submission Test
Open the live WordPress page or popup with the form in an incognito or private browser window. That helps avoid cached sessions or past signups getting in the way. Then submit a clearly labeled test email, such as firstname+klaviyotest@yourdomain.com, and fill out all required fields and consent steps.
Next, log in to Klaviyo, go to Audience → Lists & Segments, and open the list connected to that form. Within a few minutes, you should see the new profile with the right email address and field mapping. If double opt-in is turned on, check that the confirmation email goes out and that the profile changes to Subscribed after the link is clicked.
If there’s a welcome flow tied to that list, open Flows and review the activity feed or the first email step. You want to see the test profile marked as Sent and an event timeline that shows Subscribed to List followed by Email Sent. If nothing fires, check two things first: the flow is set to Live, and the test profile matches the trigger rules.
If your site also syncs store or onsite data, test those events after the form submission.
Check WooCommerce or Tracking Events if Enabled
If WooCommerce is enabled, place a test order using a test email and a U.S. address. Then confirm that Klaviyo logs the order and checkout events for that email.
If you’re not using WooCommerce, check the page source for klaviyo.js to make sure the script is loading. After that, confirm onsite tracking by looking at the profile timeline for page activity.
Common Setup Issues and How to Fix Them
Most issues come from a few small mismatches between WordPress and Klaviyo. This table can help you narrow things down fast.
| Problem | Fix |
|---|---|
| Form submissions not appearing in Klaviyo | Confirm the public API key (Site ID) in WordPress matches Account → Settings → API Keys in Klaviyo. Also verify the Klaviyo plugin or script is active and that the form is published, not in draft mode. |
| Contacts added to the wrong list | Open the form in Klaviyo and verify the destination list. |
| No WooCommerce order events in Klaviyo | Verify the WooCommerce integration shows Connected in Klaviyo, that the REST API keys have Read/Write access, and that the store URL matches your live WordPress site. |
| Tracking events (Active on Site, Viewed Page) missing | Use browser developer tools to confirm the Klaviyo script loads. Also check whether caching or minification plugins are stripping it out or delaying it. |
| Double opt-in or welcome flows not triggering | Confirm flows are set to Live, the trigger points to the correct list, and any filters are not excluding the test profile. |
FAQs
Do I need WooCommerce to use Klaviyo with WordPress?
No. You do not need WooCommerce to use Klaviyo with WordPress.
For standard Klaviyo signup forms, you only need Klaviyo.js installed correctly and the form published in your Klaviyo account. WooCommerce only comes into play for ecommerce-specific features, like checkout page integration.
Should I use the plugin or an embed for my Klaviyo form?
It comes down to how hands-on you want to be and where you want the form to appear.
A Klaviyo plugin can handle the JavaScript setup for your whole WordPress site. That’s handy if you want a simpler setup and less manual work.
An embed gives you more control. You can paste the form code in the exact spot where you want it to show up.
If you go with an embedded form, check that your site settings or other plugins aren’t blocking or breaking the JavaScript.
Why isn’t my Klaviyo welcome flow sending after signup?
First, make sure you’ve had at least one successful test submission. Klaviyo only creates flow triggers after an event happens. It also helps to use a unique email address that hasn’t been used with that form before.
Then check a few common trouble spots:
- The flow is triggered by the right list or metric
- No flow filters are blocking the subscriber
- Your site’s JavaScript is loading the way it should
If one of those pieces is off, the flow may not start even if the form submission looks fine on the surface.
Related Blog Posts
Get new content delivered straight to your inbox

The Response
Updates on the Reform platform, insights on optimizing conversion rates, and tips to craft forms that convert.


Drive real results with form optimizations
Tested across hundreds of experiments, our strategies deliver a 215% lift in qualified leads for B2B and SaaS companies.
