
.webp)
Set Up HubSpot Form Submission Alerts



If HubSpot form alerts are not coming through, the issue is usually one of four things: user notifications are off, the form has no recipients, a page override changed the recipients, or the workflow/inbox route is wrong.
I’d fix it in this order:
- Turn on personal Form submissions notifications first
- Add the right users or teams in the form settings
- Check for page-level overrides on HubSpot pages
- Test workflows, re-enrollment, and shared inbox routing
- Run one full test submission in an incognito window
Here’s the short version:
- User settings control delivery. If a recipient has Form submissions turned off, HubSpot won’t send the alert.
- Form settings control who gets alerted. You can notify the contact owner or named users/teams.
- Contact-owner alerts fail for new leads when no owner is set yet.
- Team alerts are usually the safer option for demo requests, support forms, and campaign leads.
- External forms use account-level settings, not one-by-one form alerts.
- Repeat submissions need workflow re-enrollment or later submits may not trigger a new alert.
- Email, desktop, in-app, and mobile push can all be used, but each user has to enable the channels they want.
A simple rule I’d follow: use contact-owner alerts for existing accounts, and team alerts or inbox routing for new inbound leads. Then test every handoff: form submit, contact record, alert email, workflow history, and inbox assignment.
| Setup area | What to check | Common failure |
|---|---|---|
| Personal notifications | Form submissions enabled | User never gets alerts |
| Form recipients | Users, teams, or owner set | Nobody gets notified |
| Page/module settings | HubSpot page override | Alerts work on one page but not another |
| Workflow/inbox routing | Re-enrollment, assignment, channel setup | Submission logs, but no follow-up alert |
Bottom line: I’d start with user notification settings, then confirm form recipients, then test routing. That path solves most alert issues fast without digging through every setting at once.
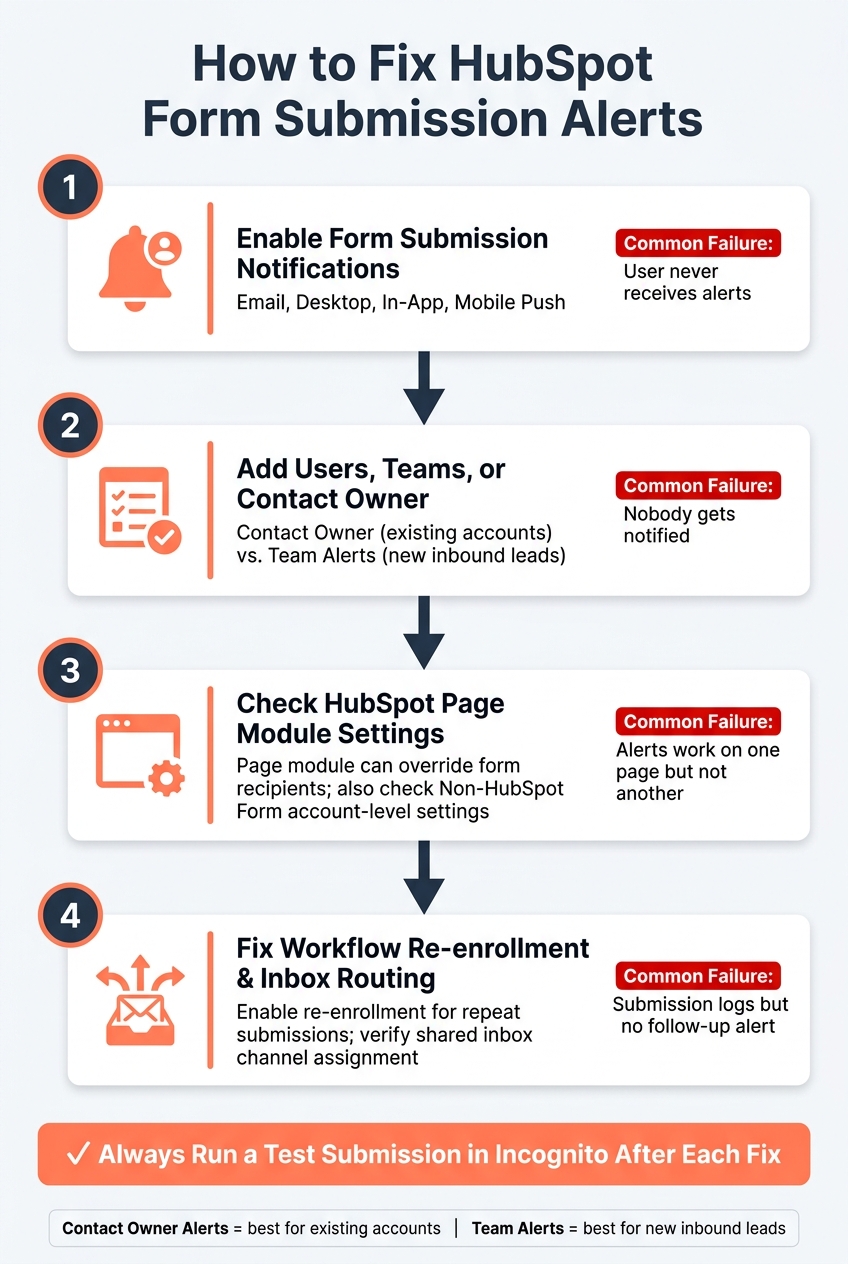
HubSpot Form Alert Troubleshooting: 4-Step Fix Order
How to Set Up Form Submission Notifications in HubSpot (Easy Guide)
sbb-itb-5f36581
Set Up Personal Notification Settings First
Personal notification settings decide whether HubSpot sends the alert at all. So even if a form lists the right people, nothing will go out if those users have switched off form submission notifications in their own profiles. After that, the form-level recipient settings decide who gets each alert.
Enable Email, Desktop, and Mobile Form Notifications
In HubSpot, go to Settings and open Notifications. Next, open the Email & Desktop tab, search for Form submissions, and turn on the channels you want: email, in-app alerts, and desktop notifications. Then click Save.
Also, check that your HubSpot profile uses an active primary email address that you actually watch. Add noreply@notifications.hubspot.com to your safe senders list so messages are less likely to land in spam. And make sure the user is still active in HubSpot.
For mobile alerts, install the HubSpot app from the App Store or Google Play and allow push notifications in your phone's system settings. Then turn on Form submissions inside the app’s notification settings. Both app permissions and device permissions need to be on, or mobile alerts won’t come through.
Check Your Profile Time Zone and App Settings
Go to Settings → Users & Teams, open your user record, and find Preferences → Working hours. Set your time zone so it matches your local working hours.
If mobile alerts still don’t show up, check whether your phone is in Do Not Disturb or another focus mode. It’s also worth confirming that the device is signed in to the same HubSpot user account tied to your notification settings. If you’re logged in with a different account, you may be looking at a different settings profile.
Once personal notifications are on, you can add recipients inside each form—including multi-step forms that often require specific routing.
Configure Real-Time Alerts in HubSpot Form Settings
Once personal notifications are on, set each form to alert the right people.
Add Notification Recipients to a Form
Go to Marketing > Forms, open the form you want to set up, and look for Submission settings. From there, use Notify contact owner or Add users to notify.
Notify contact owner sends an alert to the owner of the contact record. If the contact doesn’t have an owner, HubSpot won’t send an alert. Add users to notify lets you pick specific HubSpot users or teams, which works well when more than one person needs to respond.
If the form sits on a HubSpot page, check the page module after this step. That module can override the people you picked in the form itself.
Handle Page-Level Overrides and Non-HubSpot Forms
If your form is embedded in a HubSpot page module, the page can override the recipients set in the form editor. The module has an option to send notifications to custom email addresses instead of using the form defaults. So if alerts aren’t coming through, check both places: the form and the page module.
External forms work a bit differently. Non-HubSpot forms are set at the account level, not one form at a time. Go to Settings > Marketing > Forms > Non-HubSpot Forms and use the email notification dropdown to choose who gets alerts for all captured external forms.
Use Reform with HubSpot for External Forms
If your external forms use Reform, send those submissions into HubSpot and handle alert routing there too. That gives you one place to manage responses. For team handling and automation, send submissions into workflows or a team inbox next.
Route Form Submissions to Workflows and a Team Inbox
Use workflows or a shared inbox when basic alerts need routing or assignment.
Send Internal Alerts Using HubSpot Workflows
Create a contact-based workflow in Automation → Workflows and enroll contacts based on a specific form submission, like Contact Sales or Request a Demo.
Then add a Send internal email notification action. Include the main contact details and ONLY the fields your reps need to act on, such as budget or urgency. HubSpot automatically adds a direct link to the contact in the email.
You can also use branches to route submissions by region or company size, then assign the Contact owner. That way, leads don't just land in someone's lap at random.
Turn on re-enrollment so repeat submissions trigger the workflow again. This is a big deal for support forms and repeat demo requests. Each new submission should trigger a new alert or task, not get lost because the contact already filled out the form once.
Once the routing is live, check that each submission reaches the right person or team.
Route Alerts to a Shared Conversations Inbox
If you need team-based routing, connect a team email like sales@yourcompany.com or support@yourcompany.com to a Conversations inbox in Settings → Inbox → Inboxes. You can connect it through Gmail, Google Workspace, or Microsoft 365, then add the users who should manage that inbox.
Next, go to Inbox → Inboxes → Channels, add a form channel, and choose which forms should send submissions into that inbox. After that, set routing rules so new conversations go to specific users, teams, or the contact owner.
For support teams, this setup works well with a Submit a Ticket form. A submission can create a conversation in the Support inbox tied to support@yourcompany.com, then assign it automatically based on current workload.
After routing is set, run a test submission to make sure delivery and assignment work as expected.
Fix Common HubSpot Form Alert Errors and Test Your Setup
Most missed alerts come down to one missed setting somewhere in the delivery path. In plain English, the problem usually sits in one of four places: personal notification settings, form recipients, page-level overrides, or routing. If alerts still don't come through after setup, check each layer in that order.
| Error | Likely root cause | Fix step |
|---|---|---|
| No alerts received by anyone | Recipients missing from the form | Open the form editor → Options tab → add active users to "Send notifications to", then republish the form. |
| One person misses alerts | Personal notifications disabled or HubSpot email doesn't match the inbox they're checking | That user must turn on form submission notifications in their HubSpot notification settings and confirm the email address in their user record matches the inbox they monitor. |
| Alerts stop for a specific user | User is inactive or lacks access | Confirm the user is active and still has access to the forms tool. |
| If alerts work on one page but not another | Page-level override in effect | Edit the specific HubSpot page and check the form module's recipient settings. |
| External form not sending alerts | Non-HubSpot form settings off or tracking code not loading | Enable "Collect data from website forms" under Settings → Marketing → Forms → Non-HubSpot Forms, and confirm the tracking code loads successfully. |
| Repeat submissions don't trigger alerts | Workflow re-enrollment disabled | Turn on re-enrollment in the workflow trigger settings. |
| Delivered but missed | Spam filtering or mail quarantine | Search for noreply@notifications.hubspot.com in spam, junk, and Outlook quarantine. |
Start with the standalone form URL. If alerts work there but fail on the live page, the issue is often on the host page itself, like a script conflict or blocked tracking code.
Run a Test Submission and Confirm Each Handoff
After every fix, run one full test from start to finish. That's the fastest way to see where things fall apart.
- Submit the form in an incognito window with a test email address you haven't used before.
- Confirm contact creation in HubSpot CRM and make sure the contact record appears or updates right away.
- Verify alert delivery in each recipient's inbox, including spam and Promotions folders.
- Review workflow history if a workflow handles routing. Open the History tab and confirm the test contact enrolled and the "Send internal email notification" action executed.
- Check the team inbox if you're routing to a shared Conversations inbox. Make sure the message lands in Unassigned or the expected folder.
This makes the failure point pretty obvious: form capture, notification logic, email delivery, or inbox visibility.
Conclusion: The Shortest Path to Reliable Form Alerts
Turn on personal notifications first. Then set form-level recipients, add workflow routing when you need conditional logic, and use a shared inbox so the team can see what's coming in. After each change, run a test so small setup mistakes don't quietly swallow leads.
FAQs
Why aren’t my HubSpot form alerts sending instantly?
First, make sure your global notification settings are turned on and the email address in your user profile is correct. If the form lives on a HubSpot page, check for page-level overrides too. Those can replace the default recipients.
Then confirm the recipient is an active user and has form submission notifications turned on. If the alert comes from a workflow, check these points:
- The contact is a Marketing Contact
- The workflow is active
- Re-enrollment is turned on for repeat submissions
It’s also worth checking the recipient’s spam, junk, and any suppressed or bounced addresses.
Should I notify the contact owner or the team?
Yes - notify both.
Notify contact owner helps, but it only works when the contact already has an assigned owner.
Here’s the catch: many lead-gen forms create new contacts without owners. If you rely on owner alerts alone, some submissions can slip through the cracks.
That’s why it’s smart to also notify specific active users or teams. This gives you a backup, so new leads still get seen right away.
For high-priority submissions, instant alerts can help your team follow up on time.
How do I test if a form alert is working?
First, make sure the submission created a contact in CRM > Contacts. Then send a live test through the form.
If the alert email doesn’t show up, check spam, junk, or quarantine folders for messages from HubSpot’s notification address. If needed, add another recipient email to find out whether the problem is tied to one user or affects the whole account.
Related Blog Posts
Get new content delivered straight to your inbox

The Response
Updates on the Reform platform, insights on optimizing conversion rates, and tips to craft forms that convert.


Drive real results with form optimizations
Tested across hundreds of experiments, our strategies deliver a 215% lift in qualified leads for B2B and SaaS companies.
