
.webp)
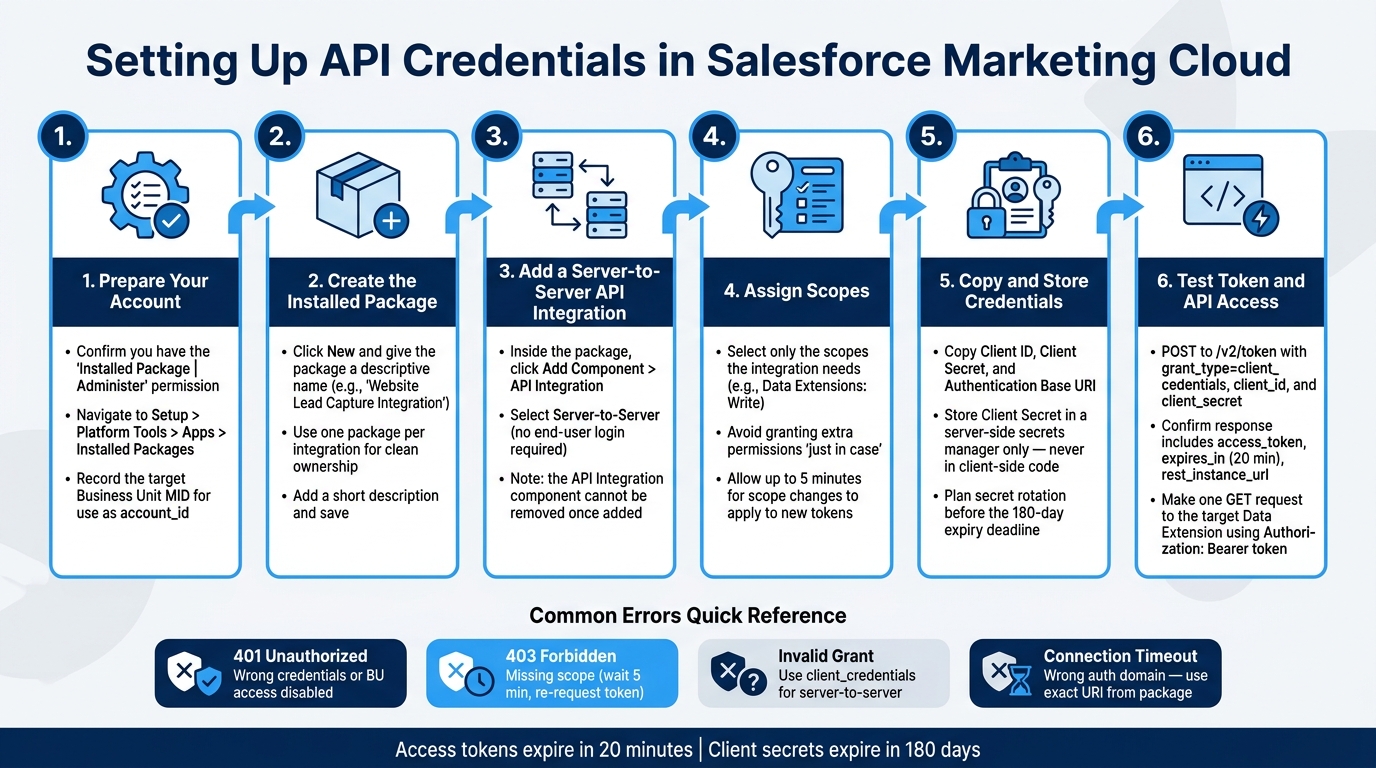
Setting Up API Credentials in Salesforce Marketing Cloud


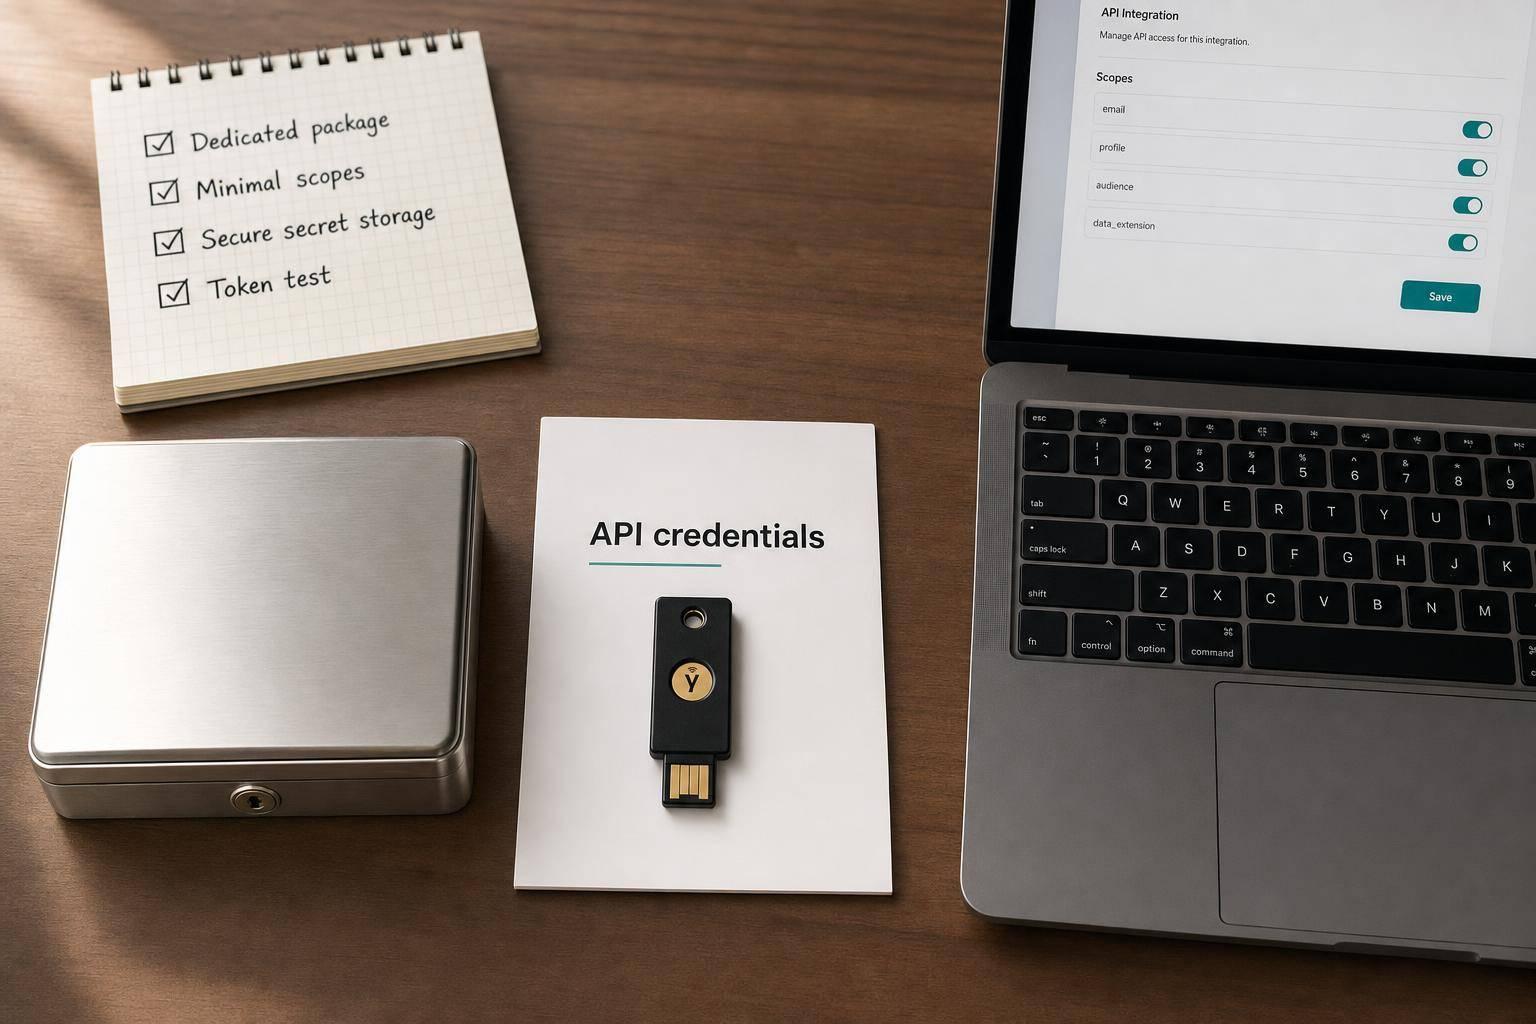
If you want an app to connect to Salesforce Marketing Cloud, I only need three things to get it working: a Client ID, a Client Secret, and the tenant-specific Authentication Base URI. I create those inside an Installed Package, use them to request an access token, and then use that token for API calls. Each token lasts 20 minutes, and each client secret expires after 180 days.
Before I start, I make sure I have the right permission, the target Business Unit’s MID, a safe place to store the secret, and the right server-to-server setup. Then I assign only the scopes I need, test /v2/token, and run one API call to confirm access.
Here’s the whole process in plain terms:
-
Check access first
- I need Installed Package | Administer
- I need access to Setup > Platform Tools > Apps > Installed Packages
- I need the target Business Unit MID for
account_id
-
Create the package
- I make one package per integration
- I use a clear name so ownership is obvious
- I add an API Integration component with Server-to-Server
-
Get the credentials
- Client ID
- Client Secret
- Authentication Base URI like
https://YOUR_SUBDOMAIN.auth.marketingcloudapis.com
-
Set the right scopes
- If I only write to a Data Extension, I turn on Data Extensions: Write
- I avoid extra scopes
- Scope changes can take up to 5 minutes to show up in new tokens
-
Store secrets safely
- I keep the client secret in a server-side secret manager
- I never place it in browser code or shared notes
- I plan rotation before the 180-day secret expiry
-
Test the setup
- I
POSTto/v2/tokenwithgrant_type=client_credentials - I expect
access_token,token_type,expires_in,rest_instance_url, andsoap_instance_url - Then I make one API call with
Authorization: Bearer <token>
- I
-
Fix common issues
- 401 usually means bad credentials, expired token, or no Business Unit access
- 403 usually means a missing scope
- Invalid Grant usually means the wrong grant type
- Timeouts often mean I used the wrong auth domain
Bottom line: if I create a dedicated installed package, use server-to-server, limit scopes, store the secret on the server side, and test both token and API access, I can get a secure SFMC integration live with fewer setup mistakes.
How to Set Up API Credentials in Salesforce Marketing Cloud
How to Create an API Key in Salesforce Marketing Cloud
Prepare Your Salesforce Marketing Cloud Account
Before you open Setup, check your account permissions first. You need the Installed Package | Administer permission to create, edit, or manage API integrations. That permission is granted by default to the Administrator and Marketing Cloud Administrator built-in roles. You also need access to Setup > Platform Tools > Apps > Installed Packages.
Next, record the Member ID (MID) for the target Business Unit. You’ll use that MID as the account_id in token requests for that Business Unit. Keep it handy, because you’ll need it when you test the token request later.
Choose a Dedicated Package and a Clear Naming Convention
Create one installed package for each integration instead of stuffing several tools into one package. It keeps ownership clear and makes access reviews much easier down the road.
Be specific with naming. For example, Website Lead Capture Integration tells your team what the package does and who owns it at a glance. Clear names make maintenance and credential rotation less of a headache.
Plan Secret Storage and Logging Before You Create Credentials
Pick your secret storage location before you generate the client secret. Store it in a secrets manager or in encrypted server-side config. Never put it in client-side code.
Client secrets expire 180 days after they’re generated. New secrets follow the format SFMC_ + 51 characters + an 8-character checksum. That pattern can help you scan repos for credentials that were committed by mistake. It also means you should plan rotation before the secret hits that 180-day limit.
With permissions, secret storage, and the target MID lined up, you’re ready to create the installed package next.
Create the Installed Package and Generate API Credentials
Create a New Installed Package in Setup
Once you've mapped out permissions and where secrets will live, it's time to create the package.
Log in to Marketing Cloud, click your username, and open Setup. Then expand Platform Tools, click Apps, and select Installed Packages. Click New, add a clear name and a short description, and hit Save.
Add a Server-to-Server API Integration
Inside the package, go to the Components section and click Add Component. Choose API Integration, then select Server-to-Server as the integration type.
This type works without any end-user interaction. So if your website form sends leads to Marketing Cloud behind the scenes, this is usually the right fit.
Be careful here: once you add an API Integration component, you can't remove it later. When you save it, Marketing Cloud generates the Client ID, Client Secret, and Authentication Base URI.
After that, lock access down to only what the integration needs.
Assign Scopes Based on What the Integration Needs to Do
Select only the scopes required for the job. In plain English, don't give the integration extra access "just in case." Stick to the smallest set that supports the workflow.
For a standard lead capture setup, these are the main scopes to look at:
| Category | Scopes | Use It For |
|---|---|---|
| Data Extensions | Read, Write | Writing lead data to a Data Extension |
| Lists and Subscribers | Read, Write | Updating subscribers |
| Audiences | Read, Write | Reading or writing audience data |
| Read, Write, Send | Sending a confirmation email |
If you're only writing to a Data Extension, turn on Data Extensions Write and leave the rest off. One small gotcha: scope updates can take up to 5 minutes to apply to new tokens.
sbb-itb-5f36581
Retrieve, Store, and Test Your Credentials
Copy the Client ID, Client Secret, and Authentication Base URI
Open the API Integration component under Components and copy the Client ID, Client Secret, and Authentication Base URI.
The Authentication Base URI is tied to your tenant. It usually looks like https://YOUR_SUBDOMAIN.auth.marketingcloudapis.com. To create the token endpoint, add /v2/token to the end of that URI.
Store the Client Secret in your server-side secret manager. Don’t leave it in client-side code or scattered across notes and docs. Once you’ve saved it, you can use the credentials to request an access token.
Send a Token Request to Verify Access
After you’ve copied the credentials, send a token request to make sure they work.
Use an API client to POST to /v2/token with:
grant_type=client_credentialsclient_idclient_secret
Set the Content-Type header to application/json.
If the request works, the response returns an access_token, a token_type of Bearer, an expires_in value, plus tenant-specific rest_instance_url and soap_instance_url values.
Cache the token until it expires. Then use the returned instance URLs for later API calls.
This is your quick proof that the package, scopes, and URLs are set up the right way.
Verify Access With a Basic API Call
If the token request succeeds, make one simple API call against the target object.
A good starting point is a GET request to the target Data Extension, which is the object your form writes to. Add the token to the Authorization header as Bearer <YOUR_ACCESS_TOKEN>, and use the rest_instance_url from the token response as your base URL.
If you get a 403 Forbidden response, the needed scope may be missing. It can also mean the integration doesn’t have access to the target Business Unit. If you change scopes, request a new token after the update.
If you see 401 Unauthorized, the Client ID or Client Secret was likely copied wrong. It can also mean the integration hasn’t been enabled for the target Business Unit in the package’s Access tab.
Common Errors, Field Mapping, and Final Checklist
Fix Invalid Credentials, Wrong URLs, and Missing Scopes
Use these checks to narrow down the issue.
| Error | Likely Cause | Fix |
|---|---|---|
| 401 Unauthorized | Wrong credentials, expired token, or BU access disabled | Recheck the Client ID/Secret and the package Access tab |
| 403 Forbidden | Missing required scope | Add the scope, wait 5 minutes, then request a new token |
| Invalid Grant | Wrong grant type for the integration type | Server-to-server integrations must use client_credentials; web apps use authorization_code |
| Connection Timeout | Incorrect auth domain used instead of the tenant-specific subdomain | Copy the exact Authentication Base URI from the Installed Package component |
One small detail trips people up all the time: scope changes can take up to 5 minutes to apply to new access tokens. If you update scopes and test again too soon, you can end up chasing a problem that isn’t there. Wait the full 5 minutes, then request a new token.
It’s also worth checking Business Unit access. A server-to-server integration does not get BU access by default. You need to allow it in the Access tab for the target Business Unit. If you switch units and suddenly see 401 errors, that’s often the reason.
Map Form Fields to a Marketing Cloud Data Extension
Once auth is working, the next step is mapping the form payload to the target Data Extension. To write lead data, the integration must have the Data Extensions: Write scope.
Then line up each form field with the matching Data Extension column. That keeps the payload clean and helps avoid bad writes, blank values, or mismatched data types.
Conclusion: The Minimum Steps to Get a Secure Integration Working
After the field mapping is set, run one live submission from start to finish.
Here’s the minimum setup for production: make sure you have access to Setup and Installed Packages, create a dedicated package with a clear name, add a server-to-server integration, and give it only the scopes it needs. Store the Client Secret on the server side - never in client-side code. Use the exact Authentication Base URI from the package component, then request a token through /v2/token. Before launch, test one real write to the target Data Extension.
FAQs
How do I find the right Business Unit MID?
The Business Unit MID (Member ID) is the account identifier for the business unit you want to use. You can find it in your Salesforce Marketing Cloud account details.
For API requests, pass the MID as the account_id parameter. That makes sure the access token is issued for the correct business unit.
If you leave out account_id, the request will use the business unit where the integration was created.
When should I rotate the client secret?
Rotate your client secret on a regular schedule for security - ideally at least every 180 days. If you lose access to it, rotate it right away.
Client secrets expire 180 days after they’re generated, so routine rotation helps you avoid service interruptions. When it’s time to update, you can stage a new secret first and then activate it. That gives you a smoother handoff and helps keep downtime low.
Which API scope do I need first?
You don’t need to pick a single scope up front. In Installed Packages, assign the scopes that match the capabilities and data access your application needs.
If you leave out the scope parameter when requesting an access token, Salesforce Marketing Cloud uses the scopes assigned during package setup. Check the available REST API permission IDs and scopes to make sure they line up with what your app needs.
Related Blog Posts
Get new content delivered straight to your inbox

The Response
Updates on the Reform platform, insights on optimizing conversion rates, and tips to craft forms that convert.


Drive real results with form optimizations
Tested across hundreds of experiments, our strategies deliver a 215% lift in qualified leads for B2B and SaaS companies.
