
.webp)
How to Set Up OAuth for HubSpot API


Want to connect your app to HubSpot securely? OAuth 2.0 is the standard method. It uses tokens instead of passwords to authenticate and authorize access to HubSpot user accounts. This guide breaks down the process into manageable steps:
- Create a HubSpot OAuth App: Get your Client ID and Client Secret.
- Set Permissions (Scopes): Specify what your app can access.
- Build an Authorization URL: Direct users to approve app access.
- Exchange Authorization Code for Tokens: Obtain access and refresh tokens.
- Authenticate API Calls: Use the access token for secure requests.
- Refresh Tokens When Needed: Keep the connection active.
With these steps, you can set up OAuth for your HubSpot integration securely and efficiently.
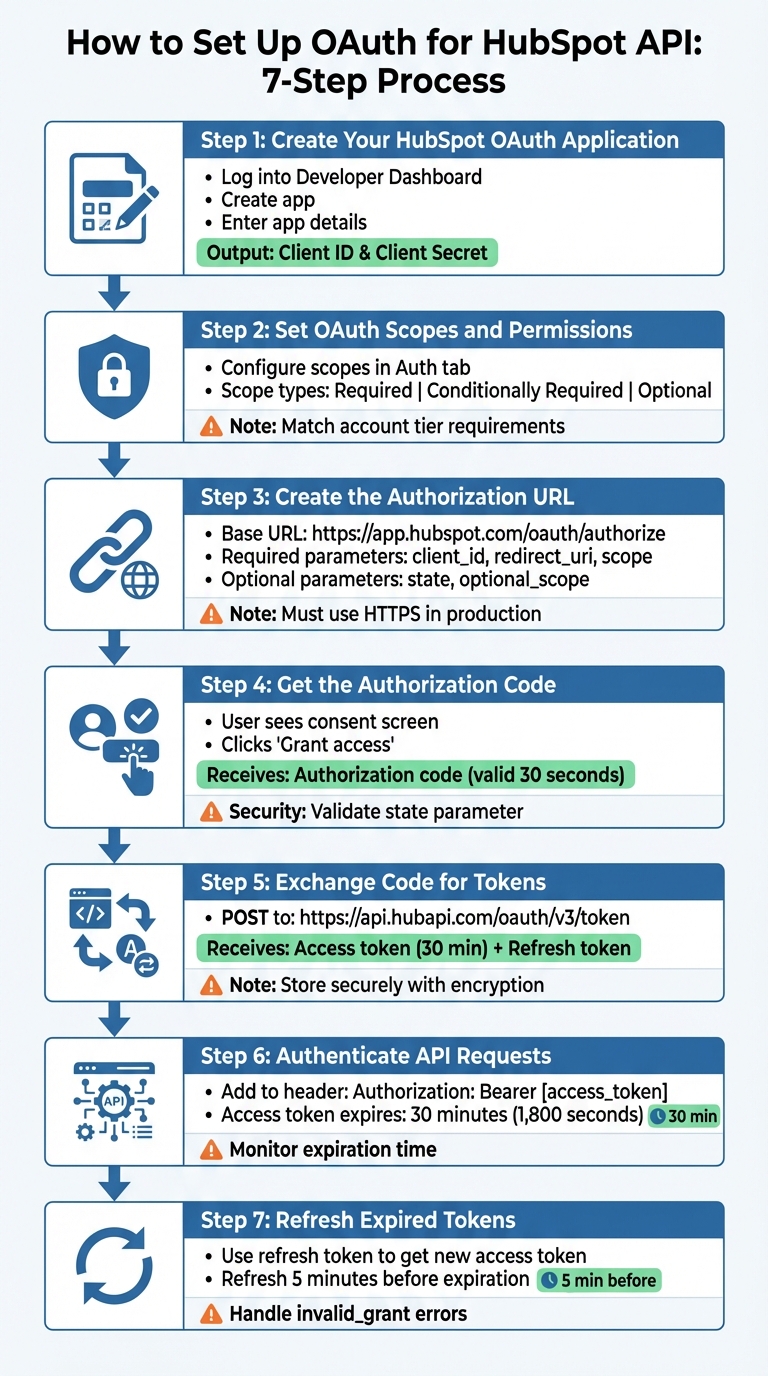
7-Step HubSpot OAuth Setup Process Flow
Step 1: Create Your HubSpot OAuth Application
Log In to the HubSpot Developer Dashboard
First, log into your HubSpot account and head over to the Developer Dashboard. If you're working with legacy apps, select "Legacy apps", then click "Create app" > "Public app." For the newer platform, go to "Projects" and manage your app through the Project Components section.
Enter Your Application Details
When setting up your app, you'll need to fill in the details users will see during the authorization process. This includes the app name, description, logo, and support contact information. The app name will appear in various HubSpot features, like CRM cards and timeline events. To avoid the "unverified app" warning, make sure to verify your company domain in the Contact & support settings.
Another crucial step is entering a Redirect URL in the Auth tab. For production environments, this URL must use https, but for local development or testing, http://localhost is acceptable.
Find Your Client ID and Client Secret
Once your app is created, go to the Auth tab in the app settings to locate your Client ID and Client Secret. These are essential for OAuth authentication. As HubSpot's documentation explains:
"Your app credentials (i.e., your App ID, Client ID, and Client secret) as well as your Sample install URL are not accessible while your app is in a draft state, and will only be available after you create your app."
The Client ID is a public identifier for your app, while the Client Secret is a private key used to exchange authorization codes for access tokens. It's important to handle these credentials securely - never log your Client Secret or store it in plain text. Instead, use tools like environment variables or a secrets manager (e.g., AWS Secrets Manager or HashiCorp Vault).
With these credentials ready, you're now set to move on to configuring OAuth scopes in Step 2.
sbb-itb-5f36581
Step 2: Set OAuth Scopes and Permissions
What OAuth Scopes Are
OAuth scopes define the permissions your application has within a user's HubSpot account. Think of them as filters that restrict access to specific API endpoints, like contacts, deals, or custom objects, ensuring your app only accesses what it truly needs.
When your app requests access tokens, those tokens reflect the scopes you specify - not the individual user's permissions. For instance, if a user can only view their own contacts but your app requests the crm.objects.contacts.read scope, the app gains access to all contacts in that account.
"Access tokens reflect the scopes requested from the app and do not reflect the permissions or limitations of what a user can do in their HubSpot account."
- HubSpot Documentation
Keep in mind that access to certain scopes depends on the user's HubSpot account tier. For example, custom object scopes require an Enterprise account, while the automation scope is available only for Marketing Hub Professional accounts or higher. If your app requests a scope that the user's account doesn't support, the installation process will fail.
To configure these permissions, you'll need to set up the required scopes in the Auth tab of your app's settings.
Select Scopes in the Auth Tab
Head over to the Auth tab in your HubSpot Developer Dashboard to define the scopes your app requires. Missing or unsupported scopes will block the app's installation, so accuracy here is crucial.
To identify the scopes you need for a specific API task, refer to the Requirements section in the API's documentation. For example, to work with contacts, you'll need crm.objects.contacts.read to access contact details or crm.objects.contacts.write to make changes or add new ones.
HubSpot categorizes scopes into three types:
- Required – These are non-negotiable for the app to function and must be included.
- Conditionally Required – These apply only when specified in the authorization URL.
- Optional – These are automatically excluded if the user's account doesn't support them.
If your app includes features tied to higher-tier accounts, use the optional_scope parameter. This ensures that users with lower-tier accounts can still install your app without errors. However, make sure your advanced scope settings align between the dashboard and the authorization URL - any mismatches will block installation.
To minimize security risks and protect sensitive data, only request the scopes your app truly needs. If you're working with optional scopes, review the access token metadata after authorization to confirm which ones were granted.
Step 3: Create the Authorization URL
Build the Authorization URL
The authorization URL is what takes users to HubSpot's consent screen, where they can approve your app's access. Every authorization URL starts with the base: https://app.hubspot.com/oauth/authorize. If you need to direct users to a specific HubSpot account, you can include the account ID (Portal ID) in the path: https://app.hubspot.com/oauth/[ACCOUNT_ID]/authorize.
Your URL must include three required query parameters:
client_id: This is your app's unique identifier, which you can find in the Auth tab of your HubSpot Developer Dashboard.redirect_uri: This tells HubSpot where to send users after they grant or deny access. It must match exactly what you registered in your app settings, including any trailing slashes.scope: This lists the permissions your app needs, separated by spaces and URL-encoded (spaces become%20).
Here’s an example of how the URL might look: https://app.hubspot.com/oauth/authorize?client_id=xxxxxxxx-xxxx-xxxx-xxxx-xxxxxxxxxxxx&scope=contacts%20automation&redirect_uri=https://www.example.com/
You can also include two optional parameters:
state: A unique string that HubSpot returns with the authorization response. It helps prevent CSRF attacks and keeps track of user context.optional_scope: Use this to request permissions tied to higher-tier accounts. If the user's account doesn’t support these features, HubSpot will drop them without blocking the installation.
| Parameter | Required? | Description |
|---|---|---|
client_id |
Yes | Your app's unique identifier from the Auth settings |
redirect_uri |
Yes | Where users are sent after granting access (must use https in production) |
scope |
Yes | Space-separated list of permissions, URL-encoded |
optional_scope |
No | Permissions ignored if the account doesn’t support them |
state |
No | Unique string for CSRF protection and user context management |
When building the URL programmatically, use encodeURIComponent() to properly encode the redirect_uri, scope, and state values. For production, the redirect_uri must use https. While http is allowed during development for localhost, HubSpot requires domain names instead of IP addresses.
"The redirect URI must match EXACTLY what you registered. Not just the domain, not just the path, but every single character, including trailing slashes." - Saurabh Rai
Once your URL is ready, test it in your browser.
Test and Deploy the URL
Testing your URL ensures it works as expected. Open it in a browser, and you should see HubSpot's account selection screen showing the permissions your app is requesting. If there’s a mismatch between the scopes in your app settings and the URL, you’ll see an error.
When moving to production, update your redirect URI to use https and ensure it matches in both your app settings and the authorization URL. Note that the user granting access must either be a Super Admin or have "App Marketplace Access" permissions in their HubSpot account.
Once the user clicks "Grant access", HubSpot will redirect them to your specified URI with a temporary code included as a query parameter, like this:
https://example.com/?code=xxxx.
This code is valid for only 30 seconds, so your application needs to exchange it for tokens immediately. If there’s an issue, HubSpot will redirect with error and error_description parameters instead.
Step 4: Get the Authorization Code
How User Consent Works
When users click the authorization URL, they’ll see a consent window showing your app and the requested scopes. For approval, the user must have Super Admin or App Marketplace Access. If they lack permission for any of the requested scopes, the installation will fail, and an error page will appear. Derek Gervais from HubSpot explains this process clearly:
"Whether or not an app can be installed depends on the intersection of the app's required scopes, the account's included tools, and the authorizing user's roles"
Once the user clicks "Grant access", HubSpot sends a GET request to your redirect_uri with the authorization code included. If the user denies access, the response will instead include error parameters.
Retrieve and Verify the Authorization Code
This step ensures user consent is confirmed before moving to the token exchange. Your redirect endpoint will receive the authorization code in the code query parameter. If you included a state parameter in your original request, HubSpot will also return it, allowing you to validate the request and maintain user context.
To prevent Cross-Site Request Forgery (CSRF) attacks, always validate the state parameter. Here's how you can handle it securely:
- Generate a cryptographically secure unique string before redirecting the user.
- Temporarily store this string in the user's session.
- Verify that the returned
statevalue matches the one you generated.
Use a URL search parameter helper to extract both the code and state values when the user is redirected to your callback endpoint.
| Parameter | Description |
|---|---|
code |
The temporary authorization code used to exchange for tokens |
state |
The unique string passed in the original request to maintain state and prevent CSRF |
error |
An error code if the user denies access or the request fails |
error_description |
A human-readable explanation of why the authorization failed |
Act quickly to exchange the authorization code for tokens. The code is single-use and expires fast, so any delay will require the user to restart the authorization process. Your app will not appear as a "Connected App" in the user's HubSpot account until this token exchange is successfully completed.
Once the authorization code is captured and validated, you're ready to move forward with exchanging it for access tokens.
Step 5: Exchange the Code for Tokens
Send a Token Request
After obtaining the single-use authorization code, exchange it for tokens right away to avoid making the user restart the process.
Send a POST request to https://api.hubapi.com/oauth/v3/token with the header Content-Type: application/x-www-form-urlencoded.
The request body should include the following five parameters, ensuring they’re not exposed in logs:
grant_type: Useauthorization_codefor the initial token exchange.code: The temporary code you received from the redirect URL after the user gave consent.redirect_uri: The app's registered redirect URL (must match the one used during the authorization request).client_id: Your app’s unique client ID.client_secret: Your app’s unique client secret.
| Parameter | Description |
|---|---|
grant_type |
Specifies authorization_code for the initial exchange. |
code |
The temporary code from the redirect URL after user consent. |
redirect_uri |
The registered redirect URL for your app. |
client_id |
The unique client ID for your application. |
client_secret |
The unique client secret for your application. |
If the exchange fails, HubSpot will return an error response in line with RFC 6749 standards. Common errors include:
invalid_grant: The code has expired or is invalid.invalid_client: The client secret is incorrect.
Read the Token Response
A successful token request will return a JSON object with the necessary tokens for authenticated API calls. The response includes:
access_token: A short-lived token to authenticate API requests, typically valid for 30 minutes (1,800 seconds).refresh_token: A long-lived token that stays valid until revoked or the app is uninstalled.expires_in: The number of seconds before the access token expires.token_type: Usuallybearer.hub_id: The HubSpot portal ID where the app was installed.scopes: An array of permissions granted to the access token.
To manage token expiration, calculate the expiration time (e.g., Date.now() + expires_in * 1000) and aim to refresh the token about 5 minutes before it expires. Remember that access tokens can vary in size, so ensure your storage can handle at least 512 characters.
Security Tip: Never store tokens in plain text. Use secure storage solutions like an encrypted database (e.g., AES-256) or a secrets manager (e.g., AWS Secrets Manager or HashiCorp Vault). In multi-tenant applications, associate tokens with the hub_id to prevent any cross-account data access.
Once this exchange is complete, your app will show up as a "Connected App" in the user's HubSpot account. With the tokens securely stored, you can now authenticate API requests using the access token.
Step 6: Authenticate API Requests with Access Tokens
Add Access Tokens to API Requests
To make authenticated calls to HubSpot's API, include your access token in the Authorization HTTP header using the Bearer authentication scheme. Here's the format:
Authorization: Bearer [access_token]
Additionally, for most HubSpot CRM API requests, you'll need to specify the content type:
Content-Type: application/json
"The access token is what you use for every API request. It goes in the Authorization header as a Bearer token and proves to HubSpot that your app has permission to act on behalf of the user's account." – HubSpot Developer Blog
Make sure to monitor the token's validity to avoid interruptions in API access.
Handle Token Expiration
Once you've secured your tokens, managing their lifecycle becomes essential. Access tokens have a short lifespan, expiring in just 30 minutes (1,800 seconds). To avoid disruptions, calculate the expiration time as soon as you receive the token by adding the expires_in value to the current timestamp.
It's a good practice to refresh tokens at least five minutes before they expire. If you encounter a 401 Unauthorized or 403 Forbidden error during a token refresh attempt, it likely means the refresh token is invalid or has been revoked - often due to the user uninstalling your app. In such cases, stop retrying and prompt the user to reauthorize your app through the OAuth flow.
Step 7: Refresh Expired Tokens
Send a Refresh Token Request
When your access token expires, you can use the refresh token to get a new one. To do this, send a POST request to HubSpot's token endpoint: https://api.hubapi.com/oauth/v3/token. Make sure the request includes the content type application/x-www-form-urlencoded and the following parameters:
grant_type=refresh_tokenclient_idclient_secretrefresh_token
HubSpot will respond with a new access token, an expires_in value (usually 1,800 seconds or 30 minutes), and possibly a new refresh token. Always use the updated tokens provided in the response.
If you encounter an invalid_grant error, it means the refresh token is no longer valid, either because it was revoked or the user has uninstalled your app. In this case, do not retry automatically. Instead, prompt the user to reauthorize your app through the OAuth flow.
Store and Use Refresh Tokens Securely
Once you've refreshed the tokens, it's crucial to store them securely. Refresh tokens typically don’t expire on their own but can be manually revoked. To protect these tokens:
- Avoid plain text storage: Use strong encryption methods like AES-256 or a secrets management tool such as AWS Secrets Manager or HashiCorp Vault.
- Account isolation: For multi-tenant apps, associate tokens with their respective HubSpot
portal_id(orhub_id) to avoid mix-ups. - Prevent race conditions: In multi-server setups, use distributed locking tools like Redis (with the NX option) to ensure only one server refreshes the token at a time.
- Separate encryption keys: Store encryption keys in environment variables or a secure secrets manager, away from the tokens themselves.
"The gap between a working integration and a production-ready one usually comes down to how well you handle tokens." – HubSpot Developer Blog
HubSpot OAuth Integration
Conclusion
Setting up HubSpot OAuth involves seven clear steps: creating your app to obtain credentials, setting up the right scopes, building an authorization URL, capturing the authorization code, exchanging it for tokens, using access tokens for API requests, and refreshing expired tokens. Together, these steps ensure your integration is secure and runs smoothly.
Two key areas often determine the success of an integration: scope configuration and token security. For example, if your app requests a scope that isn’t supported by a user’s HubSpot account tier, the installation will fail immediately. To avoid this, use optional scopes for tier-specific features like custom objects available in Enterprise accounts. This approach keeps your app accessible across various subscription levels. On the security front, proactively refreshing tokens helps prevent disruptions in API calls.
Additionally, secure token storage is essential. Make sure to validate the state parameter during authorization to guard against CSRF attacks. These measures elevate your integration from a simple setup to a reliable, production-ready solution.
FAQs
What HubSpot scopes do I need?
When building an app that integrates with HubSpot, the scopes you need depend entirely on the API endpoints your app plans to use. It's important to include only the specific scopes listed for those endpoints in HubSpot's reference documentation. Carefully reviewing this documentation is key - it helps you avoid requesting permissions your app doesn't actually need.
Why does my redirect URI have to match exactly?
Your redirect URI needs to match exactly during the OAuth process to ensure both security and proper validation. This precision is crucial to prevent issues like token misuse or interception. HubSpot relies on this exact match to verify that the authorization response is sent to the right endpoint associated with your app. If the URIs don't align perfectly, it can result in authentication errors or potential security vulnerabilities.
How should I store and refresh tokens safely?
When dealing with access and refresh tokens, it's crucial to store them in a secure environment. This could mean using encrypted storage or a protected server to ensure they remain safe from unauthorized access.
Use the refresh token to request a new access token before the current one expires. Pay attention to the expires_in parameter to proactively refresh tokens and avoid disruptions. Make sure your system can handle errors gracefully, ensuring continuous and secure access without interruptions.
Related Blog Posts
Get new content delivered straight to your inbox

The Response
Updates on the Reform platform, insights on optimizing conversion rates, and tips to craft forms that convert.


Drive real results with form optimizations
Tested across hundreds of experiments, our strategies deliver a 215% lift in qualified leads for B2B and SaaS companies.
