
.webp)
Troubleshooting Webflow to HubSpot Integration Issues


When connecting Webflow forms to HubSpot, integration problems can cause delays in lead management, missed opportunities, and data errors. Common issues include:
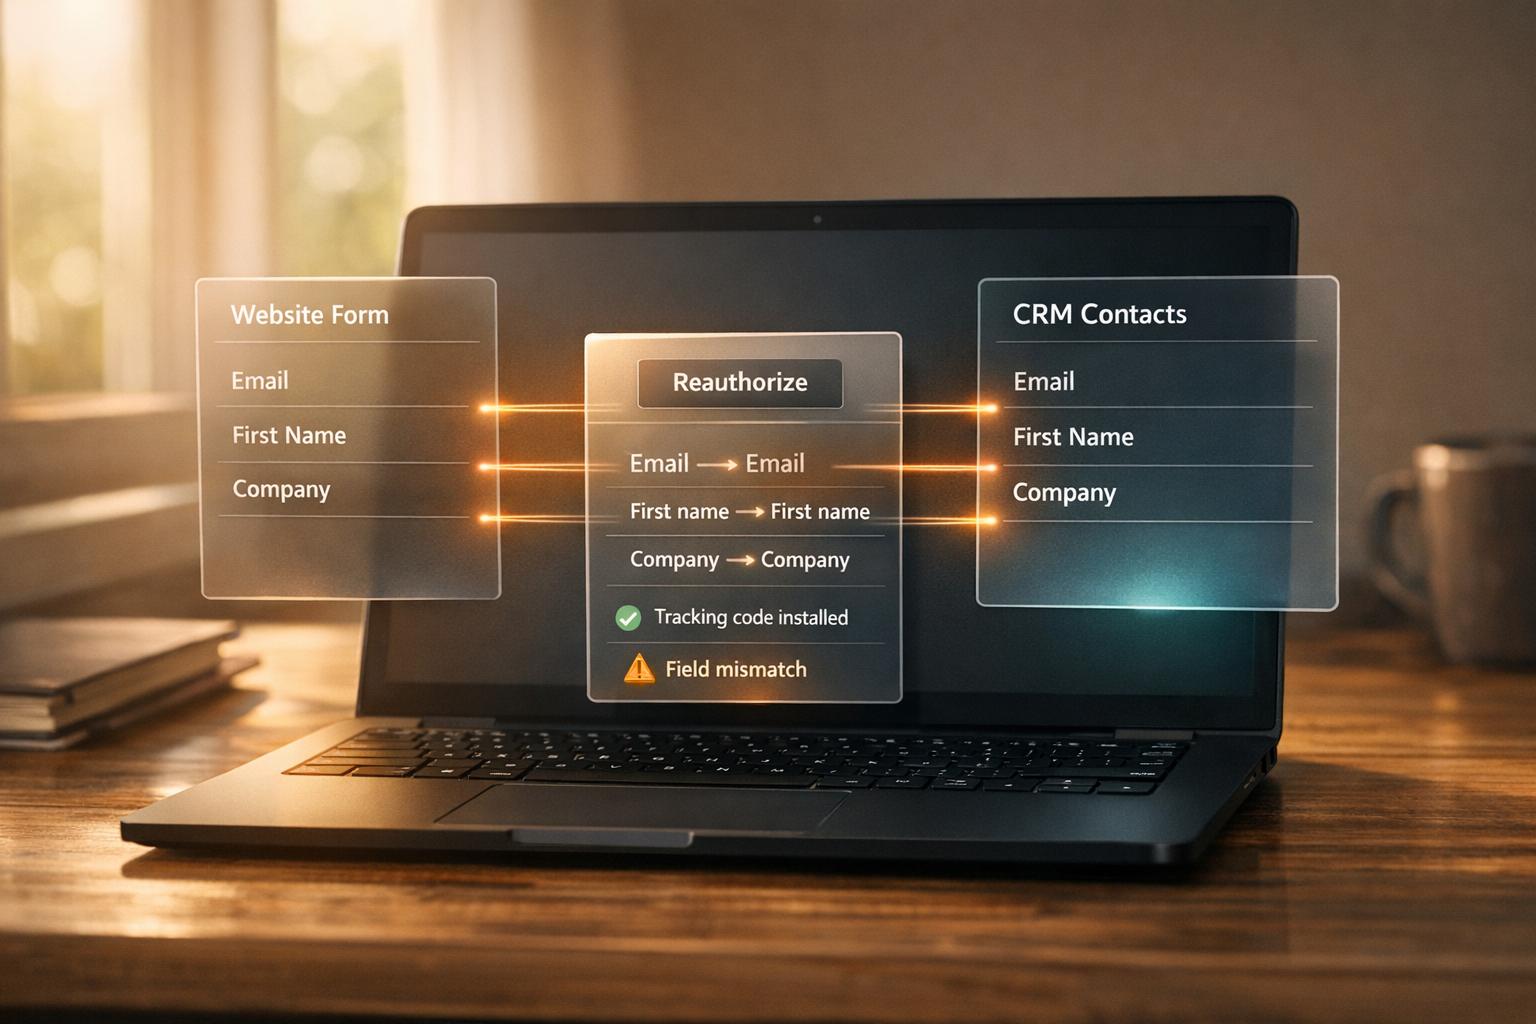
- Form submissions not syncing: Caused by incorrect field mapping or missing HTML labels.
- Authentication errors: Often due to insufficient HubSpot user permissions or browser-related interference.
- Tracking code problems: Scripts may not load because of ad blockers or incorrect placement.
- Duplicate or missing entries: Triggered by HubSpot's deduplication logic or conflicting form settings.
Quick solutions:
- Check HubSpot user permissions (e.g., "App Marketplace" access).
- Use incognito mode to resolve browser conflicts.
- Verify field mappings and enable external form submissions in HubSpot.
- Add the HubSpot tracking code to Webflow correctly and test functionality.
For persistent issues, reinstall the integration or consider using third-party tools like Reform for reliable syncing and advanced features.
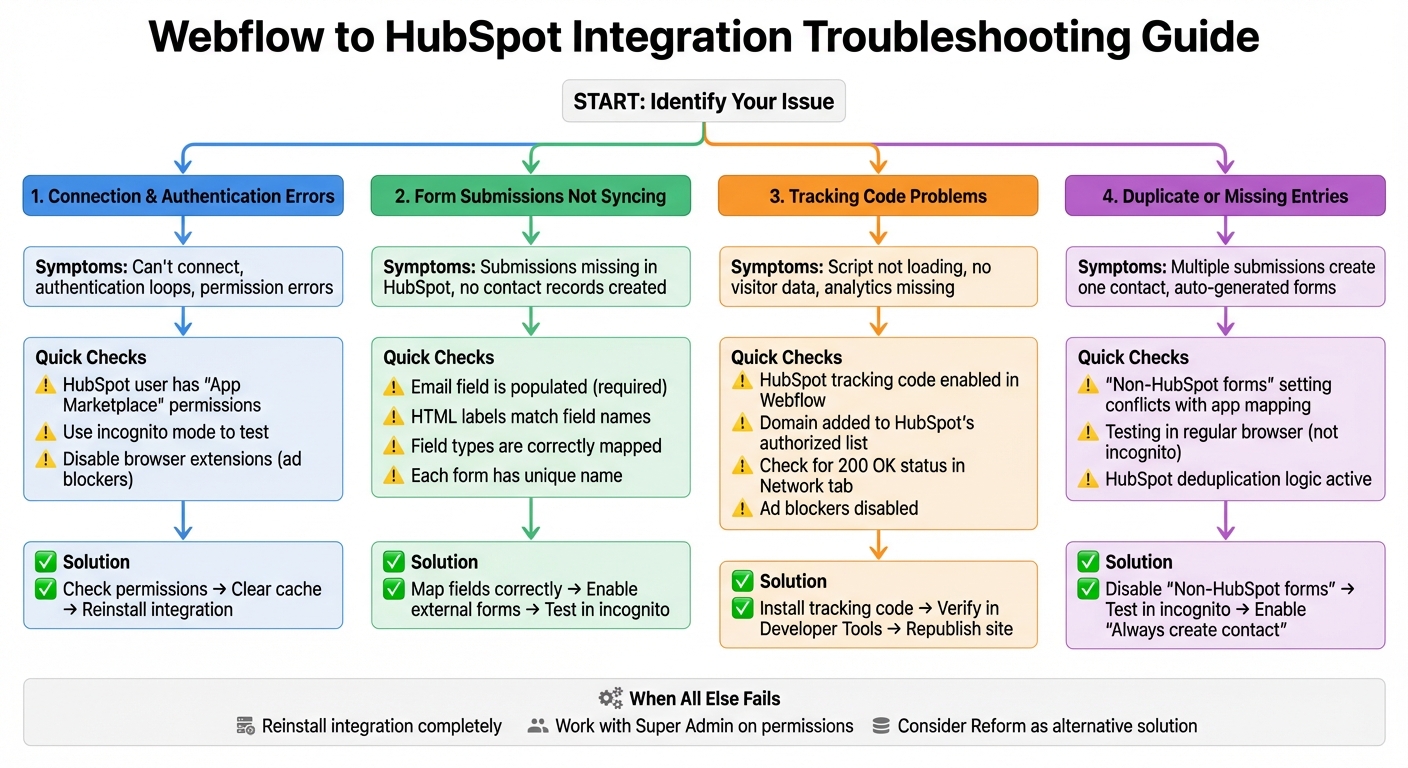
Webflow to HubSpot Integration Troubleshooting Flowchart
Manage leads using Webflow Logic and Hubspot - Workflow series
sbb-itb-5f36581
Connection and Authentication Errors
When Webflow and HubSpot fail to connect, the issue often boils down to permission mismatches or browser-related interference. For instance, if the HubSpot user trying to authorize the integration lacks the necessary permissions, the connection won’t go through. As HubSpot's Knowledge Base explains, "The HubSpot user attempting to connect the integration doesn't have the necessary user roles or permissions to authorize the required scopes requested by the integration".
Sometimes, browser extensions or cached data can disrupt the authentication process. If you find yourself stuck in a loop after clicking the "Authenticate HubSpot" button, clearing your browser cache or disabling extensions might resolve the issue.
Another potential roadblock is subscription-level limitations. If your HubSpot plan doesn’t include essential tools like workflows or specific APIs, the connection may fail even if permissions are correctly set. Additionally, make sure the HubSpot App is connected to individual Webflow sites rather than an entire Workspace.
To address these issues, start by checking your HubSpot user’s permissions and access settings.
Checking App Permissions and Access Settings
The first step in resolving authentication problems is ensuring that your HubSpot user has the appropriate permissions. Specifically, confirm that "App Marketplace" permissions are enabled. As Jaycee Lewis from the HubSpot Community notes, "If you are not a Super Admin and this is a first-time installation, you need to have the App Marketplace permission". If this doesn’t solve the issue, consider temporarily assigning Super Admin status to the user for testing purposes.
In Webflow, you can verify the connection status by navigating to Site settings > Apps & Integrations and checking if the HubSpot App appears in the list. If the authentication process keeps looping, try reauthenticating in an incognito or private browser window. Extensions like ad blockers (e.g., Ghostery or Privacy Badger) or cookie consent scripts (e.g., OneTrust) can interfere with the connection process, so disabling them temporarily may help. For more detailed troubleshooting, collect a HAR file during the connection attempt to pinpoint missing scopes or network errors.
How to Reinstall and Reauthenticate the Connection
If adjusting permissions doesn’t resolve the issue, you may need to reinstall the integration. To uninstall the existing connection, go to Site settings > Apps & Integrations > Connected Apps, find HubSpot, and click Uninstall App. Alternatively, open the Apps panel in the Designer, hover over the HubSpot App, and click Remove app.
To reinstall and reauthenticate, visit the HubSpot App installation page in the Webflow Marketplace. Select the specific site, review the requested scopes, and click Authorize App. Then, choose the correct HubSpot account and click Connect App to complete the process. Open the app within the Webflow Designer to confirm the connection is active. Keep in mind that if you’re using a legacy Workspace-level integration, deleting and re-adding it will require you to recreate all existing form mappings on individual sites.
| Error Message | Likely Cause | Recommended Action |
|---|---|---|
| "You don't have permission to connect this integration" | Missing App Marketplace or Super Admin roles | Grant App Marketplace permissions or Super Admin status in HubSpot |
| "Authorization failed because the provided scopes are insufficient" | App configuration missing required scope in install URL | Contact the app developer to update the install URL |
| "This account doesn't have access to some HubSpot features" | HubSpot subscription plan too low for requested tools | Upgrade your HubSpot subscription or review the subscription requirements |
| "Authenticate HubSpot" button loops | Browser cache, cookies, or missing permissions | Clear browser cache, use an incognito tab, or check user permissions |
Form Submissions Not Appearing in HubSpot
Even after connecting Webflow and HubSpot, form submissions might still fail to sync. One common issue is missing HTML labels, which prevents HubSpot from mapping form data correctly. Make sure field types are matched correctly. For instance, if you're mapping a Webflow "Plain Text" field to a HubSpot "Date" field, the date must follow the YYYY-MM-DD format. Additionally, ensure the Email field is filled out, as HubSpot requires it to create contact records.
Browser extensions can also block the HubSpot script, causing submissions to vanish. Similarly, if visitors decline your site's cookie banner, HubSpot won't track their submissions. HubSpot's deduplication logic - based on email addresses and tracking cookies - can also cause multiple test submissions from the same browser to update an existing contact instead of creating new ones.
Mapping Field Names and Types Correctly
Once you've addressed label issues, the next step is to ensure field names and types are mapped correctly. Publish your Webflow site, submit a test form, and verify that each input field's "Name" matches its HTML Label text. As Santiagoaday from the HubSpot Community explains:
"The documentation is referring to the HTML element Label, which you have to add to the Webflow form... Once you add this to the form, make sure that the 'Name' on the email field and the 'Text' field in the Label element are the same"
Each Webflow form block must have a unique name. Duplicating names can confuse the API, leading to incorrect form mapping or connection issues. After mapping, open the HubSpot App in the Webflow Designer and select "Connected forms" to review or update mappings for the current page. Perform a live submission and check the "submission log" in HubSpot's form settings to confirm that data is transferring correctly.
| Webflow Field Type | Corresponding HubSpot Field Type |
|---|---|
| Plain (Text) | Single-line text, Multi-line text, Paragraph, Date (YYYY-MM-DD) |
| Single-line text | |
| Phone | Single-line text |
| Number | Number, Single-line text, Multi-line text |
| Radio button | Radio |
| Checkbox | Single checkbox |
| File upload | File |
| Text area | Multi-line text |
| Select | Dropdown |
Enabling External Form Submissions in HubSpot
Once field mapping is correct, verify that external form submissions are enabled in HubSpot. The HubSpot tracking code must be active on your Webflow site. Open the HubSpot App in the Webflow Designer, go to "Manage site tracking", toggle "Enable HubSpot site tracking code" to On, and publish your site. With tracking enabled, HubSpot automatically picks up form submissions using the Webflow Form ID, even without manual mapping.
If you're not using the native app mapping tool, ensure "Non-HubSpot forms" are enabled in your HubSpot account settings to allow the tracking code to capture external submissions. However, enabling both "Map Webflow form" and "Non-HubSpot forms" at the same time can result in duplicate submissions. If you notice unexpected forms being auto-generated in HubSpot, try disabling the "Non-HubSpot forms" feature to resolve the issue.
Republish your Webflow site after making any tracking or mapping changes. If a contact's page view count shows "0" after submission, it’s likely the visitor blocked cookies or declined the cookie consent banner.
Testing Submissions in Contact Timelines
Always test form submissions in an incognito or private browser window. Ben_M, a Key Advisor in the HubSpot Community, explains:
"If you are not using incognito mode, then your submission will be tracked potentially to a single hubspot record because Hubspot can store multiple email addresses to the same record"
Submit a test form and check the contact's timeline in HubSpot to confirm the submission appears. This step helps ensure that your mapping and tracking configurations are working. If the submission doesn’t show up, verify that your form includes a populated "Email" field - HubSpot won’t create or update a record without it. To display a submission on a specific object's timeline (like a Company or Deal), the form must include fields linked to that object type.
If the form works via its standalone HubSpot URL but not on your Webflow page, the issue might be a script conflict or an ad blocker interfering with the page. To avoid multiple submissions from the same email being merged into one record, enable the "Always create contact for new email address" option in the HubSpot form settings.
Tracking Code and Script Problems
Once you've mapped fields and set up tracking, the next step is tackling any tracking code issues that could disrupt data syncing. The HubSpot tracking code is essential for monitoring site traffic, capturing analytics, and identifying visitors on platforms like Webflow. Without it, you risk losing visitor data and preventing form submissions from syncing. Common problems include incorrect placement of the code, duplicate installations, or browser extensions blocking the script.
Adding HubSpot Tracking Code to Webflow
You can easily add the tracking code using the Webflow HubSpot App. Open the app in the Webflow Designer, select "Manage site tracking", toggle the "Enable HubSpot site tracking code" option to On, and publish your site. This setup automatically tracks all multi-step form submissions using the Webflow Form ID, even if you don't manually map fields.
For manual installation, copy the tracking code from HubSpot (Settings > Tracking & Analytics) and paste it in Webflow's "Head Code" section or before the closing </body> tag. Alternatively, you can deploy the code through Google Tag Manager (GTM) using an "All Pages" trigger. After installation, verify the script is working by using Developer Tools to check for a 200 OK or 304 status in the Network tab. Look for the hubspotutk cookie to ensure proper functionality. Make sure to install only one HubSpot tracking code per page to avoid conflicts. Also, add your Webflow domain to the "Additional Site Domains" list in HubSpot's tracking settings to prevent submissions from being flagged as spam.
If the script still isn't working, browser extensions like ad blockers could be causing the issue. Here's how to address that.
Fixing Script Blocking and Ad Blocker Issues
Ad blockers and similar browser extensions, like Ghostery, can silently block the HubSpot tracking script, making it tricky to diagnose. To check if the script is loading, open Developer Tools (Right-click > Inspect > Network), refresh the page, and search for your HubSpot ID (e.g., 123456.js). A 200 OK status confirms the script is loading correctly. Additionally, look for __ptq.gif in the Network tab - this pixel indicates the script is firing and should also show a 200 OK status.
Testing in incognito mode can help identify if extensions are causing the problem. During the initial setup or when re-authenticating the HubSpot app in Webflow, disable ad blockers temporarily and allow third-party cookies to ensure the OAuth flow completes. If you're using Google Tag Manager to deploy the code, the script won't appear in the page source. Instead, use the Network tab to confirm it's firing.
| Issue | Common Cause | Resolution |
|---|---|---|
| CORS Error | Mixed HTTP/HTTPS protocols or script proxying | Ensure the site uses HTTPS; load the script without XHR/fetch |
| Script Not Found | Ad blocker or Ghostery extension | Disable blockers for testing; ask users to whitelist the site |
| 404 Error | Old or broken tracking URL | Replace outdated code with the current embed code from HubSpot |
| No Data in Dashboard | Domain not authorized in HubSpot | Add the Webflow domain to HubSpot's "Tracking & Analytics" settings |
| Missing in Source | Deployed using Google Tag Manager | Verify script loading via the Network tab, not "View Page Source" |
Advanced Troubleshooting Methods
When basic fixes don’t cut it, advanced troubleshooting can help resolve stubborn browser conflicts, authentication errors, and permission-related issues.
Clearing Cache and Testing in Incognito Mode
Sometimes, browser cache and cookies can cause unexpected problems with integrations. For example, they might lead to authentication loops where the "Authenticate HubSpot" button keeps reappearing. Instead of clearing your entire browsing history, focus on site-specific data.
- In Chrome: Go to
chrome://settings/content/alland remove data for "webflow.com" or "hubspot.com." - In Firefox: Navigate to Settings > Privacy & Security > Cookies and Site Data > Manage Data. Search for the specific site and delete its data.
This method keeps your other browsing data intact while targeting the issue directly.
Using incognito mode is another key step, especially for testing form submissions. HubSpot tracks visitors with cookies, so testing multiple submissions in a regular browser window may link all entries to a single contact record. Incognito mode avoids this problem. As Ben_M, a Key Advisor in the HubSpot Community, explains:
"If you are not using incognito mode, then your submission will be tracked potentially to a single HubSpot record because HubSpot can store multiple email addresses to the same record".
If the integration works in incognito mode but not in a standard browser window, the issue is often a browser extension or corrupted cookie. Extensions like Grammarly, Ghost Inspector, Ublock Origin, and Flash Video Downloader are known troublemakers for Webflow. Disable them one at a time to identify the culprit.
If problems persist after clearing cache, the next step is to reset the app connection.
Revoking and Reauthorizing App Access
Stuck in an authentication loop? Resetting the app connection can resolve issues like "401 Unauthorized" errors, which indicate an invalid or expired authentication token. This process also ensures the app has the necessary OAuth scopes, such as crm.objects.contacts.read and crm.objects.contacts.write.
Here’s how to revoke access:
- From Webflow: Go to Site settings > Apps & Integrations tab, locate HubSpot under Connected Apps, click View Details, and select Uninstall App.
- From Webflow Designer: Open the Apps panel, click HubSpot, and choose Remove app.
Before reauthorizing, clear your browser cache or use incognito mode to avoid interference from old session data. Then, head to the HubSpot App install page in the Webflow Marketplace, select your Webflow site, review the requested scopes, and click Authorize App. Choose your HubSpot account and click Connect App to finish.
Keep in mind, the person reauthorizing must have "App Marketplace" permissions enabled in HubSpot. As Jaycee Lewis, a Thought Leader in the HubSpot Community, points out:
"If you are not a Super Admin and this is a first-time installation, you need to have the App Marketplace permission. This is a recent change".
| Error Code | What It Means | How to Fix It |
|---|---|---|
| 401 Unauthorized | Invalid or expired authentication token | Revoke and reauthorize the app connection |
| 403 Forbidden | Token lacks required OAuth scopes | Reinstall the app and accept all permissions |
| Authentication Loop | Browser or session conflict | Clear cache/cookies or use Incognito mode |
| Permission Error | Insufficient HubSpot user rights | Assign "App Marketplace" or "Super Admin" permissions |
Working with Super Admins on Permissions and API Issues
If reauthorizing doesn’t fix the problem, it might be time to involve a Super Admin. Some issues, like stricter permission requirements for first-time installations, can only be resolved by someone with Super Admin access to your HubSpot account. If "App Marketplace" permissions alone don’t work, Super Admin rights might be necessary.
Another common hurdle is subscription tier mismatches. For example, if the integration requires features your HubSpot plan doesn’t include - like workflow automation on a Marketing Hub Starter plan - you might see errors like "Account doesn't have access to some HubSpot features". A Super Admin can review your subscription level to ensure it supports the integration.
For duplicate submissions or auto-generated "Non-HubSpot" forms in HubSpot, check whether the "Collect data from non-HubSpot forms" setting is enabled. As Pashairshad, a Gold Partner at HubSpot, explains:
"If you have 'non-hubspot forms' turned on... it could cause a duplicative form due to the integration conflict".
Disabling this feature prevents the tracking code from capturing submissions outside the mapped Webflow connection.
Missing fields? A Super Admin should go to Settings > Properties in HubSpot, select the property, and ensure the "Show property in forms" checkbox is checked under the Rules section. This ensures fields appear in contact records when mapped correctly in Webflow.
For persistent authentication loops, Super Admins can use HAR (HTTP Archive) analyzer tools to inspect network traffic and identify missing scopes or "403 Forbidden" errors. This deeper level of analysis can uncover API configuration problems that standard troubleshooting might miss.
Using Reform for HubSpot Integration

When traditional troubleshooting doesn’t cut it, there’s a simpler way to handle Webflow-to-HubSpot connections. Reform offers a straightforward three-step process: Add, Connect, Customize - making integration a breeze.
Reform's HubSpot Integration Features
Reform's HubSpot integration, available with the Pro Plan at $35/month, ensures real-time data synchronization. This means form submissions are instantly pushed to HubSpot, keeping your CRM updated at all times.
One of the standout tools introduced in January 2025 is partial form submission tracking. This feature captures data from incomplete multi-step forms, allowing you to recover potential leads that might have otherwise slipped through the cracks.
With advanced field mapping, you can assign Webflow form blocks directly to HubSpot properties like Contacts, Companies, and Deals through a user-friendly configuration menu. For marketers, hidden fields can be set up to track UTM parameters (e.g., utm_source, utm_medium), which are automatically recorded in HubSpot if tracking is enabled.
Reform also includes built-in spam prevention. Advanced filters and bot detection ensure that only high-quality leads make it into your CRM. To safeguard your submissions, simply add reform.app to your HubSpot analytics tracking list. Unlike Webflow forms, which count submissions against your site plan limits, Reform allows unlimited responses on all plans.
How Reform Solves Webflow-HubSpot Integration Problems
Reform tackles common Webflow-to-HubSpot integration issues like authentication loops, mapping errors, and script glitches with its direct API connection and easy setup. For example, native integrations can often create duplicate "Non-HubSpot forms" in your CRM. Reform avoids this by using an authorized API connection that seamlessly maps to your existing HubSpot forms and properties.
| Common Webflow-HubSpot Issue | How Reform Solves It |
|---|---|
| Authentication loops and 401 errors | Stable OAuth connection with a simple three-step setup |
| Missing submissions in contact timelines | Real-time synchronization ensures immediate data push |
| Field mapping errors | Dropdown options for mapping Contacts, Companies, Deals |
| Lost leads from form abandonment | Tracks partial submissions from multi-step forms |
| Spam submissions polluting your CRM | Advanced filters and domain authorization |
| Submission count limits | Unlimited responses on all plans |
Reform also simplifies contact management by automatically matching submissions to existing HubSpot contacts using email addresses. If no match exists, a new contact is created - keeping your CRM data organized without manual effort. And with a free trial (no credit card required), you can easily test if Reform solves your integration headaches.
Conclusion
For a seamless Webflow–HubSpot integration, keep these key points in mind:
- Unique Form Names: Assign distinct names to each Form block in Webflow. Duplicate names can confuse the API and disrupt mappings.
- Republish After Changes: Always republish your site after making integration or form updates.
- Adjust HubSpot Settings: If you're using the official Webflow-HubSpot App, turn off the "Collect data from non-HubSpot forms" setting in HubSpot to prevent duplicate leads.
- Field Type Matching: Ensure Webflow field types align with HubSpot's requirements (e.g., map "Email" to "Single-line text") and make sure all fields have visible labels.
- Testing and Permissions: Test forms in incognito mode and confirm the user managing the integration has Super Admin privileges.
If you encounter persistent issues despite troubleshooting, consider using Reform as an alternative. Its stable OAuth connection, real-time syncing, and advanced features - like partial submission tracking and multi-object mapping - can resolve many of the challenges native integrations often face.
FAQs
Why aren't my Webflow form submissions syncing with HubSpot?
If your Webflow form submissions aren’t syncing with HubSpot, the first step is to review your integration setup. Check that everything is configured correctly and that the forms are mapped to the appropriate HubSpot fields. Also, ensure the forms aren’t marked as non-HubSpot forms, as this can interfere with syncing.
It’s also worth checking for duplicate forms or conflicting settings within the integration. If the issue continues, take a closer look at the form settings in both Webflow and HubSpot to spot any potential misconfigurations. Getting the mapping and settings aligned is essential for fixing these syncing problems.
How can I fix authentication errors when integrating Webflow with HubSpot?
If you're running into authentication issues while integrating Webflow with HubSpot, here are some steps to help you troubleshoot and resolve the problem:
- Verify authorization: Make sure the HubSpot app has been correctly authorized, with all necessary permissions granted. If needed, go through the authorization process again.
- Reconnect your account: If the integration still seems disconnected, try reconnecting your HubSpot account, ensuring you select the correct account during the process.
- Adjust browser settings: Pop-up blockers or disabled cookies can interfere with authentication. Temporarily disable pop-up blockers and enable cookies to see if that resolves the issue.
- Clear cache or try another browser: If nothing else works, clear your browser's cache or switch to a different browser to eliminate potential conflicts.
These steps should resolve most authentication problems. If the issue persists, consider reaching out to support for additional guidance.
Why are some of my Webflow form submissions missing or showing up as duplicates in HubSpot?
Missing or duplicate form submissions in HubSpot often stem from mismatched field names or types between your Webflow and HubSpot forms. These inconsistencies can disrupt data syncing or even create duplicate entries. Another frequent culprit is improperly mapped forms during the integration process, which can lead to unexpected issues.
To fix this, make sure all form fields in Webflow align with the corresponding fields in HubSpot, including both names and field types. Also, take a close look at your integration settings to confirm that each form is mapped correctly and that no unnecessary duplicates are being generated. Once you've made adjustments, test the setup thoroughly to ensure everything is functioning as expected.
Related Blog Posts
Get new content delivered straight to your inbox

The Response
Updates on the Reform platform, insights on optimizing conversion rates, and tips to craft forms that convert.


Drive real results with form optimizations
Tested across hundreds of experiments, our strategies deliver a 215% lift in qualified leads for B2B and SaaS companies.
