
.webp)
Ultimate Guide to Multi-Stage Drip Campaign Setup


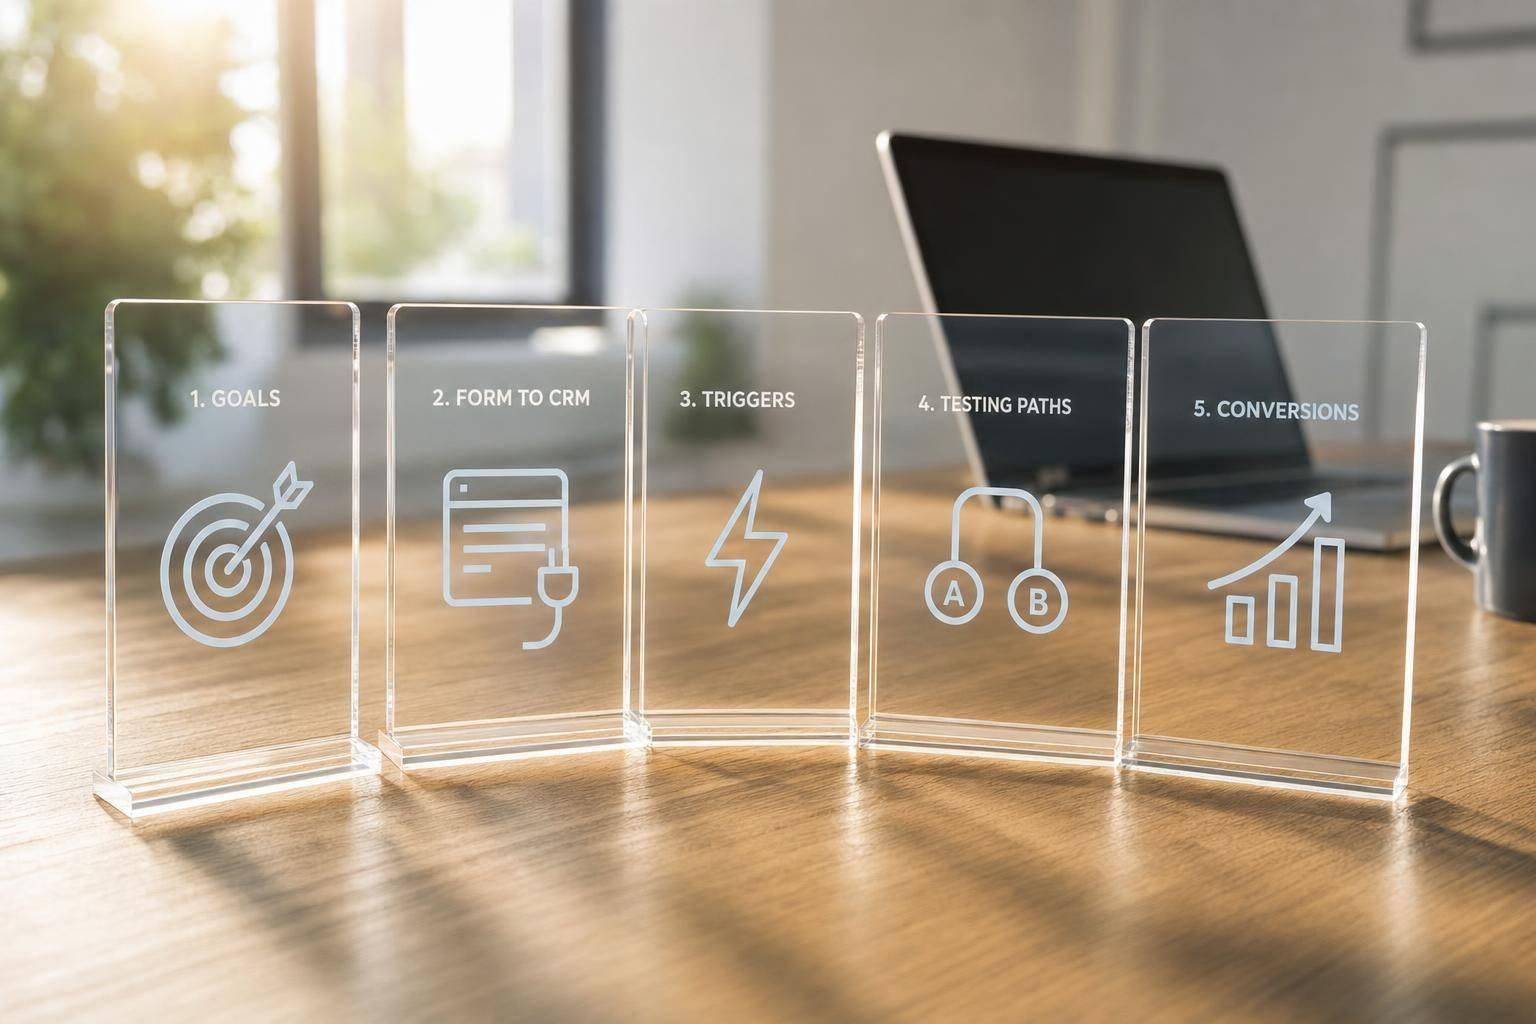
A multi-stage drip campaign works best when I set the path before I build the emails. The article’s main point is simple: I need clear goals, clean form data, tight automation rules, stage-based emails, and routine testing. If I skip setup, I risk wrong sends, low conversion, and weak handoff to sales.
Here’s the full article in plain terms:
- Start with one conversion goal like a demo booking, trial activation, or paid signup.
- Define who goes where based on source, intent, company fit, and lifecycle stage.
- Use form fields that change routing, not fields that just add clutter.
- Map form answers to CRM fields so triggers, tags, and owner assignment work the same way everywhere.
- Build a simple flow with one trigger, clear delays, a few behavior branches, and hard stop rules.
- Write stage-based emails for welcome, education, evaluation, and re-engagement.
- Test every path before launch, including links, tokens, rendering, time zones, and exit rules.
- Track both email metrics and sequence metrics like CTR, unsubscribe rate, conversion rate, time to conversion, and revenue per lead.
- Keep updating the campaign as offers, buyer behavior, and sales feedback change.
A few numbers from the article stand out:
- Triggered emails can see 4–8x higher opens and 5–6x higher clicks than scheduled sends.
- One-field forms may convert around 18.2%, while forms with 9+ fields can drop to 4.2%.
- Progress bars in multi-step forms may lift completion by 20–30%.
- A spam complaint rate should stay under 0.01% of sends.
- One benchmark cited: 43.46% open rate, 2.09% click rate, and 0.22% unsubscribe rate.
What I like about this guide is that it treats drip setup as a system, not just an email task. The form, CRM, automation logic, email copy, QA process, and sales handoff all need to match. If one part is off, the full sequence suffers.
Bottom line: this article is a step-by-step playbook for building a drip campaign that sends the right email to the right lead at the right stage, then measures what happens and fixes weak spots.
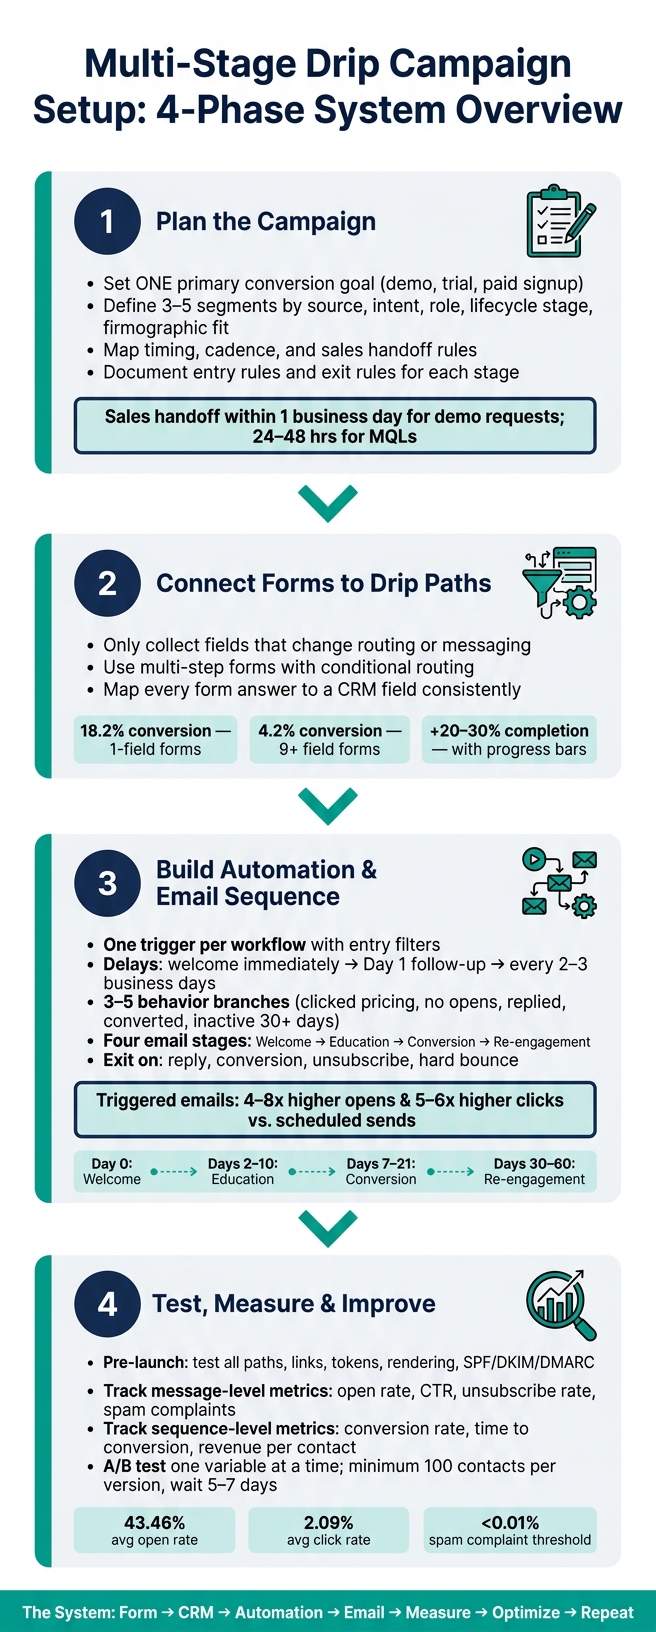
Multi-Stage Drip Campaign Setup: 4-Phase System Overview
How to setup drip email campaigns with real-world examples (step-by-step)
sbb-itb-5f36581
1. Plan the Campaign Before You Build It
Build the plan before you touch the workflow.
That means setting the goal, defining your segments, choosing timing, and spelling out handoff rules upfront. This plan becomes the guide for your multi-step form design, routing logic, and automation setup.
Set Goals, Conversion Events, and Stage Entry Rules
Start with one primary conversion event for the full campaign. For a B2B SaaS company, that could be a booked demo, a trial activation, or a paid subscription. Every stage should push the lead toward that one result.
Then track a small set of supporting metrics, like:
- Conversion rate
- Time to conversion
- Revenue per lead
These give you clear numbers to work from once the campaign goes live.
Each stage also needs a clear entry rule and exit rule. For example, a contact might enter Stage 1 after submitting a form and confirming their email. They move to Stage 2 after opening at least one email and clicking a resource. They leave the automation when they book a demo, become a sales opportunity, unsubscribe, get disqualified, or show no engagement for 30–60 days.
Segment Leads by Source, Intent, and Lifecycle Stage
Not every lead should get the same email sequence.
Someone who filled out a "Request a Demo" form is thinking very differently from someone who downloaded a top-of-funnel guide. Put both people into the same path, and you waste the moment.
A solid starting point is 3–5 segments based on the factors most likely to change your message: source, intent, role, lifecycle stage, engagement, and firmographic fit. Here’s how those inputs shape drip decisions:
| Segmentation Category | Data Points to Collect | Purpose in Drip Campaign |
|---|---|---|
| Form Source | Referral URL, Campaign ID | Tailors the opening message to the specific offer or ad that brought the lead in |
| Intent | Product interest, "Reason for reaching out" | Routes the lead into a product-focused or education-focused branch |
| Firmographic Fit | Company size, industry, revenue | Adjusts cadence and handoff timing (e.g., enterprise vs. SMB paths) |
| Lifecycle Stage | Lead, MQL, SQL, Customer | Prevents sending introductory content to someone already in a sales conversation |
Before you lock in segments, check what your form and CRM already collect. Segmentation is only as good as the fields behind it.
Map Timing, Cadence, and Sales Handoff Points
Cadence should reflect intent. Warm leads can move faster. Colder leads usually need a longer sequence built around education first.
Sales handoff also shouldn’t run on time alone. Behavior tells you much more. Repeated visits to a pricing page, multiple clicks across emails, a reply that shows purchase intent, or reaching a lead score threshold are stronger signs that someone is ready. When one of those triggers fires, the contact should leave automation right away and move to a human follow-up - ideally within 1 business day for demo requests and within 24–48 hours for MQLs.
| Rule Category | What to Document | Why It Matters |
|---|---|---|
| Stage Entry | Form source, lead score, or intent signal | Puts the lead on the right path from the start |
| Timing/Cadence | Delay intervals between messages | Prevents inbox fatigue and keeps engagement steady |
| Handoff Rules | MQL criteria, fit and intent score, or direct request | Moves the lead from automation to sales at the right moment |
| Exit Rules | Conversion events or disqualification signals | Stops nurture emails once the goal is met or the lead opts out |
Write all of this down in a shared blueprint before you build anything. A simple flowchart plus a written spec usually does the job. Review it with sales and operations so you can catch holes early. Once that blueprint is set, map your form data to each segment and handoff rule.
2. Connect Lead Capture Forms to the Right Drip Path
Your form decides which drip path a lead enters. So don’t ask for data just because it might be nice to have later. Ask for the data you need to route the lead and tailor the message right away.
Choose Form Fields That Support Segmentation
Only collect data that changes routing or messaging. For most B2B and SaaS forms, that usually means name, email, role or job title, company name, company size, primary use case, product interest, and source or campaign data. If a field doesn’t affect where the lead goes or what they see next, it probably doesn’t belong on the form.
This matters for conversion, too. Fewer fields tend to perform better. One-field forms convert at roughly 18.2%, while forms with nine or more fields drop to around 4.2%. That doesn’t mean you should strip out every qualifying question. It means you should be picky. If company size helps you split enterprise from SMB leads, keep it. If a phone number won’t change the workflow, save it for later.
For U.S. forms, stick to two-letter state codes, 10-digit phone formatting, and consistent country values.
Once you’ve set the field list, use multi-step logic to route people based on their answers.
Use Multi-Step Forms, Conditional Routing, and Validation
One long form can feel like a chore. A multi-step form spreads the same questions across two or three screens, which feels easier to finish. It’s the same idea as carrying groceries in a few lighter trips instead of trying to grab every bag at once.
Progress indicators can increase form completion by up to 20–30%. But the bigger win is routing. Multi-step forms let you ask one high-signal question per screen and branch from there.
If a visitor selects "Enterprise", you can send them into an enterprise nurture track. If they choose "Free trial", you can place them in a product education sequence. The person sees a smooth form experience, while the routing happens behind the scenes.
Reform supports multi-step forms, conditional routing, lead enrichment, spam prevention, email validation, and CRM integrations, so contacts enter the drip with clean data.
Map Form Data to CRM and Automation Fields
Before launch, map every form answer to a CRM property. This step sounds small, but it saves a lot of pain later. If "Enterprise" in your form maps to "Large business" in your CRM and "ENT" in your automation tool, triggers can misfire and segments can split apart.
Use the same field names and values across your form, CRM, and automation platform. That means mapping answers to clear CRM properties like lifecycle stage, lead source, campaign ID, assigned owner, product interest, and segment tag.
Here are a few common examples:
| Form Answer | CRM Field Updated | Automation Triggered |
|---|---|---|
| Company size = 500+ employees | Segment = Enterprise | Enterprise nurture sequence + sales owner assigned |
| Use case = Integrations | Segment = Technical buyer | Technical education drip |
| Lead source = Paid search | Source = Paid search / Campaign ID | Faster conversion-focused sequence |
| Use case = Free trial | Lifecycle stage = Trial | Product education sequence |
Store this mapping in a shared spec. That way, when someone updates the form, routing can be updated fast too. Then use those fields to build triggers and delays.
3. Build the Automation Rules and Email Sequence
With your form data mapped to CRM fields, the next step is to build the workflow.
Configure Triggers, Delays, and Branching Logic
Start each workflow with one trigger. That could be a demo request, trial start, webinar registration, or pricing-page visit. Add entry filters so existing customers, or contacts already in another nurture path, don't get pulled into the workflow by mistake.
Triggered emails can beat broadcast campaigns by a big margin, with open rates 4–8x higher and click rates 5–6x higher than scheduled sends.
After the trigger fires, delays control the pace. A common setup is simple: send the welcome email right away, follow up one business day later, then space the rest of the emails 2–3 business days apart. Send based on the contact's time zone during business hours, Monday through Friday.
Give behavior-based branches a little breathing room. If you split the path too soon, the system may not have enough time to log the action. In most cases, this small set of branches covers the bulk of the journey:
| Behavior | Branch Action |
|---|---|
| Clicked pricing CTA | Fast-track to a high-intent path with shorter delays |
| No opens after 2–3 emails | Move to a re-engagement mini-sequence |
| Replied to any email | Pause automation and notify sales via CRM task |
| Converted (demo booked, trial upgraded) | Exit the drip and enroll in onboarding |
| Inactive for 30+ days | Move to a sunset or re-permission sequence |
Keep the branching logic tight. For most journeys, 3–5 key decisions are enough to tailor the path without turning the workflow into a mess.
Write Emails for Each Stage of the Journey
Give each email one idea and one CTA.
Build the sequence around four stages. A common pattern is the 3:1 ratio: three value-first emails before a direct sales ask. Here's a practical way to map that out:
| Stage | Timing | Subject Line Approach | Core Message | CTA |
|---|---|---|---|---|
| Welcome | Day 0 (immediate) | Reference the trigger: You're in: Next steps for your [Product] trial | Confirm the action, set expectations, and help them get a quick win | Log in and complete the first setup step |
| Education | Days 2–10 | Outcome-focused: How SaaS teams cut onboarding time by 40% | Share one use case, playbook, or customer story | Watch the 3-minute setup walkthrough |
| Conversion | Days 7–21 | Benefit + specificity: See your projected ROI with [Product] in 5 minutes | Present one decision aid, such as ROI data, pricing clarity, or an implementation plan | Schedule a 20-minute strategy call |
| Re-engagement | Day 30–60 post-inactivity | Honest framing: Still working on [Outcome]? Here's what changed in 2026 | Offer one simple value proposition or updated resource | Update your preferences or share your top challenge |
Most B2B emails should land in the 75–200 word range. Start with the context for why they're getting the email, spell out the one thing they'll gain by reading, and end with one clear next step. Include a visible unsubscribe link and clear sender details to stay compliant with CAN-SPAM.
Once the sequence is drafted, test every trigger, delay, and exit before launch.
Set Exit Conditions and Document the Flow
Define exit rules before launch. Exit conditions stop the workflow from sending follow-ups that no longer make sense.
The core stop rules are simple: stop on reply, stop on conversion, stop on unsubscribe, and stop on hard bounce. In practice, that means pausing the automation, removing the contact from the current sequence, and routing the lead to the right next step, such as sales or onboarding. It also helps to set a global frequency cap of no more than 1–2 marketing emails per contact per day across all campaigns.
After the rules are in place, document the flow as a simple diagram or checklist showing triggers → delays → branches → exits. Anyone across marketing, sales, or ops should be able to look at it and understand the flow right away. That same doc also makes updates and troubleshooting much less painful.
Use the diagram as your pre-launch test checklist.
4. Test, Measure, and Improve Performance
Run a Full Pre-Launch Test
Once the flow is built, check every path before the first live send.
Before launch, add test contacts for each segment, confirm routing, check links and UTM tags, and make sure personalization tokens and CRM fields show up the right way. Then test rendering in Gmail, Outlook, and Apple Mail on desktop and mobile. After that, verify delays, branches, and exit rules with enrolled test contacts. Conversion exits should fire right away. Keep every result in a shared QA log so the team can repeat checks and fix problems fast.
There’s one more item to clear before launch: check SPF, DKIM, and DMARC alignment, and run a spam-check tool to catch deliverability issues before the first real send.
Track Message-Level and Sequence-Level Metrics
Track results on two levels: how each email performs and how the full sequence converts. In both cases, measure against the campaign’s main conversion event.
At the message level, focus on open rate, click-through rate (CTR), unsubscribe rate, and spam complaint rate. Open rate still helps, but click and conversion data usually tell you more about actual engagement. A low open rate often points to a weak subject line or poor sender recognition. If opens look solid but CTR is low, the body copy or CTA is likely the problem. If unsubscribes jump after one email, the content may have missed the mark or the send frequency may have been too high. Spam complaints need the fastest response - keep them below 0.01% of sends to protect sender reputation.
For a benchmark, 2025 industry averages show an open rate of 43.46%, a click rate of 2.09%, and an unsubscribe rate of 0.22%. Those numbers are useful as reference points, but your own past data is usually the better baseline.
At the sequence level, watch completion rate, conversion rate, time to conversion, and revenue per contact. Drop-off by stage can expose flow problems. If early engagement looks good but later performance falls off a cliff, the issue is usually the sequence design, not just one email.
| Metric Layer | Key Metrics | What a Problem Signals |
|---|---|---|
| Message-level | Open rate, CTR, unsubscribe rate, spam complaints | Weak subject line, poor CTA, deliverability issue, bad targeting |
| Sequence-level | Conversion rate, completion rate, revenue per contact, time to conversion | Weak stage design, poor branching logic, bad handoff timing |
Use the weakest metric to decide what to test next.
Use A/B Tests to Refine the Flow
Test one variable at a time - subject line, send timing, CTA copy, or email count - so you know what changed the result. A simple place to start is subject lines. Then move to CTA language, body copy, or send cadence.
Don’t call a winner too early. A solid floor is at least 100 contacts per version, plus a wait window of 5–7 days after the last send so delayed opens and clicks have time to show up. Early calls are one of the most common testing mistakes, and they often lead to changes that fall apart once volume goes up.
If you’re using Reform, its real-time analytics can show metrics like view-to-start rate, step-level drop-off, and completion rate by traffic source. That can help you spot weak lead sources, like a paid channel that drives lots of form views but very few completions, or low-intent submissions that keep showing weak drip engagement. Clean that up upstream with conditional routing or tighter qualification questions, and the contacts entering the sequence tend to get better.
Log each test hypothesis, setup, and result in an experimentation doc. That way, the team can build on what worked and avoid running the same failed test twice.
Conclusion: Keep the Campaign Current as Offers, Data, and Buyer Behavior Change
Once your flow is live, maintenance is what keeps it converting. A multi-stage drip campaign only works when goals, routing, automation, and optimization stay in sync. Miss one piece, and results start to slide.
After launch, stale content is one of the fastest ways to lose trust. Review every email that mentions pricing, plan names, or offers, and check it against your current website and billing system. Set a monthly KPI review that looks at open rate, click-through rate, unsubscribe rate, spam complaints, conversion rate, time to conversion, and revenue per contact. If something falls below your internal baseline, flag it and make it the next thing you test.
List hygiene matters too. Keep it on a regular schedule:
- Suppress hard bounces right away
- Remove repeated soft bounces
- Keep your list clean so your data stays dependable
Clean lists give you better data. Better data leads to better optimization calls.
Form routing needs the same level of care. When offers or personas shift, update your routing rules and qualification questions. Reform's real-time analytics can help you spot form drop-off early, before it starts hurting campaign performance, so you can fix leaks before they hit the drip. If you need help building these systems, you can optimize lead generation with expert form strategies to ensure your routing is airtight.
Team feedback fills in the gaps that numbers can't always show. Bring sales and customer success into the loop every month or every other month. They often spot objections that metrics miss. A recurring sync, clear owners, and a shared update list can help keep the campaign current.
FAQs
How long should a multi-stage drip campaign be?
Build your multi-stage drip campaign around your sales cycle, with an ideal conversion goal within 28 days of lead generation.
If leads often take longer to convert, think about shortening the sequence or using more aggressive triggers. Send nurture emails 1 to 2 days apart, then adjust the timing based on intent and engagement.
What data should I collect on my form first?
Start with only the must-have fields - ideally five or fewer. Stick to basics like name and email address, and only ask for information that helps with the very next step in your automation flow.
If you need more detail, don’t pile it all into one form. Use multi-step forms, data enrichment for firmographic data, and hidden fields for context like UTM parameters or page URLs. And when you can, use dropdowns instead of open text fields so your data stays clean and standardized.
When should a lead move from automation to sales?
A lead should move from automation into a sales-owned sequence once it hits a set SQL threshold.
That handoff usually happens when the lead reaches a certain score, like 50 points, or takes a high-intent action such as requesting a demo or asking about the pricing page. Once that happens, assign a sales rep, stop the nurture emails, and move the contact into a sales workflow so the follow-up is fast and personal.
Related Blog Posts
Get new content delivered straight to your inbox

The Response
Updates on the Reform platform, insights on optimizing conversion rates, and tips to craft forms that convert.



Drive real results with form optimizations
Tested across hundreds of experiments, our strategies deliver a 215% lift in qualified leads for B2B and SaaS companies.
