
.webp)
Wix Form Integration Methods: Guide



If I had to sum it up in one line: use native Wix forms for simple jobs, use apps or embeds for better form UX, and use webhooks or Velo when submissions need to update other systems.
I’d choose a Wix form setup based on workflow depth, not feature hype. In this guide, the six paths are clear:
- Wix native forms for contact, support, quote, and signup forms
- Embedded forms for teams that already use another form tool
- App-based forms for added field types and multi-step forms without custom code
- Webhook flows for sending submissions to CRMs, help desks, or other tools right away
- CRM sync for lead assignment, segmentation, and sales follow-up
- Custom Velo/API builds for routing rules, order checks, deduplication, and multi-system logic
A few points stood out to me:
- Wix Forms V2 validates data before it records a submission
- Native forms work best when fields are stable and the submission has one main destination
- Webhook setups should use HTTPS, signature checks, logs, retries, and idempotency
- Testing should cover desktop, mobile, invalid inputs, duplicate events, and API failures
- For consent tracking, teams should store items like status, timestamp, source, and policy version
- Spam controls can include invisible reCAPTCHA and extra filtering
Wix Website Tutorial: Custom Forms 3 Ways
sbb-itb-5f36581
Quick Comparison
| Method | Setup | Control | Best use |
|---|---|---|---|
| Wix native forms | Low | Good inside Wix limits | Simple forms with one destination |
| Embedded forms | Low to medium | Depends on provider | Existing form stack or better UX |
| App-based forms | Low to medium | Varies by app | More features without code |
| Webhooks | Medium | Based on form layer | Instant delivery to other tools |
| CRM sync | Medium | Based on CRM and form | Sales workflows and contact history |
| Velo/API | High | Highest | Custom logic and multi-step processing |
My takeaway: the article makes one point over and over, and it’s the right one: start with the least complex setup that fits the job, then add automation only when the workflow calls for it.
That means a support form may only need an inbox alert. But a wholesale form may need validation, CRM mapping, owner routing, and follow-up tasks. Same store, same Wix site, different form path.
So if you’re deciding what to use, I’d keep it simple:
- Pick native forms for low-friction setup using lead generation form templates
- Pick embedded or app-based forms when the user flow needs more polish or expert form strategies
- Pick webhooks or CRM sync when teams need fast downstream action
- Pick Velo/API only when the form logic depends on store data, custom rules, or server-side handling
The rest of the article breaks down where each option fits, what can go wrong, and how to test before launch.
How to choose the right Wix form integration method
Wix Form Integration Methods: Setup, Control & Best Use Cases
Start with the simplest option that does the job. Then add more moving parts only if you need them.
A wholesale application and a basic contact form are both forms. But they don’t need the same setup. One may need deeper data handling, routing rules, and follow-up actions. The other may just need to land in an inbox.
Before you pick a method, ask a few plain questions:
- How many fields does the form need?
- Does the form change based on what someone selects?
- Where should the submission go?
- Who needs to act on it, and how fast?
- Does it need file uploads, payments, or order data?
Those answers usually get you to the right option faster than a long feature-by-feature debate.
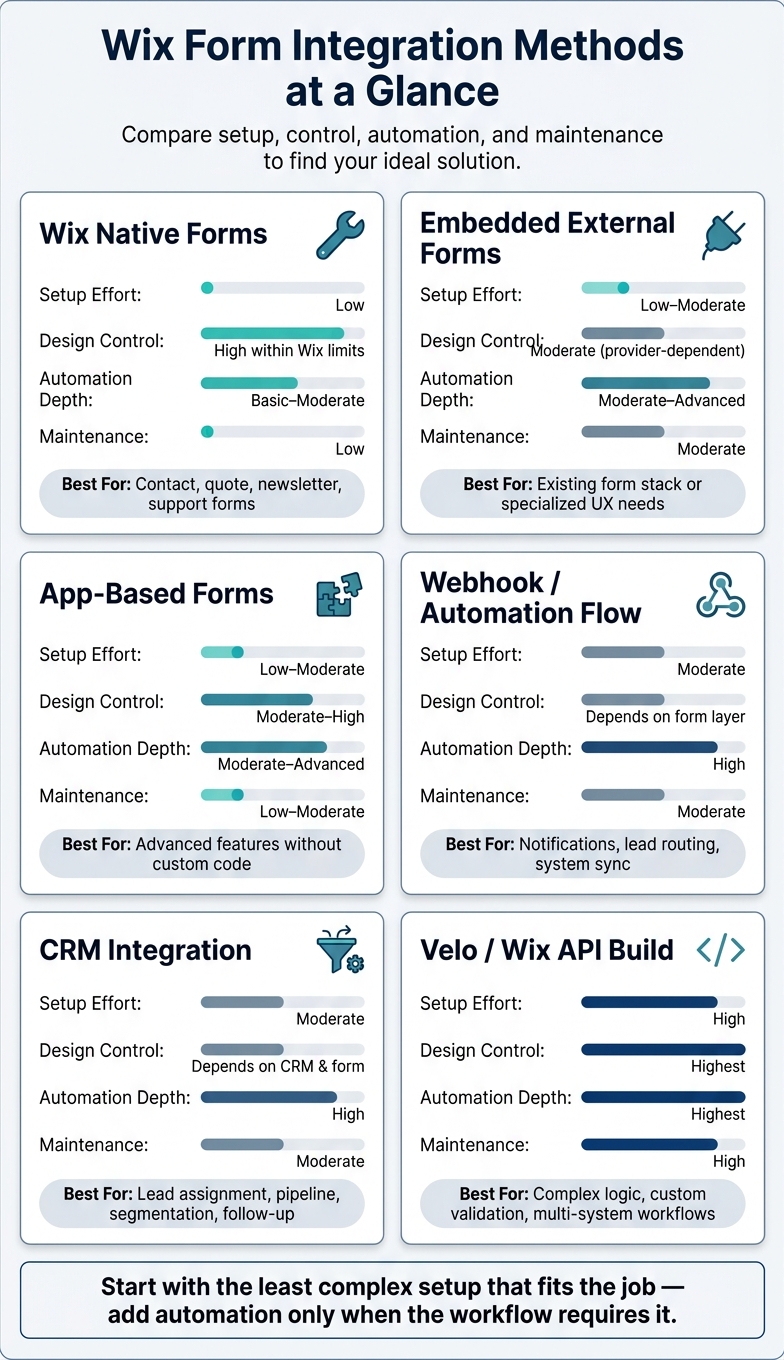
Comparison table: setup effort, control, automation, and best-fit use case
| Method | Setup effort | Design control | Primary data destination | Automation depth | Maintenance | Best-fit use case |
|---|---|---|---|---|---|---|
| Wix native form | Low | High within Wix's form capabilities | Wix submissions and Wix automations | Basic to moderate | Low | Contact, quote, newsletter, and support forms |
| Embedded external form | Low–moderate | Moderate; partly controlled by the provider | External platform, CRM, or database | Moderate to advanced, depending on provider | Moderate | Teams with an existing form system or specialized UX needs |
| Wix app-based form | Low–moderate | Moderate to high, depending on the app | Wix, app account, or connected systems | Moderate to advanced | Low–moderate | Advanced features without custom development |
| Webhook or automation flow | Moderate | Depends on the form layer | CRM, email platform, help desk, or database | High for event-based workflows | Moderate | Notifications, lead routing, record creation, system sync |
| CRM integration | Moderate | Depends on the form and CRM | CRM as the system of record | High for sales and lifecycle processes | Moderate | Lead assignment, pipeline creation, segmentation, follow-up |
| Velo/Wix API build | High | Highest | Wix collections, external APIs, or multiple systems | Highest | High | Complex logic, custom validation, enrichment, multi-system workflows |
Use the table to narrow your options. The next section gets into each method in more detail.
When the simplest method is the best method
Native Wix forms make sense when the form has a small set of stable fields, sends data to one place, and doesn’t need branching logic. A support form that collects name, email, order number, and message - and sends it to a shared inbox through an email alert - doesn’t need a webhook or custom Velo code.
Move to an app or embedded form when there’s a clear feature gap. Maybe you need conditional fields, richer layouts, a built-in CRM connection, or a form setup you can reuse across several pages or sites.
Move to webhooks or automation when a submission needs to kick off work in another system, like creating a CRM record, alerting a sales rep, or opening a support ticket.
Save Velo/API build for cases that actually need it: custom validation tied to order data, routing by product SKU or customer type, deduplication logic, or writing to multiple systems at the same time.
Here’s the simple gut check: if a nontechnical team member needs to update fields on a regular basis, a native form or app-based form is usually the better pick. If a submission has to trigger several downstream actions across different systems, that’s an automation or API issue - not a form issue.
With the right fit in mind, the next section walks through the native, embedded, automation, and custom paths.
The core Wix form integration methods
Wix native forms for fast setup inside the Wix Editor
Wix native forms are the fastest way to get a form live inside the Wix Editor.
You can add a form, pick a template, or build one from scratch. Wix gives you ready-made options like contact, subscribe, and order forms. From there, you can edit field labels, placeholder text, required fields, field order, button text, and the confirmation message.
Form submissions land in Forms & Submissions, where your team can review, manage, and track entries. You can also set up notifications so alerts go to a shared inbox or straight to specific teammates.
This setup works best when you need fixed fields and one clear destination for submissions. If you need branching logic, data enrichment, or CRM routing, native forms will feel limiting pretty fast.
Once branding needs get tighter, or you want to reuse the same form across several pages, it usually makes sense to switch to an embed or app.
Embedded and app-based forms for more control over UX and features
Embedded forms let you keep an existing form setup while giving you more control over branding, user flow, and integrations. Before you publish, test the full experience on both desktop and mobile. That means checking responsive behavior, validation, redirects, tracking, and form delivery.
If your team wants branded multi-step forms, conditional routing, email validation, spam prevention, lead enrichment, live analytics, and marketing or CRM connections, a platform like Reform can be embedded on Wix pages.
App Market form apps sit somewhere in between. They give you packaged features without needing custom code. Before installing one, review a few basics:
- Editor compatibility
- Supported field types
- Responsive behavior
- Who owns the submission data
- Data export options
- Webhook or API access
- Consent controls
- Compatibility with Wix Stores and customer accounts
- Plan limits
- Lock-in risk
That last point matters more than people think. A form app can look fine on day one, then become a headache when you need to move data out or connect it to the rest of your stack.
If submissions need to update other systems right away, you'll want webhook or API handling in the mix.
Webhooks, CRM sync, and custom Velo/API workflows
A good workflow usually follows a simple path: capture → validate → normalize → deliver → log.
The form should check required fields and formats before submission. Then the receiving workflow should check the payload again, standardize phone numbers and country codes, and map fields to CRM properties. After that, the system can create a new contact, update an existing one, open a support ticket, attach the submission to an order, or route the record based on rules like product category or region.
For webhook endpoints, use HTTPS and verify incoming requests with the signature from the sending system, usually a SHA-256 HMAC hash of the request body. Add idempotency with a unique submission ID so retries don't create duplicate CRM contacts or tickets. Log delivery attempts, response codes, and failure reasons, and send repeat failures to an alert queue. Keep API keys and webhook secrets on the server side.
For Wix-native workflows connected to commerce data, use Velo or the Wix APIs.
Velo and Wix APIs make sense when the workflow depends on Wix commerce context. For example, you might show different questions based on a selected product, connect a submission to a logged-in customer, pull order details, or route wholesale requests by estimated annual revenue.
The Wix Forms V2 submission API validates submitted values and only records a submission after successful validation. If validation fails, the submission is aborted. For CRM field mapping, Wix now recommends per-field contact mapping. The older postSubmissionTriggers.upsertContact method does nothing for contact mapping.
E-commerce workflows, testing, and launch readiness
Common Wix e-commerce form workflows that benefit from integration
Once you’ve picked your form setup, the next step is simple: tie each submission to the action it should kick off. That’s where e-commerce forms start pulling their weight. A form shouldn’t just collect data. It should do something useful with it.
Here’s a practical way to map common form types to the workflow behind them:
| Workflow | What to capture | Where it should go |
|---|---|---|
| Back-in-stock request | Product name, SKU, variant, customer email | Email marketing audience or inventory alert system |
| Wholesale/trade application | Company name, tax ID, estimated annual revenue, industry | CRM lead + sales owner notification |
| Custom quote request | Product name, product ID, quantity, page URL | Sales task with product context attached |
| Returns/damaged item | Order number, issue type, customer email, optional photo | Support ticket or specialized queue |
| Product feedback | Product name, order number, rating, open comment | Database or analytics system for categorization |
The big idea here is context. Don’t make your team guess what the customer meant or where the form came from. Pass details like product name, product ID, page URL, and campaign source through hidden or prefilled fields so each submission arrives ready to route.
That means back-in-stock requests can go straight into marketing or inventory alerts. Wholesale applications can create CRM leads. Quote requests can open sales tasks with product details already attached. Returns forms can land in a support queue. Feedback can move into reporting for sorting and analysis.
For logged-in shoppers, use account data when you can. For guest users, order number plus email is often the cleanest way to match the submission to the right person.
Use the table to connect the form to the business action behind it, not just the page where the form lives.
Testing checklist before launch and after changes
After the workflow is set, test the live form and every step that happens after submission before launch. Don’t stop at preview mode. Use the published form in actual desktop and mobile browsers before you send traffic to it.
Check the basics first: layout, field validation, multi-step flow, file uploads, redirects, loading states, and error messages on both desktop and mobile. Then submit test entries that look like real use, including valid data, missing required fields, invalid email addresses, long text, special characters, and boundary values.
It also helps to build a test matrix for what happens behind the scenes. Cover cases like:
- New contact creation
- Existing-contact updates
- Duplicate submissions
- Incomplete submissions
- Failed API calls
- Repeated webhook events
Make sure field mappings keep the right data type all the way through. If the goal is to update an existing contact, confirm that the system updates that record instead of creating a duplicate. For webhook-based flows, check signatures, unique event IDs, retries, logs, and failure handling. And if the CRM, webhook endpoint, or third-party API is down for a bit, the submission should fail gracefully, not vanish.
You’ll also want a written record of the setup: form owner, use case, fields, destinations, permissions, notifications, failure process, and retention period. That sounds a little tedious, but it saves a lot of pain later.
Consent, spam prevention, and accessibility need testing after every change. If marketing permission is required, use a clear unchecked consent control and store the consent status, timestamp, form source, and policy version when needed. Wix Forms includes configurable spam protection, including invisible reCAPTCHA and additional filtering levels, and Wix also documents reCAPTCHA for custom data submissions. Validate email syntax on the form and, when lead quality matters, consider email verification before creating high-value CRM or sales records; Wix's Forms V2 submission API performs general validation such as checking email fields.
Any time you update fields, validation rules, conditional routing, confirmation behavior, integrations, permissions, or connected APIs, run at least one successful submission and one intentionally invalid submission on desktop and mobile. Then confirm the whole chain: CRM mapping, webhook logs, consent records, notifications, spam controls, and the final user experience.
For Velo-based forms, test collection permissions and event handlers again because the workflow may depend on both form settings and custom code. The submission has to work in all three places: the form itself, the destination system, and the automation path.
Conclusion: Pick the method that matches your workflow complexity
After weighing setup time, control, and automation, the best Wix form method is usually the one that fits your workflow, not the one with the longest feature list.
Native Wix Forms work well for simple contact, quote, signup, or support forms that live fully inside Wix.
Embedded or app-based forms make sense when you want a branded experience, multi-step flows, or conditional questions.
Custom Wix/Velo forms are the right fit when you need routing, data transformation, deduplication, or other business logic.
Focus on four things:
- How much branding control you need
- How much lead qualification the form should handle
- Whether you need routing or data enrichment
- Which internal systems need to receive the data
Those answers usually get you to the right level of complexity much faster than a feature-by-feature comparison.
Map the customer journey, figure out the minimum fields and destinations you need, pick the simplest method that does the job, and add custom logic only when it solves an actual workflow problem.
Start simple, then add complexity only when the workflow requires it.
FAQs
How do I know when Wix native forms are enough?
Wix native forms work well when your setup is simple, your team doesn’t have much engineering support, and you only need standard field mapping for basic contact, company, or deal syncing.
They’re a practical, budget-friendly choice for low-volume setups where leads can go straight into your CRM without extra processing. If your needs remain simple, built-in forms are a fast, reliable option.
When should I use webhooks instead of CRM sync?
Use webhooks when you need near real-time data transfer and the next step has to happen right away. That makes sense for urgent lead routing, instant sales follow-up, and time-sensitive notifications.
Use native CRM sync for standard, predictable workflows where fast setup and easier upkeep matter more. If those built-in connectors start to feel limiting, move to webhooks or a custom API integration.
What should I test before launching a Wix form?
Before you launch, test the form on both desktop and mobile. Make sure the layout responds well, the fields and buttons are sized right, the form is accessible, and there are no JavaScript errors.
Then submit at least five test entries to check that the data shows up the way it should. If your form includes multi-step flows or tool integrations, go through every conditional path and make sure the data lands correctly in your CRM or marketing platform using realistic dummy data.
Related Blog Posts
Get new content delivered straight to your inbox

The Response
Updates on the Reform platform, insights on optimizing conversion rates, and tips to craft forms that convert.




Drive real results with form optimizations
Tested across hundreds of experiments, our strategies deliver a 215% lift in qualified leads for B2B and SaaS companies.
