
.webp)
Top AMPscript Use Cases for Forms


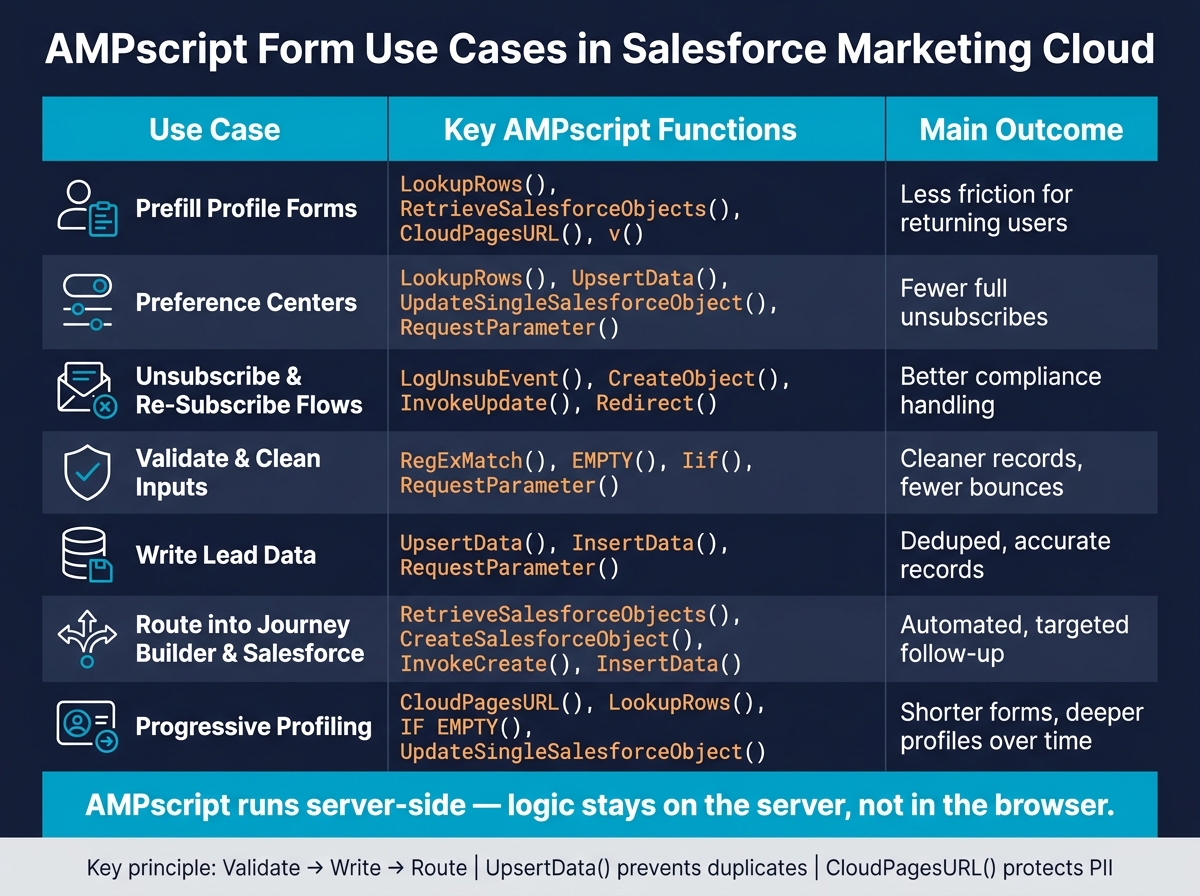
If you use Salesforce Marketing Cloud forms, AMPscript is best at four jobs: prefill known data, validate inputs on the server, save submissions without duplicates, and route people into the right next step.
I’d sum up the article like this: AMPscript helps me turn a basic form into a server-side workflow, or I can use expert form strategies to optimize lead generation without custom code. That means I can show saved profile data, run checks after submit, write to Data Extensions or Salesforce, and handle unsubscribe or preference updates with more control. It also helps cut duplicate records, trim bad data, and keep follow-up flows in sync.
Here’s the full scope covered in the article:
- Prefill profile forms with data from Data Extensions or Salesforce
- Run preference centers with saved choices and topic updates
- Handle unsubscribe and re-subscribe flows in All Subscribers and CRM
- Validate inputs like email, ZIP code, phone, and state
- Write lead data with
UpsertData()orInsertData() - Route submissions into Salesforce, Campaigns, Triggered Sends, or Journey Builder
- Show progressive fields based on what I already know about the contact
- Store hidden attribution data like UTM tags, referrer, and subscriber key
- Reduce spam and failures with POST checks, honeypots, reCAPTCHA, and error logs
A few points stand out right away:
- AMPscript runs before the page loads, so form logic stays on the server
- Using
CloudPagesURL()helps avoid passing PII in plain-text URLs UpsertData()is usually the safer pick for lead forms because it helps stop duplicate rows- A POST-only flow, plus validation and redirect-after-submit, lowers repeat submissions and bad writes
- For compliance, full unsubscribes should update All Subscribers, not just a Data Extension
Here’s a quick view of the main form use cases:
| Use Case | Main AMPscript Role | Main Outcome |
|---|---|---|
| Profile updates | Prefill and save known data | Less friction for returning users |
| Preference centers | Load and update opt-in choices | Fewer full unsubscribes |
| Unsubscribe flows | Update All Subscribers status | Better compliance handling |
| Lead forms | Validate and write form data | Cleaner records |
| Salesforce routing | Check, create, or update records | Better follow-up paths |
| Progressive profiling | Show only missing fields | Shorter forms |
| Hidden attribution | Store source and campaign data | Better reporting |
If I had to put the whole article into one line, it would be this: AMPscript works well when a form needs more than data entry and has to support server-side checks, updates, and routing.
AMPscript Form Use Cases: Functions, Data Sources & Outcomes
Handling Form Data with AMPscript in Cloud Pages | Salesforce Marketing Cloud

sbb-itb-5f36581
How AMPscript Powers Forms in Salesforce Marketing Cloud
AMPscript runs server-side. That means Marketing Cloud processes your code before the page loads in the user's browser, which makes form validation and data handling much harder to bypass.
On CloudPages, a form can post back to the same page or to a dedicated handler page. From there, AMPscript reads the submitted values, processes them, and redirects the user if needed. It’s a clean setup, and it keeps the form flow easy to manage. Those same building blocks support the use cases in the next section.
The main functions used in most form workflows are RequestParameter(), InsertData(), UpdateData(), Lookup(), LookupRows(), IF/IIF, and Redirect().
They handle jobs like:
- prefilling form fields
- validating input
- storing submissions
- routing users based on needs
- personalizing follow-up steps
AMPscript can also normalize stored dates, currency, phone numbers, and addresses to U.S. formats.
Why AMPscript Works Well for Forms
These use cases depend on AMPscript’s server-side access to form data and subscriber attributes. AMPscript runs the form logic before the page renders, so the logic stays on the server instead of being exposed in the browser. That’s where it shines in the use cases below.
A front-end form builder can take care of layout and client-side validation. AMPscript handles the data work on the CloudPage, like lookups, writes, and routing.
1. Prefilling Profile Update Forms
One of the most useful patterns is using AMPscript to load known profile data into a form before the subscriber sees it.
With this setup, a subscriber lands on a CloudPage profile update form and finds their current details already filled in. Instead of starting from scratch, they can review the information and change only what needs fixing.
LookupRows pulls stored profile data from a Data Extension. RetrieveSalesforceObjects pulls live CRM data when Marketing Cloud Connect is available. To do this safely, you need a secure way to identify the subscriber, and that’s where CloudPagesURL comes in. Once you have the returned values, you can place them right into HTML inputs with v(), like <input value="%%=v(@FirstName)=%%">. You can also use IF logic to control checked and selected states for saved choices.
Use CloudPagesURL to identify the subscriber because it encrypts parameters like _subscriberkey and emailaddr. Do not send PII through plain-text URL parameters.
This approach cuts friction, can improve completion rates, and gives users a simple way to confirm or fix data that already exists instead of creating duplicate records. If the form lets someone change their email address, update both the CRM record and All Subscribers so the two systems stay in sync.
The same lookup-and-render pattern also works well for preference centers, where the form shifts based on the subscriber’s saved choices.
2. Personalizing Preference Centers
Primary form scenario
Building on the prefilled profile form above, a preference center gives subscribers a simple way to edit what lands in their inbox. AMPscript turns a static form into a personalized preference center.
When a subscriber opens the page, their current contact details and topic choices are already loaded. They flip a few toggles, hit "Update," and they're done. That kind of control matters. Instead of pushing people toward a full unsubscribe, you let them choose the emails they still want.
Core AMPscript functions
The same prefill logic now becomes a two-way preference workflow.
Use CloudPagesURL() in the email footer to pass a secure subscriber key. On the CloudPage, use LookupRows() to pull current preferences from a Data Extension in one call. With Marketing Cloud Connect, RetrieveSalesforceObjects() can pull live consent status from Salesforce.
When the subscriber submits the form, RequestParameter() captures the new selections. UpsertData() writes those updates back to the Data Extension, and UpdateSingleSalesforceObject() syncs them to the CRM if needed. Put together, those functions let the page do both jobs: show saved preferences and save new ones.
Write-back is only one part of the flow. Unsubscribe handling also needs to stay compliant.
Unsubscribe handling
If the form includes a full unsubscribe option, use LogUnsubEvent for full unsubscribes so All Subscribers stays compliant. Topic-only changes should still write back to the Data Extension and CRM.
Business outcome
Preference centers can reduce full opt-outs and keep segments cleaner.
3. Powering Unsubscribe and Re-Subscribe Flows
Primary form scenario
When a subscriber chooses to opt out fully instead of changing preferences, pass SubscriberKey and JobID through CloudPagesURL(). Then read those values with RequestParameter() on the CloudPage.
Core AMPscript functions
For a global unsubscribe, use LogUnsubEvent with CreateObject("ExecuteRequest"). This changes the subscriber's status to "Unsubscribed" in the All Subscribers list, which is the system of record for compliance in Marketing Cloud.
For a re-subscribe, use InvokeUpdate() on the Subscriber object to switch the status back to "Active" in the All Subscribers list. If you're working with connected accounts, also update HasOptedOutOfEmail on the linked Contact or Lead in Salesforce.
After the update runs, show a confirmation message or send the subscriber to another page with Redirect().
Business outcome
When set up the right way, these flows keep Marketing Cloud and Salesforce CRM in sync. They also give subscribers instant feedback that their request went through. That same server-side setup can also handle input checks before writing data back.
4. Validating and Cleaning Form Input
Primary form scenario
HTML5 validation is a good first layer, but it isn't enough on its own. Someone can still bypass it with a direct GET submission. That’s why the form should only be processed after a POST request.
Core AMPscript functions
Use RegExMatch() to check inputs like email addresses, ZIP codes, phone numbers, and state codes. Pair it with EMPTY() for fields that users must fill out. This gives you a simple way to catch bad or missing input before anything gets stored.
For checkbox values, Iif() helps clean and standardize the data before you write it to Salesforce records. If regex by itself doesn’t do the job, use email validation tools. For patterns you plan to use again, store them in a RegexPatterns Data Extension and pull them in with Lookup().
Once the values are cleaned up, AMPscript can write them to the correct Data Extension or CRM field.
Business outcome
Clean input before it reaches Data Extensions or Salesforce. That cuts down on bounces, bad segmentation, and manual cleanup work. Put simply: clean the data first, then write it into your lead records.
5. Writing Lead Data to Data Extensions
Primary form scenario
After validation, write the form submission one time to the right Data Extension. The big issue here is duplicate rows when someone submits the form more than once. To avoid that, the form and the Data Extension need to use the same field names.
Core AMPscript functions
For most lead generation forms, use UpsertData(). Use InsertData() only when each submission should add a brand-new row. UpsertData() looks for an existing record first, then updates it when it finds a matching key.
Before any write logic runs, wrap it in IF RequestParameter("submitted") == "true" THEN. That keeps the script from running when the page first loads. To make that check work, add a hidden field in your HTML:
<input type="hidden" name="submitted" value="true">
That hidden input acts as the trigger for the check.
Data Extension structure
Once your write logic is set, the Data Extension needs to line up with the form. Field names should match the name attributes in your HTML form so RequestParameter() maps cleanly. Length limits matter too. If a submitted value is longer than the field allows, the write fails. It also helps to add a CreateDate field and set its default to the current system date.
After a successful write, redirect the user to a thank-you page. This clears the POST data and helps stop duplicate submissions when someone refreshes the page.
6. Routing Submissions into Journey Builder and Salesforce
Primary form scenario
After the write-back step, AMPscript can send a submission to Salesforce, a Campaign, or a Journey Builder entry source.
That matters because not every form fill should go down the same road. With RequestParameter(), the script can read the values a person submitted and use IF/ELSE logic to decide what happens next. For example, returning contacts can go through update logic, while new leads can go through create logic based on lead source or lifecycle stage.
That means a form submission doesn't just sit in a record. It kicks off the next action.
Core AMPscript functions
The routing process usually starts with a lookup. Use RetrieveSalesforceObjects() to check whether a Lead or Contact already exists in Salesforce based on email address. If nothing comes back, create the record. If a match exists, update that record instead.
This lookup-before-create pattern is the main step for keeping your CRM clean.
For Campaign enrollment, pass the Lead ID into CreateSalesforceObject() when creating the CampaignMember record. You can pair that with a hardcoded Campaign ID or one set dynamically. If you need to send an instant confirmation, call InvokeCreate() with a TriggeredSend object after the save.
If the destination is Journey Builder, the write step changes a bit. Instead of writing straight into Salesforce, write the submission to the sendable entry-source Data Extension with InsertData(). Journey Builder picks up the new row on its next run.
Business outcome
Custom AMPscript routing helps keep records deduplicated, adds campaign members on its own, and sends each submission into the right Journey Builder path.
7. Supporting Progressive Profiling
Primary form scenario
Progressive profiling cuts form friction by showing only the fields AMPscript still needs from a contact. It builds on the same lookup-based personalization used in profile and preference forms.
Here’s what that looks like in practice: a returning customer opens a profile form and sees only Company Size and Industry. The form stays short, relevant, and easier to finish.
Core AMPscript functions
Start by identifying the visitor. After that, AMPscript can decide what to hide and what to show.
Use CloudPagesURL() in your email to identify the visitor, LookupRows() or RetrieveSalesforceObjects() to pull known data, and UpdateSingleSalesforceObject() to save new values. Then use IF EMPTY(@variable) THEN blocks to control field rendering. If a value is empty, the field appears. If the value already exists, the field stays hidden.
Use Data Extensions for stored profile data and Salesforce for real-time fields. That way, each visit stays focused on the next missing field instead of making people fill out the same details again.
Business outcome
Progressive profiling lowers friction, improves completion rates, and fills profiles over time.
8. Using Hidden Fields for Attribution and Personalization
Primary form scenario
Once a form captures a lead, hidden fields hold onto source data for reporting and follow-up personalization. They let AMPscript pass data the user never sees, which keeps the form clean and easy to fill out.
A common path looks like this: someone clicks from an email or ad, lands on a page, and submits the form. In the background, hidden fields can store a SubscriberKey, UTM parameters from the URL, and the referrer URL through HTTPRequestHeader("Referer"). The user gets a smooth experience, while you still keep the source details tied to the submission.
Core AMPscript functions
QueryParameter() pulls UTM values straight from the URL query string and writes them into hidden <input> fields. That makes it the right choice when you want to grab attribution data before the form is submitted.
Use RequestParameter() only after submit, when you need to read the values that were posted back. Also, set method="post" so submitted values don't appear in the URL. That's a simple way to keep attribution data out of sight while still storing clean source details.
Data target or source
Here are some common hidden-field mappings:
| Hidden Field | AMPscript Function | Storage Target | Use Case |
|---|---|---|---|
| UTM Parameters | QueryParameter() |
SFMC Data Extension | Channel attribution and ROI |
| Subscriber Key | QueryParameter() |
SFMC Data Extension | Journey entry and personalization |
| Campaign ID | RequestParameter() |
Salesforce CampaignMember |
Attribution and ROI reporting |
| Lead Source | RequestParameter() |
Salesforce Lead object |
Sales routing and segmentation |
Business outcome
Hidden-field attribution connects each submission to its source channel, which helps teams track ROI with much better accuracy.
Comparison Tables for Key Workflows and Tradeoffs
These tables help you compare common AMPscript form setups side by side.
At a practical level, you’re usually making four choices: where the data comes from, how you check it, where you save it, and what should happen after the submit.
Prefilling Use Cases
Prefill choices depend on what you already know about the user and where that data lives.
| Use Case | Data Source | Benefits |
|---|---|---|
| Profile Update | Data Extension (LookupRows) |
Shows current values at a glance. |
| Unsubscribe / Preference Center | Subscriber record | Reduces friction; ensures the correct user is being updated. |
| Lead Capture Prefill | URL Parameters (QueryParameter) |
Preloads known values from the click source. |
| CRM Prefill | Salesforce Object (RetrieveSalesforceObjects) |
Pulls real-time CRM data for Sales and Service Cloud records. |
Validation Approaches
Validation usually works best as a two-layer setup. Client-side checks catch format issues fast. Server-side checks handle the logic that matters for clean data.
| Approach | Best For | Limitations/Risk | UX Impact |
|---|---|---|---|
| Client-side (HTML5/JS) | Immediate format feedback (e.g., email syntax) | Easily bypassed by bots or disabling JS | High; instant feedback |
| Server-side (AMPscript) | Data integrity, duplicate checks, CRM lookups | Requires page reload; limited error messaging | Medium; needs clear error messages |
| Hybrid (AMPscript + SSJS) | Complex logic, error logging, graceful redirects | Most complex | High; allows graceful error handling |
| Google reCAPTCHA | Bot and spam prevention | Requires API keys and client-side plus server-side verification | Low; adds an extra verification step |
After validation, the next call is simple: where does the submission go?
Routing and Storage Workflows
This is where form design starts to connect with follow-up. A lead form might go straight into Salesforce. A newsletter form may only need a Data Extension and a welcome email.
| Form Type | Storage Target (DE / Salesforce Object) | Next-Step Automation | Main Benefit |
|---|---|---|---|
| Lead Gen | Salesforce Lead Object | Journey Builder Injection | Real-time sales follow-up |
| Newsletter Sign-up | Data Extension | Triggered Send (Welcome Email) | Immediate subscriber engagement |
| Event Registration | Salesforce CampaignMember |
Automation Studio (Reporting) | Automated attendance tracking |
| Support Request | Salesforce Case Object | Service Cloud Routing | Streamlined agent response |
Field count affects completion rate too, which is why progressive form features are worth a close look.
Static vs. Progressive Forms
A static form asks for everything upfront. A progressive form only shows what’s still missing. That small shift can make the form feel much shorter, especially for returning users.
| Form Type | Number of Fields Shown | Completion Rate Impact | Profile Depth |
|---|---|---|---|
| Static Form | All fields | Lower; high user friction | Immediate but often incomplete |
| Progressive Form | Only unknown fields | Higher; feels shorter to returning users | Builds deep profiles incrementally |
Security, Spam Prevention, and Reliability
Once validation and write-back are in place, add one last guardrail for bots, bad data, and error tracking. Before any write happens, check for required fields first. If a must-have field is missing, stop processing and redirect the user right away.
For email fields, use MXValidator to reject domains that don't have valid MX records, and ListDetectiveValidator to filter out role-based and known-bad addresses. That helps protect deliverability and sender reputation.
Input validation alone isn't enough. You also need to stop automated submissions at the request layer. Use SSJS to confirm Platform.Request.Method == "POST" before any processing logic runs. Then add a honeypot field. If that hidden field has a value, treat the submission as a bot and skip the insert.
For forms with more abuse risk, add Google reCAPTCHA v3. It returns a risk score from 0.0 to 1.0 and lets you route suspicious submissions to review instead of pushing them straight through.
When validation or inserts fail, log every failure. Use an SSJS try-catch block to write the error message, timestamp, and submitted payload to a dedicated Error Log Data Extension. And if you send the user back after an error, pass their submitted values as URL parameters so the form can reload with those fields pre-filled. That saves people from having to start over and gives you a clear record of what went wrong.
| Risk | AMPscript Technique | Impact if Unaddressed |
|---|---|---|
| Invalid email data | MXValidator + ListDetectiveValidator |
High bounce rates and damaged sender reputation |
| Bot/spam submissions | Honeypot fields + reCAPTCHA v3 | Flooded Data Extensions and wasted API or license limits |
| Malformed input | Server-side RegExMatch() normalization |
Potential for XSS or data corruption |
| Silent insert failures | SSJS try-catch with Error Log DE |
Permanent data loss with no visibility for debugging |
Conclusion
Across the use cases above, AMPscript turns forms into server-side workflows instead of static capture points. It does its best work when forms need server-side personalization, validation, write-back, and routing in Salesforce Marketing Cloud. Put simply, it keeps the logic on the server and sends data into the right workflow.
The biggest payoff comes when these pieces work together. Validation helps protect data quality. Write-back functions keep records current. Journey Builder connections can turn one form submission into the start of a broader engagement flow. If your forms need more than basic capture, AMPscript is a strong fit.
FAQs
When should I use UpsertData() instead of InsertData()?
Use UpsertData() when you want to update an existing Data Extension row if a match is found, or insert a new one if it doesn’t.
By contrast, InsertData() always adds a new record.
That difference matters. UpsertData() checks a search column and value first, which helps prevent duplicate rows. It’s a solid fit for lead forms or profile updates where you want one record per subscriber, not a new entry every time someone submits the form.
How do I securely identify a subscriber on a CloudPage?
Retrieve subscriber data from a secure source, like a Data Extension or Salesforce object, by using a unique identifier such as a Customer ID or email address passed through URL parameters. You can use RetrieveSalesforceObjects or LookupRows, but validate the subscriber before showing any data.
For tighter security, make sure the request uses POST. It also helps to use headers or reCAPTCHA to cut down on bots and cross-domain form submissions.
What should I validate before saving form data?
Before saving form data, validate it at more than one layer. That's how you protect data quality and reduce security problems.
Start with the basics:
- Confirm the request uses POST.
- Check for empty fields.
- Use HTML5 validation for simple front-end feedback.
- Repeat those same checks on the server with AMPscript’s RegExMatch.
- Validate the email on the server before anything is stored.
Why do this twice? Because browser-side checks are easy to skip. A user can disable them, or a bad actor can send data straight to your endpoint. Server-side validation acts as the final gate, so bad data doesn't slip into your system just because the front end looked fine.
Related Blog Posts
Get new content delivered straight to your inbox

The Response
Updates on the Reform platform, insights on optimizing conversion rates, and tips to craft forms that convert.


Drive real results with form optimizations
Tested across hundreds of experiments, our strategies deliver a 215% lift in qualified leads for B2B and SaaS companies.
